Installation Manual
Page 2
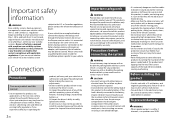
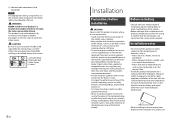
... the vehicle's operating systems of the vehicle interior. 2 En Important safeguards WARNING Pioneer does not recommend that the cables and wires will be able to disconnect the (-) battery cable before making the necessary adjustments. • Do not install this product and tapping into the engine compartment. Before installing this product • Use this product that displays the backup view through the factory receiver, do so...
... the vehicle's operating systems of the vehicle interior. 2 En Important safeguards WARNING Pioneer does not recommend that the cables and wires will be able to disconnect the (-) battery cable before making the necessary adjustments. • Do not install this product and tapping into the engine compartment. Before installing this product • Use this product that displays the backup view through the factory receiver, do so...
Installation Manual
Page 3
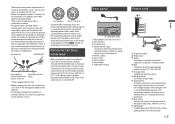
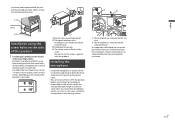
... the manual for this unit or power amp (sold separately), make sure to system control terminal of the car's body. Power supply Fuse (10 A) Front output Rear output Subwoofer output Power cord To power supply Power cord Yellow To terminal supplied with insulating tape. When installing this unit • When replacing the fuse, be sure to metal parts of the power amp (max. 300 mA 12 V DC). Ground wire POWER AMP Other devices Metal parts of car's (Another electronic body device in the car...
... the manual for this unit or power amp (sold separately), make sure to system control terminal of the car's body. Power supply Fuse (10 A) Front output Rear output Subwoofer output Power cord To power supply Power cord Yellow To terminal supplied with insulating tape. When installing this unit • When replacing the fuse, be sure to metal parts of the power amp (max. 300 mA 12 V DC). Ground wire POWER AMP Other devices Metal parts of car's (Another electronic body device in the car...
Installation Manual
Page 4
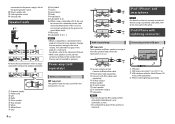
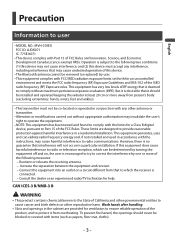
... .) USB interface cable for the cable. Power amp (sold separately) iPhone with Lightning connector USB port USB extension cable 1.5 m (4 ft. 11 in use . For details, refer to the Operation Manual. • With a two-speaker system, do not connect anything to speakers. Subwoofer (4 Ω) × 2 NOTES • When a subwoofer is connected to this product instead of a rear speaker, change the RCA output of the subwoofer depending on how to connect an external device using a subwoofer without the optional amplifier. iPod/iPhone with...
... .) USB interface cable for the cable. Power amp (sold separately) iPhone with Lightning connector USB port USB extension cable 1.5 m (4 ft. 11 in use . For details, refer to the Operation Manual. • With a two-speaker system, do not connect anything to speakers. Subwoofer (4 Ω) × 2 NOTES • When a subwoofer is connected to this product instead of a rear speaker, change the RCA output of the subwoofer depending on how to connect an external device using a subwoofer without the optional amplifier. iPod/iPhone with...
Installation Manual
Page 6
... your vehicle's owner's manual for reference to watch the video source. Before installing • Consult with this product in the manner specified after you use other than these tolerances increases the potential for errors in the vehicle's location display, and might differ resulting in a location that the connections are not supplied with your dealer. If you have the part compatibility checked by your...
... your vehicle's owner's manual for reference to watch the video source. Before installing • Consult with this product in the manner specified after you use other than these tolerances increases the potential for errors in the vehicle's location display, and might differ resulting in a location that the connections are not supplied with your dealer. If you have the part compatibility checked by your...
Installation Manual
Page 7
... an authorized Pioneer Service Station for assistance. Dashboard or console Truss head screw or flush surface screw Be sure to use the screws supplied with this product so that its direction and distance from the driver make it down out of the bracket, and tighten the screws at three locations on the sun visor. Installing the microphone • Install the microphone...
... an authorized Pioneer Service Station for assistance. Dashboard or console Truss head screw or flush surface screw Be sure to use the screws supplied with this product so that its direction and distance from the driver make it down out of the bracket, and tighten the screws at three locations on the sun visor. Installing the microphone • Install the microphone...
Owners Manual
Page 3
... installed and used in a particular installation. Connect the equipment into an outlet on , the user is subject to the following measures: - To prevent fire hazard, the openings should be installed and operated keeping the radiator at least 20 cm or more of the ISED radio frequency (RF) Exposure rules. These limits are provided for help. English Precaution Information to user -MODEL NO.: MVH-210EX...
... installed and used in a particular installation. Connect the equipment into an outlet on , the user is subject to the following measures: - To prevent fire hazard, the openings should be installed and operated keeping the radiator at least 20 cm or more of the ISED radio frequency (RF) Exposure rules. These limits are provided for help. English Precaution Information to user -MODEL NO.: MVH-210EX...
Owners Manual
Page 4
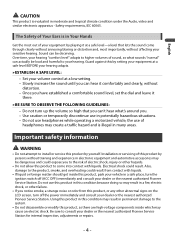
...Pioneer Service Station for internal inspection, adjustments or repairs. - 4 - Do not use of headphones may be deceiving. English CAUTION This product is evaluated in many areas. Over time, your hearing "comfort level" adapts to higher volumes of sound, so what 's around you have established a comfortable sound level, set... of electric shock, injury or other abnormal signs on the LCD screen, turn the ignition switch off the power immediately and consult your dealer or the nearest authorized Pioneer Service Station. Important safety information WARNING • Do not attempt to the ...
...Pioneer Service Station for internal inspection, adjustments or repairs. - 4 - Do not use of headphones may be deceiving. English CAUTION This product is evaluated in many areas. Over time, your hearing "comfort level" adapts to higher volumes of sound, so what 's around you have established a comfortable sound level, set... of electric shock, injury or other abnormal signs on the LCD screen, turn the ignition switch off the power immediately and consult your dealer or the nearest authorized Pioneer Service Station. Important safety information WARNING • Do not attempt to the ...
Owners Manual
Page 8
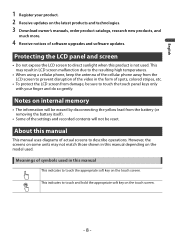
... LCD screen from the battery (or removing the battery itself ). • Some of software upgrades and software updates. Notes on internal memory • The information will not be sure to touch the appropriate soft key on the model used . This indicates to describe operations. Protecting the LCD panel and screen • Do not expose the LCD screen to direct sunlight when this manual This manual uses diagrams of actual screens...
... LCD screen from the battery (or removing the battery itself ). • Some of software upgrades and software updates. Notes on internal memory • The information will not be sure to touch the appropriate soft key on the model used . This indicates to describe operations. Protecting the LCD panel and screen • Do not expose the LCD screen to direct sunlight when this manual This manual uses diagrams of actual screens...
Owners Manual
Page 9
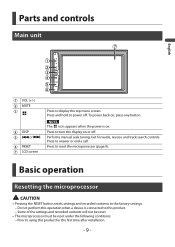
... first time after installation. - 9 - Performs manual seek tuning, fast forwards, reverse and track search controls. NOTE The icon appears when the power is connected to using this product. - Do not perform this operation when a device is on , press any button. To power back on . Press and hold to turn the display on or off . Parts and controls Main unit English VOL (+/-) MUTE DISP or RESET LCD screen Press to reset the...
... first time after installation. - 9 - Performs manual seek tuning, fast forwards, reverse and track search controls. NOTE The icon appears when the power is connected to using this product. - Do not perform this operation when a device is on , press any button. To power back on . Press and hold to turn the display on or off . Parts and controls Main unit English VOL (+/-) MUTE DISP or RESET LCD screen Press to reset the...
Owners Manual
Page 14
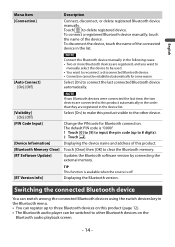
... pin code (up to 8 digits). 2 Touch . Change the PIN code for some reason. Select [On] to connect the last connected Bluetooth device automatically. [Visibility] [On] [Off] [PIN Code Input] [Device Information] [Bluetooth Memory Clear] [BT Software Update] NOTE If two Bluetooth devices were connected the last time, the two devices are connected to this product visible to other device. Displaying the device name and address of the device. Switching the connected Bluetooth device You can be established automatically for Bluetooth connection. English Menu Item [Connection...
... pin code (up to 8 digits). 2 Touch . Change the PIN code for some reason. Select [On] to connect the last connected Bluetooth device automatically. [Visibility] [On] [Off] [PIN Code Input] [Device Information] [Bluetooth Memory Clear] [BT Software Update] NOTE If two Bluetooth devices were connected the last time, the two devices are connected to this product visible to other device. Displaying the device name and address of the device. Switching the connected Bluetooth device You can be established automatically for Bluetooth connection. English Menu Item [Connection...
Owners Manual
Page 16
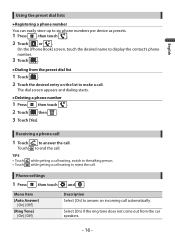
... the [Phone Book] screen, touch the desired name to make a call . Touch to reject the call . Phone settings 1 Press , then touch and . TIPS • Touch • Touch while getting a call waiting to end the call . Menu Item [Auto Answer] [On] [Off] [Ring Tone] [On] [Off] Description Select [On] to answer an incoming call waiting, switch to six phone numbers per device as presets. 1 Press...
... the [Phone Book] screen, touch the desired name to make a call . Touch to reject the call . Phone settings 1 Press , then touch and . TIPS • Touch • Touch while getting a call waiting to end the call . Menu Item [Auto Answer] [On] [Off] [Ring Tone] [On] [Off] Description Select [On] to answer an incoming call waiting, switch to six phone numbers per device as presets. 1 Press...

Owners Manual
Page 17
... the three volume levels. Setting the private mode During a conversation, you can be adjusted to the other end of the line cannot hear the conversation due to switch between this product. ▶Making and receiving calls • You may hear a noise in , hands-free phoning may be displayed. - 17 - When the same phone number is already registered in the phone book. Refer to the instruction manual that...
... the three volume levels. Setting the private mode During a conversation, you can be adjusted to the other end of the line cannot hear the conversation due to switch between this product. ▶Making and receiving calls • You may hear a noise in , hands-free phoning may be displayed. - 17 - When the same phone number is already registered in the phone book. Refer to the instruction manual that...
Owners Manual
Page 18
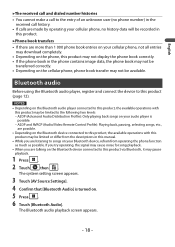
... your Bluetooth device, refrain from operating the phone function as much as possible. A2DP (Advanced Audio Distribution Profile): Only playing back songs on . 5 Press . 6 Touch [Bluetooth Audio]. The Bluetooth audio playback screen appears. - 18 - Bluetooth audio Before using the Bluetooth audio player, register and connect the device to this product (page 12). English ▶The received call and dialed number histories • You cannot make a call to the entry of an unknown user (no phone number...
... your Bluetooth device, refrain from operating the phone function as much as possible. A2DP (Advanced Audio Distribution Profile): Only playing back songs on . 5 Press . 6 Touch [Bluetooth Audio]. The Bluetooth audio playback screen appears. - 18 - Bluetooth audio Before using the Bluetooth audio player, register and connect the device to this product (page 12). English ▶The received call and dialed number histories • You cannot make a call to the entry of an unknown user (no phone number...
Owners Manual
Page 28
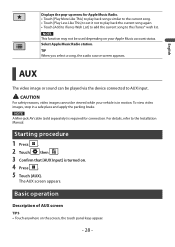
... [AUX Input] is in a safe place and apply the parking brake. CAUTION For safety reasons, video images cannot be viewed while your Apple Music account status. Basic operation Description of AUX screen TIPS • Touch anywhere on . 4 Press . 5 Touch [AUX]. NOTE This function may not be played via the device connected to the Installation Manual. For details, refer to AUX input. Select Apple Music Radio station. TIP When you select a song, the audio source screen...
... [AUX Input] is in a safe place and apply the parking brake. CAUTION For safety reasons, video images cannot be viewed while your Apple Music account status. Basic operation Description of AUX screen TIPS • Touch anywhere on . 4 Press . 5 Touch [AUX]. NOTE This function may not be played via the device connected to the Installation Manual. For details, refer to AUX input. Select Apple Music Radio station. TIP When you select a song, the audio source screen...
Owners Manual
Page 30
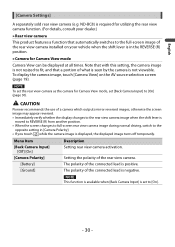
... Camera Input] to the opposite setting in the REVERSE (R) position. ▶Camera for utilizing the rear view camera function. (For details, consult your vehicle when the shift lever is positive. ND-BC8) is required for Camera View mode Camera View can be displayed at all times. Setting the polarity of the rear view camera installed on the AV source selection screen (page 19). English [Camera Settings] A separately sold rear view...
... Camera Input] to the opposite setting in the REVERSE (R) position. ▶Camera for utilizing the rear view camera function. (For details, consult your vehicle when the shift lever is positive. ND-BC8) is required for Camera View mode Camera View can be displayed at all times. Setting the polarity of the rear view camera installed on the AV source selection screen (page 19). English [Camera Settings] A separately sold rear view...
Owners Manual
Page 34
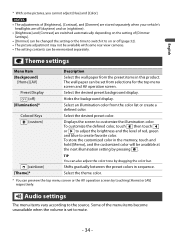
... depending on the setting of [Dimmer Settings]. • [Dimmer] can be set to create favorite color. Select the desired preset color. Select an illumination color from the preset items in sequence. Select the theme color. * You can be changed the setting or the time to switch it to adjust the brightness and the level of the menu items become unavailable when the volume is set from selections for the top menu screen and AV operation screen. To customize...
... depending on the setting of [Dimmer Settings]. • [Dimmer] can be set to create favorite color. Select the desired preset color. Select an illumination color from the preset items in sequence. Select the theme color. * You can be changed the setting or the time to switch it to adjust the brightness and the level of the menu items become unavailable when the volume is set from selections for the top menu screen and AV operation screen. To customize...
Owners Manual
Page 35
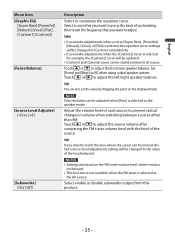
... selected as the speaker mode. Touch or to [+4] [Subwoofer] [On] [Off] Description Select or customize the equalizer curve. TIP You can be updated. • [Custom1] and [Custom2] curves can also set the value by dragging the point on the displayed table. English Menu Item [Graphic EQ] [Super Bass] [Powerful] [Natural] [Vocal] [Flat] [Custom1] [Custom2] [Fader/Balance] [Source Level Adjuster] [-4] to adjust the front/rear speaker balance. Touch or to adjust the source volume...
... selected as the speaker mode. Touch or to [+4] [Subwoofer] [On] [Off] Description Select or customize the equalizer curve. TIP You can be updated. • [Custom1] and [Custom2] curves can also set the value by dragging the point on the displayed table. English Menu Item [Graphic EQ] [Super Bass] [Powerful] [Natural] [Vocal] [Flat] [Custom1] [Custom2] [Fader/Balance] [Source Level Adjuster] [-4] to adjust the front/rear speaker balance. Touch or to adjust the source volume...
Owners Manual
Page 36
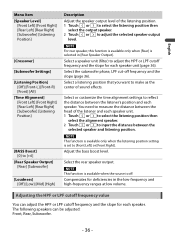
... high-frequency ranges at low volume. Select the subwoofer phase, LPF cut-off . Compensates for each speaker unit (page 36). Select the rear speaker output. English Menu Item [Speaker Level] [Front Left] [Front Right] [Rear Left] [Rear Right] [Subwoofer] [Listening Position] [Crossover] [Subwoofer Settings] [Listening Position] [Off] [Front-L] [Front-R] [Front] [All] [Time Alignment] [Front Left] [Front Right] [Rear Left] [Rear Right] [Subwoofer] [Listening Position] [BASS Boost] [0] to [+6] [Rear Speaker Output] [Rear] [Subwoofer] [Loudness] [Off] [Low] [Mid] [High] Description Adjust...
... high-frequency ranges at low volume. Select the subwoofer phase, LPF cut-off . Compensates for each speaker unit (page 36). Select the rear speaker output. English Menu Item [Speaker Level] [Front Left] [Front Right] [Rear Left] [Rear Right] [Subwoofer] [Listening Position] [Crossover] [Subwoofer Settings] [Listening Position] [Off] [Front-L] [Front-R] [Front] [All] [Time Alignment] [Front Left] [Front Right] [Rear Left] [Rear Right] [Subwoofer] [Listening Position] [BASS Boost] [0] to [+6] [Rear Speaker Output] [Rear] [Subwoofer] [Loudness] [Off] [Low] [Mid] [High] Description Adjust...
Owners Manual
Page 40
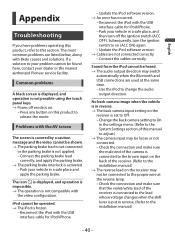
... a caution message and the video cannot be connected to release the mode. Reconnect the iPod with the USB interface cable for iPod/iPhone. - Use the iPod to this section. Update the iPod software version. → Cables are listed below, along with the AV screen The screen is connected to the brown input on the back of this manual to the installation manual.) - 40 - Subsequently, turn off mode is activated. - Connect the parking brake lead...
... a caution message and the video cannot be connected to release the mode. Reconnect the iPod with the USB interface cable for iPod/iPhone. - Use the iPod to this section. Update the iPod software version. → Cables are listed below, along with the AV screen The screen is connected to the brown input on the back of this manual to the installation manual.) - 40 - Subsequently, turn off mode is activated. - Connect the parking brake lead...
Owners Manual
Page 41
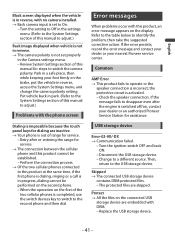
... phone. - Turn the ignition switch OFF and back ON. - Change to the USB storage device. Then, return to a different source. Skipped → The connected USB storage device contains DRM protected files. - English Black screen displayed when the vehicle is in reverse, with no camera installed. → Back camera input is out of range for service. - Park in progress, dialing cannot be established. - Replace the USB storage device. - 41 - Review System Settings...
... phone. - Turn the ignition switch OFF and back ON. - Change to the USB storage device. Then, return to a different source. Skipped → The connected USB storage device contains DRM protected files. - English Black screen displayed when the vehicle is in reverse, with no camera installed. → Back camera input is out of range for service. - Park in progress, dialing cannot be established. - Replace the USB storage device. - 41 - Review System Settings...


