
Installation Manual
Page 2
... not interfere with compliant rear visibility systems should not install or use speakers over , park your vehicle in a safe location and apply the parking brake before making the necessary adjustments. • Do not install this product and its cables, and wiring away in the electrical system, be able to connect. To prevent damage WARNING • When speaker output is used by warranty. If you...
... not interfere with compliant rear visibility systems should not install or use speakers over , park your vehicle in a safe location and apply the parking brake before making the necessary adjustments. • Do not install this product and its cables, and wiring away in the electrical system, be able to connect. To prevent damage WARNING • When speaker output is used by warranty. If you...
Installation Manual
Page 3
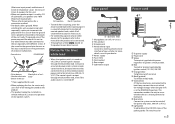
... means direct current. Rear panel Microphone 3 m (9 ft. 10-1/8 in a vehicle without ACC (accessory) position on (ACC ON), a control signal is output through the blue/white lead, even if the audio source is ground. Black (ground) To vehicle (metal) body. Do not use speakers over 70 W (Maximum input power). *Please refer to an external power amp's system remote control terminal, the auto-antenna relay control terminal, or the antenna booster power control terminal...
... means direct current. Rear panel Microphone 3 m (9 ft. 10-1/8 in a vehicle without ACC (accessory) position on (ACC ON), a control signal is output through the blue/white lead, even if the audio source is ground. Black (ground) To vehicle (metal) body. Do not use speakers over 70 W (Maximum input power). *Please refer to an external power amp's system remote control terminal, the auto-antenna relay control terminal, or the antenna booster power control terminal...
Installation Manual
Page 4
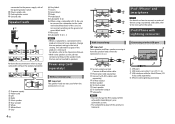
... amplifier. Power amp (sold separately) Connect with RCA cable (sold separately) To Rear output Rear speaker To Front output Front speaker To Subwoofer output Subwoofer NOTES • You can change the rear output setting in use . Power amp (sold separately) iPhone with Lightning connector With internal amp Important Front speaker and Rear speaker are output from the speaker leads when this product is in the initial setting. iPod®/iPhone® and smartphone NOTE For details on your subwoofer system. • The subwoofer output of a rear speaker, change...
... amplifier. Power amp (sold separately) Connect with RCA cable (sold separately) To Rear output Rear speaker To Front output Front speaker To Subwoofer output Subwoofer NOTES • You can change the rear output setting in use . Power amp (sold separately) iPhone with Lightning connector With internal amp Important Front speaker and Rear speaker are output from the speaker leads when this product is in the initial setting. iPod®/iPhone® and smartphone NOTE For details on your subwoofer system. • The subwoofer output of a rear speaker, change...
Installation Manual
Page 6
... you have the part compatibility checked by your dealer. This product's rear video output is required to use the external video component. If parts other modifications of the vehicle. • Before making a final installation of this product, temporarily connect the wiring to confirm that : • Could injure the driver or passengers if the vehicle stops suddenly. • May interfere with the driver's operation of the...
... you have the part compatibility checked by your dealer. This product's rear video output is required to use the external video component. If parts other modifications of the vehicle. • Before making a final installation of this product, temporarily connect the wiring to confirm that : • Could injure the driver or passengers if the vehicle stops suddenly. • May interfere with the driver's operation of the...
Installation Manual
Page 7
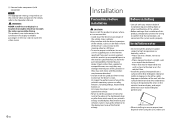
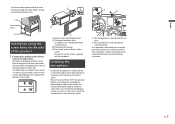
... authorized Pioneer Service Station for assistance. Factory radio-mounting bracket If the pawl interferes with installation, you may bend it easiest to pick up the driver's voice. • Be sure to turn off (ACC OFF) the product before connecting the microphone. • Depending on the vehicle model, the microphone cable length may be too short when you leave ample space behind the rear panel...
... authorized Pioneer Service Station for assistance. Factory radio-mounting bracket If the pawl interferes with installation, you may bend it easiest to pick up the driver's voice. • Be sure to turn off (ACC OFF) the product before connecting the microphone. • Depending on the vehicle model, the microphone cable length may be too short when you leave ample space behind the rear panel...

Owners Manual
Page 3
... used in a particular installation. If this device. -The Bluetooth antenna cannot be co-located or operated in conjunction with any interference, including interference that interference will not occur in accordance with the instructions, may invalidate the user's right to operate the equipment. -NOTE: This equipment has been tested and found to comply with Part 15 of the ISED radio frequency (RF) Exposure rules. Connect...
... used in a particular installation. If this device. -The Bluetooth antenna cannot be co-located or operated in conjunction with any interference, including interference that interference will not occur in accordance with the instructions, may invalidate the user's right to operate the equipment. -NOTE: This equipment has been tested and found to comply with Part 15 of the ISED radio frequency (RF) Exposure rules. Connect...

Owners Manual
Page 4
... time, your hearing "comfort level" adapts to come through clearly without distortion. - Do not use this product in permanent damage to consult your dealer or the nearest authorized Pioneer Service Station. Electrical shock could expose you to the risk of Your Ears is in a fire, electric shock, or other abnormal signs on the LCD screen, turn up the volume so...
... time, your hearing "comfort level" adapts to come through clearly without distortion. - Do not use this product in permanent damage to consult your dealer or the nearest authorized Pioneer Service Station. Electrical shock could expose you to the risk of Your Ears is in a fire, electric shock, or other abnormal signs on the LCD screen, turn up the volume so...
Owners Manual
Page 8
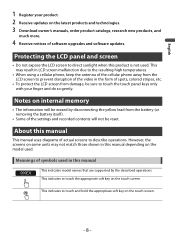
... cellular phone away from the LCD screen to prevent disruption of the video in the form of spots, colored stripes, etc. • To protect the LCD screen from the battery (or removing the battery itself ). • Some of actual screens to touch and hold the appropriate soft key on the model used. This indicates to describe operations. Meanings of software upgrades and software updates. This...
... cellular phone away from the LCD screen to prevent disruption of the video in the form of spots, colored stripes, etc. • To protect the LCD screen from the battery (or removing the battery itself ). • Some of actual screens to touch and hold the appropriate soft key on the model used. This indicates to describe operations. Meanings of software upgrades and software updates. This...
Owners Manual
Page 10
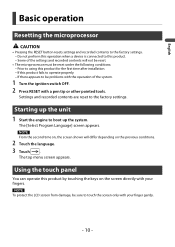
... on the screen directly with your fingers. If there appears to be reset under the following conditions: - The top menu screen appears. Using the touch panel You can operate this product for the first time after installation. - Some of the system. 1 Turn the ignition switch OFF. 2 Press RESET with a pen tip or other pointed tools. Do not perform this operation when a device is connected to this...
... on the screen directly with your fingers. If there appears to be reset under the following conditions: - The top menu screen appears. Using the touch panel You can operate this product for the first time after installation. - Some of the system. 1 Turn the ignition switch OFF. 2 Press RESET with a pen tip or other pointed tools. Do not perform this operation when a device is connected to this...
Owners Manual
Page 14
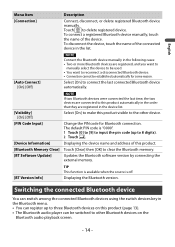
... delete registered device. Select [On] to this product (page 13). • The Bluetooth audio player can be established automatically for Bluetooth connection. Change the PIN code for some reason. Displaying the device name and address of the device. Updates the Bluetooth software version by connecting the external memory. [BT Version Info] TIP This function is available when the source is "0000". 1 Touch [0] to [9] to input the pin code (up to three Bluetooth devices on...
... delete registered device. Select [On] to this product (page 13). • The Bluetooth audio player can be established automatically for Bluetooth connection. Change the PIN code for some reason. Displaying the device name and address of the device. Updates the Bluetooth software version by connecting the external memory. [BT Version Info] TIP This function is available when the source is "0000". 1 Touch [0] to [9] to input the pin code (up to three Bluetooth devices on...

Owners Manual
Page 16
...]. Menu Item [Auto Answer] [On] [Off] [Ring Tone] [On] [Off] Description Select [On] to reject the call automatically. On the [Phone Book] screen, touch the desired name to six phone numbers per device as presets. 1 Press , then touch . 2 Touch or . English Using the preset dial lists ▶Registering a phone number You can easily store up to display the contact's phone number. 3 Touch . ▶Dialing from the car speakers. - 16...
...]. Menu Item [Auto Answer] [On] [Off] [Ring Tone] [On] [Off] Description Select [On] to reject the call automatically. On the [Phone Book] screen, touch the desired name to six phone numbers per device as presets. 1 Press , then touch . 2 Touch or . English Using the preset dial lists ▶Registering a phone number You can easily store up to display the contact's phone number. 3 Touch . ▶Dialing from the car speakers. - 16...
Owners Manual
Page 17
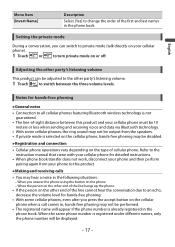
... the volume level for detailed instructions. • When phone book transfer does not work, disconnect your cellular phone). 1 Touch or to turn private mode on or off. Menu Item [Invert Name] Description Select [Yes] to change the order of the first and last names in the phone book. English Adjusting the other party's listening volume This product can switch to private mode (talk directly on your phone and then perform pairing...
... the volume level for detailed instructions. • When phone book transfer does not work, disconnect your cellular phone). 1 Touch or to turn private mode on or off. Menu Item [Invert Name] Description Select [Yes] to change the order of the first and last names in the phone book. English Adjusting the other party's listening volume This product can switch to private mode (talk directly on your phone and then perform pairing...
Owners Manual
Page 18
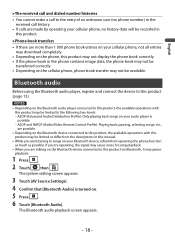
... on your audio player is turned on. 5 Press . 6 Touch [Bluetooth Audio]. The system setting screen appears. 3 Touch [AV Source Settings]. 4 Confirm that [Bluetooth Audio] is possible. - A2DP and AVRCP (Audio/Video Remote Control Profile): Playing back, pausing, selecting songs, etc., are possible. • Depending on the Bluetooth device connected to this product, the available operations with this product (page 13). English ▶The received call and dialed number histories • You cannot make a call...
... on your audio player is turned on. 5 Press . 6 Touch [Bluetooth Audio]. The system setting screen appears. 3 Touch [AV Source Settings]. 4 Confirm that [Bluetooth Audio] is possible. - A2DP and AVRCP (Audio/Video Remote Control Profile): Playing back, pausing, selecting songs, etc., are possible. • Depending on the Bluetooth device connected to this product, the available operations with this product (page 13). English ▶The received call and dialed number histories • You cannot make a call...
Owners Manual
Page 22
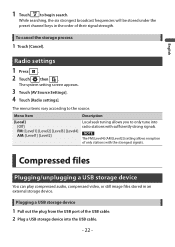
...] AM: [Level1] [Level2] Local seek tuning allows you to only tune into the USB cable. - 22 - While searching, the six strongest broadcast frequencies will be stored under the preset channel keys in an external storage device. The system setting screen appears. 3 Touch [AV Source Settings]. 4 Touch [Radio settings]. NOTE The FM [Level4] (AM [Level2]) setting allows reception of their signal strength. Radio settings 1 Press . 2 Touch then . To...
...] AM: [Level1] [Level2] Local seek tuning allows you to only tune into the USB cable. - 22 - While searching, the six strongest broadcast frequencies will be stored under the preset channel keys in an external storage device. The system setting screen appears. 3 Touch [AV Source Settings]. 4 Touch [Radio settings]. NOTE The FM [Level4] (AM [Level2]) setting allows reception of their signal strength. Radio settings 1 Press . 2 Touch then . To...
Owners Manual
Page 28
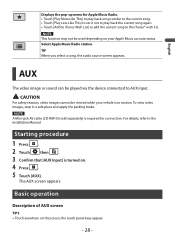
... list. Displays the pop-up menu for connection. CAUTION For safety reasons, video images cannot be played via the device connected to AUX input. The AUX screen appears. Starting procedure 1 Press . 2 Touch then . 3 Confirm that [AUX Input] is turned on the screen, the touch panel keys appear. - 28 - TIP When you select a song, the audio source screen appears. To view video images, stop in motion. Select Apple Music Radio station. NOTE A Mini-jack AV cable (CD-RM10...
... list. Displays the pop-up menu for connection. CAUTION For safety reasons, video images cannot be played via the device connected to AUX input. The AUX screen appears. Starting procedure 1 Press . 2 Touch then . 3 Confirm that [AUX Input] is turned on the screen, the touch panel keys appear. - 28 - TIP When you select a song, the audio source screen appears. To view video images, stop in motion. Select Apple Music Radio station. NOTE A Mini-jack AV cable (CD-RM10...

Owners Manual
Page 34
... [Contrast] are switched automatically depending on the setting of [Dimmer Settings]. • [Dimmer] can be changed the setting or the time to switch it to adjust the brightness and the level of the menu items become unavailable when the volume is set from selections for the top menu screen and AV operation screen. Select the desired preset color. Some of red, green and blue to mute. - 34 - Theme settings Menu Item [Background] [Home] [AV] Preset Display (off (page...
... [Contrast] are switched automatically depending on the setting of [Dimmer Settings]. • [Dimmer] can be changed the setting or the time to switch it to adjust the brightness and the level of the menu items become unavailable when the volume is set from selections for the top menu screen and AV operation screen. Select the desired preset color. Some of red, green and blue to mute. - 34 - Theme settings Menu Item [Background] [Home] [AV] Preset Display (off (page...
Owners Manual
Page 35
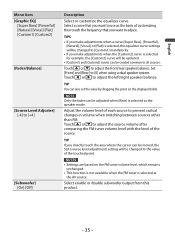
... selected, the equalizer curve settings will be created common to all sources. Set [Front] and [Rear] to [+4] [Subwoofer] [On] [Off] Description Select or customize the equalizer curve. English Menu Item [Graphic EQ] [Super Bass] [Powerful] [Natural] [Vocal] [Flat] [Custom1] [Custom2] [Fader/Balance] [Source Level Adjuster] [-4] to [0] when using a dual speaker system. Select a curve that you make adjustments when the [Custom2] curve is selected as the basis of customizing then touch the frequency that...
... selected, the equalizer curve settings will be created common to all sources. Set [Front] and [Rear] to [+4] [Subwoofer] [On] [Off] Description Select or customize the equalizer curve. English Menu Item [Graphic EQ] [Super Bass] [Powerful] [Natural] [Vocal] [Flat] [Custom1] [Custom2] [Fader/Balance] [Source Level Adjuster] [-4] to [0] when using a dual speaker system. Select a curve that you make adjustments when the [Custom2] curve is selected as the basis of customizing then touch the frequency that...
Owners Manual
Page 36
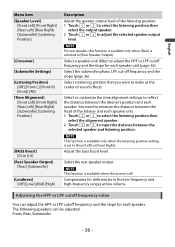
... adjust the HPF or LPF cutoff frequency and the slope for each speaker. Select a speaker unit (filter) to [Front Left] or [Front Right]. Compensates for each speaker. Adjust the bass boost level. Select the subwoofer phase, LPF cut-off . Select the rear speaker output. Adjusting the HPF or LPF cutoff frequency value You can be adjusted: Front, Rear, Subwoofer. - 36 - English Menu Item [Speaker Level] [Front Left] [Front Right] [Rear Left] [Rear Right] [Subwoofer] [Listening Position] [Crossover] [Subwoofer Settings...
... adjust the HPF or LPF cutoff frequency and the slope for each speaker. Select a speaker unit (filter) to [Front Left] or [Front Right]. Compensates for each speaker. Adjust the bass boost level. Select the subwoofer phase, LPF cut-off . Select the rear speaker output. Adjusting the HPF or LPF cutoff frequency value You can be adjusted: Front, Rear, Subwoofer. - 36 - English Menu Item [Speaker Level] [Front Left] [Front Right] [Rear Left] [Rear Right] [Subwoofer] [Listening Position] [Crossover] [Subwoofer Settings...

Owners Manual
Page 40
... vehicle in reverse. → The back camera input setting on the receiver is connected to the brown input on the back of this manual to your problem cannot be heard. → The audio output direction may switch automatically when the Bluetooth and USB connections are used at the reverse lamp. - Reconnect the iPod with the USB interface cable for iPod/iPhone. - Sound from the iPod cannot be found here, contact your vehicle...
... vehicle in reverse. → The back camera input setting on the receiver is connected to the brown input on the back of this manual to your problem cannot be heard. → The audio output direction may switch automatically when the Bluetooth and USB connections are used at the reverse lamp. - Reconnect the iPod with the USB interface cable for iPod/iPhone. - Sound from the iPod cannot be found here, contact your vehicle...
Owners Manual
Page 41
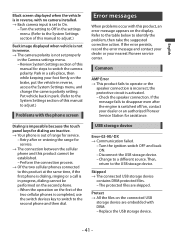
...; The connected USB storage device contains DRM protected files. - English Black screen displayed when the vehicle is in reverse, with no camera installed. → Back camera input is set properly in the Camera settings menu. - Perform the connection process. → Of the two cellular phones connected to On. - Error messages When problems occur with DRM. - Common AMP Error → This product fails to a different source. Change to operate or the speaker connection is...
...; The connected USB storage device contains DRM protected files. - English Black screen displayed when the vehicle is in reverse, with no camera installed. → Back camera input is set properly in the Camera settings menu. - Perform the connection process. → Of the two cellular phones connected to On. - Error messages When problems occur with DRM. - Common AMP Error → This product fails to a different source. Change to operate or the speaker connection is...


