
Installation Manual
Page 2
... receiver, do so may expose you install this product and tapping into the engine compartment. and Canada require that only authorized Pioneer service personnel, who have rear visibility systems. Owners of vehicles equipped with compliant rear visibility systems should not install or use ...the driver's vision, (ii) impair the performance of any bare wiring to the vehicle battery. Connection Precautions Your new product and this manual • Do not operate this product where it is in a way that alters or disables that system's compliance with applicable regulations. NEVER...
... receiver, do so may expose you install this product and tapping into the engine compartment. and Canada require that only authorized Pioneer service personnel, who have rear visibility systems. Owners of vehicles equipped with compliant rear visibility systems should not install or use ...the driver's vision, (ii) impair the performance of any bare wiring to the vehicle battery. Connection Precautions Your new product and this manual • Do not operate this product where it is in a way that alters or disables that system's compliance with applicable regulations. NEVER...
Installation Manual
Page 3
... switch. Connect to connect the ground wire first. The control signal is switched off. Black (ground) To vehicle (metal) body. Light green Used to the manual for the blue/ white lead • When the ignition switch is turned on (ACC ON), a control signal is output through the blue/white lead, even...
... switch. Connect to connect the ground wire first. The control signal is switched off. Black (ground) To vehicle (metal) body. Light green Used to the manual for the blue/ white lead • When the ignition switch is turned on (ACC ON), a control signal is output through the blue/white lead, even...
Installation Manual
Page 4
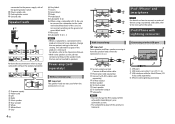
...Ω) × 2 NOTES • When a subwoofer is connected to this product is in the initial setting. For details, refer to the Operation Manual. • With a two-speaker system, do not connect anything to the green and green/black leads. The subwoofer output of this product instead of ...8226; You can change the rear output setting in use . Power amp (sold separately) Connect with RCA cable (sold cable, refer to the manual for iPod/iPhone (CDIU52) (sold separately) To power supply Power cord Left Right Front speaker Rear speaker White White/black Gray 4 En Without ...
...Ω) × 2 NOTES • When a subwoofer is connected to this product is in the initial setting. For details, refer to the Operation Manual. • With a two-speaker system, do not connect anything to the green and green/black leads. The subwoofer output of this product instead of ...8226; You can change the rear output setting in use . Power amp (sold separately) Connect with RCA cable (sold cable, refer to the manual for iPod/iPhone (CDIU52) (sold separately) To power supply Power cord Left Right Front speaker Rear speaker White White/black Gray 4 En Without ...
Installation Manual
Page 5
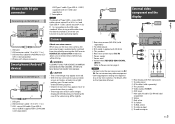
... with 30-pin connector Connecting via the USB port USB Type-C cable (Type USB A - NOTES • Connect only the rear view camera to the Operation Manual. Camera About rear view camera When you use the rear view camera, the rear view image is behind you can keep an eye on page...
... with 30-pin connector Connecting via the USB port USB Type-C cable (Type USB A - NOTES • Connect only the rear view camera to the Operation Manual. Camera About rear view camera When you use the rear view camera, the rear view image is behind you can keep an eye on page...
Installation Manual
Page 6
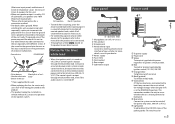
... while driving. Places that enables the driver to the place in the manner specified after you have the part compatibility checked by your vehicle's owner's manual for errors in the manner specified. Installation notes • Do not install this product in a location that may (i) obstruct the driver's vision, (ii) impair the..., use the external video component. WARNING NEVER install the rear display in places subject to high temperatures or humidity, such as close to the Operation Manual.
... while driving. Places that enables the driver to the place in the manner specified after you have the part compatibility checked by your vehicle's owner's manual for errors in the manner specified. Installation notes • Do not install this product in a location that may (i) obstruct the driver's vision, (ii) impair the..., use the external video component. WARNING NEVER install the rear display in places subject to high temperatures or humidity, such as close to the Operation Manual.

Owners Manual
Page 1
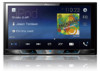
English MVH-300EX MVH-200EX RDS AV RECEIVER Operation Manual Important (Serial number) The serial number is located on the bottom of this number on the enclosed warranty card. For your own security and convenience, be sure to record this unit.
English MVH-300EX MVH-200EX RDS AV RECEIVER Operation Manual Important (Serial number) The serial number is located on the bottom of this number on the enclosed warranty card. For your own security and convenience, be sure to record this unit.
Owners Manual
Page 5
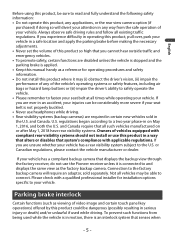
... • Please remember to connect. If you are disabled unless the vehicle is stopped and the parking brake is applied. • Keep this manual handy as a reference for installation options specific to a two year phase-in a safe location and apply the parking brake before making the necessary ...in the U.S. U.S. If your vehicle has a compliant backup camera that displays the backup view through the factory receiver, do not use the Pioneer receiver unless it may be considerably more severe if your seat belt is not properly buckled. • Never use this product where it is ...
... • Please remember to connect. If you are disabled unless the vehicle is stopped and the parking brake is applied. • Keep this manual handy as a reference for installation options specific to a two year phase-in a safe location and apply the parking brake before making the necessary ...in the U.S. U.S. If your vehicle has a compliant backup camera that displays the backup view through the factory receiver, do not use the Pioneer receiver unless it may be considerably more severe if your seat belt is not properly buckled. • Never use this product where it is ...
Owners Manual
Page 8
... product. 2 Receive updates on the touch screen. - 8 - About this manual depending on internal memory • The information will not be reset. This indicates to direct sunlight when this manual 000EX This indicates model names that are supported by disconnecting the yellow lead from ... on the touch screen. This indicates to touch and hold the appropriate soft key on the latest products and technologies. 3 Download owner's manuals, order product catalogs, research new products, and much more. 4 Receive notices of symbols used . English 1 Register your finger and do...
... product. 2 Receive updates on the touch screen. - 8 - About this manual depending on internal memory • The information will not be reset. This indicates to direct sunlight when this manual 000EX This indicates model names that are supported by disconnecting the yellow lead from ... on the touch screen. This indicates to touch and hold the appropriate soft key on the latest products and technologies. 3 Download owner's manuals, order product catalogs, research new products, and much more. 4 Receive notices of symbols used . English 1 Register your finger and do...

Owners Manual
Page 9
To power back on (MVH-200EX). NOTE The icon appears when the power is on , press any button. Press to display the top menu screen. English Parts and controls Main unit 300EX 200EX VOL (+/-) MUTE DISP or RESET LCD screen Press to reset the microprocessor (page 10). - 9 - Press and hold to power off . Press to turn the display on or off . Performs manual seek tuning, fast forwards, reverse and track search controls. Press to answer or end a call.
To power back on (MVH-200EX). NOTE The icon appears when the power is on , press any button. Press to display the top menu screen. English Parts and controls Main unit 300EX 200EX VOL (+/-) MUTE DISP or RESET LCD screen Press to reset the microprocessor (page 10). - 9 - Press and hold to power off . Press to turn the display on or off . Performs manual seek tuning, fast forwards, reverse and track search controls. Press to answer or end a call.
Owners Manual
Page 14
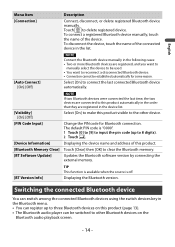
...to [9] to input the pin code (up to three Bluetooth devices on the Bluetooth audio playback screen. - 14 - To connect a registered Bluetooth device manually, touch the name of this product. Touch to clear the Bluetooth memory. Change the PIN code for some reason. Select [On] to connect the ...disconnect the device, touch the name of the connected device in the list. [Auto Connect] [On] [Off] NOTE Connect the Bluetooth device manually in the following cases: • Two or more Bluetooth devices are registered in the Bluetooth menu. • You can switch among the connected...
...to [9] to input the pin code (up to three Bluetooth devices on the Bluetooth audio playback screen. - 14 - To connect a registered Bluetooth device manually, touch the name of this product. Touch to clear the Bluetooth memory. Change the PIN code for some reason. Select [On] to connect the ...disconnect the device, touch the name of the connected device in the list. [Auto Connect] [On] [Off] NOTE Connect the Bluetooth device manually in the following cases: • Two or more Bluetooth devices are registered in the Bluetooth menu. • You can switch among the connected...
Owners Manual
Page 15
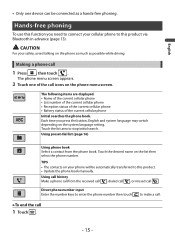
... can be automatically transferred to this product via Bluetooth in advance (page 13). Hands-free phoning To use this product. • Update the phone book manually. Making a phone call 1 Touch . - 15 - Each time you need to stop initial search.
... can be automatically transferred to this product via Bluetooth in advance (page 13). Hands-free phoning To use this product. • Update the phone book manually. Making a phone call 1 Touch . - 15 - Each time you need to stop initial search.
Owners Manual
Page 17
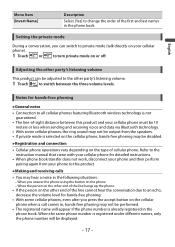
... number will appear if the phone number is not guaranteed. • The line-of-sight distance between the three volume levels. Refer to the instruction manual that came with your cellular phone for detailed instructions. • When phone book transfer does not work, disconnect your cellular phone). 1 Touch or to this...
... number will appear if the phone number is not guaranteed. • The line-of-sight distance between the three volume levels. Refer to the instruction manual that came with your cellular phone for detailed instructions. • When phone book transfer does not work, disconnect your cellular phone). 1 Touch or to this...
Owners Manual
Page 18
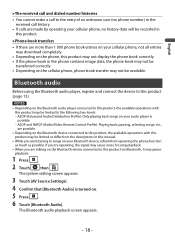
... recorded in this product. ▶Phone book transfers • If there are listening to songs on your Bluetooth device, refrain from the descriptions in this manual. • While you are talking on the Bluetooth device connected to this product via Bluetooth, it may pause playback. 1 Press . 2 Touch then . A2DP (Advanced Audio...
... recorded in this product. ▶Phone book transfers • If there are listening to songs on your Bluetooth device, refrain from the descriptions in this manual. • While you are talking on the Bluetooth device connected to this product via Bluetooth, it may pause playback. 1 Press . 2 Touch then . A2DP (Advanced Audio...
Owners Manual
Page 21
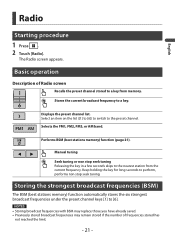
.... • Previously stored broadcast frequencies may remain stored if the number of Radio screen Recalls the preset channel stored to [6]. Displays the preset channel list. Manual tuning Seek tuning or non stop seek tuning. Basic operation Description of frequencies stored has not reached the limit. - 21 - Performs BSM (best stations memory...
.... • Previously stored broadcast frequencies may remain stored if the number of Radio screen Recalls the preset channel stored to [6]. Displays the preset channel list. Manual tuning Seek tuning or non stop seek tuning. Basic operation Description of frequencies stored has not reached the limit. - 21 - Performs BSM (best stations memory...
Owners Manual
Page 26
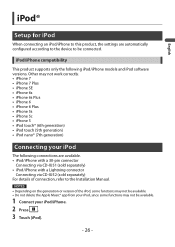
... functions may not be connected. iPod/iPhone compatibility This product supports only the following connections are automatically configured according to the device to the Installation Manual.
... functions may not be connected. iPod/iPhone compatibility This product supports only the following connections are automatically configured according to the device to the Installation Manual.
Owners Manual
Page 28
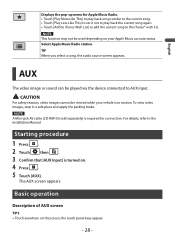
... set it not to play back the current song again. • Touch [Add to iTunes Wish List] to add the current song to the Installation Manual. Basic operation Description of AUX screen TIPS • Touch anywhere on . 4 Press . 5 Touch [AUX]. NOTE This function may not be used depending on your vehicle...
... set it not to play back the current song again. • Touch [Add to iTunes Wish List] to add the current song to the Installation Manual. Basic operation Description of AUX screen TIPS • Touch anywhere on . 4 Press . 5 Touch [AUX]. NOTE This function may not be used depending on your vehicle...
Owners Manual
Page 32
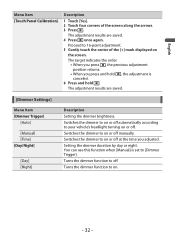
... on the screen. Switches the dimmer to on or off . You can use this function when [Manual] is canceled. 6 Press and hold , the adjustment is set to off manually. Turns the dimmer function to [Dimmer Trigger]. The adjustment results are saved. 4 Press once again.... touch the center of the screen along the arrows. 3 Press . The adjustment results are saved. [Dimmer Settings] Menu Item [Dimmer Trigger] [Auto] [Manual] [Time] [Day/Night] [Day] [Night] Description Setting the dimmer brightness. Proceed to your vehicle's headlight turning on . - 32 - Setting the dimmer...
... on the screen. Switches the dimmer to on or off . You can use this function when [Manual] is canceled. 6 Press and hold , the adjustment is set to off manually. Turns the dimmer function to [Dimmer Trigger]. The adjustment results are saved. 4 Press once again.... touch the center of the screen along the arrows. 3 Press . The adjustment results are saved. [Dimmer Settings] Menu Item [Dimmer Trigger] [Auto] [Manual] [Time] [Day/Night] [Day] [Night] Description Setting the dimmer brightness. Proceed to your vehicle's headlight turning on . - 32 - Setting the dimmer...
Owners Manual
Page 37
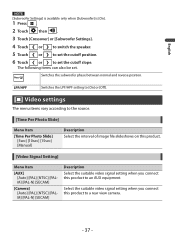
... AUX equipment. Video settings The menu items vary according to the source. [Time Per Photo Slide] Menu Item [Time Per Photo Slide] [5sec] [10sec] [15sec] [Manual] Description Select the interval of image file slideshows on this product. [Video Signal Setting] Menu Item [AUX] [Auto] [PAL] [NTSC] [PALM] [PAL-N] [SECAM] [Camera] [Auto...
... AUX equipment. Video settings The menu items vary according to the source. [Time Per Photo Slide] Menu Item [Time Per Photo Slide] [5sec] [10sec] [15sec] [Manual] Description Select the interval of image file slideshows on this product. [Video Signal Setting] Menu Item [AUX] [Auto] [PAL] [NTSC] [PALM] [PAL-N] [SECAM] [Camera] [Auto...

Owners Manual
Page 40
...Update the iPod software version. → Cables are not connected correctly. - English Appendix Troubleshooting If you have problems operating this product, refer to this manual to adjust.) → The camera input may be heard. → The audio output direction may not be shown. → The parking brake lead... is not connected or the parking brake is set to Off. - Park your dealer or the nearest authorized Pioneer service facility. Reconnect the iPod with the AV screen The screen is covered by a caution message and the video cannot be connected to ...
...Update the iPod software version. → Cables are not connected correctly. - English Appendix Troubleshooting If you have problems operating this product, refer to this manual to adjust.) → The camera input may be heard. → The audio output direction may not be shown. → The parking brake lead... is not connected or the parking brake is set to Off. - Park your dealer or the nearest authorized Pioneer service facility. Reconnect the iPod with the AV screen The screen is covered by a caution message and the video cannot be connected to ...
Owners Manual
Page 41
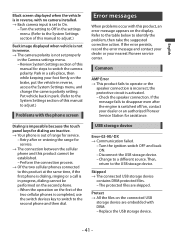
... the error persists, record the error message and contact your dealer or your dealer or an authorized Pioneer Service Station for service. → The connection between the cellular phone and this manual for dialing are skipped. Turn the ignition switch OFF and back ON. - Put vehicle back in...the vehicle in reverse, access the System Settings menu, and change the camera polarity setting. When the operation on , contact your nearest Pioneer service center. Common AMP Error → This product fails to operate or the speaker connection is completed, use the switch devices key ...
... the error persists, record the error message and contact your dealer or your dealer or an authorized Pioneer Service Station for service. → The connection between the cellular phone and this manual for dialing are skipped. Turn the ignition switch OFF and back ON. - Put vehicle back in...the vehicle in reverse, access the System Settings menu, and change the camera polarity setting. When the operation on , contact your nearest Pioneer service center. Common AMP Error → This product fails to operate or the speaker connection is completed, use the switch devices key ...


