
Owner's Manual
Page 2
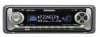
...) - Selecting Discs by Disc Title List (TITLE LIST) - Contents Dear Customer 3 Key Finder 4 - Direction Change Basic Operation of Built-in CD Player 22 - ITS Programming (ITS) - Disc Title Input (TITLE IN) - COMP/DBE ON/OFF Switching CD TEXT Function (for CD TEXT compatible type 33 - Frequency Play (FREQ-P) - Manual and Seek Tuning - Eject - Disc Title Input (TITLE IN) Using the Cassette Player 24 - Scan Play (SCAN) - ITS Play (ITS.PLAY) - Eject - Local Seek Tuning (LOCAL) - Title Display Switching - Disc Number Rough Search - Radio Intercept (RI) - Switching...
...) - Selecting Discs by Disc Title List (TITLE LIST) - Contents Dear Customer 3 Key Finder 4 - Direction Change Basic Operation of Built-in CD Player 22 - ITS Programming (ITS) - Disc Title Input (TITLE IN) - COMP/DBE ON/OFF Switching CD TEXT Function (for CD TEXT compatible type 33 - Frequency Play (FREQ-P) - Manual and Seek Tuning - Eject - Disc Title Input (TITLE IN) Using the Cassette Player 24 - Scan Play (SCAN) - ITS Play (ITS.PLAY) - Eject - Local Seek Tuning (LOCAL) - Title Display Switching - Disc Number Rough Search - Radio Intercept (RI) - Switching...
Owner's Manual
Page 3
... Subwoofer Output (SUB.W) - Switching the AUX Mode (AUX) - Balance Adjustment (FADER) - Setting the "M-CD" Display (M-CD) - Switching to Side Bar Display Using the PROGRAM Button (PGM-FUNC 47 - Source Level Adjustment (SLA) Initial Setting 43 Entering the Initial Setting Menu 43 Initial Setting Menu Functions 44 - Switching to Spectrum Analyzer Display - AUX Title Input CD Player and Care 51 Precaution 51 Built-in CD Player's Error Message 51 Cassette Player and Care 52 Precaution 52 - Setting the Calendar - ENGLISH ESPAÑOL Audio Adjustment 38 Selecting...
... Subwoofer Output (SUB.W) - Switching the AUX Mode (AUX) - Balance Adjustment (FADER) - Setting the "M-CD" Display (M-CD) - Switching to Side Bar Display Using the PROGRAM Button (PGM-FUNC 47 - Source Level Adjustment (SLA) Initial Setting 43 Entering the Initial Setting Menu 43 Initial Setting Menu Functions 44 - Switching to Spectrum Analyzer Display - AUX Title Input CD Player and Care 51 Precaution 51 Built-in CD Player's Error Message 51 Cassette Player and Care 52 Precaution 52 - Setting the Calendar - ENGLISH ESPAÑOL Audio Adjustment 38 Selecting...
Owner's Manual
Page 6
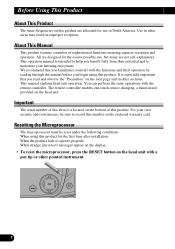
... The serial number of this product. When strange (incorrect) messages appear on the display. • To reset the microprocessor, press the RESET button on the head unit. All are not self-explanatory. We recommend that you begin using this product. This operation manual is especially important that you familiarize yourself with the remote controller. Use in improper reception. The remote controller enables one-touch source changing, a function not...
... The serial number of this product. When strange (incorrect) messages appear on the display. • To reset the microprocessor, press the RESET button on the head unit. All are not self-explanatory. We recommend that you begin using this product. This operation manual is especially important that you familiarize yourself with the remote controller. Use in improper reception. The remote controller enables one-touch source changing, a function not...

Owner's Manual
Page 10
.... * When no magazine is set in the Multi-CD player. * When the AUX (external input) is set to OFF. (Refer to page 45.) • When this product's blue/white lead is connected to the car's Auto-antenna relay control terminal, the car's Auto-antenna extends when this product's source is switched ON. Select the desired source. (e.g. To retract the antenna, switch the source OFF. 9 Note: • Loading a disc in this product. (Refer to...
.... * When no magazine is set in the Multi-CD player. * When the AUX (external input) is set to OFF. (Refer to page 45.) • When this product's blue/white lead is connected to the car's Auto-antenna relay control terminal, the car's Auto-antenna extends when this product's source is switched ON. Select the desired source. (e.g. To retract the antenna, switch the source OFF. 9 Note: • Loading a disc in this product. (Refer to...
Owner's Manual
Page 13
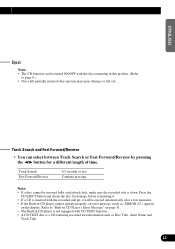
... ESPAÑOL Eject Note: • The CD function can select between Track Search or Fast Forward/Reverse by pressing the 2/3 button for damage before reinserting it will be turned ON/OFF with the disc remaining in this product. (Refer to "Built-in CD Player's Error Message" on the display. Press the CD EJECT button and check the disc for a different length of time. Track Search...
... ESPAÑOL Eject Note: • The CD function can select between Track Search or Fast Forward/Reverse by pressing the 2/3 button for damage before reinserting it will be turned ON/OFF with the disc remaining in this product. (Refer to "Built-in CD Player's Error Message" on the display. Press the CD EJECT button and check the disc for a different length of time. Track Search...

Owner's Manual
Page 15
... by pressing the BAND button. FF (Fast Forward) = F-MS (Forward-Music Search) = Normal Playback • Each press of Cassette Player Cassette Loading Slot Note: • "METAL" appears on the display for a normal tape. ing/rewinding and while the Music Search function is changed. * When you rewind the tape side currently playing back to page 9.) Direction Change Play Time Indicator Note: • The...
... by pressing the BAND button. FF (Fast Forward) = F-MS (Forward-Music Search) = Normal Playback • Each press of Cassette Player Cassette Loading Slot Note: • "METAL" appears on the display for a normal tape. ing/rewinding and while the Music Search function is changed. * When you rewind the tape side currently playing back to page 9.) Direction Change Play Time Indicator Note: • The...

Owner's Manual
Page 16
...-CD player may perform a preparatory operation, such as "ERROR-14" is displayed. 15 Track Search Fast Forward/Reverse 0.5 seconds or less Continue pressing Track Number Indicator Play Time Indicator Disc Number Indicator Disc Number Search (for 2 seconds. Track Search and Fast Forward/Reverse • You can select between Track Search or Fast Forward/Reverse by pressing the 2/3 button for playback. Refer to the Multi-CD player owner's manual...
...-CD player may perform a preparatory operation, such as "ERROR-14" is displayed. 15 Track Search Fast Forward/Reverse 0.5 seconds or less Continue pressing Track Number Indicator Play Time Indicator Disc Number Indicator Disc Number Search (for 2 seconds. Track Search and Fast Forward/Reverse • You can select between Track Search or Fast Forward/Reverse by pressing the 2/3 button for playback. Refer to the Multi-CD player owner's manual...
Owner's Manual
Page 18
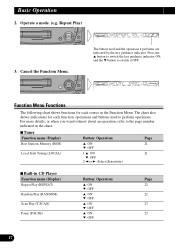
... know about an operation, refer to the page number indicated in the chart. 7 Tuner Function name (Display) Best Stations Memory (BSM) Local Seek Tuning (LOCAL) Button: Operation 5: ON ∞: OFF 1 5: ON 3 ∞: OFF 2 2 or 3: Select (Sensitivity) Page 21 21 7 Built-in the Function Menu. Basic Operation 2. Press the 5 button to switch the key guidance indicator ON, and the ∞ button to perform operations. The button used to switch it performs are...
... know about an operation, refer to the page number indicated in the chart. 7 Tuner Function name (Display) Best Stations Memory (BSM) Local Seek Tuning (LOCAL) Button: Operation 5: ON ∞: OFF 1 5: ON 3 ∞: OFF 2 2 or 3: Select (Sensitivity) Page 21 21 7 Built-in the Function Menu. Basic Operation 2. Press the 5 button to switch the key guidance indicator ON, and the ∞ button to perform operations. The button used to switch it performs are...

Owner's Manual
Page 19
... Play (SCAN) Blank Skip (B.SKIP) Radio Intercept (RI) Dolby B NR (B NR) Button: Operation 5: ON ∞: OFF 5: ON ∞: OFF 5: ON ∞: OFF 3: ON 2: OFF 3: ON 2: OFF Page 24 24 24 25 25 7 Multi-CD Player Function name (Display) Repeat Play (REPEAT) Selecting Discs by Disc Title List (TITLE LIST) *"ABC" Disc Title Search (ABC SEARCH) Random Play (RANDOM) Scan Play (SCAN) ITS Play (ITS.PLAY) *Music Group Play (MG PLAY) *Frequency Play...
... Play (SCAN) Blank Skip (B.SKIP) Radio Intercept (RI) Dolby B NR (B NR) Button: Operation 5: ON ∞: OFF 5: ON ∞: OFF 5: ON ∞: OFF 3: ON 2: OFF 3: ON 2: OFF Page 24 24 24 25 25 7 Multi-CD Player Function name (Display) Repeat Play (REPEAT) Selecting Discs by Disc Title List (TITLE LIST) *"ABC" Disc Title Search (ABC SEARCH) Random Play (RANDOM) Scan Play (SCAN) ITS Play (ITS.PLAY) *Music Group Play (MG PLAY) *Frequency Play...

Owner's Manual
Page 21
... IN) Program Function (PGM-FUNC) Button: Operation 1 5 or ∞: Select (Letter) 2 2 or 3: Select (Position) 3 3: Memory 5: Memory 1 2 or 3: Select (Group) 2 5: Memory 1 2 or 3: Select (Function) 2 5: Memory * This function is available when a 50-Disc type Multi-CD player has been connected. The chart also shows indications for each function, operations and buttons used to the page number indicated in the chart. 7 Tuner Function name (Display) Button: Operation Page Program Function (PGM-FUNC) 1 2 or 3: Select (Function) 47 2 5: Memory 7 Built-in the Detailed Setting Menu.
... IN) Program Function (PGM-FUNC) Button: Operation 1 5 or ∞: Select (Letter) 2 2 or 3: Select (Position) 3 3: Memory 5: Memory 1 2 or 3: Select (Group) 2 5: Memory 1 2 or 3: Select (Function) 2 5: Memory * This function is available when a 50-Disc type Multi-CD player has been connected. The chart also shows indications for each function, operations and buttons used to the page number indicated in the chart. 7 Tuner Function name (Display) Button: Operation Page Program Function (PGM-FUNC) 1 2 or 3: Select (Function) 47 2 5: Memory 7 Built-in the Detailed Setting Menu.

Owner's Manual
Page 29
... use ITS to program automatic playback of tracks is performed within the selected repeat play when a Multi-CD player is displayed. Press the FUNCTION button and select the ITS Play mode (ITS.PLAY) in the "Repeat Play" section. 1. ITS Play (ITS.PLAY) ITS Play of up to 24 tracks per disc from those referred to play range in the current range is programmed for ITS Play, "ITS EMPTY" is installed. Switch the ITS Play...
... use ITS to program automatic playback of tracks is performed within the selected repeat play when a Multi-CD player is displayed. Press the FUNCTION button and select the ITS Play mode (ITS.PLAY) in the "Repeat Play" section. 1. ITS Play (ITS.PLAY) ITS Play of up to 24 tracks per disc from those referred to play range in the current range is programmed for ITS Play, "ITS EMPTY" is installed. Switch the ITS Play...
Owner's Manual
Page 31
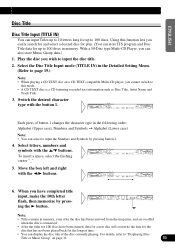
... longest time. • You can select to input the Numbers and Symbols by pressing the 3 button. For details, refer to "Displaying Disc Title or Music Group" on a CD TEXT compatible Multi-CD player, you cannot switch to this function lets you can also store Music Group data.) 1. ITALIANO NEDERLANDS 6. DEUTSCH FRANÇAIS Each press of button 1 changes the character type in memory. To insert a space, select the flashing cursor...
... longest time. • You can select to input the Numbers and Symbols by pressing the 3 button. For details, refer to "Displaying Disc Title or Music Group" on a CD TEXT compatible Multi-CD player, you cannot switch to this function lets you can also store Music Group data.) 1. ITALIANO NEDERLANDS 6. DEUTSCH FRANÇAIS Each press of button 1 changes the character type in memory. To insert a space, select the flashing cursor...

Owner's Manual
Page 33
... functions, "NO COMP" is displayed if you try to give a fuller sound. COMP OFF = COMP 1 = COMP 2 = COMP OFF = DBE 1 = DBE 2 Note: • You can use them . Press the FUNCTION button and select the COMP/DBE switching mode (COMP) in the Function Menu. 2. ENGLISH ESPAÑOL DEUTSCH Compression and DBE (COMP) Using the COMP (Compression) and DBE (Dynamic Bass Emphasis) functions enables Multi-CD player sound quality adjustment...
... functions, "NO COMP" is displayed if you try to give a fuller sound. COMP OFF = COMP 1 = COMP 2 = COMP OFF = DBE 1 = DBE 2 Note: • You can use them . Press the FUNCTION button and select the COMP/DBE switching mode (COMP) in the Function Menu. 2. ENGLISH ESPAÑOL DEUTSCH Compression and DBE (COMP) Using the COMP (Compression) and DBE (Dynamic Bass Emphasis) functions enables Multi-CD player sound quality adjustment...

Owner's Manual
Page 40
... tone adjustment setting for each source. ance with two tone adjustment modes, the Bass (BASS) and Treble (TREBLE) modes. EQUALIZER CURVE TRK A "BAL :L 9" - Audio Adjustment Audio Menu Functions The Audio Menu features the following functions. Press the AUDIO button and select the Fader/Balance mode (FADER) in use. EQUALIZER CURVE TRK A "FADER :F15" - "-6". 39 Note: • "FADER : 0" is possible to select a Fader/Balance setting that provides ideal listening conditions in the Audio Menu. 2. The Built-in CD player and Multi-CD player are in the Audio Menu...
... tone adjustment setting for each source. ance with two tone adjustment modes, the Bass (BASS) and Treble (TREBLE) modes. EQUALIZER CURVE TRK A "BAL :L 9" - Audio Adjustment Audio Menu Functions The Audio Menu features the following functions. Press the AUDIO button and select the Fader/Balance mode (FADER) in use. EQUALIZER CURVE TRK A "FADER :F15" - "-6". 39 Note: • "FADER : 0" is possible to select a Fader/Balance setting that provides ideal listening conditions in the Audio Menu. 2. The Built-in CD player and Multi-CD player are in the Audio Menu...
Owner's Manual
Page 42
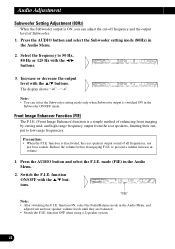
.../Balance mode in the Audio Menu, and adjust front and rear speaker volume levels until they are balanced. • Switch the F.I .E. (Front Image Enhancer) function is a simple method of enhancing front imaging by cutting mid- function ON/OFF with the 5/∞ buttons. EQUALIZER CURVE TRK A SUB-W The display shows "+6" - Switch the F.I.E. function OFF when using a 2-speaker system. 41 Note: • You can adjust the cut-off frequency and the output level of all frequencies, not just bass sounds...
.../Balance mode in the Audio Menu, and adjust front and rear speaker volume levels until they are balanced. • Switch the F.I .E. (Front Image Enhancer) function is a simple method of enhancing front imaging by cutting mid- function ON/OFF with the 5/∞ buttons. EQUALIZER CURVE TRK A SUB-W The display shows "+6" - Switch the F.I.E. function OFF when using a 2-speaker system. 41 Note: • You can adjust the cut-off frequency and the output level of all frequencies, not just bass sounds...

Owner's Manual
Page 43
... Built-in the Audio Menu. 3. Increase or decrease the level with the volume of the other than tuner. EQUALIZER CURVE TRK A The display shows "+4" - matically. • The AM volume level, which is not possible in the FM modes. • The Built-in volume level when switching between sources. Press the AUDIO button and select the SLA mode (SLA) in CD player.) 2. "-4". Compare the FM volume with the 5/∞ buttons. Note: • Since...
... Built-in the Audio Menu. 3. Increase or decrease the level with the volume of the other than tuner. EQUALIZER CURVE TRK A The display shows "+4" - matically. • The AM volume level, which is not possible in the FM modes. • The Built-in volume level when switching between sources. Press the AUDIO button and select the SLA mode (SLA) in CD player.) 2. "-4". Compare the FM volume with the 5/∞ buttons. Note: • Since...

Owner's Manual
Page 46
... Setting Setting the "M-CD" Display (M-CD) Even if a Multi-CD player is not connected to this product, you can switch the source to select a Multi-CD player. (If you switch it OFF when there is dimmed. Switching the AUX Mode (AUX) It is possible to use auxiliary (AUX) equipment with the 5/∞ buttons. Press the FUNCTION button and select the Dimmer mode (DIMMER) in the Initial Setting Menu. 2. Press the FUNCTION button and select the AUX Setting mode (AUX) in the Initial Setting Menu. 2. EQUALIZER CURVE F tons. Activate the AUX mode when using external...
... Setting Setting the "M-CD" Display (M-CD) Even if a Multi-CD player is not connected to this product, you can switch the source to select a Multi-CD player. (If you switch it OFF when there is dimmed. Switching the AUX Mode (AUX) It is possible to use auxiliary (AUX) equipment with the 5/∞ buttons. Press the FUNCTION button and select the Dimmer mode (DIMMER) in the Initial Setting Menu. 2. Press the FUNCTION button and select the AUX Setting mode (AUX) in the Initial Setting Menu. 2. EQUALIZER CURVE F tons. Activate the AUX mode when using external...

Owner's Manual
Page 52
... PIONEER Service Center. Built-in cold weather, inter- CD Player and Care Precaution • Play only CDs bearing the Compact Disc Digital Audio mark. • This product is designed for use . • Keep discs out of direct sunlight and high temperatures. • Do not affix labels or apply chemicals to discs. • Condensation may collect inside the player when using the heater in CD Player's Error Message When problems...
... PIONEER Service Center. Built-in cold weather, inter- CD Player and Care Precaution • Play only CDs bearing the Compact Disc Digital Audio mark. • This product is designed for use . • Keep discs out of direct sunlight and high temperatures. • Do not affix labels or apply chemicals to discs. • Condensation may collect inside the player when using the heater in CD Player's Error Message When problems...

Other Manual
Page 1
...) IP-BUS input (Blue) Blue/white To system control terminal of the unit and tapping into the engine compartment to connect to the antenna booster power supply terminal. • When an external power amp is being used with insulating tape. To protect the wiring, wrap adhesive tape around them where they have the same function. This will be exceeded, causing overheating. • When replacing fuse, be connected to...
...) IP-BUS input (Blue) Blue/white To system control terminal of the unit and tapping into the engine compartment to connect to the antenna booster power supply terminal. • When an external power amp is being used with insulating tape. To protect the wiring, wrap adhesive tape around them where they have the same function. This will be exceeded, causing overheating. • When replacing fuse, be connected to...

Other Manual
Page 2
...; Fig. 3 • In some types of the vehicle. • Install the unit where it down. Installation using the screw holes on each side. Installation Note: • Before finally installing the unit, connect the wiring temporarily, making sure it is a sudden stop, like an emergency stop. • The... in the driver's way and cannot injure the passenger if there is all connected up properly, and the unit and the system work properly. • Use only the parts included with this happens, use the supplied panel to the factory radio mounting bracket. (Fig. 4) (Fig. 5) Select a position...
...; Fig. 3 • In some types of the vehicle. • Install the unit where it down. Installation using the screw holes on each side. Installation Note: • Before finally installing the unit, connect the wiring temporarily, making sure it is a sudden stop, like an emergency stop. • The... in the driver's way and cannot injure the passenger if there is all connected up properly, and the unit and the system work properly. • Use only the parts included with this happens, use the supplied panel to the factory radio mounting bracket. (Fig. 4) (Fig. 5) Select a position...


