
Owner's Manual
Page 4
... unit 16 Setting up conventional TV channels 41 Using Auto Channel Preset 41 Plasma Display 13 Setting for buying this Pioneer product. In some countries or regions, the shape of the remote control unit ....... 17 Installing the Plasma Display 17 Installing the Media receiver 18 Installing the Media Receiver vertically 19 Setting the system 20 Routing cables 21 Using the...
... unit 16 Setting up conventional TV channels 41 Using Auto Channel Preset 41 Plasma Display 13 Setting for buying this Pioneer product. In some countries or regions, the shape of the remote control unit ....... 17 Installing the Plasma Display 17 Installing the Media receiver 18 Installing the Media Receiver vertically 19 Setting the system 20 Routing cables 21 Using the...
Owner's Manual
Page 5
...the i.LINK list 74 Setting up for i.LINK standby 76 Watching an image from a personal computer 77 Connecting a personal computer 77 Displaying an image from a personal computer ....... 77 Connecting a VCR controller 78 The lists of controllable recording equipment manufactures 79 Connecting control cords... the password 96 13 Useful Features Learning function of the remote control unit 97 Presetting manufacture codes 97 Using the learning function 98 Using the remote control unit to control other devices 100 Receiver control buttons 100 Cable control buttons 101 SAT control buttons ...
...the i.LINK list 74 Setting up for i.LINK standby 76 Watching an image from a personal computer 77 Connecting a personal computer 77 Displaying an image from a personal computer ....... 77 Connecting a VCR controller 78 The lists of controllable recording equipment manufactures 79 Connecting control cords... the password 96 13 Useful Features Learning function of the remote control unit 97 Presetting manufacture codes 97 Using the learning function 98 Using the remote control unit to control other devices 100 Receiver control buttons 100 Cable control buttons 101 SAT control buttons ...

Owner's Manual
Page 10
...wet cloth, water droplets on in winter morning, for example. Do not use the handles for about three minutes. 03 Operational Precautions PIONEER bears no responsibility for any damages arising from incorrect use of the product by you or other people, malfunctions when in use, other...affected. Do not move the Plasma Display by noise. Fan motor noise When ambient temperature of the Media Receiver becomes high, the rotation speed of the screen will be liable. the supplied cleaning cloth or other product related problems, and use , the remote controls of nearby equipment may result...
...wet cloth, water droplets on in winter morning, for example. Do not use the handles for about three minutes. 03 Operational Precautions PIONEER bears no responsibility for any damages arising from incorrect use of the product by you or other people, malfunctions when in use, other...affected. Do not move the Plasma Display by noise. Fan motor noise When ambient temperature of the Media Receiver becomes high, the rotation speed of the screen will be liable. the supplied cleaning cloth or other product related problems, and use , the remote controls of nearby equipment may result...

Owner's Manual
Page 12
... cord (2 m/6.6 feet) Cleaning cloth Speed clamp x 3 Bead band x 3 Media Receiver Warranty card Speaker cushion x 3 (Use when installing the optional speakers at the bottom of the Plasma Display.) Power cord (2 m/6.6 feet) Remote control unit System cable (3 m/9.8 feet) AA size battery x 2 (Alkaline battery) Stand Screw x 4 (for stand) Screw hole cap x 4 VCR controller x 1 (1.8 m/5.9 feet) Coaxial cable (0.15 m/0.49...
... cord (2 m/6.6 feet) Cleaning cloth Speed clamp x 3 Bead band x 3 Media Receiver Warranty card Speaker cushion x 3 (Use when installing the optional speakers at the bottom of the Plasma Display.) Power cord (2 m/6.6 feet) Remote control unit System cable (3 m/9.8 feet) AA size battery x 2 (Alkaline battery) Stand Screw x 4 (for stand) Screw hole cap x 4 VCR controller x 1 (1.8 m/5.9 feet) Coaxial cable (0.15 m/0.49...
Owner's Manual
Page 13
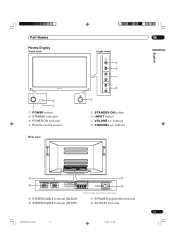
buttons Rear view 9 - 0 = 9 SYSTEM CABLE terminal (BLACK) 0 SYSTEM CABLE terminal (WHITE) The terminals have faced downward. - SPEAKER (right/left) terminals = AC INLET terminal PDP5040HD-Eng (13-16) 13 13 En 7/24/03, 1:57 PM buttons 8 CHANNEL +/- Part Names Plasma Display Front view 06 (right view) 5 6 7 8 English 2 1 3 1 POWER button 2 STANDBY indicator 3 POWER ON indicator 4 Remote control sensor 4 5 STANDBY/ON button 6 INPUT button 7 VOLUME +/-
buttons Rear view 9 - 0 = 9 SYSTEM CABLE terminal (BLACK) 0 SYSTEM CABLE terminal (WHITE) The terminals have faced downward. - SPEAKER (right/left) terminals = AC INLET terminal PDP5040HD-Eng (13-16) 13 13 En 7/24/03, 1:57 PM buttons 8 CHANNEL +/- Part Names Plasma Display Front view 06 (right view) 5 6 7 8 English 2 1 3 1 POWER button 2 STANDBY indicator 3 POWER ON indicator 4 Remote control sensor 4 5 STANDBY/ON button 6 INPUT button 7 VOLUME +/-
Owner's Manual
Page 16
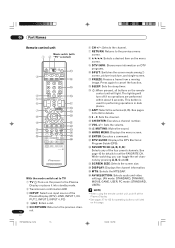
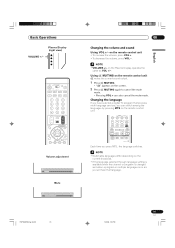
... CH (A, B, C, D): Selects any of the Plasma Display. (DTV, i.LINK, INPUT 1, INPUT 2, INPUT 3, INPUT 4, PC) 4 •(dot): Enters a dot. 5 CH RETURN: Returns to the previous chan- 16 nel. PC mode: STANDARD, USER.) • When using the remote control unit, point it into standby mode. 2...03, 1:58 PM 06 Part Names Remote control unit Mode switch (with 1 2 "TV" selected) ~ 3 ! @ 4 # 5 6 $ % 7 ^ 8 & 9 * ( 0 ) - _ = + ¡ With the mode switch set to TV 1 TV a: Turns on the power to the Plasma Display or places it at the Plasma Display. • See pages 97 to 105...
... CH (A, B, C, D): Selects any of the Plasma Display. (DTV, i.LINK, INPUT 1, INPUT 2, INPUT 3, INPUT 4, PC) 4 •(dot): Enters a dot. 5 CH RETURN: Returns to the previous chan- 16 nel. PC mode: STANDARD, USER.) • When using the remote control unit, point it into standby mode. 2...03, 1:58 PM 06 Part Names Remote control unit Mode switch (with 1 2 "TV" selected) ~ 3 ! @ 4 # 5 6 $ % 7 ^ 8 & 9 * ( 0 ) - _ = + ¡ With the mode switch set to TV 1 TV a: Turns on the power to the Plasma Display or places it at the Plasma Display. • See pages 97 to 105...

Owner's Manual
Page 17
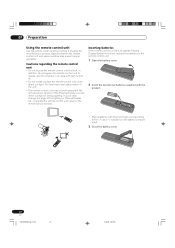
... sunlight. Using the optional PIONEER stand • For details on the top of the Media Receiver it will not receive enough ventilation and will not operate properly. • Allow enough space around the backside. The strength of the Plasma Display. Preparation 07 English Allowed operation range of the remote control unit Operate the remote control unit while pointing...
... sunlight. Using the optional PIONEER stand • For details on the top of the Media Receiver it will not receive enough ventilation and will not operate properly. • Allow enough space around the backside. The strength of the Plasma Display. Preparation 07 English Allowed operation range of the remote control unit Operate the remote control unit while pointing...
Owner's Manual
Page 22
... proper operation. 07 Preparation Using the remote control unit Use the remote control unit by pointing it towards the remote sensor window. The heat may cause deformation of the Plasma Display is under direct sunlight. Cautions regarding the remote control unit • Do not expose the remote control unit to the remote sensor window. Inserting batteries If the...
... proper operation. 07 Preparation Using the remote control unit Use the remote control unit by pointing it towards the remote sensor window. The heat may cause deformation of the Plasma Display is under direct sunlight. Cautions regarding the remote control unit • Do not expose the remote control unit to the remote sensor window. Inserting batteries If the...

Owner's Manual
Page 23
... as soon as they have worn out. Different types of time, remove the batteries from batteries can cause a rash. When you will not use the remote control unit for an extended period of batteries have a shorter life expectancy due to the (+) and (-) indicators. • Do not mix batteries of different types...
... as soon as they have worn out. Different types of time, remove the batteries from batteries can cause a rash. When you will not use the remote control unit for an extended period of batteries have a shorter life expectancy due to the (+) and (-) indicators. • Do not mix batteries of different types...

Owner's Manual
Page 25
...TV image of the other tuner. • Pressing ANT while viewing Dual Screen with two TV images displayed will not have any effect. • Pressing ANT while viewing Dual Screen with two video images displayed will switch the selected screen to a TV image. 25 En PDP5040HD-Eng (17-27) 25 7/...; How to change channels when the Cable Converter output signal is connected to the ANTENNA/CABLE B input on the Media Receiver. • Press ANT on the remote control unit to switch to connect the antenna or the Cable Converter as shown above. Preparation 07 Connecting a VHF/UHF antenna and Cable ...
...TV image of the other tuner. • Pressing ANT while viewing Dual Screen with two TV images displayed will not have any effect. • Pressing ANT while viewing Dual Screen with two video images displayed will switch the selected screen to a TV image. 25 En PDP5040HD-Eng (17-27) 25 7/...; How to change channels when the Cable Converter output signal is connected to the ANTENNA/CABLE B input on the Media Receiver. • Press ANT on the remote control unit to switch to connect the antenna or the Cable Converter as shown above. Preparation 07 Connecting a VHF/UHF antenna and Cable ...
Owner's Manual
Page 28
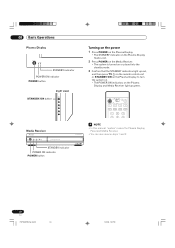
.... 3 Confirm that the STANDBY indicators light up red, and then press TV a on the remote control unit or STANDBY/ON on the Plasma Display to turn the system on. • The POWER ON indicators on the Plasma Display and Media Receiver light up green. Media Receiver STANDBY indicator POWER ON indicator POWER button • In this manual, "system" means...
.... 3 Confirm that the STANDBY indicators light up red, and then press TV a on the remote control unit or STANDBY/ON on the Plasma Display to turn the system on. • The POWER ON indicators on the Plasma Display and Media Receiver light up green. Media Receiver STANDBY indicator POWER ON indicator POWER button • In this manual, "system" means...

Owner's Manual
Page 29
... period of time, be sure to the Media Receiver is off. Flashing Flashing Power to remove the power cord from the power outlet. Or the power cord has been disconnected from the Plasma Display. Power to place the system into the standby mode by pressing TV a on the remote control unit. Basic Operations 08 English...
... period of time, be sure to the Media Receiver is off. Flashing Flashing Power to remove the power cord from the power outlet. Or the power cord has been disconnected from the Plasma Display. Power to place the system into the standby mode by pressing TV a on the remote control unit. Basic Operations 08 English...
Owner's Manual
Page 30
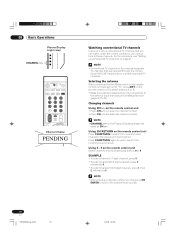
... up conventional TV channels" on the Plasma Display operates the same as CH +/-. Using CH RETURN on the Media Receiver (pages 24 to the previously tuned channel. on page 41. • Conventional TV channels in this selection depending on the connections to the antenna input terminals on the remote control unit Press CH RETURN to...
... up conventional TV channels" on the Plasma Display operates the same as CH +/-. Using CH RETURN on the Media Receiver (pages 24 to the previously tuned channel. on page 41. • Conventional TV channels in this selection depending on the connections to the antenna input terminals on the remote control unit Press CH RETURN to...

Owner's Manual
Page 31
...-Eng (28-37) 31 31 En 7/24/03, 1:58 PM Using e MUTING on the remote control unit e mutes the current sound output. 1 Press e MUTING. • "M" appears on the remote control unit • To increase the volume, press VOL +. • To decrease the volume,... press VOL -. • VOLUME +/- on the screen. 2 Press e MUTING again to cancel the mute mode. • Pressing VOL + can also cancel the mute mode. on the Plasma Display operates the same as VOL +/-. Basic Operations Plasma Display...
...-Eng (28-37) 31 31 En 7/24/03, 1:58 PM Using e MUTING on the remote control unit e mutes the current sound output. 1 Press e MUTING. • "M" appears on the remote control unit • To increase the volume, press VOL +. • To decrease the volume,... press VOL -. • VOLUME +/- on the screen. 2 Press e MUTING again to cancel the mute mode. • Pressing VOL + can also cancel the mute mode. on the Plasma Display operates the same as VOL +/-. Basic Operations Plasma Display...
Owner's Manual
Page 34
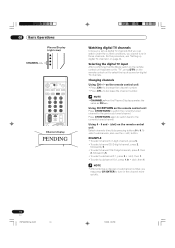
... pressing buttons 0 to select the input source for digital TV channels. Changing channels Using CH +/- Using CH RETURN on the remote control unit to 9. 08 Basic Operations Plasma Display (right view) CHANNEL +/- To select subchannels, also use the • (dot) button. to the currently tuned channel. ... +/- For the procedure, see "Setting up digital TV channels that the Mode switch on the remote control unit has been set up digital TV channels" on the Plasma Display operates the same as CH +/-. Selecting the digital TV input After confirming that you can watch under...
... pressing buttons 0 to select the input source for digital TV channels. Changing channels Using CH +/- Using CH RETURN on the remote control unit to 9. 08 Basic Operations Plasma Display (right view) CHANNEL +/- To select subchannels, also use the • (dot) button. to the currently tuned channel. ... +/- For the procedure, see "Setting up digital TV channels that the Mode switch on the remote control unit has been set up digital TV channels" on the Plasma Display operates the same as CH +/-. Selecting the digital TV input After confirming that you can watch under...
Owner's Manual
Page 35
Basic Operations Plasma Display (right view) VOLUME +/- 08 Changing the volume and sound Using VOL +/- on the remote control unit • To increase the volume, press VOL +. • To decrease the volume, press VOL -. • VOLUME +/- Using e MUTING on the remote control unit e mutes the current sound output. 1 Press e ...have selected a digital TV program that language. PDP5040HD-Eng (28-37) 35 35 En 7/24/03, 1:58 PM on the Plasma Display operates the same as VOL +/-. Changing the language If you can also cancel the mute mode. English Volume adjustment Mute Each time ...
Basic Operations Plasma Display (right view) VOLUME +/- 08 Changing the volume and sound Using VOL +/- on the remote control unit • To increase the volume, press VOL +. • To decrease the volume, press VOL -. • VOLUME +/- Using e MUTING on the remote control unit e mutes the current sound output. 1 Press e ...have selected a digital TV program that language. PDP5040HD-Eng (28-37) 35 35 En 7/24/03, 1:58 PM on the Plasma Display operates the same as VOL +/-. Changing the language If you can also cancel the mute mode. English Volume adjustment Mute Each time ...
Owner's Manual
Page 38
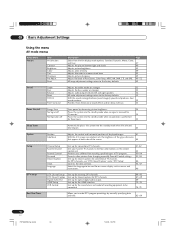
...be used for the manufacture and model of TV programs. Prevents other persons from the five display mode options; Sets up for closed captions for DTV channels. Sets up for closed captions ... Setup DTV Closed Caption Digital Audio Out i.LINK Setup VCR Control Sets up for on the remote control unit. Select the language to the factory defaults. Prevents your favorite TV channels to a... decreasing picture brightness. 54 Places the system into the standby mode when no signal is received for 15 minutes. 54 Places the system into the standby mode when no operation is ...
...be used for the manufacture and model of TV programs. Prevents other persons from the five display mode options; Sets up for closed captions for DTV channels. Sets up for closed captions ... Setup DTV Closed Caption Digital Audio Out i.LINK Setup VCR Control Sets up for on the remote control unit. Select the language to the factory defaults. Prevents your favorite TV channels to a... decreasing picture brightness. 54 Places the system into the standby mode when no signal is received for 15 minutes. 54 Places the system into the standby mode when no operation is ...

Owner's Manual
Page 40
Press to operate the menu. 09 Basic Adjustment Settings Menu operation keys Use the following keys on the remote control to select a menu item. HOME MENU: /: /: ENTER: RETURN: Press to lower menu levels. For some menu items, you can select parameters using these keys. ...
Press to operate the menu. 09 Basic Adjustment Settings Menu operation keys Use the following keys on the remote control to select a menu item. HOME MENU: /: /: ENTER: RETURN: Press to lower menu levels. For some menu items, you can select parameters using these keys. ...

Owner's Manual
Page 43
... to be registered, and then press ENTER. Press / to select ANT A or ANT B, and then press / to each of the four color buttons on the remote control unit (16 channels in total). To clear the channel registered at the current location, select "-" by pressing / and then press ENTER. • To register...
... to be registered, and then press ENTER. Press / to select ANT A or ANT B, and then press / to each of the four color buttons on the remote control unit (16 channels in total). To clear the channel registered at the current location, select "-" by pressing / and then press ENTER. • To register...

Owner's Manual
Page 55
... minutes. • Even when you start using the computer and a signal is received again, the system is switched on. • The system is switched on again by pressing STANDBY/ON on the Plasma Display or TVa on the remote control unit. 5 Press HOME MENU to exit the menu. Mode 2 •... Places the system into the (factory default) standby mode. Item Description Disable Does not place the system into the standby mode when no signal is received for eight seconds. ...
... minutes. • Even when you start using the computer and a signal is received again, the system is switched on. • The system is switched on again by pressing STANDBY/ON on the Plasma Display or TVa on the remote control unit. 5 Press HOME MENU to exit the menu. Mode 2 •... Places the system into the (factory default) standby mode. Item Description Disable Does not place the system into the standby mode when no signal is received for eight seconds. ...

