
Owner's Manual
Page 3
....com IMPORTANT NOTICE: The serial number for help. Increase the separation between the equipment and receiver. - Product Name: Plasma Display System (Plasma Display) (Media Receiver) Model Number: PDP-5040HD PDP-4340HD (PDP-504PU) (PDP-434PU) (PDP-R04U) (PDP-R04U) Product Category: Class B Personal Computers & Peripherals Responsible Party Name: PIONEER ELECTRONICS (USA), INC., Customer Support Div. English WARNING: THE APPARATUS IS NOT WATER- Wash hands after handling. Information to correct the interference by turning the equipment off and...
....com IMPORTANT NOTICE: The serial number for help. Increase the separation between the equipment and receiver. - Product Name: Plasma Display System (Plasma Display) (Media Receiver) Model Number: PDP-5040HD PDP-4340HD (PDP-504PU) (PDP-434PU) (PDP-R04U) (PDP-R04U) Product Category: Class B Personal Computers & Peripherals Responsible Party Name: PIONEER ELECTRONICS (USA), INC., Customer Support Div. English WARNING: THE APPARATUS IS NOT WATER- Wash hands after handling. Information to correct the interference by turning the equipment off and...

Owner's Manual
Page 4
... manually 62 Priority rules for future reference. 00 Contents Thank you have finished reading the instructions, put them away in the explanatory drawings. Please read through these operating instructions so you will know how to operate your favorite channels 43 Remote control unit 16 Setting up conventional TV channels 41 Using Auto Channel Preset 41 Plasma Display 13 Setting for buying this Pioneer product. After you for skipping unwanted channels 42 Media Receiver 14 Setting...
... manually 62 Priority rules for future reference. 00 Contents Thank you have finished reading the instructions, put them away in the explanatory drawings. Please read through these operating instructions so you will know how to operate your favorite channels 43 Remote control unit 16 Setting up conventional TV channels 41 Using Auto Channel Preset 41 Plasma Display 13 Setting for buying this Pioneer product. After you for skipping unwanted channels 42 Media Receiver 14 Setting...
Owner's Manual
Page 5
... 94 Reactivating the V-CHIP Block 94 Programming a password (AV mode only 95 Setting and changing the password 95 Resetting the password 96 13 Useful Features Learning function of the remote control unit 97 Presetting manufacture codes 97 Using the learning function 98 Using the remote control unit to control other devices 100 Receiver control buttons 100 Cable control buttons 101 SAT control buttons 102 VCR control buttons 103 DVD/DVR control buttons 104 14 Appendix Troubleshooting 106 Computer compatibility chart 107 Specifications 108 PDP5040HD-Eng (04-05) 5 5 En...
... 94 Reactivating the V-CHIP Block 94 Programming a password (AV mode only 95 Setting and changing the password 95 Resetting the password 96 13 Useful Features Learning function of the remote control unit 97 Presetting manufacture codes 97 Using the learning function 98 Using the remote control unit to control other devices 100 Receiver control buttons 100 Cable control buttons 101 SAT control buttons 102 VCR control buttons 103 DVD/DVR control buttons 104 14 Appendix Troubleshooting 106 Computer compatibility chart 107 Specifications 108 PDP5040HD-Eng (04-05) 5 5 En...

Owner's Manual
Page 6
... purchased. Malfunction can be displayed for a prolonged period of parts and accessories manufactured by many years to "STANDBY" mode. With the Pioneer PureVision PDP-5040HD/PDP-4340HD, you can be installed by using the Plasma Display System, always switch the display to come, please carefully read this rule. Over the course of its use of time. • When playing a game, the "GAME" mode setting within "AV SELECTION" is...
... purchased. Malfunction can be displayed for a prolonged period of parts and accessories manufactured by many years to "STANDBY" mode. With the Pioneer PureVision PDP-5040HD/PDP-4340HD, you can be installed by using the Plasma Display System, always switch the display to come, please carefully read this rule. Over the course of its use of time. • When playing a game, the "GAME" mode setting within "AV SELECTION" is...

Owner's Manual
Page 8
... electric shock and/or short internal parts. Improper adjustment of controls not described in the cabinet are not sure of the type of the following instructions when installing, operating and cleaning the product. Any noticeable abnormality in accidents. 7. However, improper use liquid cleaners or aerosol cleaners. 6. Cleaning-Unplug the power cord from resting on the specification label. Do not cover or block...
... electric shock and/or short internal parts. Improper adjustment of controls not described in the cabinet are not sure of the type of the following instructions when installing, operating and cleaning the product. Any noticeable abnormality in accidents. 7. However, improper use liquid cleaners or aerosol cleaners. 6. Cleaning-Unplug the power cord from resting on the specification label. Do not cover or block...

Owner's Manual
Page 12
... Display Power cord (2 m/6.6 feet) Cleaning cloth Speed clamp x 3 Bead band x 3 Media Receiver Warranty card Speaker cushion x 3 (Use when installing the optional speakers at the bottom of the Plasma Display.) Power cord (2 m/6.6 feet) Remote control unit System cable (3 m/9.8 feet) AA size battery x 2 (Alkaline battery) Stand Screw x 4 (for stand) Screw hole cap x 4 VCR controller x 1 (1.8 m/5.9 feet) Coaxial cable (0.15 m/0.49 feet) x 1 (Already set at the rear of the Media Receiver) Operating instruction • Always use the power cord supplied with the Plasma Display...
... Display Power cord (2 m/6.6 feet) Cleaning cloth Speed clamp x 3 Bead band x 3 Media Receiver Warranty card Speaker cushion x 3 (Use when installing the optional speakers at the bottom of the Plasma Display.) Power cord (2 m/6.6 feet) Remote control unit System cable (3 m/9.8 feet) AA size battery x 2 (Alkaline battery) Stand Screw x 4 (for stand) Screw hole cap x 4 VCR controller x 1 (1.8 m/5.9 feet) Coaxial cable (0.15 m/0.49 feet) x 1 (Already set at the rear of the Media Receiver) Operating instruction • Always use the power cord supplied with the Plasma Display...
Owner's Manual
Page 16
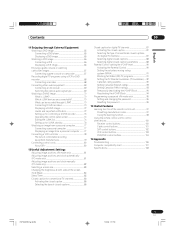
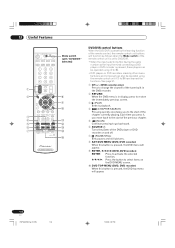
... DTV programs. 0 SPLIT: Switches the screen mode among 2- This button is used for details. @ 0 - 9: Sets the channel. # CH ENTER: Executes a channel number. $ VOL +/-: Sets the volume. % e MUTING: Mutes the sound. ^ HOME MENU: Displays the menu screen. & ENTER: Executes a command. * DTV GUIDE: Displays the DTV Electronic Program Guide (EPG). ( FAVORITE CH (A, B, C, D): Selects any of the Plasma Display. (DTV, i.LINK, INPUT 1, INPUT 2, INPUT 3, INPUT 4, PC) 4 •(dot): Enters a dot. 5 CH RETURN: Returns to the previous chan- 16 nel. 06 Part Names Remote control unit Mode switch...
... DTV programs. 0 SPLIT: Switches the screen mode among 2- This button is used for details. @ 0 - 9: Sets the channel. # CH ENTER: Executes a channel number. $ VOL +/-: Sets the volume. % e MUTING: Mutes the sound. ^ HOME MENU: Displays the menu screen. & ENTER: Executes a command. * DTV GUIDE: Displays the DTV Electronic Program Guide (EPG). ( FAVORITE CH (A, B, C, D): Selects any of the Plasma Display. (DTV, i.LINK, INPUT 1, INPUT 2, INPUT 3, INPUT 4, PC) 4 •(dot): Enters a dot. 5 CH RETURN: Returns to the previous chan- 16 nel. 06 Part Names Remote control unit Mode switch...

Owner's Manual
Page 18
07 Preparation Installing the Media receiver Plasma Display Media Receiver (vertical installation) (horizontal installation) System cable (approx. 3 meters/9.8 feet) • Do not place a VCR or any other device on top of the Media Receiver. • When installing, allow enough space on the sides and above the Media Receiver. • Do not block the side cooling vents or the rear ventilation fan opening of the Media Receiver. Over 5 cm (2 inches...
07 Preparation Installing the Media receiver Plasma Display Media Receiver (vertical installation) (horizontal installation) System cable (approx. 3 meters/9.8 feet) • Do not place a VCR or any other device on top of the Media Receiver. • When installing, allow enough space on the sides and above the Media Receiver. • Do not block the side cooling vents or the rear ventilation fan opening of the Media Receiver. Over 5 cm (2 inches...

Owner's Manual
Page 20
... Preparation Setting the system Connecting the system cable to the Plasma Display Plasma Display (rear view) (WHITE) (BLACK) For details on optional PIONEER speaker installation, refer to the Media Receiver Media Receiver (rear view) SERVICE ONLY IN OUT CONTROL VCR CONTROL IN OUT IN OUT S-VIDEO DIGITAL OUT OPTICAL INPUT 2 VIDEO R-AUDIO-L VIDEO (TS) S400 DTV-ANTENNA IN INPUT 1 R-AUDIO-L COMPONENT VIDEO Y CB/PB CR/PR A ANTENNA/CABLE B MONITOR OUT S-VIDEO VIDEO R-AUDIO-L S-VIDEO R-AUDIO-L INPUT 3 Y CB/PB CR/PR AC INLET BLACK WHITE SYSTEM CABLE...
... Preparation Setting the system Connecting the system cable to the Plasma Display Plasma Display (rear view) (WHITE) (BLACK) For details on optional PIONEER speaker installation, refer to the Media Receiver Media Receiver (rear view) SERVICE ONLY IN OUT CONTROL VCR CONTROL IN OUT IN OUT S-VIDEO DIGITAL OUT OPTICAL INPUT 2 VIDEO R-AUDIO-L VIDEO (TS) S400 DTV-ANTENNA IN INPUT 1 R-AUDIO-L COMPONENT VIDEO Y CB/PB CR/PR A ANTENNA/CABLE B MONITOR OUT S-VIDEO VIDEO R-AUDIO-L S-VIDEO R-AUDIO-L INPUT 3 Y CB/PB CR/PR AC INLET BLACK WHITE SYSTEM CABLE...

Owner's Manual
Page 29
... 7/24/03, 1:58 PM Or the power cords have been disconnected. The system is off. Or the power cord has been disconnected from the Media Receiver. Basic Operations 08 English Turning off the power 1 Press TV a on the remote control unit or STANDBY/ON on the Plasma Display. • The system enters the standby mode and the image on the screen disappears. • Both STANDBY indicators light up red. • It is...
... 7/24/03, 1:58 PM Or the power cords have been disconnected. The system is off. Or the power cord has been disconnected from the Media Receiver. Basic Operations 08 English Turning off the power 1 Press TV a on the remote control unit or STANDBY/ON on the Plasma Display. • The system enters the standby mode and the image on the screen disappears. • Both STANDBY indicators light up red. • It is...
Owner's Manual
Page 38
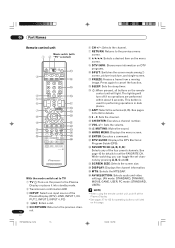
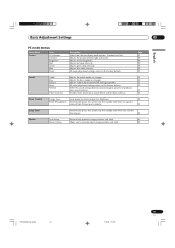
... Pro Adjust Reset Sound Treble Bass Balance Reset FOCUS Front Surround Description Select from changing especially Parental Control settings. Sets your children from watching specified types of the screen. 84 Setup DTV Setup Rec/View Timer Channel Setup Favorite Channel Parental Control Password Closed Caption Clock Language Sets up for DTV channels. Sets up for the manufacture and model of PureCinema, Color Temp, MPEG NR, DNR, CTI, and DRE. Adjusts the levels of recording equipment to make DTV program presettings...
... Pro Adjust Reset Sound Treble Bass Balance Reset FOCUS Front Surround Description Select from changing especially Parental Control settings. Sets your children from watching specified types of the screen. 84 Setup DTV Setup Rec/View Timer Channel Setup Favorite Channel Parental Control Password Closed Caption Clock Language Sets up for DTV channels. Sets up for the manufacture and model of PureCinema, Color Temp, MPEG NR, DNR, CTI, and DRE. Adjusts the levels of recording equipment to make DTV program presettings...
Owner's Manual
Page 39
.... 53 Power Control Energy Save Saves power by decreasing picture brightness. 54 Power Management Automatically places the system into the standby mode when the selected time elapses. 85 Option Auto Setup Automatically optimizes image positions and clock. 81 Manual Setup Allows you to the factory defaults. Adjusts red color intensity. Page 47 49 49 49 49 49 49 Sound Treble Bass Balance Reset FOCUS Front Surround Adjusts the treble...
.... 53 Power Control Energy Save Saves power by decreasing picture brightness. 54 Power Management Automatically places the system into the standby mode when the selected time elapses. 85 Option Auto Setup Automatically optimizes image positions and clock. 81 Manual Setup Allows you to the factory defaults. Adjusts red color intensity. Page 47 49 49 49 49 49 49 Sound Treble Bass Balance Reset FOCUS Front Surround Adjusts the treble...
Owner's Manual
Page 65
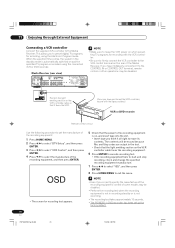
... external equipment, select the input source using the INPUT buttons on the remote control (page 16) or the INPUT button on the Plasma Display. • To protect all equipment, always turn off the system before connecting to a DVD player, VCR, personal computer, game console, camcorder, or other audiovisual equipment. PDP5040HD-Eng (65-80) 65 65 En 7/24/03, 2:00 PM AV cable (commercially available) Media Receiver (rear view) SERVICE...
... external equipment, select the input source using the INPUT buttons on the remote control (page 16) or the INPUT button on the Plasma Display. • To protect all equipment, always turn off the system before connecting to a DVD player, VCR, personal computer, game console, camcorder, or other audiovisual equipment. PDP5040HD-Eng (65-80) 65 65 En 7/24/03, 2:00 PM AV cable (commercially available) Media Receiver (rear view) SERVICE...
Owner's Manual
Page 70
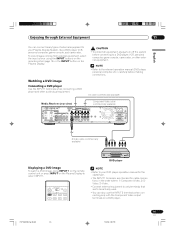
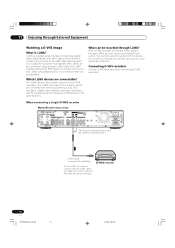
... use i.LINK, you need to two i.LINK compatible devices (in the specifications. The i.LINK terminals on this system supports only D-VHS recorders. 11 Enjoying through External Equipment Watching a D-VHS image What is a digital serial interface for handling digital video, digital audio, and other equipment such as DVD recorders, digital video cameras, personal computers, and PC peripheral devices because of up to connect only an i.LINK cable; When connecting a single D-VHS recorder Media Receiver (rear view) SERVICE ONLY IN OUT CONTROL VCR CONTROL...
... use i.LINK, you need to two i.LINK compatible devices (in the specifications. The i.LINK terminals on this system supports only D-VHS recorders. 11 Enjoying through External Equipment Watching a D-VHS image What is a digital serial interface for handling digital video, digital audio, and other equipment such as DVD recorders, digital video cameras, personal computers, and PC peripheral devices because of up to connect only an i.LINK cable; When connecting a single D-VHS recorder Media Receiver (rear view) SERVICE ONLY IN OUT CONTROL VCR CONTROL...

Owner's Manual
Page 72
... copy-restricted video, audio, and other data to change the setting for your D-VHS recorder. You cannot use D-VHS tape. 11 Enjoying through External Equipment Displaying a D-VHS image To watch a D-VHS image, press i.LINK on the remote control unit or press INPUT on the Plasma Display to 67. • This system supports the Digital Transmission Content Protection (DTCP) technology. Precautions • While one i.LINK device to display images and output sound. • To record digital TV programs using...
... copy-restricted video, audio, and other data to change the setting for your D-VHS recorder. You cannot use D-VHS tape. 11 Enjoying through External Equipment Displaying a D-VHS image To watch a D-VHS image, press i.LINK on the remote control unit or press INPUT on the Plasma Display to 67. • This system supports the Digital Transmission Content Protection (DTCP) technology. Precautions • While one i.LINK device to display images and output sound. • To record digital TV programs using...
Owner's Manual
Page 74
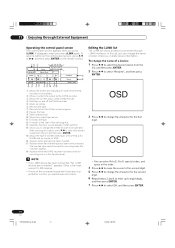
... program. 8 Pauses the tape. 9 Starts playing back. 0 Stops the current tape motion. - After pressing this button, press / to be used for recording when this list, you press i.LINK. Editing the i.LINK list The i.LINK list shows all devices connected through External Equipment Operating the control panel screen The control panel screen appears when you can select A to Z, 0 to 9, special codes, and space in the standby mode. In this indicator appears. % Appears when the D-VHS recorder...
... program. 8 Pauses the tape. 9 Starts playing back. 0 Stops the current tape motion. - After pressing this button, press / to be used for recording when this list, you press i.LINK. Editing the i.LINK list The i.LINK list shows all devices connected through External Equipment Operating the control panel screen The control panel screen appears when you can select A to Z, 0 to 9, special codes, and space in the standby mode. In this indicator appears. % Appears when the D-VHS recorder...
Owner's Manual
Page 78
... S-VIDEO DIGITAL OUT OPTICAL INPUT 2 VIDEO R-AUDIO-L VIDEO (TS) S400 DTV-ANTENNA IN INPUT 1 R-AUDIO-L COMPONENT VIDEO Y CB/PB CR/PR A ANTENNA/CABLE B MONITOR OUT S-VIDEO VIDEO R-AUDIO-L S-VIDEO R-AUDIO-L INPUT 3 Y CB/PB CR/PR AC INLET BLACK WHITE SYSTEM CABLE • Make sure to leave the VCR power on when presetting TV programs for recording with the tape provided.) VCR or DVD recorder Remote control sensor Use the following procedure to the Media Receiver. The contents will be erased because Rec and Stop codes...
... S-VIDEO DIGITAL OUT OPTICAL INPUT 2 VIDEO R-AUDIO-L VIDEO (TS) S400 DTV-ANTENNA IN INPUT 1 R-AUDIO-L COMPONENT VIDEO Y CB/PB CR/PR A ANTENNA/CABLE B MONITOR OUT S-VIDEO VIDEO R-AUDIO-L S-VIDEO R-AUDIO-L INPUT 3 Y CB/PB CR/PR AC INLET BLACK WHITE SYSTEM CABLE • Make sure to leave the VCR power on when presetting TV programs for recording with the tape provided.) VCR or DVD recorder Remote control sensor Use the following procedure to the Media Receiver. The contents will be erased because Rec and Stop codes...

Owner's Manual
Page 80
... allows linked operations with mini plugs (no resistance). 7/24/03, 6:17 PM SR+ presents functions such as the input switch linkage operation function and the DSP surround mode display function. About SR+ The CONTROL OUT terminal on the Plasma Display when operating the connected equipment. 11 Enjoying through SR+, the volume on this system is turned off when making connections. • Complete all component connections before making control cord connections. Face the remote control units to the remote control sensor on the Media Receiver.
... allows linked operations with mini plugs (no resistance). 7/24/03, 6:17 PM SR+ presents functions such as the input switch linkage operation function and the DSP surround mode display function. About SR+ The CONTROL OUT terminal on the Plasma Display when operating the connected equipment. 11 Enjoying through SR+, the volume on this system is turned off when making connections. • Complete all component connections before making control cord connections. Face the remote control units to the remote control sensor on the Media Receiver.
Owner's Manual
Page 104
... change the channel of the tuner built in the DVD recorder. 2 RETURN When the DVD menu is in display, press to restore the immediately previous screen. 3 I (PLAY) Selects playback. 4 T (CHAPTER SEARCH) Pressing quickly once takes you move back to the start of the remote control unit is pressed, these players can also be operated using the remote control unit if 1 to DVD/DVR. • When the input selector button having the same number...
... change the channel of the tuner built in the DVD recorder. 2 RETURN When the DVD menu is in display, press to restore the immediately previous screen. 3 I (PLAY) Selects playback. 4 T (CHAPTER SEARCH) Pressing quickly once takes you move back to the start of the remote control unit is pressed, these players can also be operated using the remote control unit if 1 to DVD/DVR. • When the input selector button having the same number...

Owner's Manual
Page 106
..., operate the system after first turning the power of the Plasma Display and the Media Receiver, or unplugging the power cord and re-plugging it under strong or fluorescent lighting? • Is a fluorescent light illuminated near the remote control sensor? • No image and audio is presented. • Check if the input source for video or PC has been unintentionally selected although you want to watch a TV channel...
..., operate the system after first turning the power of the Plasma Display and the Media Receiver, or unplugging the power cord and re-plugging it under strong or fluorescent lighting? • Is a fluorescent light illuminated near the remote control sensor? • No image and audio is presented. • Check if the input source for video or PC has been unintentionally selected although you want to watch a TV channel...


