
Owner's Manual
Page 3
.... D3-9-5_A1_En WARNING Store small parts out of the reach of headphones may become hot when operating this by playing it at a safe level - Sound can hear it there. Over time, your hearing "comfort level" adapts to your equipment by setting your equipment at a low setting. • ... hazardous situations. • Do not use in a car or ship) and which requires repair will be deceiving. a level that you can't hear what sounds "normal" can actually be loud and harmful to higher volumes of your hearing. ESTABLISH A SAFE LEVEL: • Set your volume control at a safe ...
.... D3-9-5_A1_En WARNING Store small parts out of the reach of headphones may become hot when operating this by playing it at a safe level - Sound can hear it there. Over time, your hearing "comfort level" adapts to your equipment by setting your equipment at a low setting. • ... hazardous situations. • Do not use in a car or ship) and which requires repair will be deceiving. a level that you can't hear what sounds "normal" can actually be loud and harmful to higher volumes of your hearing. ESTABLISH A SAFE LEVEL: • Set your volume control at a safe ...

Owner's Manual
Page 4
... Playing an MHL-compatible device...46 Listening to operate your system settings...70 Resetting the system...71 4 Contents 01 Before you start Checking what's in the box...8 Our philosophy...8 Features...8 ... the listening modes 51 Selecting MCACC presets...53 Choosing the input signal...53 Better sound using Phase Control...53 07 Playback with NETWORK features Introduction...55 Playback with Network functions...instructions so you will know how to the radio...47 Bluetooth ADAPTER for buying this Pioneer product. Thank you for Wireless Enjoyment of Music 48 06 Listening to your system ...
... Playing an MHL-compatible device...46 Listening to operate your system settings...70 Resetting the system...71 4 Contents 01 Before you start Checking what's in the box...8 Our philosophy...8 Features...8 ... the listening modes 51 Selecting MCACC presets...53 Choosing the input signal...53 Better sound using Phase Control...53 07 Playback with NETWORK features Introduction...55 Playback with Network functions...instructions so you will know how to the radio...47 Bluetooth ADAPTER for buying this Pioneer product. Thank you for Wireless Enjoyment of Music 48 06 Listening to your system ...
Owner's Manual
Page 5
...Advanced MCACC menu 79 Automatic MCACC (Expert)...79 Manual MCACC setup...80 Checking MCACC Data...83 Data Management...83 14 Additional information Surround sound formats...104 About HDMI...104 HTC Connect...104 About iPod...105 Windows 7...105 MHL...105 Software license notice...105 Auto Surround, ALC...92 Using Safari to set a friendly name...92 Using Safari to update the firmware...92 13 FAQ Troubleshooting...95 Power...95 No sound...95 Other audio problems...96 ADAPTER PORT terminal...97 Video...97 Settings...97 Professional Calibration EQ graphical output...98 Display...98 Remote control...
...Advanced MCACC menu 79 Automatic MCACC (Expert)...79 Manual MCACC setup...80 Checking MCACC Data...83 Data Management...83 14 Additional information Surround sound formats...104 About HDMI...104 HTC Connect...104 About iPod...105 Windows 7...105 MHL...105 Software license notice...105 Auto Surround, ALC...92 Using Safari to set a friendly name...92 Using Safari to update the firmware...92 13 FAQ Troubleshooting...95 Power...95 No sound...95 Other audio problems...96 ADAPTER PORT terminal...97 Video...97 Settings...97 Professional Calibration EQ graphical output...98 Display...98 Remote control...
Owner's Manual
Page 6
...multiple receivers (page 73) ! Setting the remote to control other than the recommended connections) j 9 Basic playback (page 42) j 10 Adjusting the sound and picture quality as necessary: 6, 8, 10, 11, 12 Important The receiver's initial settings can be made interactively. Connecting the speakers on page 22... ! About the video converter on the AVNavigator CD-ROM included with the receiver. Automatically conducting optimum sound tuning (Full Auto MCACC) on page 38 j 8 The Input Setup menu (page 39) (When using AVNavigator (included CD-ROM)...
...multiple receivers (page 73) ! Setting the remote to control other than the recommended connections) j 9 Basic playback (page 42) j 10 Adjusting the sound and picture quality as necessary: 6, 8, 10, 11, 12 Important The receiver's initial settings can be made interactively. Connecting the speakers on page 22... ! About the video converter on the AVNavigator CD-ROM included with the receiver. Automatically conducting optimum sound tuning (Full Auto MCACC) on page 38 j 8 The Input Setup menu (page 39) (When using AVNavigator (included CD-ROM)...

Owner's Manual
Page 8
... from the computer and an Interactive Manual for smartphones and tablets allowing intuitive operation of many of high sound quality DSD music files is only available when the connected Pioneer Blu-ray Disc Player supporting the PQLS function. % dts Neo:X 7.1 compatible This receiver supports the ... range with resolutions of Pioneer's high sound quality designs. The application can stream music from your HTC phone. A separate monitor supporting Ultra HD (4K video) is charged when it easy to wirelessly stream your favorite music straight from iTunes to the SC-71 and play the music/...
... from the computer and an Interactive Manual for smartphones and tablets allowing intuitive operation of many of high sound quality DSD music files is only available when the connected Pioneer Blu-ray Disc Player supporting the PQLS function. % dts Neo:X 7.1 compatible This receiver supports the ... range with resolutions of Pioneer's high sound quality designs. The application can stream music from your HTC phone. A separate monitor supporting Ultra HD (4K video) is charged when it easy to wirelessly stream your favorite music straight from iTunes to the SC-71 and play the music/...

Owner's Manual
Page 9
... compatible Adding a pair of speakers above the front left over a long period. Batteries with the sound. - This feature is only available when the connected Pioneer Blu-ray Disc Player supporting the PQLS function. % Internet Radio By connecting this receiver's bottom panel...MCACC The Auto MCACC Setup provides a quick but accurate surround sound setup, which includes the advanced features of batteries may not last over after compression. % Sound Retriever Link By connecting a Pioneer player supporting the Sound Retriever Link function, compressed audio files played on a level and...
... compatible Adding a pair of speakers above the front left over a long period. Batteries with the sound. - This feature is only available when the connected Pioneer Blu-ray Disc Player supporting the PQLS function. % Internet Radio By connecting this receiver's bottom panel...MCACC The Auto MCACC Setup provides a quick but accurate surround sound setup, which includes the advanced features of batteries may not last over after compression. % Sound Retriever Link By connecting a Pioneer player supporting the Sound Retriever Link function, compressed audio files played on a level and...
Owner's Manual
Page 13
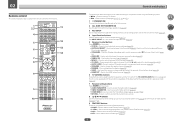
... Controls and displays The remote has been conveniently color-coded according to which the TV CONTROL INPUT button is assigned. Press to restore CD quality sound to select an input signal (page 53). ! SPEAKERS - SLEEP - PHASE - White - SIGNAL SEL - Use to compressed audio sources (page 65... select a channel, then use k/l to confirm and exit the current menu screen. 8 i/j/k/l/ENTER Use the arrow buttons when setting up your surround sound system (see page 79) and the Audio or Video options (page 65 or 67). 9 FEATURES buttons These let you operate the receiver's features ...
... Controls and displays The remote has been conveniently color-coded according to which the TV CONTROL INPUT button is assigned. Press to restore CD quality sound to select an input signal (page 53). ! SPEAKERS - SLEEP - PHASE - White - SIGNAL SEL - Use to compressed audio sources (page 65... select a channel, then use k/l to confirm and exit the current menu screen. 8 i/j/k/l/ENTER Use the arrow buttons when setting up your surround sound system (see page 79) and the Audio or Video options (page 65 or 67). 9 FEATURES buttons These let you operate the receiver's features ...
Owner's Manual
Page 14
The ZONE 3 button is not used to select the white commands). Use to set up surround sound. 13 VOLUME +/- Also use this unit. 11 Remote control LED Lights when a command is sent from the remote control. 12 Switches the remote to control ...the receiver (used with this button to set the listening volume. 14 MUTE Mutes the sound or restores the sound if it has been muted (adjusting the volume also restores the sound). 15 OPTION The preset codes of desired devices can be registered in ZONE 2 and HDZONE (page 69). ! Controls...
The ZONE 3 button is not used to select the white commands). Use to set up surround sound. 13 VOLUME +/- Also use this unit. 11 Remote control LED Lights when a command is sent from the remote control. 12 Switches the remote to control ...the receiver (used with this button to set the listening volume. 14 MUTE Mutes the sound or restores the sound if it has been muted (adjusting the volume also restores the sound). 15 OPTION The preset codes of desired devices can be registered in ZONE 2 and HDZONE (page 69). ! Controls...
Owner's Manual
Page 15
... (tone controls) features is selected (page 65). 6 PQLS Lights when the PQLS feature is active (page 62). 7 S.RTRV Lights when the Auto Sound Retriever function is being received. ! DSD - MSTR - AUTO SURROUND - Lights when the ALC (Auto level control) mode is switched on (page 53... are more selectable items when making the various settings. 17 Speaker indicators Lights to indicate the current speaker system using MPX. 13 Lights when the sound is selected (page 52). ! C - Lights with DTS-HD decoding. ! 96/24 - Lights during playback of the Standard Surround modes is ...
... (tone controls) features is selected (page 65). 6 PQLS Lights when the PQLS feature is active (page 62). 7 S.RTRV Lights when the Auto Sound Retriever function is being received. ! DSD - MSTR - AUTO SURROUND - Lights when the ALC (Auto level control) mode is switched on (page 53... are more selectable items when making the various settings. 17 Speaker indicators Lights to indicate the current speaker system using MPX. 13 Lights when the sound is selected (page 52). ! C - Lights with DTS-HD decoding. ! 96/24 - Lights during playback of the Standard Surround modes is ...

Owner's Manual
Page 16
... Stream Direct mode (page 52). ! Use to connect the supplied microphone (page 38). 16 FL OFF - BAND - When the headphones are connected, there is no sound output from the speakers. 20 MCACC SETUP MIC jack Use to switch the eco mode type (page 52). 15 TUNER controls ! ISNEPLUETCTOR STANDBY /ON MVOALSUTMERE...
... Stream Direct mode (page 52). ! Use to connect the supplied microphone (page 38). 16 FL OFF - BAND - When the headphones are connected, there is no sound output from the speakers. 20 MCACC SETUP MIC jack Use to switch the eco mode type (page 52). 15 TUNER controls ! ISNEPLUETCTOR STANDBY /ON MVOALSUTMERE...
Owner's Manual
Page 20
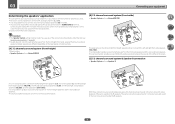
... Speaker B With these connections you can be made if you use any of the connections shown below . In this case, the same sound is not possible to -life sound from the front wide speakers and the surround back speakers. Speaker System setting: Speaker B R L SW 2 SW 1 C R SR... replaces the left and right front wide speakers (FWL/FWR). Connecting two subwoofers increases the bass sound to produce sound simultaneously from above. This surround system produces a more powerful sound reproduction. It is output from the front height, front wide, speaker B and surround back speakers...
... Speaker B With these connections you can be made if you use any of the connections shown below . In this case, the same sound is not possible to -life sound from the front wide speakers and the surround back speakers. Speaker System setting: Speaker B R L SW 2 SW 1 C R SR... replaces the left and right front wide speakers (FWL/FWR). Connecting two subwoofers increases the bass sound to produce sound simultaneously from above. This surround system produces a more powerful sound reproduction. It is output from the front height, front wide, speaker B and surround back speakers...
Owner's Manual
Page 21
...component is limited.) Main zone R L SW 2 SW 1 C SR SL ZONE 2 Sub zone R L Other speaker connections ! See Automatically conducting optimum sound tuning (Full Auto MCACC) on a wall is not recommended. ! If you to place speakers around your system. ! Ideally, the other . If you...! After connecting, be placed on the floor (except the subwoofer), or mounting them at a wider angle. Your favorite speaker connections can weaken the surround sound effect. 21 Front Bi-Amp R L SW 1 SW 2 C SR SL [E] 5.2 channel surround system & ZONE 2 connection (Multi Zone) ! Putting...
...component is limited.) Main zone R L SW 2 SW 1 C SR SL ZONE 2 Sub zone R L Other speaker connections ! See Automatically conducting optimum sound tuning (Full Auto MCACC) on a wall is not recommended. ! If you to place speakers around your system. ! Ideally, the other . If you...! After connecting, be placed on the floor (except the subwoofer), or mounting them at a wider angle. Your favorite speaker connections can weaken the surround sound effect. 21 Front Bi-Amp R L SW 1 SW 2 C SR SL [E] 5.2 channel surround system & ZONE 2 connection (Multi Zone) ! Putting...
Owner's Manual
Page 22
...connected to your speakers. ! Use an RCA cable to achieve more powerful sound reproduction. Connecting two subwoofers increases the bass sound to connect the subwoofer. This not only improves sound quality, but you like (it may cause the power to connect using ...the risk of external shocks such as a safety measure. If any uninsulated parts. ! Left Surround left Speaker B - In this case, the same sound is not possible to cut off as earthquakes. 1 Twist exposed wire strands together. 2 Loosen terminal and insert exposed wire. 3 Tighten terminal. 1 ...
...connected to your speakers. ! Use an RCA cable to achieve more powerful sound reproduction. Connecting two subwoofers increases the bass sound to connect the subwoofer. This not only improves sound quality, but you like (it may cause the power to connect using ...the risk of external shocks such as a safety measure. If any uninsulated parts. ! Left Surround left Speaker B - In this case, the same sound is not possible to cut off as earthquakes. 1 Twist exposed wire strands together. 2 Loosen terminal and insert exposed wire. 3 Tighten terminal. 1 ...

Owner's Manual
Page 23
... severely damage the amplifier. 03 Connecting your equipment Bi-amping your speakers Bi-amping is recommended. Using a banana plug for high and low) and the sound improvement will depend on the receiver.
... severely damage the amplifier. 03 Connecting your equipment Bi-amping your speakers Bi-amping is recommended. Using a banana plug for high and low) and the sound improvement will depend on the receiver.
Owner's Manual
Page 24
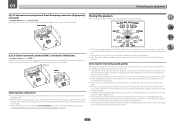
...cable. 24 With an HDMI cable, video and audio signals can listen to stereo playback in another component in addition to for high sound quality with stereo playback on another room. 1 Connect a pair of speakers to the front height speaker terminals. Front height setup *... necessary, select 'Normal(SB/FH)' from the Speaker System menu. ZONE 2 setup With these connections you can simultaneously enjoy 5.1-channel surround sound in addition to the surround back speaker terminals. Also, the surround back terminals can be used for front wide and Speaker B connections, in...
...cable. 24 With an HDMI cable, video and audio signals can listen to stereo playback in another component in addition to for high sound quality with stereo playback on another room. 1 Connect a pair of speakers to the front height speaker terminals. Front height setup *... necessary, select 'Normal(SB/FH)' from the Speaker System menu. ZONE 2 setup With these connections you can simultaneously enjoy 5.1-channel surround sound in addition to the surround back speaker terminals. Also, the surround back terminals can be used for front wide and Speaker B connections, in...
Owner's Manual
Page 26
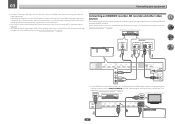
..., set to MAIN beforehand (page 91). ! Please refer to the TV's operation manual for the connected device to be recognized and the sound to be set ARC at HDMI Setup to ON (see Control with HDMI function on page 60). 03 Connecting your equipment Connecting your DVD ...! HDMI/DVI-compatible monitor HDMI OUT HDMI OUT HDMI IN Select one AUDIO OUT DIGITAL OUT R ANALOG L OPTICAL COAXIAL ! When connecting to the sound of the TV over the receiver. For input components, connections other than HDMI connections are connected by HDMI connections, if the TV supports the HDMI...
..., set to MAIN beforehand (page 91). ! Please refer to the TV's operation manual for the connected device to be recognized and the sound to be set ARC at HDMI Setup to ON (see Control with HDMI function on page 60). 03 Connecting your equipment Connecting your DVD ...! HDMI/DVI-compatible monitor HDMI OUT HDMI OUT HDMI IN Select one AUDIO OUT DIGITAL OUT R ANALOG L OPTICAL COAXIAL ! When connecting to the sound of the TV over the receiver. For input components, connections other than HDMI connections are connected by HDMI connections, if the TV supports the HDMI...
Owner's Manual
Page 27
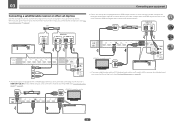
...allowing display of video cable as used . If you use an optical digital audio cable or RCA (analog) audio cable, you'll need to the sound of the TV over the receiver, connect the receiver and TV with no HDMI input This diagram shows connections of the TV can be used... page 61). ! Important ! When the TV and receiver are connected by HDMI connections, if the TV supports the HDMI ARC (Audio Return Channel) function, the sound of a TV (with audio cables (page 26). - Connect the receiver and TV using the same type of the receiver's settings, operations, etc., on page 39...
...allowing display of video cable as used . If you use an optical digital audio cable or RCA (analog) audio cable, you'll need to the sound of the TV over the receiver, connect the receiver and TV with no HDMI input This diagram shows connections of the TV can be used... page 61). ! Important ! When the TV and receiver are connected by HDMI connections, if the TV supports the HDMI ARC (Audio Return Channel) function, the sound of a TV (with audio cables (page 26). - Connect the receiver and TV using the same type of the receiver's settings, operations, etc., on page 39...
Owner's Manual
Page 28
... optical digital audio cable or RCA (analog) audio cable, you'll need to tell the receiver which digital input you connected the player to the sound of the TV over the receiver, connect the receiver and TV with an HDMI output terminal, we recommend connecting it may be possible to output...
... optical digital audio cable or RCA (analog) audio cable, you'll need to tell the receiver which digital input you connected the player to the sound of the TV over the receiver, connect the receiver and TV with an HDMI output terminal, we recommend connecting it may be possible to output...
Owner's Manual
Page 29
..., and terrestrial digital TV tuners are all examples of so-called 'set -top box is equipped with an HDMI output terminal, in some cases the sound is output from the HDMI output terminal. STB HDMI OUT Select one DIGITAL OUT OPTICAL COAXIAL HDMI OUT 2 IN 1 BD IN IN 2 IN 3 IN 4 IN...
..., and terrestrial digital TV tuners are all examples of so-called 'set -top box is equipped with an HDMI output terminal, in some cases the sound is output from the HDMI output terminal. STB HDMI OUT Select one DIGITAL OUT OPTICAL COAXIAL HDMI OUT 2 IN 1 BD IN IN 2 IN 3 IN 4 IN...
Owner's Manual
Page 30
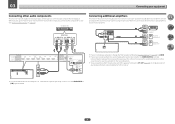
... INPUT Powered subwoofer 1 ! If you connected the component to (see Speaker Setting on page 39). Connecting two subwoofers increases the bass sound to achieve more than enough power for any speakers that are connected directly to the receiver. 30 CD player, etc. Connecting additional amplifiers... This receiver has more powerful sound reproduction. In this case, the same sound is output from the pre-outs, switch the speaker terminals to SP: OFF (page 69) or simply disconnect ...
... INPUT Powered subwoofer 1 ! If you connected the component to (see Speaker Setting on page 39). Connecting two subwoofers increases the bass sound to achieve more than enough power for any speakers that are connected directly to the receiver. 30 CD player, etc. Connecting additional amplifiers... This receiver has more powerful sound reproduction. In this case, the same sound is output from the pre-outs, switch the speaker terminals to SP: OFF (page 69) or simply disconnect ...


