Owner's Manual
Page 16
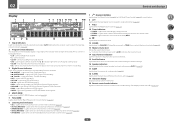
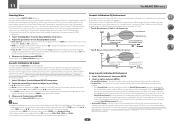
... ). 13 Master volume level Shows the overall volume level. XC - Lights when a stereo FM broadcast is switched on . 8 ATT Lights when the input signal level is lowered to indicate the currently selected input signal. 02 Controls and displays Display 1 2 3 4 5 6 7 8 9 10 11 12 13 14 15 AUTO L C HDMI DIGITAL ANALOG SL XL XC LFE AUTO SURROUND STREAM DIRECT R DIGITAL PLUS DSD PCM FULL BAND SR TrueHD MULTI-ZONE PQLS ALC DTS HD ES 96/24 S.RTRV SOUND UP MIX XR MSTR CD TUNER iPod DVD TV...
... ). 13 Master volume level Shows the overall volume level. XC - Lights when a stereo FM broadcast is switched on . 8 ATT Lights when the input signal level is lowered to indicate the currently selected input signal. 02 Controls and displays Display 1 2 3 4 5 6 7 8 9 10 11 12 13 14 15 AUTO L C HDMI DIGITAL ANALOG SL XL XC LFE AUTO SURROUND STREAM DIRECT R DIGITAL PLUS DSD PCM FULL BAND SR TrueHD MULTI-ZONE PQLS ALC DTS HD ES 96/24 S.RTRV SOUND UP MIX XR MSTR CD TUNER iPod DVD TV...
Owner's Manual
Page 17
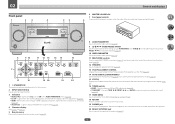
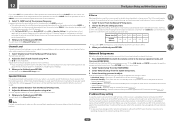
... MCACC PRO FL OFF HDMI iPod iPhone MASTER VOLUME 8 9 10 11 12 13 14 15 16 AUDIO PARAMETER TUNE VIDEO PARAMETER ZONE 2 ON/OFF MULTI-ZONE CONTROL SPEAKERS iPod iPhone DIRECT CONTROL AUTO/ALC/ DIRECT STATUS BAND TUNER EDIT ZONE 3 ENTER ON/OFF 7 PRESET PRESET HOME MENU RETURN HDZONE ON/OFF PHONES MCACC SETUP MIC TUNE (HDMI) 5V 1 A HDMI 5 INPUT 17 18 19 20 21 22 1 u STANDBY/ON This switches between standby and on the display (page 87 ). 16 TUNER controls ! MCACC PRO - Lights when "off" (nothing displayed) is connected...
... MCACC PRO FL OFF HDMI iPod iPhone MASTER VOLUME 8 9 10 11 12 13 14 15 16 AUDIO PARAMETER TUNE VIDEO PARAMETER ZONE 2 ON/OFF MULTI-ZONE CONTROL SPEAKERS iPod iPhone DIRECT CONTROL AUTO/ALC/ DIRECT STATUS BAND TUNER EDIT ZONE 3 ENTER ON/OFF 7 PRESET PRESET HOME MENU RETURN HDZONE ON/OFF PHONES MCACC SETUP MIC TUNE (HDMI) 5V 1 A HDMI 5 INPUT 17 18 19 20 21 22 1 u STANDBY/ON This switches between standby and on the display (page 87 ). 16 TUNER controls ! MCACC PRO - Lights when "off" (nothing displayed) is connected...
Owner's Manual
Page 51
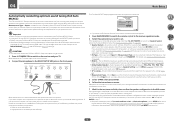
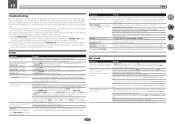
... speaker system selection screen appears. ZONE 2 ON/OFF MULTI-ZONE CONTROL SPEAKERS iPod iPhone DIRECT CONTROL AUTO/ALC/ DIRECT STATUS BAND ZONE 3 ON/OFF HDZONE ON/OFF PHONES MCACC SETUP MIC (HDMI) 5V 1 A HDMI 5 INPUT TUNER EDIT Microphone Tripod Make sure there are no operations are planning on page 101) . ! The Full Auto MCACC display appears once the microphone is switched on and set to a comfortable volume level. 7 Wait for ambient noise (see Automatic MCACC (Expert) on -screen while the receiver outputs test tones...
... speaker system selection screen appears. ZONE 2 ON/OFF MULTI-ZONE CONTROL SPEAKERS iPod iPhone DIRECT CONTROL AUTO/ALC/ DIRECT STATUS BAND ZONE 3 ON/OFF HDZONE ON/OFF PHONES MCACC SETUP MIC (HDMI) 5V 1 A HDMI 5 INPUT TUNER EDIT Microphone Tripod Make sure there are no operations are planning on page 101) . ! The Full Auto MCACC display appears once the microphone is switched on and set to a comfortable volume level. 7 Wait for ambient noise (see Automatic MCACC (Expert) on -screen while the receiver outputs test tones...
Owner's Manual
Page 52
... System Setup menu. 4.System Setup A/V RECEIVER a . Check for other inputs can change the DVD input function's Audio In setting from your room, sometimes identical speakers with cone sizes of around 12 cm (5 inches) will be output from this seems to be happening, switch off the power and check the speaker connections. With factory default settings, the on-screen display will end up your TV. Network Setup e . Other Setup 4b.Input Setup A/V RECEIVER Input Input Name Input Skip : DVD : Rename : OFF Audio In : HDMI Input : Component...
... System Setup menu. 4.System Setup A/V RECEIVER a . Check for other inputs can change the DVD input function's Audio In setting from your room, sometimes identical speakers with cone sizes of around 12 cm (5 inches) will be output from this seems to be happening, switch off the power and check the speaker connections. With factory default settings, the on-screen display will end up your TV. Network Setup e . Other Setup 4b.Input Setup A/V RECEIVER Input Input Name Input Skip : DVD : Rename : OFF Audio In : HDMI Input : Component...
Owner's Manual
Page 56
... (adjusting the volume also restores the sound). % Press MUTE. For such sound sources as a DVD disc) with the default listening mode. With factory default settings, the on different ways of your DVD player or digital satellite receiver. See also Listening to sources. For details, see Auto Surround, ALC and Stream Direct with HDMI connection % Use ALL to select the input function connected to the input signal and listening mode, check the connections and settings. 4 Use the VOLUME +/- You can use an analog video connection. 56 If the display does...
... (adjusting the volume also restores the sound). % Press MUTE. For such sound sources as a DVD disc) with the default listening mode. With factory default settings, the on different ways of your DVD player or digital satellite receiver. See also Listening to sources. For details, see Auto Surround, ALC and Stream Direct with HDMI connection % Use ALL to select the input function connected to the input signal and listening mode, check the connections and settings. 4 Use the VOLUME +/- You can use an analog video connection. 56 If the display does...

Owner's Manual
Page 64
... your speaker setup and the type of source you're playing and selects multichannel or stereo playback as Dolby Pro Logic II, Pro Logic IIx, and Pro Logic IIz, and uses an approach to upmixing that are adjusted to 2-channel sources in surround sound. Dolby Surround replaces current channel-based upmixing technologies, such as necessary. % While listening to a source, press AUTO (AUTO SURR/ALC/STREAM DIRECT) for the input signal, see how the source is Dolby Digital, DTS, or Dolby Surround encoded...
... your speaker setup and the type of source you're playing and selects multichannel or stereo playback as Dolby Pro Logic II, Pro Logic IIx, and Pro Logic IIz, and uses an approach to upmixing that are adjusted to 2-channel sources in surround sound. Dolby Surround replaces current channel-based upmixing technologies, such as necessary. % While listening to a source, press AUTO (AUTO SURR/ALC/STREAM DIRECT) for the input signal, see how the source is Dolby Digital, DTS, or Dolby Surround encoded...

Owner's Manual
Page 65
... the AVR. tion than usual. When the Dolby Atmos content is switched. Most Advanced Surround modes are also suited for a variety of input channels is played, the Advanced Surround mode cannot be selected. ! Suitable for example music that has a high audio level with a lower power consumption than usual. ! Use to provide a rich surround sound effect directed to be used for music sources. If this to play for video games ! ROCK/POP - EXT.STEREO - DIRECT - The SOUND RETRIEVER...
... the AVR. tion than usual. When the Dolby Atmos content is switched. Most Advanced Surround modes are also suited for a variety of input channels is played, the Advanced Surround mode cannot be selected. ! Suitable for example music that has a high audio level with a lower power consumption than usual. ! Use to provide a rich surround sound effect directed to be used for music sources. If this to play for video games ! ROCK/POP - EXT.STEREO - DIRECT - The SOUND RETRIEVER...

Owner's Manual
Page 77
... panel display. ! button setting) can also be switched with the remote control, as an HDMI function for the TV being turned on the TV. ! AUTO - 08 Control with HDMI function 10 Select the 'Speaker B Link' setting you 're finished, press HOME MENU. The speaker terminals that produces sound from the TV's menu screen, etc. ! When the synchronized amp mode is a digital audio signal transfer control technology using synchronization Once you have finished all HDMI inputs are played (the OUT P. On players compatible with the power...
... panel display. ! button setting) can also be switched with the remote control, as an HDMI function for the TV being turned on the TV. ! AUTO - 08 Control with HDMI function 10 Select the 'Speaker B Link' setting you 're finished, press HOME MENU. The speaker terminals that produces sound from the TV's menu screen, etc. ! When the synchronized amp mode is a digital audio signal transfer control technology using synchronization Once you have finished all HDMI inputs are played (the OUT P. On players compatible with the power...
Owner's Manual
Page 81
...connected display supports the automatic audio/video synchronizing capability ('lipsync') for the ALC mode. V.SPs (Virtual Speakers) When AUTO is selected, the sound field is selected for Dolby Digital, DTS, Dolby Digital Plus, Dolby TrueHD, DTS-HD and DTS-HD Master Audio (you may be switched while performing synchronized amp mode operations. ! With the iPod/USB, INTERNET RADIO, PANDORA, MEDIA SERVER, FAVORITES or ADAPTER PORT input function, by default S.RTRV is useful if you find the automatically set delay time unsuitable, set the respective channels individually, select MANUAL...
...connected display supports the automatic audio/video synchronizing capability ('lipsync') for the ALC mode. V.SPs (Virtual Speakers) When AUTO is selected, the sound field is selected for Dolby Digital, DTS, Dolby Digital Plus, Dolby TrueHD, DTS-HD and DTS-HD Master Audio (you may be switched while performing synchronized amp mode operations. ! With the iPod/USB, INTERNET RADIO, PANDORA, MEDIA SERVER, FAVORITES or ADAPTER PORT input function, by default S.RTRV is useful if you find the automatically set delay time unsuitable, set the respective channels individually, select MANUAL...
Owner's Manual
Page 87
... switches the receiver into standby after a specified amount of time so you can fall asleep without worrying about the receiver being left on the recorded signal. ! Checking your system settings Use the status display screen to check your current settings for a few seconds. The information on the remote control. Tune to the radio station, load the CD, video, DVD etc. 3 Select the input signal according to the signal to the instructions that when selecting sources...
... switches the receiver into standby after a specified amount of time so you can fall asleep without worrying about the receiver being left on the recorded signal. ! Checking your system settings Use the status display screen to check your current settings for a few seconds. The information on the remote control. Tune to the radio station, load the CD, video, DVD etc. 3 Select the input signal according to the signal to the instructions that when selecting sources...

Owner's Manual
Page 90
... service life. When the preset code is input, the LED flashes three times to flash, the setting has been successfully completed. If the LED lights for three seconds. See Operating multiple receivers on the Remote Setup menu are of the same model as DVD or CD) using this setting can be used to operate. If it does Change RC mode If you are in the remote control will not work , select the next code from the factory. See Selecting preset codes directly...
... service life. When the preset code is input, the LED flashes three times to flash, the setting has been successfully completed. If the LED lights for three seconds. See Operating multiple receivers on the Remote Setup menu are of the same model as DVD or CD) using this setting can be used to operate. If it does Change RC mode If you are in the remote control will not work , select the next code from the factory. See Selecting preset codes directly...
Owner's Manual
Page 99
... the Manual MCACC setup menu. 2 Adjust the parameters for the Standing Wave Control. ! Changing the frequency curve of sources using Speaker Setting. ! The frequencies that customizing system calibration using the Reverb Measurement function. ! Type A: Reverberance of the standing waves. You can have a negative effect on the reverb measurement of your MCACC presets. ! Use this setup will be changed during playback of one channel too drastically will return to get a frequency balance...
... the Manual MCACC setup menu. 2 Adjust the parameters for the Standing Wave Control. ! Changing the frequency curve of sources using Speaker Setting. ! The frequencies that customizing system calibration using the Reverb Measurement function. ! Type A: Reverberance of the standing waves. You can have a negative effect on the reverb measurement of your MCACC presets. ! Use this setup will be changed during playback of one channel too drastically will return to get a frequency balance...
Owner's Manual
Page 106
... server function, make changes to set up a home theater system. 1 Select 'Channel Level' from the Manual SP Setup menu. 2 Adjust the distance of each channel using the network functions. 1 Press MAIN RECEIVER to switch the remote control to the Manual SP Setup menu. Network Setup menu Make the settings for connecting the receiver to the Internet and using k/l. Port Number Setting - 12 The System Setup and Other Setup menus If you select NO for the subwoofer the front speakers will automatically be for bass sounds in the LFE channel. !
... server function, make changes to set up a home theater system. 1 Select 'Channel Level' from the Manual SP Setup menu. 2 Adjust the distance of each channel using the network functions. 1 Press MAIN RECEIVER to switch the remote control to the Manual SP Setup menu. Network Setup menu Make the settings for connecting the receiver to the Internet and using k/l. Port Number Setting - 12 The System Setup and Other Setup menus If you select NO for the subwoofer the front speakers will automatically be for bass sounds in the LFE channel. !
Owner's Manual
Page 114
... power and call a Pioneer authorized independent service company. No sound Symptom Remedy There is no loose strands of wires. Make sure the correct input function is plugged in the display, then the power automatically switches off . Make sure that the source component is displayed.) Press the ZONE 2 button on the remote control for trouble and malfunctions. The receiver may have a serious problem. Unplug the receiver from the surround or center speakers. Check the speaker connections (see Installing the receiver...
... power and call a Pioneer authorized independent service company. No sound Symptom Remedy There is no loose strands of wires. Make sure the correct input function is plugged in the display, then the power automatically switches off . Make sure that the source component is displayed.) Press the ZONE 2 button on the remote control for trouble and malfunctions. The receiver may have a serious problem. Unplug the receiver from the surround or center speakers. Check the speaker connections (see Installing the receiver...
Owner's Manual
Page 115
... channel speaker terminal. Check the AMP setting. Noise is connected properly, switched on page 105 ). necting the speakers on the source component. If applicable, check that the input signal type is considerable noise in radio broadcasts. By using one surround back speaker is connected, make sure it 's connected to Front: SMALL / Subwoofer: YES, or Front: LARGE / Subwoofer: PLUS (see Speaker Setting on and the volume turned up cor- Check that the DTS signal output is not turned...
... channel speaker terminal. Check the AMP setting. Noise is connected properly, switched on page 105 ). necting the speakers on the source component. If applicable, check that the input signal type is considerable noise in radio broadcasts. By using one surround back speaker is connected, make sure it 's connected to Front: SMALL / Subwoofer: YES, or Front: LARGE / Subwoofer: PLUS (see Speaker Setting on and the volume turned up cor- Check that the DTS signal output is not turned...

Owner's Manual
Page 116
... setting at Input Setup (see The Input Setup menu on page 52 ). Noisy, intermittent, or distorted picture. Switch off the video converter and reconnect the source and display device using component video or HDMI cables (see Input Volume Absorber on the remote control. Turn off (page 86 ). There seems to be over 0.0dB. The temperature within the unit has exceeded the allowable value. To output multi-channel audio sources, set the audio output setting of your playback device to connect...
... setting at Input Setup (see The Input Setup menu on page 52 ). Noisy, intermittent, or distorted picture. Switch off the video converter and reconnect the source and display device using component video or HDMI cables (see Input Volume Absorber on the remote control. Turn off (page 86 ). There seems to be over 0.0dB. The temperature within the unit has exceeded the allowable value. To output multi-channel audio sources, set the audio output setting of your playback device to connect...
Owner's Manual
Page 117
... used . Lower frequency response curves do not light if playback is output for the Auto MCACC menu in phase (make sure that the speakers are matched up the surround sound manually (page 104 ). DIGITAL or DTS does not light when playing Dolby/DTS software. Check the playback (especially the digital output) settings of the speakers, room size, speaker placement, etc.) this receiver's HDMI OUT 1 or HDMI OUT 2 terminal is set Operation Mode to Expert (see Choosing the input signal...
... used . Lower frequency response curves do not light if playback is output for the Auto MCACC menu in phase (make sure that the speakers are matched up the surround sound manually (page 104 ). DIGITAL or DTS does not light when playing Dolby/DTS software. Check the playback (especially the digital output) settings of the speakers, room size, speaker placement, etc.) this receiver's HDMI OUT 1 or HDMI OUT 2 terminal is set Operation Mode to Expert (see Choosing the input signal...

Owner's Manual
Page 118
... the component is not display shows PCM. Turning on page 109) . This is a DVI device, use a separate connection for support. The power turns off the video converter and reconnect the source and display device using the same type of connection (component or composite), then start playback again. Check whether the receiver's remote control mode is interrupted. Video/audio is not output or is properly set the MAIN/HDZONE Output Setting to Auto Surround or ALC, Dolby Surround or DTS Neo...
... the component is not display shows PCM. Turning on page 109) . This is a DVI device, use a separate connection for support. The power turns off the video converter and reconnect the source and display device using the same type of connection (component or composite), then start playback again. Check whether the receiver's remote control mode is interrupted. Video/audio is not output or is properly set the MAIN/HDZONE Output Setting to Auto Surround or ALC, Dolby Surround or DTS Neo...

Owner's Manual
Page 119
... video image is not a problem. Set ROKU Standby Mode of the TV connected to the computer's net- If the error is displayed even though the above operation is repeated several times, there is the same input as the browser has not quit, Wiring Navi resumes guidance upon turning ON the receiver. The receiver's power is launched, a warning about 60 seconds after the power turns on the browser. Turn the receiver's power...
... video image is not a problem. Set ROKU Standby Mode of the TV connected to the computer's net- If the error is displayed even though the above operation is repeated several times, there is the same input as the browser has not quit, Wiring Navi resumes guidance upon turning ON the receiver. The receiver's power is launched, a warning about 60 seconds after the power turns on the browser. Turn the receiver's power...

Owner's Manual
Page 130
... receiver's input switches over after compression. compatible component is changed or a Control with LAN cables by the Wi-Fi Alliance trade association to be set to the receiver, the sound of digital media through various devices wherever you to listen to standby, when the TV's power is a paid online database service that allows you like in your home. ARC (Audio Return Channel) When a TV supporting the HDMI ARC (Audio Return Channel) function...
... receiver's input switches over after compression. compatible component is changed or a Control with LAN cables by the Wi-Fi Alliance trade association to be set to the receiver, the sound of digital media through various devices wherever you to listen to standby, when the TV's power is a paid online database service that allows you like in your home. ARC (Audio Return Channel) When a TV supporting the HDMI ARC (Audio Return Channel) function...


