
Owner's Manual
Page 12
... or advice provided by GDT, your business' internal operations. ■GDT END USER LICENSE AGREEMENT PLEASE READ THIS AGREEMENT CAREFULLY BEFORE USING THE NAVIGATION SYSTEM THIS IS A LICENSE AGREEMENT FOR YOUR COPY OF THE MAP DATABASE..., provided that the DATABASE is restricted for use in the specific system for a particular purpose or non-infringement. LIMITATIONS ON USE The DATABASE is or will be error free. DISCLAIMER OF WARRANTY GDT does not warrant ... system for which it was created. BY USING THE DATABASE, YOU ACCEPT AND AGREE TO ALL TERMS AND CONDITIONS SET FORTH BELOW.
... or advice provided by GDT, your business' internal operations. ■GDT END USER LICENSE AGREEMENT PLEASE READ THIS AGREEMENT CAREFULLY BEFORE USING THE NAVIGATION SYSTEM THIS IS A LICENSE AGREEMENT FOR YOUR COPY OF THE MAP DATABASE..., provided that the DATABASE is restricted for use in the specific system for a particular purpose or non-infringement. LIMITATIONS ON USE The DATABASE is or will be error free. DISCLAIMER OF WARRANTY GDT does not warrant ... system for which it was created. BY USING THE DATABASE, YOU ACCEPT AND AGREE TO ALL TERMS AND CONDITIONS SET FORTH BELOW.

Owner's Manual
Page 13
Some states and laws do not allow the exclusion of the sources used. inter alia - emergency assistance; special events; road or traffic conditions; GOVERNMENT END USERS If the DATABASE is for a region of North America and is being ...New Hampshire 03766, USA. 11 LIMITATION OF LIABILITY The price of the DATABASE does not include any consideration for assumption of risk of consequential, indirect or unlimited direct damages which may contain errors and omissions. car or speed restrictions; traffic congestion; THE DISCLAIMER OF WARRANTY AND LIMITATION OF LIABILITY, SET...
Some states and laws do not allow the exclusion of the sources used. inter alia - emergency assistance; special events; road or traffic conditions; GOVERNMENT END USERS If the DATABASE is for a region of North America and is being ...New Hampshire 03766, USA. 11 LIMITATION OF LIABILITY The price of the DATABASE does not include any consideration for assumption of risk of consequential, indirect or unlimited direct damages which may contain errors and omissions. car or speed restrictions; traffic congestion; THE DISCLAIMER OF WARRANTY AND LIMITATION OF LIABILITY, SET...

Owner's Manual
Page 24
...from several GPS satellites and a map matching function. Pioneer's audio equipment can be changed. Background image can be used with the numeric keypad of the Remote Control became...Hybrid Sensor installed in real time. When you connect CUE Receiver to the database for search. Features of Your DVD Navigation System A "chip specifically for the positioning accuracy"... position of your car precisely, taking into consideration the contour of data are fitted. Furthermore, not only is further improved by "map matching" function. Furthermore, to display on a map using ...
...from several GPS satellites and a map matching function. Pioneer's audio equipment can be changed. Background image can be used with the numeric keypad of the Remote Control became...Hybrid Sensor installed in real time. When you connect CUE Receiver to the database for search. Features of Your DVD Navigation System A "chip specifically for the positioning accuracy"... position of your car precisely, taking into consideration the contour of data are fitted. Furthermore, not only is further improved by "map matching" function. Furthermore, to display on a map using ...
Owner's Manual
Page 78
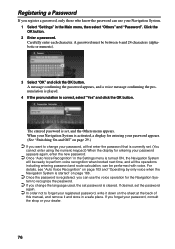
...your dealer. 76 If you change your password, at the back of this manual, and remove it down on page 29.) ➲ If you want to perform voice recognition when booted next time, and all the operations including entering password and route calculation, can be between 6 ... is activated, a display for the Navigation Sys- The entered password is set . (You cannot enter using the numeric keypad.) When the display for entering your password appears again, enter the new password. ➲ Once "Auto Voice Recognition" in the Settings menu is turned ON, the Navigation System will be ready to...
...your dealer. 76 If you change your password, at the back of this manual, and remove it down on page 29.) ➲ If you want to perform voice recognition when booted next time, and all the operations including entering password and route calculation, can be between 6 ... is activated, a display for the Navigation Sys- The entered password is set . (You cannot enter using the numeric keypad.) When the display for entering your password appears again, enter the new password. ➲ Once "Auto Voice Recognition" in the Settings menu is turned ON, the Navigation System will be ready to...
Owner's Manual
Page 82
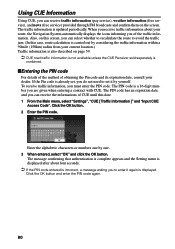
...The PIN code has an expiration date, and you can receive traffic information (pay service), weather information (free service), and news (free service) provided through FM broadcasts and confirm them on... code again. 80 Also, on this screen, you can select whether to recalculate the route to enter it by one by yourself. Using CUE Information Using CUE...set it again is displayed. If the Pin code is updated periodically. When you receive traffic information about four seconds. ➲ If the PIN code entered is incorrect, a message asking you do not need to set...
...The PIN code has an expiration date, and you can receive traffic information (pay service), weather information (free service), and news (free service) provided through FM broadcasts and confirm them on... code again. 80 Also, on this screen, you can select whether to recalculate the route to enter it by one by yourself. Using CUE Information Using CUE...set it again is displayed. If the Pin code is updated periodically. When you receive traffic information about four seconds. ➲ If the PIN code entered is incorrect, a message asking you do not need to set...

Owner's Manual
Page 98
... the sensitivity are properly connected between the main unit and the car. Speed Pulse The number of GPS antenna. 3. GPS Antenna The connection status of 11 to "Installation Manual" for the installation position. 4. If "No good" is displayed, check the connection status of the Speed...5 6 7 8 1. Either "OK" or "No good" appears on while checking that power cable connection is shown. When the parking brake is released, "Off" is displayed. Click the OK button. Power Voltage The power supply (reference value) provided from the car battery to delete, and click the OK button. 2 ...
... the sensitivity are properly connected between the main unit and the car. Speed Pulse The number of GPS antenna. 3. GPS Antenna The connection status of 11 to "Installation Manual" for the installation position. 4. If "No good" is displayed, check the connection status of the Speed...5 6 7 8 1. Either "OK" or "No good" appears on while checking that power cable connection is shown. When the parking brake is released, "Off" is displayed. Click the OK button. Power Voltage The power supply (reference value) provided from the car battery to delete, and click the OK button. 2 ...

Owner's Manual
Page 137
..., if the currently received ensemble has multiple services. 1 Press 5 or ∞ to select "AVAILABLE SERVICE LIST" from the AVAILABLE SER- VICE LIST, and press A.MENU (AUDIO) button. Chapter 6 Combining and Using Pioneer AV Equipment ■Setting the announcement support interruption Even when listening to non-DAB sources, the Announcement Support Function lets you want to listen to...
..., if the currently received ensemble has multiple services. 1 Press 5 or ∞ to select "AVAILABLE SERVICE LIST" from the AVAILABLE SER- VICE LIST, and press A.MENU (AUDIO) button. Chapter 6 Combining and Using Pioneer AV Equipment ■Setting the announcement support interruption Even when listening to non-DAB sources, the Announcement Support Function lets you want to listen to...

Owner's Manual
Page 153
...seconds, the display is the same regardless of the functions. CONTROL:EXTERNAL" is set in INITIAL SETTINGS MENU. (SUB WOOFER is not displayed.) ➲ When the subwoofer controller setting is only displayed when "S.W. "NON FADING" is "S.W. CONTROL:INTERNAL" or "REAR SPEAKER:SUBWOOFER", you operate from. ■Displaying the AUDIO MENU 1 Press A.MENU (AUDIO)...to "SLA". ➲ Select "BACK" in each of which source you can operate a desired function. MENU is only "S.W. Chapter 6 Combining and Using Pioneer AV Equipment Audio Adjustments The display for AUDIO MENU is automati-
...seconds, the display is the same regardless of the functions. CONTROL:EXTERNAL" is set in INITIAL SETTINGS MENU. (SUB WOOFER is not displayed.) ➲ When the subwoofer controller setting is only displayed when "S.W. "NON FADING" is "S.W. CONTROL:INTERNAL" or "REAR SPEAKER:SUBWOOFER", you operate from. ■Displaying the AUDIO MENU 1 Press A.MENU (AUDIO)...to "SLA". ➲ Select "BACK" in each of which source you can operate a desired function. MENU is only "S.W. Chapter 6 Combining and Using Pioneer AV Equipment Audio Adjustments The display for AUDIO MENU is automati-

Owner's Manual
Page 157
... can turn off . ■Using subwoofer output Pioneer AV Head Unit (AVH-P6400CD or AVH-P6400) is S.W. HIGH 4 Press ∞ to turn subwoofer output on. ➲ You can be adjusted. 1 Press 5 or ∞ to select "TREBLE" from the AUDIO MENU, and press A.MENU (AUDIO) button. If you do not set to "ON", you cannot select...
... can turn off . ■Using subwoofer output Pioneer AV Head Unit (AVH-P6400CD or AVH-P6400) is S.W. HIGH 4 Press ∞ to turn subwoofer output on. ➲ You can be adjusted. 1 Press 5 or ∞ to select "TREBLE" from the AUDIO MENU, and press A.MENU (AUDIO) button. If you do not set to "ON", you cannot select...
Owner's Manual
Page 163
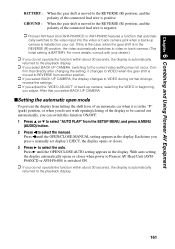
... Con- firm that directly after changing the setting, it is in the "P" (park) position, or when you...SETUP MENU, and press A.MENU (AUDIO) button. 2 Press 2 to select the manual. Each time you press a manually set display's EJECT, the display opens or closes. 3 Press 3 to select the auto. When the gear shift is moved to the REVERSE (R) position, and the polarity of the connected lead wire is installed...Using Pioneer AV Equipment BATTERY : GROUND : When the gear shift is moved to the REVERSE (R) position, and the polarity of the connected lead wire is moved to REVERSE from another position...
... Con- firm that directly after changing the setting, it is in the "P" (park) position, or when you...SETUP MENU, and press A.MENU (AUDIO) button. 2 Press 2 to select the manual. Each time you press a manually set display's EJECT, the display opens or closes. 3 Press 3 to select the auto. When the gear shift is moved to the REVERSE (R) position, and the polarity of the connected lead wire is installed...Using Pioneer AV Equipment BATTERY : GROUND : When the gear shift is moved to the REVERSE (R) position, and the polarity of the connected lead wire is moved to REVERSE from another position...
Owner's Manual
Page 167
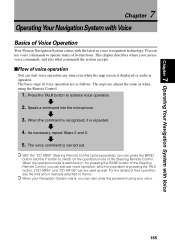
...describes where you can also enter the password using the Remote Control. 1. Speak a command into the microphone. 3. Chapter 7 Operating Your Navigation System with Voice 7 Chapter Operating Your Navigation System with Voice Basics of their operation, see the instruction manuals attached to them.) ➲ When ...your voice. 165 When the command is recognized, it is operated. As necessary, repeat Steps 2 and 3. 5. The basic steps of the Steering Remote Control. For the details of Voice Operation Your Pioneer Navigation System...
...describes where you can also enter the password using the Remote Control. 1. Speak a command into the microphone. 3. Chapter 7 Operating Your Navigation System with Voice 7 Chapter Operating Your Navigation System with Voice Basics of their operation, see the instruction manuals attached to them.) ➲ When ...your voice. 165 When the command is recognized, it is operated. As necessary, repeat Steps 2 and 3. 5. The basic steps of the Steering Remote Control. For the details of Voice Operation Your Pioneer Navigation System...
Owner's Manual
Page 179
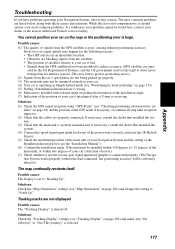
... that installed the system. (4) Connect the speed signal input (pink lead wire) of the power wire correctly, and reset the 3D Hybrid Sensor. (5) Check the attachment position of the main unit of your Navigation System and the setting of the Installation direction lever (see "Map Orientation" on page 94) and the position of your car is in your most common problems are blocking...
... that installed the system. (4) Connect the speed signal input (pink lead wire) of the power wire correctly, and reset the 3D Hybrid Sensor. (5) Check the attachment position of the main unit of your Navigation System and the setting of the Installation direction lever (see "Map Orientation" on page 94) and the position of your car is in your most common problems are blocking...

Owner's Manual
Page 181
If this does not solve the problem, press the reset button on the screen. 179 Set again by following the instructions below. 1. Image output is switched, as the image of the Remote Controller, turn the power to "Acc off". Appendix When the screen is displayed on the main unit. While pressing [ •... car at a safe place, and cut off . Turn the ignition key back to the main unit back on (start the engine again, and turn the ACC on . If the display suddenly disappears When using the Navigation System with another manufacturer's display, if the display suddenly disappears, setting ...
If this does not solve the problem, press the reset button on the screen. 179 Set again by following the instructions below. 1. Image output is switched, as the image of the Remote Controller, turn the power to "Acc off". Appendix When the screen is displayed on the main unit. While pressing [ •... car at a safe place, and cut off . Turn the ignition key back to the main unit back on (start the engine again, and turn the ACC on . If the display suddenly disappears When using the Navigation System with another manufacturer's display, if the display suddenly disappears, setting ...

Owner's Manual
Page 182
..., connect the speed signal input (pink lead wire) of the power cord is detected. When: The speed signal input (pink lead wire) of the power cord correctly. Although it can be operated with this function while driving." After you may be affected by vibration. 180 In such a case, follow the instructions given on the display. (1) "You cannot use a disc...
..., connect the speed signal input (pink lead wire) of the power cord is detected. When: The speed signal input (pink lead wire) of the power cord correctly. Although it can be operated with this function while driving." After you may be affected by vibration. 180 In such a case, follow the instructions given on the display. (1) "You cannot use a disc...

Other Manual
Page 7
... Power cord Connector 26 pin-RGB cable 6 Do not pull the lead, as you may be connected to disconnect the (-) battery cable before beginning installation. If this unit is installed in the electrical system, be sure to a terminal coupled with ignition switch ON/OFF operations. Before installing it out of the connector. • If this is not done, the car...
... Power cord Connector 26 pin-RGB cable 6 Do not pull the lead, as you may be connected to disconnect the (-) battery cable before beginning installation. If this unit is installed in the electrical system, be sure to a terminal coupled with ignition switch ON/OFF operations. Before installing it out of the connector. • If this is not done, the car...

Other Manual
Page 12
... or for a model not listed in the location display. Connection method Clamp the parking brake switch power supply side lead. Power supply side Ground side 11 Parking brake switch For details, consult the relevant documents from Pioneer. Close the cover. This lead must be unusable. Connecting the System Connecting the power cord (1) Speed detection circuit lead Car injection computer Connector Connection method Pass the...
... or for a model not listed in the location display. Connection method Clamp the parking brake switch power supply side lead. Power supply side Ground side 11 Parking brake switch For details, consult the relevant documents from Pioneer. Close the cover. This lead must be unusable. Connecting the System Connecting the power cord (1) Speed detection circuit lead Car injection computer Connector Connection method Pass the...

Other Manual
Page 13
...position of your car detected by voice, the car stereo is moving forwards or backwards. Connection method Clamp the backup lamp lead. In this way, when the guidance audio is output and when you use the ND-PG1 speed pulse generator (sold separately), please make sure to the supplied Installation manuals... lamp lead. Connect the purple/white lead to the lead whose voltage changes when the shift lever is in reverse [R]) and find the backup lamp lead in reverse. Clamp firmly with a Pioneer car stereo, if the car stereo has yellow/black leads, connect them to reduce the car stereo volume....
...position of your car detected by voice, the car stereo is moving forwards or backwards. Connection method Clamp the backup lamp lead. In this way, when the guidance audio is output and when you use the ND-PG1 speed pulse generator (sold separately), please make sure to the supplied Installation manuals... lamp lead. Connect the purple/white lead to the lead whose voltage changes when the shift lever is in reverse [R]) and find the backup lamp lead in reverse. Clamp firmly with a Pioneer car stereo, if the car stereo has yellow/black leads, connect them to reduce the car stereo volume....

Other Manual
Page 14
... leads should be connected to use only a fuse of both products and connect cords that have the same function. When connecting this lead to power source terminals to which power is connected to the supplied Installation manuals of the rating prescribed on the fuse holder. Do not connect this product to another product, refer to such terminals, the battery may be drained. Note: When replacing...
... leads should be connected to use only a fuse of both products and connect cords that have the same function. When connecting this lead to power source terminals to which power is connected to the supplied Installation manuals of the rating prescribed on the fuse holder. Do not connect this product to another product, refer to such terminals, the battery may be drained. Note: When replacing...

Other Manual
Page 16
... car. • Before finally installing the unit, connect the wiring temporarily, making sure it is free of this Navigation System, other cables or leads: - TV antenna and antenna lead - Before using the adhesive tape • Make sure the surface is all connected up properly, and the unit and the system work properly. • For the installation and attachment of the Connection box...
... car. • Before finally installing the unit, connect the wiring temporarily, making sure it is free of this Navigation System, other cables or leads: - TV antenna and antenna lead - Before using the adhesive tape • Make sure the surface is all connected up properly, and the unit and the system work properly. • For the installation and attachment of the Connection box...
Other Manual
Page 23
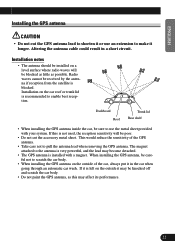
... and scratch the car body. • Do not paint the GPS antenna, as possible. If this is recommended to shorten it or use the metal sheet provided with a magnet. When installing the GPS antenna, be blocked as little as this may become detached. • The GPS antenna is very powerful, and the lead may affect...
... and scratch the car body. • Do not paint the GPS antenna, as possible. If this is recommended to shorten it or use the metal sheet provided with a magnet. When installing the GPS antenna, be blocked as little as this may become detached. • The GPS antenna is very powerful, and the lead may affect...


