Owner's Manual
Page 4
... antennas 31 Connecting external antennas 31 MULTI-ZONE setup 32 Making MULTI-ZONE connections 32 Connecting Optional Bluetooth ADAPTER . . . 33 Connecting a SiriusConnect™ Tuner 34 Connecting to the network through LAN interface 34 Connecting an HDMI-equipped component to the front panel input 35 Connecting to station presets 53 4 En After you will know how to operate your TV with no HDMI input . . . 28 Connecting a satellite/cable receiver or other set-top box 29 Connecting a HDD/DVD recorder, VCR and other video sources 29 Connecting...
... antennas 31 Connecting external antennas 31 MULTI-ZONE setup 32 Making MULTI-ZONE connections 32 Connecting Optional Bluetooth ADAPTER . . . 33 Connecting a SiriusConnect™ Tuner 34 Connecting to the network through LAN interface 34 Connecting an HDMI-equipped component to the front panel input 35 Connecting to station presets 53 4 En After you will know how to operate your TV with no HDMI input . . . 28 Connecting a satellite/cable receiver or other set-top box 29 Connecting a HDD/DVD recorder, VCR and other video sources 29 Connecting...

Owner's Manual
Page 5
... the remote control button settings 83 Resetting the input assignment of one of the input function buttons 84 Direct function 84 Multi operation and System off 85 Programming a Multi operation or a shutdown sequence 85 Using multi operations 86 Using System off 86 Erasing all the settings for the multi-operation 86 Resetting the remote control presets 87 Default preset codes 87 Controlling components 87 10 The Advanced MCACC menu Making receiver settings from the Advanced MCACC menu 90 Automatic MCACC (Expert 91 Manual MCACC setup 94 Fine Channel Level 95 Fine Speaker...
... the remote control button settings 83 Resetting the input assignment of one of the input function buttons 84 Direct function 84 Multi operation and System off 85 Programming a Multi operation or a shutdown sequence 85 Using multi operations 86 Using System off 86 Erasing all the settings for the multi-operation 86 Resetting the remote control presets 87 Default preset codes 87 Controlling components 87 10 The Advanced MCACC menu Making receiver settings from the Advanced MCACC menu 90 Automatic MCACC (Expert 91 Manual MCACC setup 94 Fine Channel Level 95 Fine Speaker...

Owner's Manual
Page 7
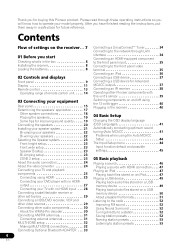
...; 5.1 channel surround system & ZONE 2 connection (Multi Zone) • Some tips for improving sound quality (page 19) 3 Connecting the speakers • Connecting the speakers (page 20) • Installing your speaker system (page 21) • Bi-amping your speakers (page 22) 4 Connecting the components • About the audio connection (page 24) • About the video converter (page 24) • Connecting your TV and playback components (page 25) • Connecting AM/FM antennas (page 31) • Plugging...
...; 5.1 channel surround system & ZONE 2 connection (Multi Zone) • Some tips for improving sound quality (page 19) 3 Connecting the speakers • Connecting the speakers (page 20) • Installing your speaker system (page 21) • Bi-amping your speakers (page 22) 4 Connecting the components • About the audio connection (page 24) • About the video converter (page 24) • Connecting your TV and playback components (page 25) • Connecting AM/FM antennas (page 31) • Plugging...

Owner's Manual
Page 9
...Front panel 1 23 45 6 7 8 STANDBY/ON INPUT SELECTOR PHASE CONTROL SPEAKERS CONTROL MULTI-ZONE ON/OFF ADVANCED MCACC PQLS HDMI iPod iPhone BAND TUNE PRESET PRESET TUNE TUNER EDIT ENTER 9 VSX-31 MASTER VOLUME PHONES AUTO/ALC/DIRECT LISTENING MODE STEREO STANDARD ADV SURROUND iPod iPhone DIRECT CONTROL MCACC SETUP MIC iPod iPhone USB VIDEO CAMERA HDMI 5 10 11 12 13 14 15 VIDEO 2 INPUT USB iPod iPhone VIDEO L AUDIO R MCACC SETUP MIC 14 16 13 VSX-30 VSX-31 1 INPUT SELECTOR dial Select an input function. 2 STANDBY/ON Switches the receiver between...
...Front panel 1 23 45 6 7 8 STANDBY/ON INPUT SELECTOR PHASE CONTROL SPEAKERS CONTROL MULTI-ZONE ON/OFF ADVANCED MCACC PQLS HDMI iPod iPhone BAND TUNE PRESET PRESET TUNE TUNER EDIT ENTER 9 VSX-31 MASTER VOLUME PHONES AUTO/ALC/DIRECT LISTENING MODE STEREO STANDARD ADV SURROUND iPod iPhone DIRECT CONTROL MCACC SETUP MIC iPod iPhone USB VIDEO CAMERA HDMI 5 10 11 12 13 14 15 VIDEO 2 INPUT USB iPod iPhone VIDEO L AUDIO R MCACC SETUP MIC 14 16 13 VSX-30 VSX-31 1 INPUT SELECTOR dial Select an input function. 2 STANDBY/ON Switches the receiver between...

Owner's Manual
Page 13
... displays 02 Remote control This section explains how to access the Video options (page 75). Receiver control, TV control • Blue - Use to operate the remote control for this receiver. 2 MULTI OPERATION - RECEIVER MULTI SOURCE OPERATION 1 R.SETUP 2 BD DVD DVR/BDR HDMI 10 TV CD NET RADIO ADAPTER 3 iPod USB TUNER SIRIUS TV CTRL 11 INPUT SELECT ZONE 2 RECEIVER 4 12 MASTER INPUT VOLUME TV CONTROL 5 13 CH VOL MUTE 14 AUDIO PARAMETER VIDEO PARAMETER 6 LIST TUNE TOOLS TOP MENU 7 BAND T.EDIT GUIDE PRESET ENTER PRESET CATEGORY HOME MENU TUNE iPod...
... displays 02 Remote control This section explains how to access the Video options (page 75). Receiver control, TV control • Blue - Use to operate the remote control for this receiver. 2 MULTI OPERATION - RECEIVER MULTI SOURCE OPERATION 1 R.SETUP 2 BD DVD DVR/BDR HDMI 10 TV CD NET RADIO ADAPTER 3 iPod USB TUNER SIRIUS TV CTRL 11 INPUT SELECT ZONE 2 RECEIVER 4 12 MASTER INPUT VOLUME TV CONTROL 5 13 CH VOL MUTE 14 AUDIO PARAMETER VIDEO PARAMETER 6 LIST TUNE TOOLS TOP MENU 7 BAND T.EDIT GUIDE PRESET ENTER PRESET CATEGORY HOME MENU TUNE iPod...
Owner's Manual
Page 34
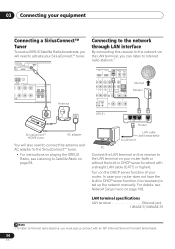
... the SiriusConnect™ tuner. • For instructions on playing the SIRIUS Radio, see Network Setup menu on your router. OPTICAL ASSIGNABLE ADAPTER PORT (OUTPUT 5 V 100 mA MAX) VR/BDR) SIRIUS IN AM LOOP URROUND FM UNBAL 75 L SURROUND BACK R L(Single) SPEAKERS FRONT HEIGHT/WIDE/ B R L SA Antenna Connecting to the network through LAN interface By connecting this receiver to set up the network manually. Turn on the DHCP server...
... the SiriusConnect™ tuner. • For instructions on playing the SIRIUS Radio, see Network Setup menu on your router. OPTICAL ASSIGNABLE ADAPTER PORT (OUTPUT 5 V 100 mA MAX) VR/BDR) SIRIUS IN AM LOOP URROUND FM UNBAL 75 L SURROUND BACK R L(Single) SPEAKERS FRONT HEIGHT/WIDE/ B R L SA Antenna Connecting to the network through LAN interface By connecting this receiver to set up the network manually. Turn on the DHCP server...

Owner's Manual
Page 44
... switch on. 2 Press RECEIVER on the remote control, then press HOME MENU. This setting should give you excellent surround sound from your TV. Input Setup c. Note 1 • Depending on the characteristics of your DVD player only has an optical output, you 've connected it is not optimal for household appliances (air conditioner, fridge, fan, etc.), that you 've connected your TV. A Graphical User Interface (GUI) screen appears on the remote control. 6 Select...
... switch on. 2 Press RECEIVER on the remote control, then press HOME MENU. This setting should give you excellent surround sound from your TV. Input Setup c. Note 1 • Depending on the characteristics of your DVD player only has an optical output, you 've connected it is not optimal for household appliances (air conditioner, fridge, fan, etc.), that you 've connected your TV. A Graphical User Interface (GUI) screen appears on the remote control. 6 Select...

Owner's Manual
Page 46
... settings. 4 Use the volume control to check on the remote control, INPUT SELECT, or the front panel INPUT SELECTOR dial.2 3 Press RECEIVER , then press AUTO/ALC/ DIRECT (AUTO SURR/ALC/STREAM DIRECT) to select 'AUTO SURROUND' and start playback of the source.3 If you're playing a Dolby Digital or DTS surround sound DVD disc, you want to play. You can use the input function buttons on the front panel display whether or not multi-channel playback is possible to adjust the volume level. Note 1 Make sure that the TV's video input...
... settings. 4 Use the volume control to check on the remote control, INPUT SELECT, or the front panel INPUT SELECTOR dial.2 3 Press RECEIVER , then press AUTO/ALC/ DIRECT (AUTO SURR/ALC/STREAM DIRECT) to select 'AUTO SURROUND' and start playback of the source.3 If you're playing a Dolby Digital or DTS surround sound DVD disc, you want to play. You can use the input function buttons on the front panel display whether or not multi-channel playback is possible to adjust the volume level. Note 1 Make sure that the TV's video input...

Owner's Manual
Page 61
... be adjusted using this receiver equalizes playback sound levels. Auto playback There are decoded accordingly using Neo:6 CINEMA or 2 Pro Logic IIx MOVIE (see Listening in surround sound above for more options using this button, see Using Stream Direct on page 64. • The AUTO SURROUND mode cannot be selected when the HDMI audio output parameter is selected, the effect level can listen to select a listening mode. Note 1 Stereo surround (matrix) formats are many features described in Setting the Audio options...
... be adjusted using this receiver equalizes playback sound levels. Auto playback There are decoded accordingly using Neo:6 CINEMA or 2 Pro Logic IIx MOVIE (see Listening in surround sound above for more options using this button, see Using Stream Direct on page 64. • The AUTO SURROUND mode cannot be selected when the HDMI audio output parameter is selected, the effect level can listen to select a listening mode. Note 1 Stereo surround (matrix) formats are many features described in Setting the Audio options...

Owner's Manual
Page 65
... set to DIGITAL, HDMI or AUTO (only selected DIGITAL or HDMI), the indicators light according to the signal being decoded (see The Input Setup menu on page 44). The compatible signals via the HDMI terminals are connected. • You can also press / to select the MCACC preset. 3 • This receiver can only play back Dolby Digital, PCM (32 kHz to 192 kHz), DTS (including DTS 96/24) and WMA9 Pro digital signal formats. Please select another input signal...
... set to DIGITAL, HDMI or AUTO (only selected DIGITAL or HDMI), the indicators light according to the signal being decoded (see The Input Setup menu on page 44). The compatible signals via the HDMI terminals are connected. • You can also press / to select the MCACC preset. 3 • This receiver can only play back Dolby Digital, PCM (32 kHz to 192 kHz), DTS (including DTS 96/24) and WMA9 Pro digital signal formats. Please select another input signal...

Owner's Manual
Page 74
... play the receiver's HDMI audio and video input signals from 0 (all center channel sent to 10 Defaults: Neo:6 MUSIC: 3 Neo:6 CINEMA: 10 EFFECT Sets the effect level for which it does Option(s) C. e.UP1 to ON. WIDTHj (Center Width) (Applicable only Provides a better blend of effects depends on page 69. 74 En when using a center speaker only). f. h.•The HDMI Audio setting cannot be switched while performing synchronized amp mode operations. • The synchronized amp mode must be turned...
... play the receiver's HDMI audio and video input signals from 0 (all center channel sent to 10 Defaults: Neo:6 MUSIC: 3 Neo:6 CINEMA: 10 EFFECT Sets the effect level for which it does Option(s) C. e.UP1 to ON. WIDTHj (Center Width) (Applicable only Provides a better blend of effects depends on page 69. 74 En when using a center speaker only). f. h.•The HDMI Audio setting cannot be switched while performing synchronized amp mode operations. • The synchronized amp mode must be turned...

Owner's Manual
Page 77
... standby, the display is output from the two speakers connected to the B-speaker terminal, and the subwoofer. No sound is dimmed, and ZONE 2 DVD for the sub zone. The options below are connected. 2 If the receiver is output from the speakers. Sound is in Manual speaker setup on the front panel to change stations when recording a radio broadcast. 77 En Using the MULTI-ZONE controls The following steps use the tuner controls to select a preset station (see Saving station presets on the source), the two speakers connected to the B-speaker...
... standby, the display is output from the two speakers connected to the B-speaker terminal, and the subwoofer. No sound is dimmed, and ZONE 2 DVD for the sub zone. The options below are connected. 2 If the receiver is output from the speakers. Sound is in Manual speaker setup on the front panel to change stations when recording a radio broadcast. 77 En Using the MULTI-ZONE controls The following steps use the tuner controls to select a preset station (see Saving station presets on the source), the two speakers connected to the B-speaker...

Owner's Manual
Page 78
... MULTI-ZONE feature for a while, turn off the power in the sub zone. Use to select the input function directly (this may not work for connecting your recorder as a CD player or TV).3 Keep in mind you can also press MULTI-ZONE ON/OFF on the front panel to switch off power in tuner, or from an audio or video source connected to the receiver (such as you used to connect your source has also been connected using Component video if your video source...
... MULTI-ZONE feature for a while, turn off the power in the sub zone. Use to select the input function directly (this may not work for connecting your recorder as a CD player or TV).3 Keep in mind you can also press MULTI-ZONE ON/OFF on the front panel to switch off power in tuner, or from an audio or video source connected to the receiver (such as you used to connect your source has also been connected using Component video if your video source...

Owner's Manual
Page 81
... same model as DVD or CD) using . The receiver to be assigned to one of the input function buttons (such as this function (see Programming signals from other components Most components can be operated is input, the LED flashes three times to indicate that matches the component you want to control, you can still teach the remote individual commands from another remote control (see Remote Control Mode Setup on page 82). When the preset code is switched by pressing R.SETUP...
... same model as DVD or CD) using . The receiver to be assigned to one of the input function buttons (such as this function (see Programming signals from other components Most components can be operated is input, the LED flashes three times to indicate that matches the component you want to control, you can still teach the remote individual commands from another remote control (see Remote Control Mode Setup on page 82). When the preset code is switched by pressing R.SETUP...

Owner's Manual
Page 82
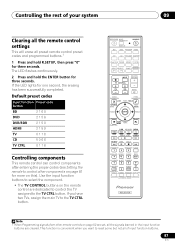
... cancel the preset setup mode press R.SETUP. 2 Press the input function button for three seconds. When assigning preset codes to enter the 4digit preset code. If the LED lights for three seconds. The buttons available are shown below: RECEIVER MULTI OPERATION SOURCE R.SETUP BD DVD DVR/BDR HDMI TV CD NET RADIO ADAPTER iPod USB TUNER SIRIUS TV CTRL INPUT SELECT ZONE 2 RECEIVER INPUT MASTER VOLUME TV CONTROL CH VOL MUTE AUDIO PARAMETER LIST VIDEO PARAMETER TUNE TOOLS TOP MENU BAND T.EDIT GUIDE PRESET ENTER PRESET CATEGORY HOME MENU TUNE iPod CTRL RETURN...
... cancel the preset setup mode press R.SETUP. 2 Press the input function button for three seconds. When assigning preset codes to enter the 4digit preset code. If the LED lights for three seconds. The buttons available are shown below: RECEIVER MULTI OPERATION SOURCE R.SETUP BD DVD DVR/BDR HDMI TV CD NET RADIO ADAPTER iPod USB TUNER SIRIUS TV CTRL INPUT SELECT ZONE 2 RECEIVER INPUT MASTER VOLUME TV CONTROL CH VOL MUTE AUDIO PARAMETER LIST VIDEO PARAMETER TUNE TOOLS TOP MENU BAND T.EDIT GUIDE PRESET ENTER PRESET CATEGORY HOME MENU TUNE iPod CTRL RETURN...
Owner's Manual
Page 87
Use the input function buttons to select the component. • The TV CONTROL buttons on page 81 for three seconds. RECEIVER MULTI OPERATION SOURCE R.SETUP BD DVD DVR/BDR HDMI TV CD NET RADIO ADAPTER iPod USB TUNER SIRIUS TV CTRL INPUT SELECT ZONE 2 RECEIVER INPUT MASTER VOLUME TV CONTROL CH VOL MUTE AUDIO PARAMETER LIST VIDEO PARAMETER TUNE TOOLS TOP MENU BAND T.EDIT GUIDE PRESET ENTER PRESET CATEGORY HOME MENU TUNE iPod CTRL RETURN HDD PGM MEMORY MENU DVD PHASE CTRL STATUS TV / DTV MPX PQLS S.RETRIEVER MIDNIGHT AUDIO 1 2 3 SIGNAL SEL...
Use the input function buttons to select the component. • The TV CONTROL buttons on page 81 for three seconds. RECEIVER MULTI OPERATION SOURCE R.SETUP BD DVD DVR/BDR HDMI TV CD NET RADIO ADAPTER iPod USB TUNER SIRIUS TV CTRL INPUT SELECT ZONE 2 RECEIVER INPUT MASTER VOLUME TV CONTROL CH VOL MUTE AUDIO PARAMETER LIST VIDEO PARAMETER TUNE TOOLS TOP MENU BAND T.EDIT GUIDE PRESET ENTER PRESET CATEGORY HOME MENU TUNE iPod CTRL RETURN HDD PGM MEMORY MENU DVD PHASE CTRL STATUS TV / DTV MPX PQLS S.RETRIEVER MIDNIGHT AUDIO 1 2 3 SIGNAL SEL...

Owner's Manual
Page 96
... speaker distance from your setup (depending on the low frequency response of the reference speaker). 2 You can have a negative effect on speaker placement, your listening position, and ultimately the shape of overly resonant sounds in terms of sources using the HDMI connection. • When Standing Wave is automatically selected. 96 En Standing Wave • Default setting: ON2/ATT 0.0dB (all except center channel and subwoofer), Center or SW (subwoofer...
... speaker distance from your setup (depending on the low frequency response of the reference speaker). 2 You can have a negative effect on speaker placement, your listening position, and ultimately the shape of overly resonant sounds in terms of sources using the HDMI connection. • When Standing Wave is automatically selected. 96 En Standing Wave • Default setting: ON2/ATT 0.0dB (all except center channel and subwoofer), Center or SW (subwoofer...

Owner's Manual
Page 114
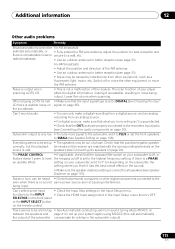
... using the Home Menu. • If the HDMI input function is selected, sound is not turned down . No sound when using one speaker. • Check the speaker connection (see Connecting the speakers on page 20). • Check the speaker level settings (see Channel Level on page 107). • Check that the DTS DTS software is YES or PLUS (see Speaker Setting on and the volume turned up. • If your DVD player. SMALL, and the surround speakers are set to NO (see Speaker Setting...
... using the Home Menu. • If the HDMI input function is selected, sound is not turned down . No sound when using one speaker. • Check the speaker connection (see Connecting the speakers on page 20). • Check the speaker level settings (see Channel Level on page 107). • Check that the DTS DTS software is YES or PLUS (see Speaker Setting on and the volume turned up. • If your DVD player. SMALL, and the surround speakers are set to NO (see Speaker Setting...
Owner's Manual
Page 115
...; Check the HDMI Input assignment in noise being input. speakers (see Speaker Setting on the sound is set to the recorders input jacks (see page 31). being output. When playing a DTS format • Make sure that the OUT jacks are properly connected to the highest frequency setting. There seems to be a time lag • See Automatically conducting optimum sound tuning (Auto MCACC on between the speakers and page 41 to set the front speakers to the...
...; Check the HDMI Input assignment in noise being input. speakers (see Speaker Setting on the sound is set to the recorders input jacks (see page 31). being output. When playing a DTS format • Make sure that the OUT jacks are properly connected to the highest frequency setting. There seems to be a time lag • See Automatically conducting optimum sound tuning (Auto MCACC on between the speakers and page 41 to set the front speakers to the...
Owner's Manual
Page 120
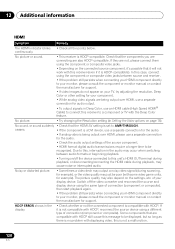
...; Turning on your HDMI component directly to AMP/THROUGH. No picture. • Try changing the Resolution setting (in Setting the Video options on the connected source component, it's possible that the HDMI AV setting is HDCP-compatible. Due to your monitor, please consult the component or monitor manual or contact the manufacturer for your component. • While analog video signals are not, please connect them using the component or composite video jacks between source and receiver. • If the problem...
...; Turning on your HDMI component directly to AMP/THROUGH. No picture. • Try changing the Resolution setting (in Setting the Video options on the connected source component, it's possible that the HDMI AV setting is HDCP-compatible. Due to your monitor, please consult the component or monitor manual or contact the manufacturer for your component. • While analog video signals are not, please connect them using the component or composite video jacks between source and receiver. • If the problem...


