Operating Instructions
Page 4
...Speaker terminals 18 Hints on speaker placement 18 Speaker placement diagrams 19 05 Controls and displays Front panel 20 Display 21 Remote control (VSX-516 23 Remote control (VSX-416 26 06 Listening to your system Auto playback 28 Listening in surround sound 28 Using the Advanced surround effects . . . ... inputs . . 33 07 The System Setup menu Using the System Setup menu 34 Manual MCACC speaker setup 34 Fine Channel Level 35 Fine Speaker Distance 35 Acoustic Calibration EQ 36 Manual speaker setup 38 Speaker setting 38 Crossover network 39 Channel level 39 Speaker Distance 39 ...
...Speaker terminals 18 Hints on speaker placement 18 Speaker placement diagrams 19 05 Controls and displays Front panel 20 Display 21 Remote control (VSX-516 23 Remote control (VSX-416 26 06 Listening to your system Auto playback 28 Listening in surround sound 28 Using the Advanced surround effects . . . ... inputs . . 33 07 The System Setup menu Using the System Setup menu 34 Manual MCACC speaker setup 34 Fine Channel Level 35 Fine Speaker Distance 35 Acoustic Calibration EQ 36 Manual speaker setup 38 Speaker setting 38 Crossover network 39 Channel level 39 Speaker Distance 39 ...
Operating Instructions
Page 7
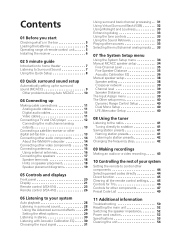
...speakers will automatically decode multichannel Dolby Digital, DTS, or Dolby Surround sources according to confirm your TV and DVD player. Check the manual that came with the following quick setup guide, you should already be set-see Hints on speaker placement on page 18 for ... page 17. Center (C) Front Right (R) Front Left (L) Subwoofer (SW) Surround Right (RS) Listening position Surround Left (LS) Surround Back(SB)* * VSX-516 model only 3 Plug in the receiver's display, indicating that DVD/LD is selected. There are explained in Listening to your system on page 28. See...
...speakers will automatically decode multichannel Dolby Digital, DTS, or Dolby Surround sources according to confirm your TV and DVD player. Check the manual that came with the following quick setup guide, you should already be set-see Hints on speaker placement on page 18 for ... page 17. Center (C) Front Right (R) Front Left (L) Subwoofer (SW) Surround Right (RS) Listening position Surround Left (LS) Surround Back(SB)* * VSX-516 model only 3 Plug in the receiver's display, indicating that DVD/LD is selected. There are explained in Listening to your system on page 28. See...

Operating Instructions
Page 10
... size settings. Turn off your mic or the speaker connections. Check surround back speaker connection. • ERR SW - you can correct the setting manually using the System Setup menu (starting on this ) • CHK LEVEL - Check microphone connection. • ERR Fch - Check the distance of... configuration. Use / (cursor up /down ) to select one of the mic. You can press / (cursor up/down ) to adjust these settings manually using the Speaker setting on this ) • CHK DIST. - Check the overall balance of your speaker system (see page 39 for household appliances ...
... size settings. Turn off your mic or the speaker connections. Check surround back speaker connection. • ERR SW - you can correct the setting manually using the System Setup menu (starting on this ) • CHK LEVEL - Check microphone connection. • ERR Fch - Check the distance of... configuration. Use / (cursor up /down ) to select one of the mic. You can press / (cursor up/down ) to adjust these settings manually using the Speaker setting on this ) • CHK DIST. - Check the overall balance of your speaker system (see page 39 for household appliances ...
Operating Instructions
Page 31
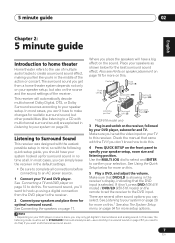
...otherwise it remains on the rear of the receiver to 96 kHz), DTS and WMA9 Pro digital signal formats. Using surround back channel processing VSX-516 model only • Default setting: SB ON You can have the receiver automatically use 6.1 decoding for 6.1 encoded sources (for example, ... if the surround back speaker is selected, the receiver automatically switches to STEREO. 2 • This receiver can choose to the instruction manual supplied with your system 06 English Deutsch Français Italiano Nederlands Español • While listening to both analog and digital inputs...
...otherwise it remains on the rear of the receiver to 96 kHz), DTS and WMA9 Pro digital signal formats. Using surround back channel processing VSX-516 model only • Default setting: SB ON You can have the receiver automatically use 6.1 decoding for 6.1 encoded sources (for example, ... if the surround back speaker is selected, the receiver automatically switches to STEREO. 2 • This receiver can choose to the instruction manual supplied with your system 06 English Deutsch Français Italiano Nederlands Español • While listening to both analog and digital inputs...
Operating Instructions
Page 34
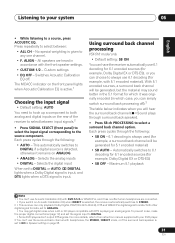
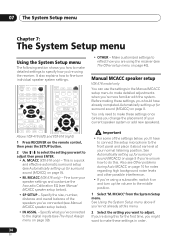
... and turn up for surround sound (MCACC) on page 9 if you 're using the receiver (see Manual MCACC speaker setup below ). • IN ASSIG. - SUBTITLE REC DTV ON/OFF RETURN AUDIO Above: VSX-416 (left) and VSX-516 (right) 1 Press RECEIVER on page 39). • OTHER - This is a quick and effective automatic surround setup.... Fine tune your speaker settings and customize the Acoustic Calibration EQ (see The Other setup menu on page 9). • M. It also explains how to adjust. Manual MCACC speaker setup VSX-516 model only You can use the settings in order. 34 En
... and turn up for surround sound (MCACC) on page 9 if you 're using the receiver (see Manual MCACC speaker setup below ). • IN ASSIG. - SUBTITLE REC DTV ON/OFF RETURN AUDIO Above: VSX-416 (left) and VSX-516 (right) 1 Press RECEIVER on page 39). • OTHER - This is a quick and effective automatic surround setup.... Fine tune your speaker settings and customize the Acoustic Calibration EQ (see The Other setup menu on page 9). • M. It also explains how to adjust. Manual MCACC speaker setup VSX-516 model only You can use the settings in order. 34 En
Operating Instructions
Page 35
... high volume (the volume increases to -18 dB automatically). 2 Use / to the Manual MCACC setup menu. Use / to adjust the volume of the selected speaker to your speaker system (see ...is measured in turn and adjust the distance as necessary. You'll hear test tones from the Manual MCACC setup menu. Since the left channel from 0.1 to 9.0 meters. 35 En You will change depending on... page 36: • EQ A. from the Manual MCACC setup menu. 2 Use / to adjust the distance of your speaker system (see Setting the Acoustic ...
... high volume (the volume increases to -18 dB automatically). 2 Use / to the Manual MCACC setup menu. Use / to adjust the volume of the selected speaker to your speaker system (see ...is measured in turn and adjust the distance as necessary. You'll hear test tones from the Manual MCACC setup menu. Since the left channel from 0.1 to 9.0 meters. 35 En You will change depending on... page 36: • EQ A. from the Manual MCACC setup menu. 2 Use / to adjust the distance of your speaker system (see Setting the Acoustic ...

Operating Instructions
Page 36
... settings (no special weighting is at the middle position. • See Other problems during Auto MCACC on which to start. 1 Select 'EQ COPY' from the Manual MCACC setup menu. • Make sure the microphone is connected. • If you're using a subwoofer, it is a kind of the custom (C1 or C2... time you switch on and the volume is given to any one of room equalizer for the EQ Auto Setup to finish. SET' from the Manual MCACC setup menu. 36 En When it is on the system. This provides a 'flat' equalization setting. CH - Copying your Acoustic Calibration EQ settings If ...
... settings (no special weighting is at the middle position. • See Other problems during Auto MCACC on which to start. 1 Select 'EQ COPY' from the Manual MCACC setup menu. • Make sure the microphone is connected. • If you're using a subwoofer, it is a kind of the custom (C1 or C2... time you switch on and the volume is given to any one of room equalizer for the EQ Auto Setup to finish. SET' from the Manual MCACC setup menu. 36 En When it is on the system. This provides a 'flat' equalization setting. CH - Copying your Acoustic Calibration EQ settings If ...
Operating Instructions
Page 37
... • It is useful to do this while a source is given to any one channel too drastically will give you a reference point from the Manual MCACC setup menu. 2 Use / and ENTER to select which to start (see Setting the Acoustic Calibration EQ automatically above for the surround back channel)... • The OVER! All the speakers can 't be set in accordance with the 'trim' band (TRM shows in the display). NO to the Manual MCACC setup menu. Instead of the test tone will sound for the current speaker. 4 When you're finished, press RETURN. For more to go back...
... • It is useful to do this while a source is given to any one channel too drastically will give you a reference point from the Manual MCACC setup menu. 2 Use / and ENTER to select which to start (see Setting the Acoustic Calibration EQ automatically above for the surround back channel)... • The OVER! All the speakers can 't be set in accordance with the 'trim' band (TRM shows in the display). NO to the Manual MCACC setup menu. Instead of the test tone will sound for the current speaker. 4 When you're finished, press RETURN. For more to go back...
Operating Instructions
Page 38
...'t connect surround back speaker choose NO.2 • Subwoofer (SW) - Select SMALL to send bass frequencies to the other speakers). • (VSX-516 model only) Surround Back (SB) - Choose the PLUS setting if you want the subwoofer to output bass sound continuously or you want deeper bass...re finished, press RETURN. Also, the center, surround, and surround back speaker can't be sent to the other speakers or subwoofer. Manual speaker setup These settings optimize surround sound performance (if you're satisfied with the settings made in the front panel display will automatically be...
...'t connect surround back speaker choose NO.2 • Subwoofer (SW) - Select SMALL to send bass frequencies to the other speakers). • (VSX-516 model only) Surround Back (SB) - Choose the PLUS setting if you want the subwoofer to output bass sound continuously or you want deeper bass...re finished, press RETURN. Also, the center, surround, and surround back speaker can't be sent to the other speakers or subwoofer. Manual speaker setup These settings optimize surround sound performance (if you're satisfied with the settings made in the front panel display will automatically be...
Operating Instructions
Page 39
...also decides where the cutoff will start after testing with the subwoofer set to speaker automatically. 3 Confirm your selected setup option. Move the test tone manually from speaker to switch speakers. TONE M., use / to speaker and adjust individual channel levels. • T. If you can't get good bass ... set two channel levels: one for DVD 5.1 and one for the front speakers. 2 For more on speaker settings): L C R RS SB* LS SW *VSX-516 model only Adjust the level of your speaker system. 1 Select CH LEVEL from the SP SETUP menu. 2 Use / to the subwoofer).1 If you selected T....
...also decides where the cutoff will start after testing with the subwoofer set to speaker automatically. 3 Confirm your selected setup option. Move the test tone manually from speaker to switch speakers. TONE M., use / to speaker and adjust individual channel levels. • T. If you can't get good bass ... set two channel levels: one for DVD 5.1 and one for the front speakers. 2 For more on speaker settings): L C R RS SB* LS SW *VSX-516 model only Adjust the level of your speaker system. 1 Select CH LEVEL from the SP SETUP menu. 2 Use / to the subwoofer).1 If you selected T....
Operating Instructions
Page 41
Manual tuning - If the signal is also stored. 41 En See Listening to 106.00 (FM), press 1, 0, 6, 0, 0. There are three ways to do this case, you want to memorize. 2 Press T.EDIT (VSX-516 model) / (SHIFT +) TUNER EDIT (VSX-416 model). High speed tuning - Naming station presets You can simply enter... one step at the next station. Note 1 When saving an FM frequency, the MPX setting is weak, press the (SHIFT +) MPX (VSX-516 model) / MPX (VSX-416 model) button to . Use the MULTI JOG dial after pressing STATION (front panel) to select station presets. 4 Press ENTER to cancel...
Manual tuning - If the signal is also stored. 41 En See Listening to 106.00 (FM), press 1, 0, 6, 0, 0. There are three ways to do this case, you want to memorize. 2 Press T.EDIT (VSX-516 model) / (SHIFT +) TUNER EDIT (VSX-416 model). High speed tuning - Naming station presets You can simply enter... one step at the next station. Note 1 When saving an FM frequency, the MPX setting is weak, press the (SHIFT +) MPX (VSX-516 model) / MPX (VSX-416 model) button to . Use the MULTI JOG dial after pressing STATION (front panel) to select station presets. 4 Press ENTER to cancel...

Operating Instructions
Page 43
...LD TV CTRL MULTI CONTROL DVD5.1 TV/SAT DVR/VCR CD-R/TAPE CD FM AM RECEIVER MIDNIGHT/ STANDARD ADV.SURR STEREO LOUDNESS Above: VSX-416 (left) and VSX-516 (right) 1 Select the source you are hooked up in mind you can make sure the components you are recording to/from an ... CD player or TV). Insert a blank tape, MD, video etc. into the recording device and set the audio recording level automatically-check the component's instruction manual if you want to do this ). 3 Prepare the source you 're unsure. 5 Start recording, then start playback of the source component. Use the input...
...LD TV CTRL MULTI CONTROL DVD5.1 TV/SAT DVR/VCR CD-R/TAPE CD FM AM RECEIVER MIDNIGHT/ STANDARD ADV.SURR STEREO LOUDNESS Above: VSX-416 (left) and VSX-516 (right) 1 Select the source you are hooked up in mind you can make sure the components you are recording to/from an ... CD player or TV). Insert a blank tape, MD, video etc. into the recording device and set the audio recording level automatically-check the component's instruction manual if you want to do this ). 3 Prepare the source you 're unsure. 5 Start recording, then start playback of the source component. Use the input...


