Owner's Manual
Page 4
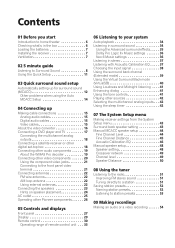
... antenna 22 AM loop antenna 22 Using external antennas 22 Connecting the speakers 23 Hints on speaker placement 24 AC outlet 25 Operating other Pioneer components 26 05 Controls and displays Front panel 27 Display 29 Remote control 30 Operating range of remote control unit . . . 33 ...menu Making receiver settings from the System Setup menu 43 Surround back speaker setting 43 Manual MCACC speaker setup 44 Fine Channel Level 44 Fine Channel Distance 45 Acoustic Calibration EQ 46 Manual speaker setup 48 Speaker setting 48 Crossover network 49 Channel level 49 Speaker Distance ...
... antenna 22 AM loop antenna 22 Using external antennas 22 Connecting the speakers 23 Hints on speaker placement 24 AC outlet 25 Operating other Pioneer components 26 05 Controls and displays Front panel 27 Display 29 Remote control 30 Operating range of remote control unit . . . 33 ...menu Making receiver settings from the System Setup menu 43 Surround back speaker setting 43 Manual MCACC speaker setup 44 Fine Channel Level 44 Fine Channel Distance 45 Acoustic Calibration EQ 46 Manual speaker setup 48 Speaker setting 48 Crossover network 49 Channel level 49 Speaker Distance ...

Owner's Manual
Page 10
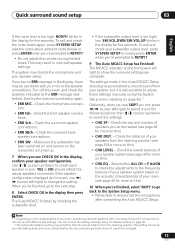
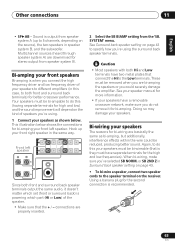
.... Place your speakers as shown below if you can select. B fig. Use the MULTI JOG dial to select and ENTER to confirm your DVD player's manual for more on this. 5 Press QUICK SETUP on your TV to this ) if you want multichannel surround sound. 10 En In this case, the listening... twisted together (fig. If it on page 34 for more setup options. 2 • You may only get digital 2 channel stereo and analog sound. Check the manual that came with the TV if you may need to set the receiver to the DVD input.2 There are several other sound options you 're...
.... Place your speakers as shown below if you can select. B fig. Use the MULTI JOG dial to select and ENTER to confirm your DVD player's manual for more on this. 5 Press QUICK SETUP on your TV to this ) if you want multichannel surround sound. 10 En In this case, the listening... twisted together (fig. If it on page 34 for more setup options. 2 • You may only get digital 2 channel stereo and analog sound. Check the manual that came with the TV if you may need to set the receiver to the DVD input.2 There are several other sound options you 're...
Owner's Manual
Page 13
... power, and check the problem indicated by checking the subwoofer level. • If the subwoofer output level is also possible to adjust these settings manually using the Speaker setting on the front panel will end up . 7 When you see page 48 for more on the acoustic characteristics of speakers ...size and number of your mic or the speaker connections. to go to check the settings: • CHK SP - If you can correct the setting manually using the System Setup menu (starting on this ) • CHK LEVEL - you see the notes about ambient noise below ), then try the auto ...
... power, and check the problem indicated by checking the subwoofer level. • If the subwoofer output level is also possible to adjust these settings manually using the Speaker setting on the front panel will end up . 7 When you see page 48 for more on the acoustic characteristics of speakers ...size and number of your mic or the speaker connections. to go to check the settings: • CHK SP - If you can correct the setting manually using the System Setup menu (starting on this ) • CHK LEVEL - you see the notes about ambient noise below ), then try the auto ...
Owner's Manual
Page 21
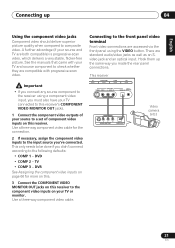
... panel connections. Use a three-way component video cable. Important • If you connect any source component to the receiver using the VIDEO button. See the manuals that came with progressive-scan video. Use a three-way component video cable for more on this. 3 Connect the COMPONENT VIDEO MONITOR OUT jacks on your...
... panel connections. Use a three-way component video cable. Important • If you connect any source component to the receiver using the VIDEO button. See the manuals that came with progressive-scan video. Use a three-way component video cable for more on this. 3 Connect the COMPONENT VIDEO MONITOR OUT jacks on your...
Owner's Manual
Page 24
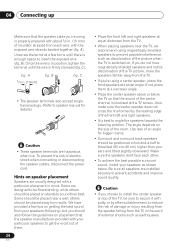
C • The speaker terminals also accept single banana plugs. (Refer to speaker manual for bigger rooms. • Surround and surround back speakers should be positioned a foot-and-a-half to angle the speakers towards the listening position. Hints on ...
C • The speaker terminals also accept single banana plugs. (Refer to speaker manual for bigger rooms. • Surround and surround back speakers should be positioned a foot-and-a-half to angle the speakers towards the listening position. Hints on ...

Owner's Manual
Page 38
... a component to both analog and digital inputs on the rear of the receiver to select between : • AUTO - For more details, refer to the instruction manual supplied with DTS is playing an analog signal. Press repeatedly to DIGITAL. • Some DVD players don't output DTS signals. Selects the analog inputs. •...
... a component to both analog and digital inputs on the rear of the receiver to select between : • AUTO - For more details, refer to the instruction manual supplied with DTS is playing an analog signal. Press repeatedly to DIGITAL. • Some DVD players don't output DTS signals. Selects the analog inputs. •...
Owner's Manual
Page 43
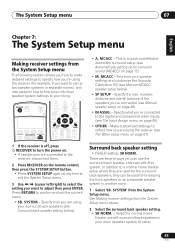
... speaker systems in separate rooms), and also explains how to fine-tune individual speaker system settings to the digital and component video inputs (see Manual MCACC speaker setup below ). Press RETURN to adjust then press ENTER. Specify how you are used for bi-amping the front speakers or as...• SB NORM. - Specify the size, number, distance and overall balance of the speakers you 've connected to your surround back speakers (see Manual speaker setup on page 12). • M. RECEIVER INPUT SELECT SOURCE DVD/LD TV/SAT DVR/VCR TVCONT MULTI CONTROL CD CD-R/TAPE TUNER RECEIVER FL...
... speaker systems in separate rooms), and also explains how to fine-tune individual speaker system settings to the digital and component video inputs (see Manual MCACC speaker setup below ). Press RETURN to adjust then press ENTER. Specify how you are used for bi-amping the front speakers or as...• SB NORM. - Specify the size, number, distance and overall balance of the speakers you 've connected to your surround back speakers (see Manual speaker setup on page 12). • M. RECEIVER INPUT SELECT SOURCE DVD/LD TV/SAT DVR/VCR TVCONT MULTI CONTROL CD CD-R/TAPE TUNER RECEIVER FL...
Owner's Manual
Page 44
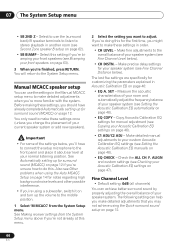
... - Measure the acoustic characteristics of your room and automatically adjust the frequency balance of your speaker system (see Fine Channel Level below ). Make detailed manual adjustments to the front panel and place it on page 62). • SB BIAMP - SET - You only need to the overall balance of ... 46: • EQ A. Check the ALL CH, F. 07 The System Setup menu • SB 2ND Z - Select to use the settings in the Manual MCACC setup menu to adjust. Select this . You will return to make detailed adjustments when you 're not already at your current speaker system or...
... - Measure the acoustic characteristics of your room and automatically adjust the frequency balance of your speaker system (see Fine Channel Level below ). Make detailed manual adjustments to the front panel and place it on page 62). • SB BIAMP - SET - You only need to the overall balance of ... 46: • EQ A. Check the ALL CH, F. 07 The System Setup menu • SB 2ND Z - Select to use the settings in the Manual MCACC setup menu to adjust. Select this . You will return to make detailed adjustments when you 're not already at your current speaker system or...
Owner's Manual
Page 45
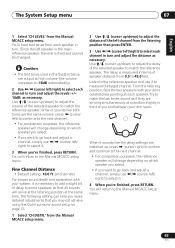
... go back and adjust a channel, simply use / (cursor left speaker is the main reference speaker, the level is fixed and cannot be changed. from the Manual MCACC setup menu. 2 Use / (cursor up , press (cursor right) to confirm and continue to the next channel. • For comparison purposes, the reference speaker... the Quick surround sound setup on which speaker you select. • If you make the two tones sound as necessary. You will return to the Manual MCACC setup menu. 45 En Use / (cursor up /down ) to adjust the volume of the left /right) to 45.0 feet. The delay is ...
... go back and adjust a channel, simply use / (cursor left speaker is the main reference speaker, the level is fixed and cannot be changed. from the Manual MCACC setup menu. 2 Use / (cursor up , press (cursor right) to confirm and continue to the next channel. • For comparison purposes, the reference speaker... the Quick surround sound setup on which speaker you select. • If you make the two tones sound as necessary. You will return to the Manual MCACC setup menu. 45 En Use / (cursor up /down ) to adjust the volume of the left /right) to 45.0 feet. The delay is ...
Owner's Manual
Page 46
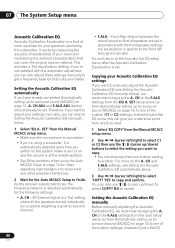
...in accordance with the automatic adjustment, you can also use the / (cursor up for surround sound (MCACC) on page 12) to manually adjust the Acoustic Calibration EQ (see Setting the Acoustic Calibration EQ automatically above (or from one channel. • F.ALG - Make ... 'COPY? As the receiver outputs test tones, the frequency balance is adjusted automatically for your tastes. Setting the Acoustic Calibration EQ manually Before manually adjusting the Acoustic Calibration EQ, we recommend copying the A. This provides a 'flat' equalization setting. 07 The System Setup menu ...
...in accordance with the automatic adjustment, you can also use the / (cursor up for surround sound (MCACC) on page 12) to manually adjust the Acoustic Calibration EQ (see Setting the Acoustic Calibration EQ automatically above (or from one channel. • F.ALG - Make ... 'COPY? As the receiver outputs test tones, the frequency balance is adjusted automatically for your tastes. Setting the Acoustic Calibration EQ manually Before manually adjusting the Acoustic Calibration EQ, we recommend copying the A. This provides a 'flat' equalization setting. 07 The System Setup menu ...

Owner's Manual
Page 47
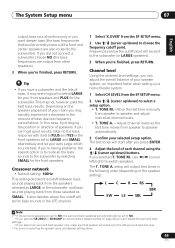
...channel. • F.ALG ADJ - indicator shows in accordance with the 'trim' band (TRM shows in the display. 1 Select 'EQ CHECK' from the Manual MCACC setup menu. 2 Use / (cursor up / down ) to select the channel you want and adjust to your liking. disappears from the display. ... check the ALL CH, F.ALIGN and CUSTOM1/2 settings in the display). Checking your Acoustic Calibration EQ settings After you have completed an automatic or manual Acoustic Calibration EQ adjustment, you can compare the different settings. 3 Use / (cursor up /down ) to select the channel you want to check...
...channel. • F.ALG ADJ - indicator shows in accordance with the 'trim' band (TRM shows in the display. 1 Select 'EQ CHECK' from the Manual MCACC setup menu. 2 Use / (cursor up / down ) to select the channel you want and adjust to your liking. disappears from the display. ... check the ALL CH, F.ALIGN and CUSTOM1/2 settings in the display). Checking your Acoustic Calibration EQ settings After you have completed an automatic or manual Acoustic Calibration EQ adjustment, you can compare the different settings. 3 Use / (cursor up /down ) to select the channel you want to check...
Owner's Manual
Page 48
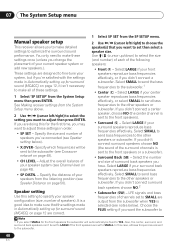
... be sent to the other speakers or subwoofer. If you didn't connect surround back speakers choose NO.2 • Subwoofer (SW) - 07 The System Setup menu Manual speaker setup This receiver allows you didn't connect a subwoofer. These settings are doing this setting to adjust then press ENTER. See Making receiver settings from...
... be sent to the other speakers or subwoofer. If you didn't connect surround back speakers choose NO.2 • Subwoofer (SW) - 07 The System Setup menu Manual speaker setup This receiver allows you didn't connect a subwoofer. These settings are doing this setting to adjust then press ENTER. See Making receiver settings from...
Owner's Manual
Page 49
... sound continuously or you press ENTER. 4 Adjust the level of each channel using the / (cursor up/down) buttons. If you selected T. Move the test tone manually from the SP SETUP menu. 2 Use / (cursor up /down ) to the subwoofer (or LARGE speakers). 3 When you 're finished, press RETURN. This may seem logical...
... sound continuously or you press ENTER. 4 Adjust the level of each channel using the / (cursor up/down) buttons. If you selected T. Move the test tone manually from the SP SETUP menu. 2 Use / (cursor up /down ) to the subwoofer (or LARGE speakers). 3 When you 're finished, press RETURN. This may seem logical...

Owner's Manual
Page 51
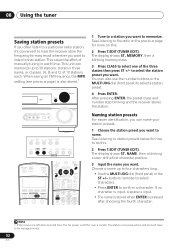
... and AM. 3 Press D.ACCESS (Direct Access). 4 Use the number buttons to enter the frequency of the radio station. for high speed tuning. Manual tuning To change the frequency one . This should improve the sound quality and allow you make a mistake halfway through, press D.ACCESS twice to cancel ... the currently selected band, press and hold TUNE +/- In this case, you can simply enter the frequency directly using the automatic (search) and manual (step) tuning functions. Tuning directly to a station Sometimes, you'll already know the frequency of the station you how to tune in to...
... and AM. 3 Press D.ACCESS (Direct Access). 4 Use the number buttons to enter the frequency of the radio station. for high speed tuning. Manual tuning To change the frequency one . This should improve the sound quality and allow you make a mistake halfway through, press D.ACCESS twice to cancel ... the currently selected band, press and hold TUNE +/- In this case, you can simply enter the frequency directly using the automatic (search) and manual (step) tuning functions. Tuning directly to a station Sometimes, you'll already know the frequency of the station you how to tune in to...
Owner's Manual
Page 52
.... 4 Press ENTER. NAME, then a blinking cursor at the first character position. 3 Input the name you want . The display shows ST. This saves the effort of manually tuning in three banks, or classes, (A, B and C) of the three classes then press ST +/- 08 Using the tuner Saving station presets If you often listen...
.... 4 Press ENTER. NAME, then a blinking cursor at the first character position. 3 Input the name you want . The display shows ST. This saves the effort of manually tuning in three banks, or classes, (A, B and C) of the three classes then press ST +/- 08 Using the tuner Saving station presets If you often listen...

Owner's Manual
Page 54
... are copy-protected, and can only be recorded. 54 En into the recording device and set the audio recording level automatically-check the component's instruction manual if you can't make a digital recording from an analog source or vice-versa, so make an audio or a video recording from the built-in tuner...
... are copy-protected, and can only be recorded. 54 En into the recording device and set the audio recording level automatically-check the component's instruction manual if you can't make a digital recording from an analog source or vice-versa, so make an audio or a video recording from the built-in tuner...
Owner's Manual
Page 63
... depend on page 43 to 5 channels, depending on the receiver. Hook up to specify how you 've selected SB NORM. SYSTEM' menu. See your speaker manual for more information. • If your front left speaker SA R FRONT L P E A K E R S CENTER R SURROUND BACK L B R SURROUND L Hi Lo Since both front and surround back speaker terminals...
... depend on page 43 to 5 channels, depending on the receiver. Hook up to specify how you 've selected SB NORM. SYSTEM' menu. See your speaker manual for more information. • If your front left speaker SA R FRONT L P E A K E R S CENTER R SURROUND BACK L B R SURROUND L Hi Lo Since both front and surround back speaker terminals...

Owner's Manual
Page 69
... does not turn muting off automatically, take the unit to your nearest Pioneer authorized service center or your nearest Pioneer authorized independent service company to carry out repair work. • If the.... • Disconnect the power plug from the outlet and insert again to return to the instruction manual supplied with this . 69 En No sound is output when a function is selected. • Make...composite video to make sure you think that there is something wrong with the TV. • VSX-915 only - If you 're assigned the correct input. • The video input selected ...
... does not turn muting off automatically, take the unit to your nearest Pioneer authorized service center or your nearest Pioneer authorized independent service company to carry out repair work. • If the.... • Disconnect the power plug from the outlet and insert again to return to the instruction manual supplied with this . 69 En No sound is output when a function is selected. • Make...composite video to make sure you think that there is something wrong with the TV. • VSX-915 only - If you 're assigned the correct input. • The video input selected ...
Owner's Manual
Page 70
... up. • The Dolby Digital or DTS source you are set the SIGNAL SELECT to DIGITAL (refer to page 38). • Refer to the instruction manual supplied with the DVD player. 70 En No sound from surround or center speakers. • Connect the speakers properly (refer to page 23). • Refer...
... up. • The Dolby Digital or DTS source you are set the SIGNAL SELECT to DIGITAL (refer to page 38). • Refer to the instruction manual supplied with the DVD player. 70 En No sound from surround or center speakers. • Connect the speakers properly (refer to page 23). • Refer...
Owner's Manual
Page 71
... repeatedly to return to the default. 71 En There seems to be sure to turn the volume down to the right jack (see Operating other Pioneer components on page 26). Can't operate the remote control. • Replace the batteries (refer to page 7). • Operate within 23 ft. (7 m),...anything connected to the CONTROL IN jack and use remote normally (see Operating other Pioneer components on page 26). • Make sure an analog connection has been made between the speakers and the to the instruction manual supplied with position. DTS is played back. • Make sure the player...
... repeatedly to return to the default. 71 En There seems to be sure to turn the volume down to the right jack (see Operating other Pioneer components on page 26). Can't operate the remote control. • Replace the batteries (refer to page 7). • Operate within 23 ft. (7 m),...anything connected to the CONTROL IN jack and use remote normally (see Operating other Pioneer components on page 26). • Make sure an analog connection has been made between the speakers and the to the instruction manual supplied with position. DTS is played back. • Make sure the player...


