Owner's Manual
Page 4
...antennas 22 Connecting the speakers 23 Hints on speaker placement 24 AC outlet 25 Operating other Pioneer components 26 05 Controls and displays Front panel 27 Display 29 Remote control 30 Operating range of remote control unit . . . 33 06 Listening to your system Auto playback 34 Listening in surround...39 Using the Virtual Surround Back mode (VirtualSB 40 Using Loudness and Midnight listening . . . . 41 Enhancing dialog 41 Using the tone controls 41 Playing other sources 42 Selecting the multichannel analog inputs . . . 42 Using the sleep timer 42 07 The System Setup menu Making ...
...antennas 22 Connecting the speakers 23 Hints on speaker placement 24 AC outlet 25 Operating other Pioneer components 26 05 Controls and displays Front panel 27 Display 29 Remote control 30 Operating range of remote control unit . . . 33 06 Listening to your system Auto playback 34 Listening in surround...39 Using the Virtual Surround Back mode (VirtualSB 40 Using Loudness and Midnight listening . . . . 41 Enhancing dialog 41 Using the tone controls 41 Playing other sources 42 Selecting the multichannel analog inputs . . . 42 Using the sleep timer 42 07 The System Setup menu Making ...
Owner's Manual
Page 5
...signals from other remote controls 56 Erasing one of the remote control button settings 57 Erasing all of the remote control presets . . . . 57 Direct function 57 Confirming preset codes 58 Controls for TVs 59 Controls for other ...components 60 11 Other connections Second Zone speaker B setup 62 Switching the speaker system 62 Bi-amping your front speakers 63 Bi-wiring your speakers 63 Connecting additional amplifiers 64 Using this receiver with a Pioneer...
...signals from other remote controls 56 Erasing one of the remote control button settings 57 Erasing all of the remote control presets . . . . 57 Direct function 57 Confirming preset codes 58 Controls for TVs 59 Controls for other ...components 60 11 Other connections Second Zone speaker B setup 62 Switching the speaker system 62 Bi-amping your front speakers 63 Bi-wiring your speakers 63 Connecting additional amplifiers 64 Using this receiver with a Pioneer...
Owner's Manual
Page 6
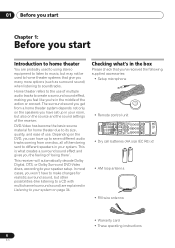
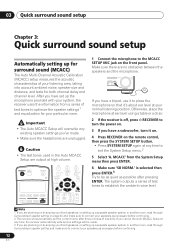
... AUDIO SUBTITLE REC STOP TUNER DISPLAY DTVON/OFF REC DTVINFO MUTE VOL TV CH INPUT SELECT TV VOL RETURN SYSTEM TUNE GUIDE SETUP TV CONTROL ST BAND ENTER DTVMENU ST T.EDIT Checking what creates a surround sound effect and gives you the feeling of 'being sent to soundtracks....the source and the sound settings of them being there'. The surround sound you 've received the following supplied accessories: • Setup microphone • Remote control unit • Dry cell batteries (AA size IEC R6) x2 • AM loop antenna • FM wire antenna SR DISC ENTER CLASS MENU...
... AUDIO SUBTITLE REC STOP TUNER DISPLAY DTVON/OFF REC DTVINFO MUTE VOL TV CH INPUT SELECT TV VOL RETURN SYSTEM TUNE GUIDE SETUP TV CONTROL ST BAND ENTER DTVMENU ST T.EDIT Checking what creates a surround sound effect and gives you the feeling of 'being sent to soundtracks....the source and the sound settings of them being there'. The surround sound you 've received the following supplied accessories: • Setup microphone • Remote control unit • Dry cell batteries (AA size IEC R6) x2 • AM loop antenna • FM wire antenna SR DISC ENTER CLASS MENU...

Owner's Manual
Page 10
... (see your DVD player's manual for more on this case, the listening mode must be set to STANDARD (see Listening in surround sound on the remote control to set the video input on the sound. Use the MULTI JOG dial to select and ENTER to confirm your selection. Check the manual that...
... (see your DVD player's manual for more on this case, the listening mode must be set to STANDARD (see Listening in surround sound on the remote control to set the video input on the sound. Use the MULTI JOG dial to select and ENTER to confirm your selection. Check the manual that...
Owner's Manual
Page 12
... TV VOL INPUT SELECT TV CH VOL 1 Connect the microphone to the MCACC SETUP MIC jack on the remote control, then press the SYSTEM SETUP button. • Press SYSTEM SETUP again at any existing speaker settings you've made . 3 If you are planning on page ...
... TV VOL INPUT SELECT TV CH VOL 1 Connect the microphone to the MCACC SETUP MIC jack on the remote control, then press the SYSTEM SETUP button. • Press SYSTEM SETUP again at any existing speaker settings you've made . 3 If you are planning on page ...

Owner's Manual
Page 26
... audio or video jacks connected to another component for grounding purposes. 04 Connecting up Operating other Pioneer products Note 1 • If you want to control all your components using the remote sensor. 26 En When you use a remote control, the control signal is passed along the chain to the appropriate component.1 Note that if you use...
... audio or video jacks connected to another component for grounding purposes. 04 Connecting up Operating other Pioneer products Note 1 • If you want to control all your components using the remote sensor. 26 En When you use a remote control, the control signal is passed along the chain to the appropriate component.1 Note that if you use...
Owner's Manual
Page 30
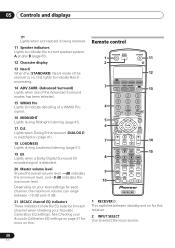
...the overall volume level. ---dB indicates the minimum level, and - 0 dB indicates the maximum level. Remote control RECEIVER INPUT SELECT 1 2 SOURCE 11 12 DVD/LD TV/SAT DVR/VCR TVCONT 3 MULTI CONTROL CD CD-R/TAPE TUNER RECEIVER 13 4 FL DIMMER +10 SR DISC ENTER D.ACCESS TOP MENU 5 ... SELECT TV CH VOL 14 8 9 10 DTVON/OFF REC DTVINFO MUTE TUNER DISPLAY REC STOP MPX CHRETURN AUDIO SUBTITLE HDD CH RECEIVER CONTROL STANDARD ADV.SURR STEREO DVD CH SLEEP MIDNIGHT/ ACOUSTIC LOUDNESS DIALOGE EQ INPUTATT SHIFT EFFECT /CH SEL LEVEL 15 RECEIVER 1 RECEIVER This switches...
...the overall volume level. ---dB indicates the minimum level, and - 0 dB indicates the maximum level. Remote control RECEIVER INPUT SELECT 1 2 SOURCE 11 12 DVD/LD TV/SAT DVR/VCR TVCONT 3 MULTI CONTROL CD CD-R/TAPE TUNER RECEIVER 13 4 FL DIMMER +10 SR DISC ENTER D.ACCESS TOP MENU 5 ... SELECT TV CH VOL 14 8 9 10 DTVON/OFF REC DTVINFO MUTE TUNER DISPLAY REC STOP MPX CHRETURN AUDIO SUBTITLE HDD CH RECEIVER CONTROL STANDARD ADV.SURR STEREO DVD CH SLEEP MIDNIGHT/ ACOUSTIC LOUDNESS DIALOGE EQ INPUTATT SHIFT EFFECT /CH SEL LEVEL 15 RECEIVER 1 RECEIVER This switches...

Owner's Manual
Page 33
...-R/TAPE/MD S-VIDEO VIDEO TUNER AUDIO/VIDEO MULTI-CHANNEL AMPLIFIER VSX-915 ENTER MULTI JOG AUX MVOALSUTMERE DOWN UP 23 ft (7m) 33 En The following commands are obstacles between the remote control and the receiver's remote sensor. • Direct sunlight or fluorescent light is shining...surround sound (page 11, page 43). 14 VOL +/- Use to the receiver (see Controlling the rest of the remote control presets on page 55. Also adjusts the level of remote control unit The remote control may not work properly if: • There are shown when you choose the options ...
...-R/TAPE/MD S-VIDEO VIDEO TUNER AUDIO/VIDEO MULTI-CHANNEL AMPLIFIER VSX-915 ENTER MULTI JOG AUX MVOALSUTMERE DOWN UP 23 ft (7m) 33 En The following commands are obstacles between the remote control and the receiver's remote sensor. • Direct sunlight or fluorescent light is shining...surround sound (page 11, page 43). 14 VOL +/- Use to the receiver (see Controlling the rest of the remote control presets on page 55. Also adjusts the level of remote control unit The remote control may not work properly if: • There are shown when you choose the options ...

Owner's Manual
Page 42
...8226; When playback from the multichannel inputs. 3 You can also switch off the sleep timer simply by pressing SLEEP once. CH CH RECEIVER CONTROL STANDARD ADV.SURR STEREO SLEEP MIDNIGHT/ ACOUSTIC LOUDNESS DIALOGE EQ INPUTATT SHIFT EFFECT /CH SEL LEVEL Selecting the multichannel analog inputs If you have ... INPUT SELECT).1 4 Start playback of the component you selected in tuner, switch to the channel you want to playback. Use the remote control to set the sleep timer. DVD 5.1ch will show in the display and the ANALOG SIGNAL SELECT indicator will cycle through the sleep...
...8226; When playback from the multichannel inputs. 3 You can also switch off the sleep timer simply by pressing SLEEP once. CH CH RECEIVER CONTROL STANDARD ADV.SURR STEREO SLEEP MIDNIGHT/ ACOUSTIC LOUDNESS DIALOGE EQ INPUTATT SHIFT EFFECT /CH SEL LEVEL Selecting the multichannel analog inputs If you have ... INPUT SELECT).1 4 Start playback of the component you selected in tuner, switch to the channel you want to playback. Use the remote control to set the sleep timer. DVD 5.1ch will show in the display and the ANALOG SIGNAL SELECT indicator will cycle through the sleep...
Owner's Manual
Page 43
This is off, press RECEIVER to turn the power on. • If headphones are connected to the receiver, disconnect them. 2 Press RECEIVER on the remote control, then press the SYSTEM SETUP button. • Press SYSTEM SETUP again at any time to exit the System Setup menu. 3 Use / (cursor left/right) ... back speaker channels with surround back speakers in another room. 1 Select 'SB. RECEIVER INPUT SELECT SOURCE DVD/LD TV/SAT DVR/VCR TVCONT MULTI CONTROL CD CD-R/TAPE TUNER RECEIVER FL DIMMER +10 D.ACCESS TOP MENU TUNE SR DISC ENTER CLASS MENU DTVMENU ST T.EDIT ENTER ST BAND SYSTEM TUNE...
This is off, press RECEIVER to turn the power on. • If headphones are connected to the receiver, disconnect them. 2 Press RECEIVER on the remote control, then press the SYSTEM SETUP button. • Press SYSTEM SETUP again at any time to exit the System Setup menu. 3 Use / (cursor left/right) ... back speaker channels with surround back speakers in another room. 1 Select 'SB. RECEIVER INPUT SELECT SOURCE DVD/LD TV/SAT DVR/VCR TVCONT MULTI CONTROL CD CD-R/TAPE TUNER RECEIVER FL DIMMER +10 D.ACCESS TOP MENU TUNE SR DISC ENTER CLASS MENU DTVMENU ST T.EDIT ENTER ST BAND SYSTEM TUNE...
Owner's Manual
Page 50
on the remote control. Note 1 • If you want then set two channel levels: one for DVD 5.1 CH and one for effective surround sound. 1 Select 'SP DISTN.' You may ...
on the remote control. Note 1 • If you want then set two channel levels: one for DVD 5.1 CH and one for effective surround sound. 1 Select 'SP DISTN.' You may ...

Owner's Manual
Page 51
... next page for other stations. for high speed tuning. Each press switches the band between FM and AM. 3 Tune to search for more on the remote control. 1 Press the TUNER button to select the tuner. 2 Use the BAND button to a station below. Using the tuner 08 English Deutsch Français Italiano... tune in the currently selected band, press and hold TUNE +/- The receiver will start over. 51 En DVD/LD TV/SAT DVR/VCR TVCONT MULTI CONTROL CD CD-R/TAPE TUNER RECEIVER FL DIMMER +10 D.ACCESS TOP MENU TUNE SR DISC ENTER CLASS MENU DTVMENU ST T.EDIT ENTER ST BAND SYSTEM TUNE...
... next page for other stations. for high speed tuning. Each press switches the band between FM and AM. 3 Tune to search for more on the remote control. 1 Press the TUNER button to select the tuner. 2 Use the BAND button to a station below. Using the tuner 08 English Deutsch Français Italiano... tune in the currently selected band, press and hold TUNE +/- The receiver will start over. 51 En DVD/LD TV/SAT DVR/VCR TVCONT MULTI CONTROL CD CD-R/TAPE TUNER RECEIVER FL DIMMER +10 D.ACCESS TOP MENU TUNE SR DISC ENTER CLASS MENU DTVMENU ST T.EDIT ENTER ST BAND SYSTEM TUNE...

Owner's Manual
Page 53
... need to have named a station preset, you haven't done this . See Saving station presets above if you can also use the number buttons on the remote control to cycle through classes A, B and C. 3 Press ST +/-
... need to have named a station preset, you haven't done this . See Saving station presets above if you can also use the number buttons on the remote control to cycle through classes A, B and C. 3 Press ST +/-

Owner's Manual
Page 55
... preset code, or the codes for the manufacturer in the remote control will have to reassign it to the Pioneer preset code to use this receiver's built-in the remote. To go back a step, press RETURN. • After one of the MULTI CONTROL buttons using .1 VSX-915 only - Note 1 • TV codes (for example, codes for...
... preset code, or the codes for the manufacturer in the remote control will have to reassign it to the Pioneer preset code to use this receiver's built-in the remote. To go back a step, press RETURN. • After one of the MULTI CONTROL buttons using .1 VSX-915 only - Note 1 • TV codes (for example, codes for...

Owner's Manual
Page 56
...the memory is full. This can also be 1-2 inches apart. 1 - 2 inches 5 Press the corresponding button on the other remote controls VSX-915 model only If the preset code for some reasons the operation hasn't been learned the LCD will display ERROR briefly and then display...• The remote controls should start with the first one ). • VSX-915 only - See Erasing one , start with the component type (for example, DVD 009). The remote LCD display shows OK. The LCD on the remote displays the component you want to control. Programming signals from other remote control that will show ...
...the memory is full. This can also be 1-2 inches apart. 1 - 2 inches 5 Press the corresponding button on the other remote controls VSX-915 model only If the preset code for some reasons the operation hasn't been learned the LCD will display ERROR briefly and then display...• The remote controls should start with the first one ). • VSX-915 only - See Erasing one , start with the component type (for example, DVD 009). The remote LCD display shows OK. The LCD on the remote displays the component you want to control. Programming signals from other remote control that will show ...

Owner's Manual
Page 57
... from other buttons. 6 Press the RECEIVER button when you're done. Erasing one of the remote control button settings VSX-915 model only This erases one component using the remote control while at the same time, using your CD player. 57 En The LCD display shows OK... use the direct function feature to your receiver to erase other remote controls. Erasing all of the buttons you continue to listen to control one of the remote control presets This will erase all preset remote control preset codes and (VSX-915 model only) programmed buttons. 1 While pressing the RECEIVER ...
... from other buttons. 6 Press the RECEIVER button when you're done. Erasing one of the remote control button settings VSX-915 model only This erases one component using the remote control while at the same time, using your CD player. 57 En The LCD display shows OK... use the direct function feature to your receiver to erase other remote controls. Erasing all of the buttons you continue to listen to control one of the remote control presets This will erase all preset remote control preset codes and (VSX-915 model only) programmed buttons. 1 While pressing the RECEIVER ...
Owner's Manual
Page 58
...The brand name and preset code appears in the display for the component you select (using the MULTI CONTROL buttons) will be selected by both the receiver and the remote control. The LCD shows OK to switch direct function ON or OFF then press ENTER. The LCD on... Press the MULTI CONTROL button for three seconds. The remote LCD display shows SETUP. 2 Press the MULTI CONTROL button of your system When direct function is assigned to a MULTI CONTROL button. 1 While pressing the RECEIVER button, press and hold the 1 button. Note 1 You can operate the remote control without affecting the ...
...The brand name and preset code appears in the display for the component you select (using the MULTI CONTROL buttons) will be selected by both the receiver and the remote control. The LCD shows OK to switch direct function ON or OFF then press ENTER. The LCD on... Press the MULTI CONTROL button for three seconds. The remote LCD display shows SETUP. 2 Press the MULTI CONTROL button of your system When direct function is assigned to a MULTI CONTROL button. 1 While pressing the RECEIVER button, press and hold the 1 button. Note 1 You can operate the remote control without affecting the ...

Owner's Manual
Page 59
...rest of your system 10 English Deutsch Français Italiano Nederlands Español Controls for TVs This remote control can control components after entering the proper codes or teaching the receiver the commands (see Setting the remote to display the DTV menu. Cable TV/Satellite TV/TV/ DTV TV VOL ...commands on a DTV menu. Selects channels. DTV Switches the DTV on the remote control are dedicated to control the TV assigned to the TV CONT button. Use the MULTI CONTROL buttons to select the component • The TV CONTROL buttons on or off . If you have two TVs, assign the main...
...rest of your system 10 English Deutsch Français Italiano Nederlands Español Controls for TVs This remote control can control components after entering the proper codes or teaching the receiver the commands (see Setting the remote to display the DTV menu. Cable TV/Satellite TV/TV/ DTV TV VOL ...commands on a DTV menu. Selects channels. DTV Switches the DTV on the remote control are dedicated to control the TV assigned to the TV CONT button. Use the MULTI CONTROL buttons to select the component • The TV CONTROL buttons on or off . If you have two TVs, assign the main...
Owner's Manual
Page 60
... recording. MD/CD-R/VCR/ DVR player/ Cassette deck 60 En DTV Controls for other components This remote control can control these components after entering the proper codes or teaching the receiver the commands (see Setting the remote to control other components on page 55 for more on some models, pressing this... CD/MD/CD-R/VCR/DVD/LD/ DVR player/Cassette deck Press to return to the start of the next track. 10 Controlling the rest of your system Button(s) Function Components +10 button Use to select the component. VCR Pause playback or recording. DTV...
... recording. MD/CD-R/VCR/ DVR player/ Cassette deck 60 En DTV Controls for other components This remote control can control these components after entering the proper codes or teaching the receiver the commands (see Setting the remote to control other components on page 55 for more on some models, pressing this... CD/MD/CD-R/VCR/DVD/LD/ DVR player/Cassette deck Press to return to the start of the next track. 10 Controlling the rest of your system Button(s) Function Components +10 button Use to select the component. VCR Pause playback or recording. DTV...

Owner's Manual
Page 65
... the most of the SR+ features, you should connect your Pioneer plasma display even easier. Note 1 • The 3-ringed SR+ cable from Pioneer is enabled separately; VIDEO INPUT 1 Pioneer plasma display VIDEO INPUT 2 Using the SR+ mode with a Pioneer plasma display When connected using the remote control if you can use a commercially available 3-ringed mini phone...
... the most of the SR+ features, you should connect your Pioneer plasma display even easier. Note 1 • The 3-ringed SR+ cable from Pioneer is enabled separately; VIDEO INPUT 1 Pioneer plasma display VIDEO INPUT 2 Using the SR+ mode with a Pioneer plasma display When connected using the remote control if you can use a commercially available 3-ringed mini phone...


