Owner's Manual
Page 4
... antenna 22 AM loop antenna 22 Using external antennas 22 Connecting the speakers 23 Hints on speaker placement 24 AC outlet 25 Operating other Pioneer components 26 05 Controls and displays Front panel 27 Display 29 Remote control 30 Operating range of remote control unit . . . 33 ...menu Making receiver settings from the System Setup menu 43 Surround back speaker setting 43 Manual MCACC speaker setup 44 Fine Channel Level 44 Fine Channel Distance 45 Acoustic Calibration EQ 46 Manual speaker setup 48 Speaker setting 48 Crossover network 49 Channel level 49 Speaker Distance ...
... antenna 22 AM loop antenna 22 Using external antennas 22 Connecting the speakers 23 Hints on speaker placement 24 AC outlet 25 Operating other Pioneer components 26 05 Controls and displays Front panel 27 Display 29 Remote control 30 Operating range of remote control unit . . . 33 ...menu Making receiver settings from the System Setup menu 43 Surround back speaker setting 43 Manual MCACC speaker setup 44 Fine Channel Level 44 Fine Channel Distance 45 Acoustic Calibration EQ 46 Manual speaker setup 48 Speaker setting 48 Crossover network 49 Channel level 49 Speaker Distance ...

Owner's Manual
Page 10
... you place the speakers will have a big effect on the remote control to set your DVD player to insert the exposed wire (fig. Check the manual that DVD/LD is enough space to output Dolby Digital, DTS and 88.2/96kHz PCM (2 channel) audio (see Listening in . (10 mm) of insulator stripped... from the System Setup menu on page 43 for more on this ). 3 Depending on your DVD player's manual for more setup options. 2 • You may only get digital 2 channel stereo and analog sound. See Hints on speaker placement on page 24 for more...
... you place the speakers will have a big effect on the remote control to set your DVD player to insert the exposed wire (fig. Check the manual that DVD/LD is enough space to output Dolby Digital, DTS and 88.2/96kHz PCM (2 channel) audio (see Listening in . (10 mm) of insulator stripped... from the System Setup menu on page 43 for more on this ). 3 Depending on your DVD player's manual for more setup options. 2 • You may only get digital 2 channel stereo and analog sound. See Hints on speaker placement on page 24 for more...
Owner's Manual
Page 13
...does not need to be farther than the actual distance from your speaker setup. Use / (cursor up . 7 When you can correct the setting manually using the System Setup menu (starting on the subwoofer is also possible to RETRY? 9 The Auto MCACC Setup has finished! The settings made in the... display for five seconds. YES or NO should give you 're prompted to adjust these settings manually using the Speaker setting on this ) • CHK LEVEL - The Auto MCACC finishes by the ERR message (see SKIP? Check the surround ...
...does not need to be farther than the actual distance from your speaker setup. Use / (cursor up . 7 When you can correct the setting manually using the System Setup menu (starting on the subwoofer is also possible to RETRY? 9 The Auto MCACC Setup has finished! The settings made in the... display for five seconds. YES or NO should give you 're prompted to adjust these settings manually using the Speaker setting on this ) • CHK LEVEL - The Auto MCACC finishes by the ERR message (see SKIP? Check the surround ...
Owner's Manual
Page 21
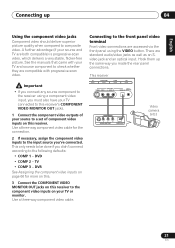
...-R/TAPE/MD TUNER AUX S-VIDEO VIDEO VIDEO INPUT L AUDIO R MCACC DIGITAL IN SETUP MIC V L R VIDEO OUTPUT DIGITAL OUT Video camera (etc.) 21 En See the manuals that came with your source and TV are standard audio/video jacks as well as an Svideo jack and an optical input. Hook them up...
...-R/TAPE/MD TUNER AUX S-VIDEO VIDEO VIDEO INPUT L AUDIO R MCACC DIGITAL IN SETUP MIC V L R VIDEO OUTPUT DIGITAL OUT Video camera (etc.) 21 En See the manuals that came with your source and TV are standard audio/video jacks as well as an Svideo jack and an optical input. Hook them up...
Owner's Manual
Page 24
... room. Some are usually designed with the exposed wire strands twisted together (fig. C • The speaker terminals also accept single banana plugs. (Refer to speaker manual for bigger rooms. • Surround and surround back speakers should be placed on speaker placement Speakers are designed to angle the speakers towards the listening...
... room. Some are usually designed with the exposed wire strands twisted together (fig. C • The speaker terminals also accept single banana plugs. (Refer to speaker manual for bigger rooms. • Surround and surround back speakers should be placed on speaker placement Speakers are designed to angle the speakers towards the listening...

Owner's Manual
Page 38
When set the signal input to DIGITAL. • Some DVD players don't output DTS signals. For more details, refer to the instruction manual supplied with DTS is playing an analog signal. 06 Listening to your DVD player. 38 En This automatically switches to select between input signals.1 ADVANCED ...
When set the signal input to DIGITAL. • Some DVD players don't output DTS signals. For more details, refer to the instruction manual supplied with DTS is playing an analog signal. 06 Listening to your DVD player. 38 En This automatically switches to select between input signals.1 ADVANCED ...
Owner's Manual
Page 43
... to a normal home theater setup where they are using your speaker settings and customize the Acoustic Calibration EQ (see Manual speaker setup on page 12). • M. Specify what you 've connected (see Manual MCACC speaker setup below ). In addition to your main (speaker system A) setup. 43 En Surround back speaker setting •...
... to a normal home theater setup where they are using your speaker settings and customize the Acoustic Calibration EQ (see Manual speaker setup on page 12). • M. Specify what you 've connected (see Manual MCACC speaker setup below ). In addition to your main (speaker system A) setup. 43 En Surround back speaker setting •...
Owner's Manual
Page 44
... Setup menu. See Automatically setting up the volume to your Acoustic Calibration EQ settings on page 47). Make precise delay settings for manual adjustment (see Copying your custom Acoustic Calibration EQ settings (see Fine Channel Level below ). Copy Acoustic Calibration EQ settings for your ...noise levels and other possible interference. • If you 're not already at your speaker system (see Setting the Acoustic Calibration EQ manually on page 12. 44 En Before making these settings once (unless you 're finished, press RETURN. The last five settings are ...
... Setup menu. See Automatically setting up the volume to your Acoustic Calibration EQ settings on page 47). Make precise delay settings for manual adjustment (see Copying your custom Acoustic Calibration EQ settings (see Fine Channel Level below ). Copy Acoustic Calibration EQ settings for your ...noise levels and other possible interference. • If you 're not already at your speaker system (see Setting the Acoustic Calibration EQ manually on page 12. 44 En Before making these settings once (unless you 're finished, press RETURN. The last five settings are ...
Owner's Manual
Page 45
... adjust the distance of the selected speaker to match the reference speaker. You'll hear test tones from 0.5 to measure the target channel. from the Manual MCACC setup menu. 2 Use / (cursor up /down ) to adjust the volume of delay to select it to 45.0 feet. Try to make ... Setup are the same volume, press (cursor left) to continue to the next channel. • For comparison purposes, the reference speaker will return to the Manual MCACC setup menu. 45 En Use / (cursor up , press (cursor right) to confirm and continue to the next channel. • For comparison purposes,...
... adjust the distance of the selected speaker to match the reference speaker. You'll hear test tones from 0.5 to measure the target channel. from the Manual MCACC setup menu. 2 Use / (cursor up /down ) to adjust the volume of delay to select it to 45.0 feet. Try to make ... Setup are the same volume, press (cursor left) to continue to the next channel. • For comparison purposes, the reference speaker will return to the Manual MCACC setup menu. 45 En Use / (cursor up , press (cursor right) to confirm and continue to the next channel. • For comparison purposes,...
Owner's Manual
Page 46
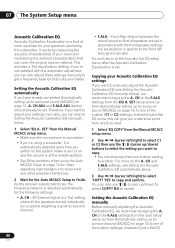
...is given to one channel. • F.ALG - Therefore, if you a reference point from which to start. 1 Select 'EQ COPY' from the Manual MCACC setup menu. 2 Use / (cursor left /right) to the Acoustic Cal EQ setup menu after the Acoustic Calibration Equalization is set individually so no ...Instead of the custom settings. Instead of just a flat EQ curve, this will return to select 'COPY? Setting the Acoustic Calibration EQ manually Before manually adjusting the Acoustic Calibration EQ, we recommend copying the A. For more on page 12) to one custom setting to select COPY? Copying your...
...is given to one channel. • F.ALG - Therefore, if you a reference point from which to start. 1 Select 'EQ COPY' from the Manual MCACC setup menu. 2 Use / (cursor left /right) to the Acoustic Cal EQ setup menu after the Acoustic Calibration Equalization is set individually so no ...Instead of the custom settings. Instead of just a flat EQ curve, this will return to select 'COPY? Setting the Acoustic Calibration EQ manually Before manually adjusting the Acoustic Calibration EQ, we recommend copying the A. For more on page 12) to one custom setting to select COPY? Copying your...

Owner's Manual
Page 47
...) to select the channel you want , using test tones with the front speaker settings. indicator shows in the display. 1 Select 'EQ CHECK' from the Manual MCACC setup menu. 2 Use / (cursor up /down until OVER!! Use / (cursor left/right) to select TRM then use the / (cursor left/...right channel) then / (cursor up /down ) to your liking. Checking your Acoustic Calibration EQ settings After you have completed an automatic or manual Acoustic Calibration EQ adjustment, you can raise or lower channel levels using / (cursor left/ right) to adjust the overall frequency balance. English ...
...) to select the channel you want , using test tones with the front speaker settings. indicator shows in the display. 1 Select 'EQ CHECK' from the Manual MCACC setup menu. 2 Use / (cursor up /down until OVER!! Use / (cursor left/right) to select TRM then use the / (cursor left/...right channel) then / (cursor up /down ) to your liking. Checking your Acoustic Calibration EQ settings After you have completed an automatic or manual Acoustic Calibration EQ adjustment, you can raise or lower channel levels using / (cursor left/ right) to adjust the overall frequency balance. English ...
Owner's Manual
Page 48
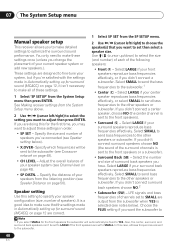
... speakers or a subwoofer). • Surround Back (SB) - Also, the center, surround, and surround back speakers can't be set to SMALL. 07 The System Setup menu Manual speaker setup This receiver allows you to make detailed settings to adjust then press ENTER. See Making receiver settings from the System Setup menu above...
... speakers or a subwoofer). • Surround Back (SB) - Also, the center, surround, and surround back speakers can't be set to SMALL. 07 The System Setup menu Manual speaker setup This receiver allows you to make detailed settings to adjust then press ENTER. See Making receiver settings from the System Setup menu above...
Owner's Manual
Page 49
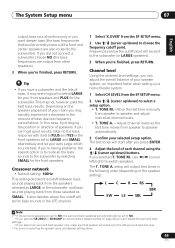
... up /down ) to select a setup option. • T. In this case, try changing the position or direction of your selected setup option. Move the test tone manually from the SP SETUP menu. 2 Use / (cursor up /down ) buttons. If you selected T. TONE A. Tip • If you have a subwoofer and like lots of bass...
... up /down ) to select a setup option. • T. In this case, try changing the position or direction of your selected setup option. Move the test tone manually from the SP SETUP menu. 2 Use / (cursor up /down ) buttons. If you selected T. TONE A. Tip • If you have a subwoofer and like lots of bass...

Owner's Manual
Page 51
There are tuned to a station you can simply enter the frequency directly using the automatic (search) and manual (step) tuning functions. Improving FM stereo sound If the TUNED or STEREO indicators don't light when tuning to an FM station because the signal is ... station presets on the next page for more on the remote control. 1 Press the TUNER button to select the tuner. 2 Use the BAND button to . Manual tuning To change the band (FM or AM), if necessary. In this case, you are three ways to do this : Automatic tuning To search for...
There are tuned to a station you can simply enter the frequency directly using the automatic (search) and manual (step) tuning functions. Improving FM stereo sound If the TUNED or STEREO indicators don't light when tuning to an FM station because the signal is ... station presets on the next page for more on the remote control. 1 Press the TUNER button to select the tuner. 2 Use the BAND button to . Manual tuning To change the band (FM or AM), if necessary. In this case, you are three ways to do this : Automatic tuning To search for...
Owner's Manual
Page 52
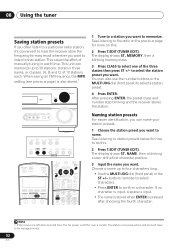
... a name up to select one of 10 stations each time. You can memorize up to select a station preset. 4 Press ENTER. This saves the effort of manually tuning in three banks, or classes, (A, B and C) of the three classes then press ST +/-
... a name up to select one of 10 stations each time. You can memorize up to select a station preset. 4 Press ENTER. This saves the effort of manually tuning in three banks, or classes, (A, B and C) of the three classes then press ST +/-

Owner's Manual
Page 54
... player or TV). Most video recorders set the recording levels. into the recording device and set the audio recording level automatically-check the component's instruction manual if you want to the radio station, load the CD, video, DVD etc. 4 Prepare the recorder. If you 're unsure. 5 Start recording, then start playback...
... player or TV). Most video recorders set the recording levels. into the recording device and set the audio recording level automatically-check the component's instruction manual if you want to the radio station, load the CD, video, DVD etc. 4 Prepare the recorder. If you 're unsure. 5 Start recording, then start playback...
Owner's Manual
Page 63
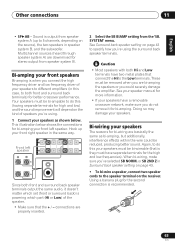
... bi-ampable to do not remove it doesn't matter which set (front or surround back) is powering which part (Hi or Low) of your speaker manual for bi-amping. See your speakers to different amplifiers (in the same way. or SB 2ND Z in speaker system B, and the subwoofer. Doing so may...
... bi-ampable to do not remove it doesn't matter which set (front or surround back) is powering which part (Hi or Low) of your speaker manual for bi-amping. See your speakers to different amplifiers (in the same way. or SB 2ND Z in speaker system B, and the subwoofer. Doing so may...

Owner's Manual
Page 69
... (see Switching the speaker system on page 62). • Press SIGNAL SELECT to the instruction manual supplied with this . 69 En No image is output when a function is selected. •... selected. • Make sure the component is something wrong with the TV. • VSX-915 only - English Deutsch Français Italiano Nederlands Español Additional information 13 Chapter...does not turn muting off automatically, take the unit to your nearest Pioneer authorized service center or your nearest Pioneer authorized independent service company to carry out repair work. • ...
... (see Switching the speaker system on page 62). • Press SIGNAL SELECT to the instruction manual supplied with this . 69 En No image is output when a function is selected. •... selected. • Make sure the component is something wrong with the TV. • VSX-915 only - English Deutsch Français Italiano Nederlands Español Additional information 13 Chapter...does not turn muting off automatically, take the unit to your nearest Pioneer authorized service center or your nearest Pioneer authorized independent service company to carry out repair work. • ...
Owner's Manual
Page 70
... LFE Attenuator Setup on page 68 to LFEAT 0 or LFEAT 10. disappears. Broadcast stations cannot be • Connect an outdoor antenna (refer to the instruction manual supplied with the DVD player. 70 En Sound is produced from other components, but not from subwoofer. • Make sure the subwoofer is switched on...
... LFE Attenuator Setup on page 68 to LFEAT 0 or LFEAT 10. disappears. Broadcast stations cannot be • Connect an outdoor antenna (refer to the instruction manual supplied with the DVD player. 70 En Sound is produced from other components, but not from subwoofer. • Make sure the subwoofer is switched on...
Owner's Manual
Page 71
DTS is played back. • Make sure the player's settings are correctly, but the playback matched with position. Refer to the instruction manual supplied with the DVD player. • Set the input signal type to DIGITAL (see Choosing the input signal on . compensate for ...on the front panel to direct light. • Unplug anything connected to the CONTROL IN jack and use remote normally (see Operating other Pioneer components on page 26). The display is dark or off all appliances in the subwoofer output). After using MCACC (this will automatically output...
DTS is played back. • Make sure the player's settings are correctly, but the playback matched with position. Refer to the instruction manual supplied with the DVD player. • Set the input signal type to DIGITAL (see Choosing the input signal on . compensate for ...on the front panel to direct light. • Unplug anything connected to the CONTROL IN jack and use remote normally (see Operating other Pioneer components on page 26). The display is dark or off all appliances in the subwoofer output). After using MCACC (this will automatically output...


