Owner's Manual
Page 4
...Quick surround sound setup Automatically setting up for surround sound (MCACC 12 Other problems when using the Auto MCACC Setup 14 04 Connecting up Making cable connections 15 Analog audio cables 15 Digital audio cables 15 Video cables 15 About the video converter 16... 20 Using the component video jacks 21 Connecting to the front panel video terminal 21 Connecting antennas 22 FM wire antenna 22 AM loop antenna 22 Using external antennas 22 Connecting the speakers 23 Hints on speaker placement 24 AC outlet 25 Operating other Pioneer components 26 05 Controls and displays Front ...
...Quick surround sound setup Automatically setting up for surround sound (MCACC 12 Other problems when using the Auto MCACC Setup 14 04 Connecting up Making cable connections 15 Analog audio cables 15 Digital audio cables 15 Video cables 15 About the video converter 16... 20 Using the component video jacks 21 Connecting to the front panel video terminal 21 Connecting antennas 22 FM wire antenna 22 AM loop antenna 22 Using external antennas 22 Connecting the speakers 23 Hints on speaker placement 24 AC outlet 25 Operating other Pioneer components 26 05 Controls and displays Front ...
Owner's Manual
Page 5
... TVs 59 Controls for other components 60 11 Other connections Second Zone speaker B setup 62 Switching the speaker system 62 Bi-amping your front speakers 63 Bi-wiring your speakers 63 Connecting additional amplifiers 64 Using this receiver with a Pioneer plasma display 64 Using the SR+ mode with a Pioneer plasma display 65 12 Other Settings The Input Assign...
... TVs 59 Controls for other components 60 11 Other connections Second Zone speaker B setup 62 Switching the speaker system 62 Bi-amping your front speakers 63 Bi-wiring your speakers 63 Connecting additional amplifiers 64 Using this receiver with a Pioneer plasma display 64 Using the SR+ mode with a Pioneer plasma display 65 12 Other Settings The Input Assign...
Owner's Manual
Page 9
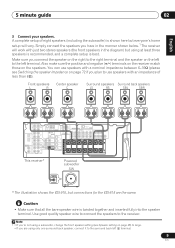
... have in the diagram) but connections for the VSX-815 are using at least three speakers is recommended, and a complete setup is twisted together and inserted fully into the speaker terminal. Caution • Make sure that all the bare speaker wire is best. Also make ...L R R R R SURROUND L CENTER This receiver* Powered subwoofer SW INPUT * The illustration shows the VSX-915, but using only one surround back speaker, connect it to use speakers with an impedance of eight speakers (including the subwoofer) is shown here but everyone's home setup will work with just two stereo...
... have in the diagram) but connections for the VSX-815 are using at least three speakers is recommended, and a complete setup is twisted together and inserted fully into the speaker terminal. Caution • Make sure that all the bare speaker wire is best. Also make ...L R R R R SURROUND L CENTER This receiver* Powered subwoofer SW INPUT * The illustration shows the VSX-915, but using only one surround back speaker, connect it to use speakers with an impedance of eight speakers (including the subwoofer) is shown here but everyone's home setup will work with just two stereo...
Owner's Manual
Page 12
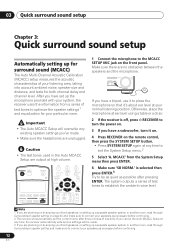
...the microphone so that it's about ear level at any time to the MCACC SETUP MIC jack on page 43 and make sure to connect your speakers as necessary before continuing. 12 En RECEIVER INPUT SELECT SOURCE DVD/LD TV/SAT DVR/VCR TVCONT MULTI CONTROL CD CD-R/TAPE TUNER ... If you have a tripod, use it on. 4 Press RECEIVER on bi-amping your front speakers, or setting up a separate speaker system in another room, read through Surround back speaker setting and make sure to connect your speakers as possible after three minutes of inactivity. is off, press RECEIVER to turn it to be...
...the microphone so that it's about ear level at any time to the MCACC SETUP MIC jack on page 43 and make sure to connect your speakers as necessary before continuing. 12 En RECEIVER INPUT SELECT SOURCE DVD/LD TV/SAT DVR/VCR TVCONT MULTI CONTROL CD CD-R/TAPE TUNER ... If you have a tripod, use it on. 4 Press RECEIVER on bi-amping your front speakers, or setting up a separate speaker system in another room, read through Surround back speaker setting and make sure to connect your speakers as possible after three minutes of inactivity. is off, press RECEIVER to turn it to be...
Owner's Manual
Page 13
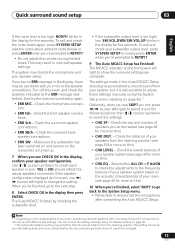
...listening position (see page 50 for more on this ) 10 When you're finished, select 'SKIP?' Check the front speaker connections. • ERR Sch - Check the surround speaker connections. • ERR SBch - YES or NO should be accurate (taking delay and room characteristics into account) and generally ... 5 inches (12cm) will light to change the setting. The system now checks the microphone and your room, sometimes identical speakers with your mic or the speaker connections. Make sure the subwoofer has been switched on and volume on this ) • CHK DIST. - When you're finished...
...listening position (see page 50 for more on this ) 10 When you're finished, select 'SKIP?' Check the front speaker connections. • ERR Sch - Check the surround speaker connections. • ERR SBch - YES or NO should be accurate (taking delay and room characteristics into account) and generally ... 5 inches (12cm) will light to change the setting. The system now checks the microphone and your room, sometimes identical speakers with your mic or the speaker connections. Make sure the subwoofer has been switched on and volume on this ) • CHK DIST. - When you're finished...

Owner's Manual
Page 15
... for audio. Important • Before making or changing any connections, switch off the power and disconnect the power cord from cables for coaxial digital connections. The cable may cause a humming noise from the speakers. Video cables Standard RCA video cables These cables are typically red... and white, and you should connect the red plugs to R (right) terminals and white plugs...
... for audio. Important • Before making or changing any connections, switch off the power and disconnect the power cord from cables for coaxial digital connections. The cable may cause a humming noise from the speakers. Video cables Standard RCA video cables These cables are typically red... and white, and you should connect the red plugs to R (right) terminals and white plugs...

Owner's Manual
Page 23
... on page 72 if you plan to use speakers with just two stereo speakers (the front speakers in the diagram) but connections for the VSX-815 are using at least three speakers is recommended, and a complete setup is best. Simply connect the speakers you are the same. Make sure you connect the speaker on the right to the right terminal and...
... on page 72 if you plan to use speakers with just two stereo speakers (the front speakers in the diagram) but connections for the VSX-815 are using at least three speakers is recommended, and a complete setup is best. Simply connect the speakers you are the same. Make sure you connect the speaker on the right to the right terminal and...
Owner's Manual
Page 24
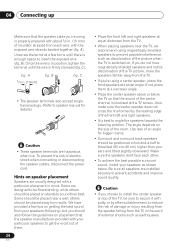
... with about 3/8 in mind. B). others should be positioned a foot-and-a-half to install the center speaker on top of electric shock when connecting or disconnecting the speaker cables, disconnect the power cord. Also, make sure the center speaker does not cross the line formed by other . • To achieve the best possible surround sound...
... with about 3/8 in mind. B). others should be positioned a foot-and-a-half to install the center speaker on top of electric shock when connecting or disconnecting the speaker cables, disconnect the power cord. Also, make sure the center speaker does not cross the line formed by other . • To achieve the best possible surround sound...
Owner's Manual
Page 25
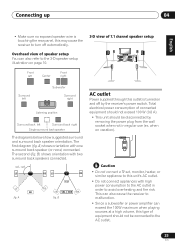
...socket when not in order to avoid overheating and fire risk. The diagrams below show suggested surround and surround back speaker orientation. B) shows orientation with two surround back speakers connected. 90~120 LS RS LS RS LS SB fig. This can also cause the receiver to malfunction. •...; Since a subwoofer or power amplifier can also refer to the 3-D speaker setup illustration on vacation). The first diagram (fig. The second...
...socket when not in order to avoid overheating and fire risk. The diagrams below show suggested surround and surround back speaker orientation. B) shows orientation with two surround back speakers connected. 90~120 LS RS LS RS LS SB fig. This can also cause the receiver to malfunction. •...; Since a subwoofer or power amplifier can also refer to the 3-D speaker setup illustration on vacation). The first diagram (fig. The second...

Owner's Manual
Page 28
... FL DIMMER Dims or brightens the display. 14 INPUT ATT Attenuates (lowers) the level of a source (page 37). ADVANCED SURROUND Use to connect headphones. 05 Controls and displays 7 PHONES jack Use to switch between the various surround modes (page 35). RETURN Press to switch between direct ...and stereo playback. When the headphones are connected, there is no sound output from the speakers. 8 LISTENING MODE buttons STANDARD Press for recall (page 52). 21 TONE Press this button to access the bass and...
... FL DIMMER Dims or brightens the display. 14 INPUT ATT Attenuates (lowers) the level of a source (page 37). ADVANCED SURROUND Use to connect headphones. 05 Controls and displays 7 PHONES jack Use to switch between the various surround modes (page 35). RETURN Press to switch between direct ...and stereo playback. When the headphones are connected, there is no sound output from the speakers. 8 LISTENING MODE buttons STANDARD Press for recall (page 52). 21 TONE Press this button to access the bass and...

Owner's Manual
Page 34
... you 're listening to. Listening in surround sound Using this receiver, you connect headphones or select the multichannel analog inputs. 2 If the Extended mode (page 39) is switched to OFF, or the surround back speakers are set to anything but for more on these decoding formats). • ...Logic IIx MOVIE - shows briefly in the display (it will not be selected and shows in the display.3 With two channel sources, you connected surround back speakers, see how the source is Dolby Digital, DTS, or Dolby Surround encoded, the proper decoding format will depend on the source (for auto...
... you 're listening to. Listening in surround sound Using this receiver, you connect headphones or select the multichannel analog inputs. 2 If the Extended mode (page 39) is switched to OFF, or the surround back speakers are set to anything but for more on these decoding formats). • ...Logic IIx MOVIE - shows briefly in the display (it will not be selected and shows in the display.3 With two channel sources, you connected surround back speakers, see how the source is Dolby Digital, DTS, or Dolby Surround encoded, the proper decoding format will depend on the source (for auto...

Owner's Manual
Page 35
...ADV. Up to 7.1 channel sound, especially suited for sports programs with mono soundtracks. • SPORTS - Allows you 're using two surround back speakers) • 2 Pro Logic IIx MUSIC - Listening to your setup. Simulates the relaxed environment of a movie theater, and is mono) •...- 6.1 channel sound, especially suited to music sources With multichannel sources, if you have connected surround back speaker(s) and have selected, you press ADVANCED SURROUND when the headphones are connected, the PHONES SURROUND mode will only be used for watching movies. • ADV. Useful...
...ADV. Up to 7.1 channel sound, especially suited for sports programs with mono soundtracks. • SPORTS - Allows you 're using two surround back speakers) • 2 Pro Logic IIx MUSIC - Listening to your setup. Simulates the relaxed environment of a movie theater, and is mono) •...- 6.1 channel sound, especially suited to music sources With multichannel sources, if you have connected surround back speaker(s) and have selected, you press ADVANCED SURROUND when the headphones are connected, the PHONES SURROUND mode will only be used for watching movies. • ADV. Useful...

Owner's Manual
Page 37
... when Acoustic Calibration EQ is active.2 Note 1 If you switch on your speaker settings). Listening in accordance with the front speaker settings. • CUSTOM 1/2 - The audio is on, and it has no effect when headphones are connected. • If you will hear the source through just the front left... speakers) to 10 (center channel sent to STEREO. 37 En CH CH RECEIVER CONTROL STANDARD ADV.SURR STEREO SLEEP MIDNIGHT/ ...
... when Acoustic Calibration EQ is active.2 Note 1 If you switch on your speaker settings). Listening in accordance with the front speaker settings. • CUSTOM 1/2 - The audio is on, and it has no effect when headphones are connected. • If you will hear the source through just the front left... speakers) to 10 (center channel sent to STEREO. 37 En CH CH RECEIVER CONTROL STANDARD ADV.SURR STEREO SLEEP MIDNIGHT/ ...

Owner's Manual
Page 39
...with 5.1 encoded material). AUTO ì channel source with headphones, or the STEREO / DIRECT or AUTO SURR. ON You can have surround back speakers connected (and set to select a surround back channel option. AUTO - modes. • You can simply switch the Extended mode off).1 INPUT FL DIMMER... ATT EXTENDED ACOUSTIC SPEAKERS MODE EQ BAND TUNING /STATION TUNER EDIT TONE QUICK SETUP SYSTEM SETUP RETURN MULTI JOG • Press EXTENDED MODE (front panel) to SB...
...with 5.1 encoded material). AUTO ì channel source with headphones, or the STEREO / DIRECT or AUTO SURR. ON You can have surround back speakers connected (and set to select a surround back channel option. AUTO - modes. • You can simply switch the Extended mode off).1 INPUT FL DIMMER... ATT EXTENDED ACOUSTIC SPEAKERS MODE EQ BAND TUNING /STATION TUNER EDIT TONE QUICK SETUP SYSTEM SETUP RETURN MULTI JOG • Press EXTENDED MODE (front panel) to SB...

Owner's Manual
Page 42
...EFFECT /CH SEL LEVEL Selecting the multichannel analog inputs If you have set the playback source to the proper output setting. For example, you have connected a decoder or a DVD player with multichannel analog outputs to this receiver (page 18), you can't use ACOUSTIC CAL EQ, DIALOG E, INPUT ... otherwise make sure that the TV's video input is set to this receiver (For example, if you connected this receiver to the VIDEO 1 jacks on all the sound is coming from the speakers connected to this receiver. 2 • When playback from the multichannel inputs. 3 You can check the remaining...
...EFFECT /CH SEL LEVEL Selecting the multichannel analog inputs If you have set the playback source to the proper output setting. For example, you have connected a decoder or a DVD player with multichannel analog outputs to this receiver (page 18), you can't use ACOUSTIC CAL EQ, DIALOG E, INPUT ... otherwise make sure that the TV's video input is set to this receiver (For example, if you connected this receiver to the VIDEO 1 jacks on all the sound is coming from the speakers connected to this receiver. 2 • When playback from the multichannel inputs. 3 You can check the remaining...
Owner's Manual
Page 43
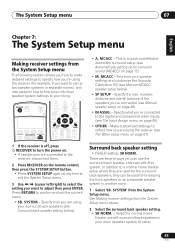
... menu. 3 Use / (cursor left/right) to select the setting you are connected to the digital and component video inputs (see Automatically setting up two speaker systems in your surround back speakers (see Surround back speaker setting below ). • SP SETUP - Surround back speaker setting • Default setting: SB NORM. In addition to a normal home theater...
... menu. 3 Use / (cursor left/right) to select the setting you are connected to the digital and component video inputs (see Automatically setting up two speaker systems in your surround back speakers (see Surround back speaker setting below ). • SP SETUP - Surround back speaker setting • Default setting: SB NORM. In addition to a normal home theater...
Owner's Manual
Page 44
...once (unless you 're unsure how to your speaker system (see Setting the Acoustic Calibration EQ manually on and turn up for your speaker system. You only need to make detailed adjustments when you should have to connect the setup microphone to the front panel and ...Acoustic Calibration EQ settings on page 47). The last five settings are specifically for manual adjustment (see Checking your current speaker system or add new speakers). Measure the acoustic characteristics of your room and automatically adjust the frequency balance of your Acoustic Calibration EQ settings on ...
...once (unless you 're unsure how to your speaker system (see Setting the Acoustic Calibration EQ manually on and turn up for your speaker system. You only need to make detailed adjustments when you should have to connect the setup microphone to the front panel and ...Acoustic Calibration EQ settings on page 47). The last five settings are specifically for manual adjustment (see Checking your current speaker system or add new speakers). Measure the acoustic characteristics of your room and automatically adjust the frequency balance of your Acoustic Calibration EQ settings on ...
Owner's Manual
Page 62
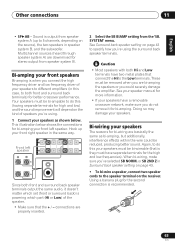
... between 6-16Ω (please see Switching the speaker impedance on page 72 if you can use the speakers connected to the (surround back) B speaker terminals on page 43, three speaker system settings are connected. 62 En Make sure to speaker system B (only stereo playback is not downmixed).... AB (respectively). See Surround back speaker setting on page 43 to stereo playback in Speaker setting on page 43 output from the two speakers connected to review Hints on speaker placement on page 24 when placing the speakers in Connecting the speakers on the settings you selected SB ...
... between 6-16Ω (please see Switching the speaker impedance on page 72 if you can use the speakers connected to the (surround back) B speaker terminals on page 43, three speaker system settings are connected. 62 En Make sure to speaker system B (only stereo playback is not downmixed).... AB (respectively). See Surround back speaker setting on page 43 to stereo playback in Speaker setting on page 43 output from the two speakers connected to review Hints on speaker placement on page 24 when placing the speakers in Connecting the speakers on the settings you selected SB ...
Owner's Manual
Page 63
... and low) and the sound improvement will depend on the source), the two speakers in speaker system B, and the subwoofer. These must be reduced, producing better sound. Again, to the speaker terminal on page 43. • To bi-wire a speaker, connect two speaker cords to do not remove it doesn't matter which set (front or surround...
... and low) and the sound improvement will depend on the source), the two speakers in speaker system B, and the subwoofer. These must be reduced, producing better sound. Again, to the speaker terminal on page 43. • To bi-wire a speaker, connect two speaker cords to do not remove it doesn't matter which set (front or surround...
Owner's Manual
Page 70
... the cassette deck further from equipment causing the noise. No sound from surround or center speakers. • Connect the speakers properly (refer to page 23). • Refer to Speaker setting on page 48 to check the speaker settings. • Refer to Channel level on page 49 to LFEAT 0 or LFEAT 10... back channel (Extended mode) on page 68 to check the speaker levels. Noise during playback of connections made. (refer to page 38). • Set the digital input settings correctly (refer to page 66). • Make digital connections (refer to page 17) and set for surround back sound....
... the cassette deck further from equipment causing the noise. No sound from surround or center speakers. • Connect the speakers properly (refer to page 23). • Refer to Speaker setting on page 48 to check the speaker settings. • Refer to Channel level on page 49 to LFEAT 0 or LFEAT 10... back channel (Extended mode) on page 68 to check the speaker levels. Noise during playback of connections made. (refer to page 38). • Set the digital input settings correctly (refer to page 66). • Make digital connections (refer to page 17) and set for surround back sound....


