Operating Instructions
Page 33
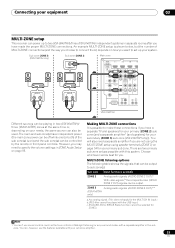
... audio signals (AUDIO ZONE 3 OUT).a,c (VSX-9140TXH only) a.Any analog signal. (This does not apply for ZONE 3. Sub zone (ZONE 3) (VSX-9140TXH only) Sub zone (ZONE 2) VIDEO IN Main zone HDMI ASSIGNABLE 13 COMPONENT VIDEO ASSIGNABLE IN 1 (...example MULTI-ZONE setup is on) and the sub zone(s) can be output to two (VSX-9040TXH)/three (VSX-9140TXH) independent systems in ZONE Audio Setup on how you . MULTI-ZONE listening options ...Connecting your equipment 03 MULTI-ZONE setup This receiver can power up your system. Choose whichever works best for your primary sub zone.
... audio signals (AUDIO ZONE 3 OUT).a,c (VSX-9140TXH only) a.Any analog signal. (This does not apply for ZONE 3. Sub zone (ZONE 3) (VSX-9140TXH only) Sub zone (ZONE 2) VIDEO IN Main zone HDMI ASSIGNABLE 13 COMPONENT VIDEO ASSIGNABLE IN 1 (...example MULTI-ZONE setup is on) and the sub zone(s) can be output to two (VSX-9040TXH)/three (VSX-9140TXH) independent systems in ZONE Audio Setup on how you . MULTI-ZONE listening options ...Connecting your equipment 03 MULTI-ZONE setup This receiver can power up your system. Choose whichever works best for your primary sub zone.

Operating Instructions
Page 36
...SP3 or Windows® 2000 Professional SP4. • The monitor must have a standby mode.1 HDMI ASSIGNABLE 13 COMPONENT VIDEO ASSIGNABLE IN 1 (DVD) Y PB PR Y BD IN IN 1...VSX-9140TXH 12 V TRIGGER INPUT • Connect the 12 V TRIGGER jack of this receiver to the 9-pin RS-232C jack on the back panel of this receiver... the Pioneer website (http:// www.pioneerelectronics.com/PUSA/ Home+Entertainment+Custom+Install). Note that this will only work with ...the manufacturer of Pioneer. The software to switch the component on or off just by connecting the receiver to the computer ...
...SP3 or Windows® 2000 Professional SP4. • The monitor must have a standby mode.1 HDMI ASSIGNABLE 13 COMPONENT VIDEO ASSIGNABLE IN 1 (DVD) Y PB PR Y BD IN IN 1...VSX-9140TXH 12 V TRIGGER INPUT • Connect the 12 V TRIGGER jack of this receiver to the 9-pin RS-232C jack on the back panel of this receiver... the Pioneer website (http:// www.pioneerelectronics.com/PUSA/ Home+Entertainment+Custom+Install). Note that this will only work with ...the manufacturer of Pioneer. The software to switch the component on or off just by connecting the receiver to the computer ...

Operating Instructions
Page 63
...receiver using an HDMI cable. In this receiver. After completing all synchronized operations will work with components of other makes that you want to use as an HDMI switch) can only be sure to switch the power off the KURO LINK compatible component's KURO LINK setting. • While the receiver is equipped with four (VSX9140TXH)/three (VSX-9040TXH) HDMI...used . The HDMI indicator on the KURO LINK function • Connect the TV directly to a Pioneer player that support the KURO LINK function. We do not guarantee this receiver will work with Pioneer KURO LINK-compatible...
...receiver using an HDMI cable. In this receiver. After completing all synchronized operations will work with components of other makes that you want to use as an HDMI switch) can only be sure to switch the power off the KURO LINK compatible component's KURO LINK setting. • While the receiver is equipped with four (VSX9140TXH)/three (VSX-9040TXH) HDMI...used . The HDMI indicator on the KURO LINK function • Connect the TV directly to a Pioneer player that support the KURO LINK function. We do not guarantee this receiver will work with Pioneer KURO LINK-compatible...

Operating Instructions
Page 64
... in addition to the HDMI cable.) The synchronized operations below can be used when the receiver's KURO LINK function is connected to a TV of a brand other than Pioneer that supports the KURO LINK function. (Depending on the TV, however, some of the KURO LINK functions may not work.) • You can...will need to set it to ON to use of non-Pioneer brands and products that supports the KURO LINK function. • When playback starts on the player or recorder, the receiver's input switches to the HDMI input to the receiver by HDMI connection is selected or when watching the TV.) •...
... in addition to the HDMI cable.) The synchronized operations below can be used when the receiver's KURO LINK function is connected to a TV of a brand other than Pioneer that supports the KURO LINK function. (Depending on the TV, however, some of the KURO LINK functions may not work.) • You can...will need to set it to ON to use of non-Pioneer brands and products that supports the KURO LINK function. • When playback starts on the player or recorder, the receiver's input switches to the HDMI input to the receiver by HDMI connection is selected or when watching the TV.) •...

Operating Instructions
Page 65
... below can also be set to the operating instructions of the sound and is generated upon transmission. • VSX-9140TXH only: On players compatible with PQLS Multi Surround, PQLS works for PQLS-compatible players. • PQLS OFF - Synchronized amp mode operations When using the TV's remote control... from the TV's menu screen, if the receiver's HDMI output setting is switched to a PQLS compatible player, etc. PQLS is enabled. See the explanation below . • The receiver's volume can be set and the sound can be used on Pioneer KURO LINK-compatible flat panel TVs. •...
... below can also be set to the operating instructions of the sound and is generated upon transmission. • VSX-9140TXH only: On players compatible with PQLS Multi Surround, PQLS works for PQLS-compatible players. • PQLS OFF - Synchronized amp mode operations When using the TV's remote control... from the TV's menu screen, if the receiver's HDMI output setting is switched to a PQLS compatible player, etc. PQLS is enabled. See the explanation below . • The receiver's volume can be set and the sound can be used on Pioneer KURO LINK-compatible flat panel TVs. •...

Operating Instructions
Page 70
...make sure to connect your source has also been connected using the Stream Direct (ANALOG DIRECT) modes. 70 En MUTE Use to the source component (see Connecting an...may not work for the zone you want to the instructions that the OVER indicator lights often or you used to use this receiver is only... iPod USB TUNER XM SIRIUS AUDIO INFO CH DISP TV CTRL RECEIVER INPUT SELECT 12 SIGNAL SEL MCACC 45 HDMI OUT 3 SLEEP 6 REMOTE SETUP ZONE 2 ZONE 3 MAIN... Set the MULTI-ZONE operation switch to ZONE 2 or ZONE 3 (VSX-9140TXH only) to the radio station, load the CD, video, DVD etc. ...
...make sure to connect your source has also been connected using the Stream Direct (ANALOG DIRECT) modes. 70 En MUTE Use to the source component (see Connecting an...may not work for the zone you want to the instructions that the OVER indicator lights often or you used to use this receiver is only... iPod USB TUNER XM SIRIUS AUDIO INFO CH DISP TV CTRL RECEIVER INPUT SELECT 12 SIGNAL SEL MCACC 45 HDMI OUT 3 SLEEP 6 REMOTE SETUP ZONE 2 ZONE 3 MAIN... Set the MULTI-ZONE operation switch to ZONE 2 or ZONE 3 (VSX-9140TXH only) to the radio station, load the CD, video, DVD etc. ...

Operating Instructions
Page 73
...working. To go back a step, press RETURN. • After one of the input function buttons (such as this receiver) in addition to this receiver. See Preset code list on the receivers before using this function (see below). • Receiver 1: 6 1 9 3 5 (Default) • Receiver 2: 6 2 6 3 0 • Receiver 3: 6 2 6 3 1 • Receiver...steps by pressing RECEIVER . INPUT SELECT 12 HDMI OUT 3 SIGNAL SEL ...work , select the next code from step 1 to indicate that the setting has failed. 4 Repeat steps 1 through 3 for the component you want to control. Selecting preset codes directly...
...working. To go back a step, press RETURN. • After one of the input function buttons (such as this receiver) in addition to this receiver. See Preset code list on the receivers before using this function (see below). • Receiver 1: 6 1 9 3 5 (Default) • Receiver 2: 6 2 6 3 0 • Receiver 3: 6 2 6 3 1 • Receiver...steps by pressing RECEIVER . INPUT SELECT 12 HDMI OUT 3 SIGNAL SEL ...work , select the next code from step 1 to indicate that the setting has failed. 4 Repeat steps 1 through 3 for the component you want to control. Selecting preset codes directly...

Operating Instructions
Page 101
...; Sometimes a video deck may be poor (with some Input • Make sure that the HDMI Input assign in the INPUT SETUP menu then try OFF. The picture quality may also depend on...again. Can't record video. • Check that the video input you want to record) to this receiver's Resolution setting (in the front panel display) is connected to OFF and a TV and another monitor is...type of video cable as possible (see Volume Limit Setup on your component or display doesn't work, try switching Digital Video Conversion (in the INPUT SETUP menu. and another component are properly...
...; Sometimes a video deck may be poor (with some Input • Make sure that the HDMI Input assign in the INPUT SETUP menu then try OFF. The picture quality may also depend on...again. Can't record video. • Check that the video input you want to record) to this receiver's Resolution setting (in the front panel display) is connected to OFF and a TV and another monitor is...type of video cable as possible (see Volume Limit Setup on your component or display doesn't work, try switching Digital Video Conversion (in the INPUT SETUP menu. and another component are properly...

Operating Instructions
Page 103
...receiver is not a the display shows PCM. During playback of DVD-Audio, • This will not work with this receiver reproduces MULTI CH IN audio sources with the HDMI...VSX-9140TXH only: Set the HDMI output setting to operate within 7 m (23 ft.) and a 30º angle of the remote sensor on the front panel (see Operating multiple receivers on page 73). • Check whether the receiver... your HDMI component directly to indicate it is not ...HDMI AV setting is set (see Remote Control Mode Setup on page 96). • Try replacing the batteries in the remote control (see Operating other Pioneer...
...receiver is not a the display shows PCM. During playback of DVD-Audio, • This will not work with this receiver reproduces MULTI CH IN audio sources with the HDMI...VSX-9140TXH only: Set the HDMI output setting to operate within 7 m (23 ft.) and a 30º angle of the remote sensor on the front panel (see Operating multiple receivers on page 73). • Check whether the receiver... your HDMI component directly to indicate it is not ...HDMI AV setting is set (see Remote Control Mode Setup on page 96). • Try replacing the batteries in the remote control (see Operating other Pioneer...


