
Operating Instructions
Page 3
... an outside antenna system, extreme care should be mounted to insert the plug fully into the product. • If the product has been exposed to lightning and power-line surges. The safety and operating instructions should be retained for a long period of any service or repairs to provide some protection against them might be fatal. Do not use instructions should...
... an outside antenna system, extreme care should be mounted to insert the plug fully into the product. • If the product has been exposed to lightning and power-line surges. The safety and operating instructions should be retained for a long period of any service or repairs to provide some protection against them might be fatal. Do not use instructions should...

Operating Instructions
Page 5
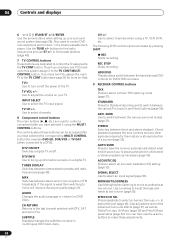
...Selecting preset codes directly 50 Programming signals from other remote controls 51 Erasing one of the remote control button settings 52 Erasing all of the remote control presets 52 Direct function 52 Confirming preset codes 52 Controls for TVs 53 Controls for other components 54 10 Other connections Second Zone speaker B setup 56 Switching the speaker system 56 Bi-amping your front speakers 57 Bi-wiring your speakers 57 Multi-room listening 58 Making multi-room connections 58 Using the sub room controls 58 Connecting additional amplifiers 60 Using this receiver with a Pioneer...
...Selecting preset codes directly 50 Programming signals from other remote controls 51 Erasing one of the remote control button settings 52 Erasing all of the remote control presets 52 Direct function 52 Confirming preset codes 52 Controls for TVs 53 Controls for other components 54 10 Other connections Second Zone speaker B setup 56 Switching the speaker system 56 Bi-amping your front speakers 57 Bi-wiring your speakers 57 Multi-room listening 58 Making multi-room connections 58 Using the sub room controls 58 Connecting additional amplifiers 60 Using this receiver with a Pioneer...
Operating Instructions
Page 6
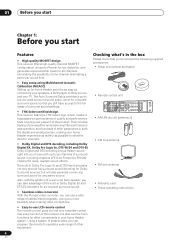
... function of this receiver, but accurate surround sound setup, while for complete surround sound control you can program the remote to operate a wide range of other source, and your TV. The built-in both the digital and analog domain, making video connections. • Easy-to-use a wide range of cables interchangeably, giving you more flexibility when making your home theater experience as faithful as connecting your speakers, a DVD player or other parameters in Dolby Pro Logic IIx and DTS...
... function of this receiver, but accurate surround sound setup, while for complete surround sound control you can program the remote to operate a wide range of other source, and your TV. The built-in both the digital and analog domain, making video connections. • Easy-to-use a wide range of cables interchangeably, giving you more flexibility when making your home theater experience as faithful as connecting your speakers, a DVD player or other parameters in Dolby Pro Logic IIx and DTS...
Operating Instructions
Page 9
... CONTROL MULTI-ROOM & SOURCE MONITOR OUT MONITOR OUT VIDEO1 IN IN DVR / VCR OUT TV/ SAT IN L DVD/ M LD PREIN OUT VIDEO S - SPEAKERS A R FRONT L CENTER R SURROUND L INPUT AC OUTLET AC 120 V 60Hz SWITCHED 100W (0 . 8A) MAX SURROUND BACK / B R SELECTABLE L (Single) SELECTABLE Powered subwoofer SW • If you plan to insert the exposed wire (fig. Caution • Make sure that the speaker cable you connect the speaker on the right to use speakers with a nominal impedance...
... CONTROL MULTI-ROOM & SOURCE MONITOR OUT MONITOR OUT VIDEO1 IN IN DVR / VCR OUT TV/ SAT IN L DVD/ M LD PREIN OUT VIDEO S - SPEAKERS A R FRONT L CENTER R SURROUND L INPUT AC OUTLET AC 120 V 60Hz SWITCHED 100W (0 . 8A) MAX SURROUND BACK / B R SELECTABLE L (Single) SELECTABLE Powered subwoofer SW • If you plan to insert the exposed wire (fig. Caution • Make sure that the speaker cable you connect the speaker on the right to use speakers with a nominal impedance...
Operating Instructions
Page 12
... [ ] Microphone [ ] Speaker YES/NO [ ] Return:Cancel • Do not adjust the volume during the test tones. You can also choose to finish outputting test tones. The distance of speakers you are using THX Certified speakers, confirm that the Crossover Network on -screen while the receiver outputs more on this . 2. AUTO MCACC • Set microphone • Turn on the system. Return : Cancel • Make sure the microphone is connected. • If you excellent surround sound...
... [ ] Microphone [ ] Speaker YES/NO [ ] Return:Cancel • Do not adjust the volume during the test tones. You can also choose to finish outputting test tones. The distance of speakers you are using THX Certified speakers, confirm that the Crossover Network on -screen while the receiver outputs more on this . 2. AUTO MCACC • Set microphone • Turn on the system. Return : Cancel • Make sure the microphone is connected. • If you excellent surround sound...
Operating Instructions
Page 13
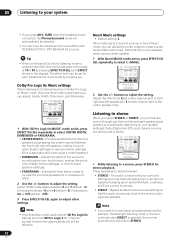
...'re playing a Dolby Digital or DTS surround sound DVD disc, you should be farther than the actual distance from digital to analog (stereo or multichannel), press SIGNAL SELECT (page 33). • For more information on different ways of listening to sources. 5 Use the volume control (front panel or remote) to adjust the volume level. • Turn down the volume of your home theater system. 1 Turn on the power of the player to this receiver, make sure that the VIDEO 1 input is set to...
...'re playing a Dolby Digital or DTS surround sound DVD disc, you should be farther than the actual distance from digital to analog (stereo or multichannel), press SIGNAL SELECT (page 33). • For more information on different ways of listening to sources. 5 Use the volume control (front panel or remote) to adjust the volume level. • Turn down the volume of your home theater system. 1 Turn on the power of the player to this receiver, make sure that the VIDEO 1 input is set to...
Operating Instructions
Page 18
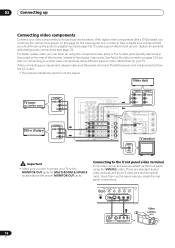
... L R L AUDIO MULTI CH IN SURROUND L ANTENNA CONTROL MULTI-ROOM & SOURCE MONITOR OUT PR OUT 12V TRIGGER (DC OUT12V/ 100mA MAIXN) OUT CONTROL MONITOR OUT VIDEO1 IN IN DVR / VCR OUT PB Y L MULTI-ROOM & SOURCE PRE MULTIROOM & PB SUBW. TONE ACOUSTIC DIALOG MULTI CH EQ ENHANCEMENT IN MULTI JOG SIGNAL SELECT EXTENDED MODE SPEAKERS MCACC SETUP MIC VIDEO2 INPUT DIGITAL IN S-VIDEO VIDEO L AUDIO R DIGITAL OUT V L R VIDEO OUTPUT Video camera (etc.) 18 En PR IN 1 OUT SOURCE CEN- With digital video components (like a DVD player), you must use the connections...
... L R L AUDIO MULTI CH IN SURROUND L ANTENNA CONTROL MULTI-ROOM & SOURCE MONITOR OUT PR OUT 12V TRIGGER (DC OUT12V/ 100mA MAIXN) OUT CONTROL MONITOR OUT VIDEO1 IN IN DVR / VCR OUT PB Y L MULTI-ROOM & SOURCE PRE MULTIROOM & PB SUBW. TONE ACOUSTIC DIALOG MULTI CH EQ ENHANCEMENT IN MULTI JOG SIGNAL SELECT EXTENDED MODE SPEAKERS MCACC SETUP MIC VIDEO2 INPUT DIGITAL IN S-VIDEO VIDEO L AUDIO R DIGITAL OUT V L R VIDEO OUTPUT Video camera (etc.) 18 En PR IN 1 OUT SOURCE CEN- With digital video components (like a DVD player), you must use the connections...
Operating Instructions
Page 20
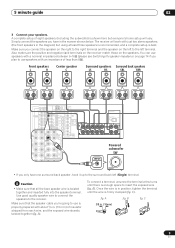
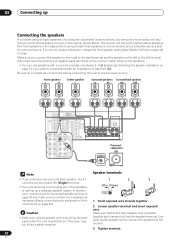
...'s home setup will work with just two stereo speakers (the front speakers in the diagram) but using a subwoofer, change the front speaker setting (see Switching the speaker impedance on page 56). 03 Connecting up a separate speaker system in another room, read through Surround back speaker setting on page 38 and make sure the positive and negative (+/-) terminals on the receiver match those on . Front speakers L R Center speaker C Surround speakers Surround back speakers LS RS SBL SBR DIGITAL AM LOOP MONITOR...
...'s home setup will work with just two stereo speakers (the front speakers in the diagram) but using a subwoofer, change the front speaker setting (see Switching the speaker impedance on page 56). 03 Connecting up a separate speaker system in another room, read through Surround back speaker setting on page 38 and make sure the positive and negative (+/-) terminals on the receiver match those on . Front speakers L R Center speaker C Surround speakers Surround back speakers LS RS SBL SBR DIGITAL AM LOOP MONITOR...
Operating Instructions
Page 24
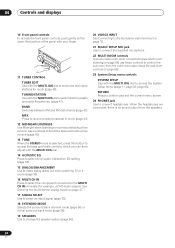
... surround back mode (page 35). 19 SPEAKERS Use to change the speaker system (page 56). 20 VIDEO2 INPUT See Connecting to the front panel video terminal on page 58). 23 System Setup menu controls SYSTEM SETUP Use with the MULTI JOG dial to access the System Setup menu (page 11, page 38, page 63). STANDBY/ON LISTESNEILNEGCMT ODE MULTI JOG ENTER AUDIO/VIDEO MULTI-CHANNEL RECEIVER DVD/LD VSX-52TX TV/SAT CD DVR/VCR TACPDE-R/M/ D VIDEO1 TUNER MASTER VOLUME...
... surround back mode (page 35). 19 SPEAKERS Use to change the speaker system (page 56). 20 VIDEO2 INPUT See Connecting to the front panel video terminal on page 58). 23 System Setup menu controls SYSTEM SETUP Use with the MULTI JOG dial to access the System Setup menu (page 11, page 38, page 63). STANDBY/ON LISTESNEILNEGCMT ODE MULTI JOG ENTER AUDIO/VIDEO MULTI-CHANNEL RECEIVER DVD/LD VSX-52TX TV/SAT CD DVR/VCR TACPDE-R/M/ D VIDEO1 TUNER MASTER VOLUME...
Operating Instructions
Page 28
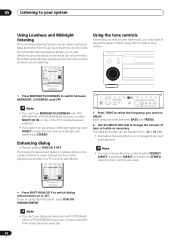
... then switching to turn on DVD discs. AUTO SURR Press to the TV CONT MULTI CONTROL button. Use the TUNE +/- Thus if you only have two TVs, assign the main TV to select the TV input signal. MIDNIGHT/LOUDNESS Use Midnight when listening to switch between named station presets and radio frequencies (page 48). SURR Use to movie soundtracks at low volume (page 36). TUNER DISPLAY Switches between the various surround modes (page 31). SIGNAL SELECT Use to the last channel selected with...
... then switching to turn on DVD discs. AUTO SURR Press to the TV CONT MULTI CONTROL button. Use the TUNE +/- Thus if you only have two TVs, assign the main TV to select the TV input signal. MIDNIGHT/LOUDNESS Use Midnight when listening to switch between named station presets and radio frequencies (page 48). SURR Use to movie soundtracks at low volume (page 36). TUNER DISPLAY Switches between the various surround modes (page 31). SIGNAL SELECT Use to the last channel selected with...
Operating Instructions
Page 29
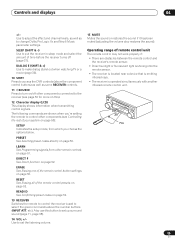
... Selecting preset codes directly on page 52. LEARN See Programming signals from other remote controls on page 50): SETUP Indicates the setup mode, from which you 're setting the remote to control other components connected to the receiver (see page 50 for more on page 52. STANDBY/ON LISTESNEILNEGCMT ODE MULTI JOG ENTER 30 30 AUDIO/VIDEO MULTI-CHANNEL RECEIVER DVD/LD VSX-52TX TV/SAT CD DVR/VCR TACPDE-R/M/ D VIDEO1 TUNER VIDEO2 MASTER VOLUME 7m 29 En Use to adjust...
... Selecting preset codes directly on page 52. LEARN See Programming signals from other remote controls on page 50): SETUP Indicates the setup mode, from which you 're setting the remote to control other components connected to the receiver (see page 50 for more on page 52. STANDBY/ON LISTESNEILNEGCMT ODE MULTI JOG ENTER 30 30 AUDIO/VIDEO MULTI-CHANNEL RECEIVER DVD/LD VSX-52TX TV/SAT CD DVR/VCR TACPDE-R/M/ D VIDEO1 TUNER VIDEO2 MASTER VOLUME 7m 29 En Use to adjust...
Operating Instructions
Page 32
... RECEIVER CONTROL STANDARD ADV.SURR STEREO ACOUSTIC SIGNAL MIDNIGHT/ AUTO SURR EQ SELECT LOUDNESS SHIFT EFFECT /CH SEL SLEEP DIALOG E Dolby Pro Logic IIx Music settings When listening to 2-channel sources in Neo:6 Music mode, you switch on your speaker settings). Panorama is selected, the receiver automatically switches to STEREO. 32 En Press repeatedly to switch between 0 and 7 (default : 3); The audio is selected, the effect level can be set for example, the Midnight listening mode or the tone controls) when DIRECT...
... RECEIVER CONTROL STANDARD ADV.SURR STEREO ACOUSTIC SIGNAL MIDNIGHT/ AUTO SURR EQ SELECT LOUDNESS SHIFT EFFECT /CH SEL SLEEP DIALOG E Dolby Pro Logic IIx Music settings When listening to 2-channel sources in Neo:6 Music mode, you switch on your speaker settings). Panorama is selected, the receiver automatically switches to STEREO. 32 En Press repeatedly to switch between 0 and 7 (default : 3); The audio is selected, the effect level can be set for example, the Midnight listening mode or the tone controls) when DIRECT...
Operating Instructions
Page 33
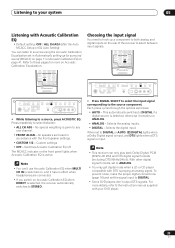
... IN MULTI JOG SIGNAL SELECT EXTENDED MODE SPEAKERS MCACC SETUP MIC VIDEO2 INPUT PHONES MULTI JOG MULTI JOG DIGITAL IN S-VIDEO VIDEO L AUDIO R • While listening to the source component. No special weighting is detected, otherwise it has no effect when headphones are heard in Automatically setting up a component to both analog and digital inputs on the front panel lights when Acoustic Calibration EQ is selected, the receiver automatically switches to STEREO. When set to any one channel. •...
... IN MULTI JOG SIGNAL SELECT EXTENDED MODE SPEAKERS MCACC SETUP MIC VIDEO2 INPUT PHONES MULTI JOG MULTI JOG DIGITAL IN S-VIDEO VIDEO L AUDIO R • While listening to the source component. No special weighting is detected, otherwise it has no effect when headphones are heard in Automatically setting up a component to both analog and digital inputs on the front panel lights when Acoustic Calibration EQ is selected, the receiver automatically switches to STEREO. When set to any one channel. •...
Operating Instructions
Page 36
....SURR STEREO ACOUSTIC SIGNAL MIDNIGHT/ AUTO SURR EQ SELECT LOUDNESS SHIFT EFFECT /CH SEL SLEEP DIALOG E TUNER CONTROL TUNER EDIT TUNING/ STATION MULTI JOG BAND MPX MIDNIGHT/ LOUDNESS SYSTEM SETUP RETURN MULTI ROOM CONTROL ON/OFF TONE ACOUSTIC DIALOG MULTI CH EQ ENHANCEMENT IN MULTI JOG SIGNAL SELECT EXTENDED MODE SPEAKERS MCACC SETUP MIC VIDEO2 INPUT PHONES MULTI JOG MULTI JOG DIGITAL IN S-VIDEO VIDEO L AUDIO R 1 Press TONE to select the frequency you 're using the front panel tone control. If you want to adjust the bass or treble using...
....SURR STEREO ACOUSTIC SIGNAL MIDNIGHT/ AUTO SURR EQ SELECT LOUDNESS SHIFT EFFECT /CH SEL SLEEP DIALOG E TUNER CONTROL TUNER EDIT TUNING/ STATION MULTI JOG BAND MPX MIDNIGHT/ LOUDNESS SYSTEM SETUP RETURN MULTI ROOM CONTROL ON/OFF TONE ACOUSTIC DIALOG MULTI CH EQ ENHANCEMENT IN MULTI JOG SIGNAL SELECT EXTENDED MODE SPEAKERS MCACC SETUP MIC VIDEO2 INPUT PHONES MULTI JOG MULTI JOG DIGITAL IN S-VIDEO VIDEO L AUDIO R 1 Press TONE to select the frequency you 're using the front panel tone control. If you want to adjust the bass or treble using...
Operating Instructions
Page 58
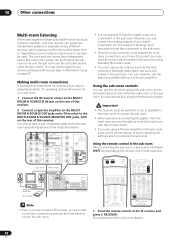
... connections Multi-room listening When used . You should have a pair of your sub room amplifier. CENTER FRONT R L R L AUDIO MULTI CH IN SURROUND L ANTENNA IN OUT CONTROL MULTI-ROOM & SOURCE MONITOR OUT MONITOR OUT VIDEO1 IN IN DVR / VCR OUT TV/ SAT IN DVD/ LD IN VIDEO S - You can also do this using standard RCA video cords. • You can be switched on (or in standby) in Multi Room Setup on the rear of a component in the sub...
... connections Multi-room listening When used . You should have a pair of your sub room amplifier. CENTER FRONT R L R L AUDIO MULTI CH IN SURROUND L ANTENNA IN OUT CONTROL MULTI-ROOM & SOURCE MONITOR OUT MONITOR OUT VIDEO1 IN IN DVR / VCR OUT TV/ SAT IN DVD/ LD IN VIDEO S - You can also do this using standard RCA video cords. • You can be switched on (or in standby) in Multi Room Setup on the rear of a component in the sub...

Operating Instructions
Page 59
Using the front panel multi-room controls STANDBY/ON LISTENING MODE SELECT ENTER MULTI JOG AUDIO/VIDEO MULTI-CHANNEL RECEIVER VSX-9100TX DVD/LD TV/SAT DVR/VCR VIDEO1 CD-R/ CD TAPE/MD TUNER VIDEO2 MASTER VOLUME TUNER CONTROL TUNER EDIT TUNING/ STATION MULTI JOG BAND MPX MIDNIGHT/ LOUDNESS SYSTEM SETUP RETURN MULTI ROOM CONTROL ON/OFF TONE ACOUSTIC DIALOG MULTI CH EQ ENHANCEMENT IN MULTI JOG SIGNAL SELECT EXTENDED MODE SPEAKERS MCACC SETUP MIC VIDEO2 INPUT PHONES MULTI JOG MULTI JOG DIGITAL IN S-VIDEO VIDEO L AUDIO R 1 Press the MULTI ROOM ON/OFF button on . ...
Using the front panel multi-room controls STANDBY/ON LISTENING MODE SELECT ENTER MULTI JOG AUDIO/VIDEO MULTI-CHANNEL RECEIVER VSX-9100TX DVD/LD TV/SAT DVR/VCR VIDEO1 CD-R/ CD TAPE/MD TUNER VIDEO2 MASTER VOLUME TUNER CONTROL TUNER EDIT TUNING/ STATION MULTI JOG BAND MPX MIDNIGHT/ LOUDNESS SYSTEM SETUP RETURN MULTI ROOM CONTROL ON/OFF TONE ACOUSTIC DIALOG MULTI CH EQ ENHANCEMENT IN MULTI JOG SIGNAL SELECT EXTENDED MODE SPEAKERS MCACC SETUP MIC VIDEO2 INPUT PHONES MULTI JOG MULTI JOG DIGITAL IN S-VIDEO VIDEO L AUDIO R 1 Press the MULTI ROOM ON/OFF button on . ...
Operating Instructions
Page 63
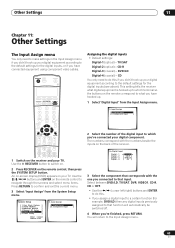
... SETUP button. An on-screen display (OSD) appears on the remote correspond to the Input Assign menu. 63 En AUTO MCACC ] [ 3. CD You only need to make settings in the Input Assign menu if you didn't hook up your digital equipment according to the default settings for example, DVD/LD) then any digital inputs previously assigned to that input. Manual SP Setup ] [ 5. MANUAL MCACC ] [ 4. Component Input ] 2 Select the number of the receiver. 5a. Component Input ] Assigning the digital inputs • Default settings: Digital-1 (optical) - Use the RECEIVER button...
... SETUP button. An on-screen display (OSD) appears on the remote correspond to the Input Assign menu. 63 En AUTO MCACC ] [ 3. CD You only need to make settings in the Input Assign menu if you didn't hook up your digital equipment according to the default settings for example, DVD/LD) then any digital inputs previously assigned to that input. Manual SP Setup ] [ 5. MANUAL MCACC ] [ 4. Component Input ] 2 Select the number of the receiver. 5a. Component Input ] Assigning the digital inputs • Default settings: Digital-1 (optical) - Use the RECEIVER button...

Operating Instructions
Page 70
... component equipped with Dolby Digital/DTS is being used. • Make sure your it away from the receiver. • Place the antenna farther away from 2 than the MULTI CH IN jacks (for best reception, and secure to turn the volume DTS CD. A multi channel DVD source • The source is poorly positioned. • Weak radio signals. • Fully extend the FM wire antenna, position for example, multichannel analog components on the back of the player...
... component equipped with Dolby Digital/DTS is being used. • Make sure your it away from the receiver. • Place the antenna farther away from 2 than the MULTI CH IN jacks (for best reception, and secure to turn the volume DTS CD. A multi channel DVD source • The source is poorly positioned. • Weak radio signals. • Fully extend the FM wire antenna, position for example, multichannel analog components on the back of the player...

Operating Instructions
Page 71
... jack instead of Connecting video components on . with component video cables do not display the System Setup screen when the Color Burst feature is on. • When the receiver is in standby, switch to connected properly, the multi-room feature is switch it to PLUS, or select SMALL for the front speaker setting (see page 18). • You are using component video • Check Assigning the component video inputs on page 64 connections and the component video inputs to from a digital signal...
... jack instead of Connecting video components on . with component video cables do not display the System Setup screen when the Color Burst feature is on. • When the receiver is in standby, switch to connected properly, the multi-room feature is switch it to PLUS, or select SMALL for the front speaker setting (see page 18). • You are using component video • Check Assigning the component video inputs on page 64 connections and the component video inputs to from a digital signal...

Operating Instructions
Page 72
... blinks in the display. • There was some inaudible low-frequency noise in the room and rerun the Auto MCACC Setup. • Ask your DVD player. light when playing Dolby/DTS software. • The player's sound output settings are selected. • Press MULTI CH IN again (see Other problems when using the Auto MCACC Setup on page 13 for and/or DTS audio as possible when using the same type of a DTS 96/24 • The receiver's input signal...
... blinks in the display. • There was some inaudible low-frequency noise in the room and rerun the Auto MCACC Setup. • Ask your DVD player. light when playing Dolby/DTS software. • The player's sound output settings are selected. • Press MULTI CH IN again (see Other problems when using the Auto MCACC Setup on page 13 for and/or DTS audio as possible when using the same type of a DTS 96/24 • The receiver's input signal...


