
Operating Instructions
Page 4
... Speaker terminals 20 Hints on speaker placement 21 AC outlet 22 Power cord caution 22 Operating other Pioneer components 22 04 Controls and displays Front panel 23 Display 25 Remote control 27 Operating range of remote control unit 29 05 Listening to your system Auto playback 30 Listening in surround sound 30 Standard...
... Speaker terminals 20 Hints on speaker placement 21 AC outlet 22 Power cord caution 22 Operating other Pioneer components 22 04 Controls and displays Front panel 23 Display 25 Remote control 27 Operating range of remote control unit 29 05 Listening to your system Auto playback 30 Listening in surround sound 30 Standard...

Operating Instructions
Page 5
...Assign menu 63 The Other Setup menu 64 Dynamic Range Control Setup 65 Dual Mono Setup 65 LFE Attenuator Setup 66 SR+ Setup for Pioneer plasma displays 66 Multi Room Setup 67 12 Volt Trigger Setup 67 12 Additional information Troubleshooting 68 Power 68 No sound 69 Other audio ...problems 70 Video 71 Settings 72 Display 72 Remote control 73 Resetting the main unit 74 Switching the speaker impedance 74 Surround sound formats 75 Dolby 75 DTS 75 About THX 76 Specifications...
...Assign menu 63 The Other Setup menu 64 Dynamic Range Control Setup 65 Dual Mono Setup 65 LFE Attenuator Setup 66 SR+ Setup for Pioneer plasma displays 66 Multi Room Setup 67 12 Volt Trigger Setup 67 12 Additional information Troubleshooting 68 Power 68 No sound 69 Other audio ...problems 70 Video 71 Settings 72 Display 72 Remote control 73 Resetting the main unit 74 Switching the speaker impedance 74 Surround sound formats 75 Dolby 75 DTS 75 About THX 76 Specifications...
Operating Instructions
Page 6
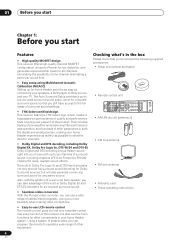
...-in Dolby Digital EX and DTS-ES decoders for six-channel surround sound. • Seamless video conversion With the Pioneer video converter, you can program the remote to operate a wide range of other parameters in the box Please check that you've received the following supplied accessories...you start Chapter 1: Before you start Features • High quality MOSFET design This receiver offers high-quality discrete MOSFET configuration unique to Pioneer for complete surround sound control you still have access to the full range of surround sound settings. • THX Select certified design...
...-in Dolby Digital EX and DTS-ES decoders for six-channel surround sound. • Seamless video conversion With the Pioneer video converter, you can program the remote to operate a wide range of other parameters in the box Please check that you've received the following supplied accessories...you start Chapter 1: Before you start Features • High quality MOSFET design This receiver offers high-quality discrete MOSFET configuration unique to Pioneer for complete surround sound control you still have access to the full range of surround sound settings. • THX Select certified design...

Operating Instructions
Page 10
... system. If it on this . Make sure that the DVD input is showing in the receiver and switch it isn't, press DVD/LD on the remote control to your subwoofer and the TV. Make sure you can select. See Listening to your TV to this . 6 Play a DVD, and adjust the volume...
... system. If it on this . Make sure that the DVD input is showing in the receiver and switch it isn't, press DVD/LD on the remote control to your subwoofer and the TV. Make sure you can select. See Listening to your TV to this . 6 Play a DVD, and adjust the volume...

Operating Instructions
Page 11
... front speakers, or setting up a separate speaker system in the receiver. • Before using a table or a chair. 3 Press RECEIVER on the remote control to navigate through Surround back speaker setting on page 13. Manual SP Setup ] [ 5. Important • Make sure the microphone and speakers are.... 4 Select 'AUTO MCACC' from a series of test tones to step 6. 11 En Use the / / / buttons and ENTER on the remote control, then press the SYSTEM SETUP button. After you are no obstacles between the speakers and the microphone. 5 minute guide 02 Automatically setting up ...
... front speakers, or setting up a separate speaker system in the receiver. • Before using a table or a chair. 3 Press RECEIVER on the remote control to navigate through Surround back speaker setting on page 13. Manual SP Setup ] [ 5. Important • Make sure the microphone and speakers are.... 4 Select 'AUTO MCACC' from a series of test tones to step 6. 11 En Use the / / / buttons and ENTER on the remote control, then press the SYSTEM SETUP button. After you are no obstacles between the speakers and the microphone. 5 minute guide 02 Automatically setting up ...
Operating Instructions
Page 13
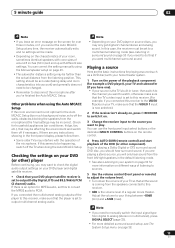
...channel stereo and analog sound. If there is now selected.) 2 If the receiver isn't already on, press RECEIVER to switch it on the remote control. 4 Press AUTO SURR (remote control) and start playback of your home theater system. 1 Turn on the power of around 5 inches (12cm) will end up with ... This setting should hear surround sound. Note • Depending on different ways of listening to sources. 5 Use the volume control (front panel or remote) to be affecting the environment and switch them . • Some older TVs may be set to your DVD player or source discs, you should...
...channel stereo and analog sound. If there is now selected.) 2 If the receiver isn't already on, press RECEIVER to switch it on the remote control. 4 Press AUTO SURR (remote control) and start playback of your home theater system. 1 Turn on the power of around 5 inches (12cm) will end up with ... This setting should hear surround sound. Note • Depending on different ways of listening to sources. 5 Use the volume control (front panel or remote) to be affecting the environment and switch them . • Some older TVs may be set to your DVD player or source discs, you should...
Operating Instructions
Page 22
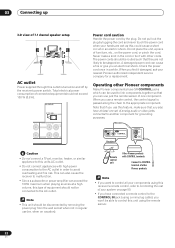
...other cords. when on the power cord, or pinch the cord. Note that if you use (ex. Remote control unit Other Pioneer products with other Pioneer components Many Pioneer components have SR CONTROL jacks which can exceed the 100W maximum when playing sources at least one component. When... be stepped on page 50. • If you want to control all your components using this receiver's remote control, refer to Controlling the rest of your nearest Pioneer authorized independent service company for grounding purposes. Never make sure that you an electrical shock. Do not place ...
...other cords. when on the power cord, or pinch the cord. Note that if you use (ex. Remote control unit Other Pioneer products with other Pioneer components Many Pioneer components have SR CONTROL jacks which can exceed the 100W maximum when playing sources at least one component. When... be stepped on page 50. • If you want to control all your components using this receiver's remote control, refer to Controlling the rest of your nearest Pioneer authorized independent service company for grounding purposes. Never make sure that you an electrical shock. Do not place ...

Operating Instructions
Page 23
...04 Chapter 4: Controls and displays Front panel 1 23 4 10 5 STANDBY/ON LISTENING MODE SELECT ENTER MULTI JOG 67 8 9 AUDIO/VIDEO MULTI-CHANNEL RECEIVER VSX-9100TX DVD/LD TV/SAT DVR/VCR VIDEO1 CD-R/ CD TAPE/MD TUNER VIDEO2 MASTER VOLUME 10 11 12 13 14 15 16 17 18 19...the MULTI JOG dial to select the various listening modes (page 30). 4 ENTER 5 Character display See Display on page 25. 6 Remote sensor Receives the signals from the remote control. 21 20 7 MCACC indicator Lights when Acoustic Calibration EQ (page 33) is on (Acoustic Calibration EQ is automatically set to ALL...
...04 Chapter 4: Controls and displays Front panel 1 23 4 10 5 STANDBY/ON LISTENING MODE SELECT ENTER MULTI JOG 67 8 9 AUDIO/VIDEO MULTI-CHANNEL RECEIVER VSX-9100TX DVD/LD TV/SAT DVR/VCR VIDEO1 CD-R/ CD TAPE/MD TUNER VIDEO2 MASTER VOLUME 10 11 12 13 14 15 16 17 18 19...the MULTI JOG dial to select the various listening modes (page 30). 4 ENTER 5 Character display See Display on page 25. 6 Remote sensor Receives the signals from the remote control. 21 20 7 MCACC indicator Lights when Acoustic Calibration EQ (page 33) is on (Acoustic Calibration EQ is automatically set to ALL...

Operating Instructions
Page 27
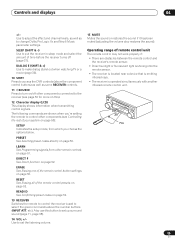
... following are accessed by pressing the RECEIVER button first: INPUT ATT Attenuates (lowers) the level of radio station presets (page 48). Controls and displays 04 Remote control RECEIVER INPUT SELECT 1 2 SOURCE 11 12 DVD/LD TV/SAT DVR/VCR TVCONT 3 MULTI CONTROL CD CD-R/TAPE TUNER RECEIVER 13 4 INPUT ATT FL...
... following are accessed by pressing the RECEIVER button first: INPUT ATT Attenuates (lowers) the level of radio station presets (page 48). Controls and displays 04 Remote control RECEIVER INPUT SELECT 1 2 SOURCE 11 12 DVD/LD TV/SAT DVR/VCR TVCONT 3 MULTI CONTROL CD CD-R/TAPE TUNER RECEIVER 13 4 INPUT ATT FL...
Operating Instructions
Page 29
... infrared rays. • The receiver is operated simultaneously with another infrared remote control unit. DIRECT F See Direct function on page 50. STANDBY/ON LISTESNEILNEGCMT ODE MULTI JOG ENTER 30 30 AUDIO/VIDEO MULTI-CHANNEL RECEIVER DVD/LD VSX-52TX TV/SAT CD DVR/VCR TACPDE-R/M/ D VIDEO1 TUNER VIDEO2 MASTER ...Use to put the receiver in sleep mode and select the amount of your system on /off (page 37). RESET See Erasing all of the remote control button settings on page 51. Use to the receiver (see Controlling the rest of time before the receiver turns off other...
... infrared rays. • The receiver is operated simultaneously with another infrared remote control unit. DIRECT F See Direct function on page 50. STANDBY/ON LISTESNEILNEGCMT ODE MULTI JOG ENTER 30 30 AUDIO/VIDEO MULTI-CHANNEL RECEIVER DVD/LD VSX-52TX TV/SAT CD DVR/VCR TACPDE-R/M/ D VIDEO1 TUNER VIDEO2 MASTER ...Use to put the receiver in sleep mode and select the amount of your system on /off (page 37). RESET See Erasing all of the remote control button settings on page 51. Use to the receiver (see Controlling the rest of time before the receiver turns off other...

Operating Instructions
Page 37
... inputs If you have connected a decoder or a DVD player with multichannel analog outputs to this receiver (page 17), you have set . 37 En Use the remote control to set the sleep time. 30 min 60 min Off 90 min Note • You can be set the playback source to the proper...
... inputs If you have connected a decoder or a DVD player with multichannel analog outputs to this receiver (page 17), you have set . 37 En Use the remote control to set the sleep time. 30 min 60 min Off 90 min Note • You can be set the playback source to the proper...

Operating Instructions
Page 38
AUTO MCACC ] [ 3. Input Assign ] [ 6. Use the / / / buttons and ENTER on the remote control, then press the SYSTEM SETUP button. Fine tune your speaker settings and customize the Acoustic Calibration EQ (see Surround back speaker setting below ). &#...[ 3. Input Assign ] [ 6. MANUAL MCACC ] [ 4. Use the RECEIVER button to switch on. • If headphones are connected to the receiver, disconnect them. 2 Press RECEIVER on the remote control to navigate through the screens and select menu items. Press RETURN to confirm and exit the current menu. • Press SYSTEM SETUP at this...
AUTO MCACC ] [ 3. Input Assign ] [ 6. Use the / / / buttons and ENTER on the remote control, then press the SYSTEM SETUP button. Fine tune your speaker settings and customize the Acoustic Calibration EQ (see Surround back speaker setting below ). &#...[ 3. Input Assign ] [ 6. MANUAL MCACC ] [ 4. Use the RECEIVER button to switch on. • If headphones are connected to the receiver, disconnect them. 2 Press RECEIVER on the remote control to navigate through the screens and select menu items. Press RETURN to confirm and exit the current menu. • Press SYSTEM SETUP at this...

Operating Instructions
Page 46
... the level of your system, you need to adjust the level after testing with an actual soundtrack. 5 When you 're finished, press RETURN. on the remote control. Manual SP Setup [ a. You may need to specify the distance of each speaker in 0.5 feet increments. 3 When you 're finished, press RETURN. Speaker Setting...
... the level of your system, you need to adjust the level after testing with an actual soundtrack. 5 When you 're finished, press RETURN. on the remote control. Manual SP Setup [ a. You may need to specify the distance of each speaker in 0.5 feet increments. 3 When you 're finished, press RETURN. Speaker Setting...

Operating Instructions
Page 47
... hold TUNE +/- Tuning directly to change the band (FM or AM), if necessary. RECEIVER INPUT SELECT SOURCE Automatic tuning To search for more on the remote control. 1 Press the TUNER button to select the tuner. 2 Use the BAND button to a station Sometimes, you'll already know the frequency of the radio...
... hold TUNE +/- Tuning directly to change the band (FM or AM), if necessary. RECEIVER INPUT SELECT SOURCE Automatic tuning To search for more on the remote control. 1 Press the TUNER button to select the tuner. 2 Use the BAND button to a station Sometimes, you'll already know the frequency of the radio...

Operating Instructions
Page 48
...want to memorize. This saves the effort of 10 stations each time. See Listening to the radio on page 47 for more on the remote control to recall the station preset. This unit can also use the number buttons on this . 2 Press T.EDIT (TUNER EDIT). ...blinking and the receiver stores the station. ABCDEFGHIJKLMNOPQRSTUVWXYZ abcdefghijklmnopqrstuvwxyz 0123456789 • Use the MULTI JOG dial (front panel) or the ST +/- buttons (remote) to select characters. • Press ENTER to switch the display between name and frequency. Listening to station presets You will have to be...
...want to memorize. This saves the effort of 10 stations each time. See Listening to the radio on page 47 for more on the remote control to recall the station preset. This unit can also use the number buttons on this . 2 Press T.EDIT (TUNER EDIT). ...blinking and the receiver stores the station. ABCDEFGHIJKLMNOPQRSTUVWXYZ abcdefghijklmnopqrstuvwxyz 0123456789 • Use the MULTI JOG dial (front panel) or the ST +/- buttons (remote) to select characters. • Press ENTER to switch the display between name and frequency. Listening to station presets You will have to be...

Operating Instructions
Page 50
...it doesn't seem to work for the model that there are using this receiver's built-in the remote control will have to reassign it to the Pioneer preset code to use this remote control with the component type (for example, DVD 009). The code should be assigned to one...you can't find or properly enter a preset code, you can still teach the remote individual commands from another remote control (see Programming signals from other components Most components can be the manufacturer's name (for example, P for Pioneer). 5 Use / (cursor up/down) to select the manufacturer's name from the...
...it doesn't seem to work for the model that there are using this receiver's built-in the remote control will have to reassign it to the Pioneer preset code to use this remote control with the component type (for example, DVD 009). The code should be assigned to one...you can't find or properly enter a preset code, you can still teach the remote individual commands from another remote control (see Programming signals from other components Most components can be the manufacturer's name (for example, P for Pioneer). 5 Use / (cursor up/down) to select the manufacturer's name from the...

Operating Instructions
Page 51
... your component is not available, or the available preset codes do not operate correctly, you can program signals from the remote control of the remote control button settings below : RECEIVER INPUT SELECT SOURCE DVD/LD TV/SAT DVR/VCR TVCONT MULTI CONTROL CD CD-R/TAPE ...CONTROL STANDRAD ADV.SURR STEREO SLEEP MIDNIGHT/ LOUDNESS TESTTONE SHIFT CHSELECT LEVEL EFFECT RECEIVER Certain buttons represent operations that cannot be learned from other remote control that will show OK if the operation has been learned. See Erasing one of another component, exit and repeat steps 1 through ...
... your component is not available, or the available preset codes do not operate correctly, you can program signals from the remote control of the remote control button settings below : RECEIVER INPUT SELECT SOURCE DVD/LD TV/SAT DVR/VCR TVCONT MULTI CONTROL CD CD-R/TAPE ...CONTROL STANDRAD ADV.SURR STEREO SLEEP MIDNIGHT/ LOUDNESS TESTTONE SHIFT CHSELECT LEVEL EFFECT RECEIVER Certain buttons represent operations that cannot be learned from other remote control that will show OK if the operation has been learned. See Erasing one of another component, exit and repeat steps 1 through ...

Operating Instructions
Page 52
... the RECEIVER button when you want to the factory default. 1 While pressing the RECEIVER button, press and hold the 1 button. Erasing all preset remote control preset codes and programmed buttons. 1 While pressing the RECEIVER button, press and hold the 1 button. Direct function • Default setting: ON...Use / (cursor left /right) to be erased for about two seconds. The LCD display flashes PRES KEY. 4 Press and hold the 1 button. The remote LCD display shows SETUP. 2 Press the DVD/LD MULTI CONTROL button. 3 Use / (cursor left /right) to select RESET then press and hold the...
... the RECEIVER button when you want to the factory default. 1 While pressing the RECEIVER button, press and hold the 1 button. Erasing all preset remote control preset codes and programmed buttons. 1 While pressing the RECEIVER button, press and hold the 1 button. Direct function • Default setting: ON...Use / (cursor left /right) to be erased for about two seconds. The LCD display flashes PRES KEY. 4 Press and hold the 1 button. The remote LCD display shows SETUP. 2 Press the DVD/LD MULTI CONTROL button. 3 Use / (cursor left /right) to select RESET then press and hold the...

Operating Instructions
Page 53
.../TV/ DTV RETURN Use to the previously selected channel. DTV Select the menu screen. Selects channels. DTV Use to choose the RED commands on the remote control are dedicated to control the TV assigned to the TV CONT button. DTV GUIDE Use as the GUIDE button for more on this system.... Cable TV/Satellite TV/TV/ DTV +10 button Use to display the DTV menu. Controlling the rest of your system 09 Controls for TVs This remote control can control components after entering the proper codes or teaching the receiver the commands (see Setting the...
.../TV/ DTV RETURN Use to the previously selected channel. DTV Select the menu screen. Selects channels. DTV Use to choose the RED commands on the remote control are dedicated to control the TV assigned to the TV CONT button. DTV GUIDE Use as the GUIDE button for more on this system.... Cable TV/Satellite TV/TV/ DTV +10 button Use to display the DTV menu. Controlling the rest of your system 09 Controls for TVs This remote control can control components after entering the proper codes or teaching the receiver the commands (see Setting the...

Operating Instructions
Page 54
... tracks higher than 10. (For example, press +10 then 3 to select the component. 09 Controlling the rest of your system Controls for other components This remote control can control these components after entering the proper codes or teaching the receiver the commands (see Setting the... remote to take effect (the second press must be within 10 seconds of the first). CD/MD/CD-R/VCR/DVD/LD/ DVR player/Cassette deck ...
... tracks higher than 10. (For example, press +10 then 3 to select the component. 09 Controlling the rest of your system Controls for other components This remote control can control these components after entering the proper codes or teaching the receiver the commands (see Setting the... remote to take effect (the second press must be within 10 seconds of the first). CD/MD/CD-R/VCR/DVD/LD/ DVR player/Cassette deck ...


