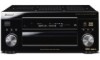
Operating Instructions
Page 3
... proper ventilation is for ventilation and to ensure reliable operation of any way. • When the product exhibits a distinct change in a stable location. LIGHTNING - For added protection for this product is grounded so as the original part. POWER LINES - When installing an outside antenna or cable system is left un-used replacement parts specified by a qualified technician to restore the product...
... proper ventilation is for ventilation and to ensure reliable operation of any way. • When the product exhibits a distinct change in a stable location. LIGHTNING - For added protection for this product is grounded so as the original part. POWER LINES - When installing an outside antenna or cable system is left un-used replacement parts specified by a qualified technician to restore the product...
Operating Instructions
Page 4
... ...22 Connecting other video sources ...23 Using the component video jacks ...24 Connecting digital audio sources ...25 Connecting analog audio sources ...26 Connecting a component to the front panel inputs . . 27 Installing your speaker system ...28 Connecting the speakers ...29 Placing the speakers ...29 Connecting antennas ...30 AM loop antenna ...30 FM wire antenna ...30 Connecting external antennas ...30 Plugging in the receiver ...31 About the AC outlet ...31 06 Using the tuner Finding a station ...47 Tuning directly to a station ...47 MPX mode ...48 Memorizing station presets ...48...
... ...22 Connecting other video sources ...23 Using the component video jacks ...24 Connecting digital audio sources ...25 Connecting analog audio sources ...26 Connecting a component to the front panel inputs . . 27 Installing your speaker system ...28 Connecting the speakers ...29 Placing the speakers ...29 Connecting antennas ...30 AM loop antenna ...30 FM wire antenna ...30 Connecting external antennas ...30 Plugging in the receiver ...31 About the AC outlet ...31 06 Using the tuner Finding a station ...47 Tuning directly to a station ...47 MPX mode ...48 Memorizing station presets ...48...
Operating Instructions
Page 5
... audio or a video recording ...Adjusting the delay of external surfaces ...89 89 90 91 92 93 93 94 94 96 96 96 97 98 99 99 10 Other connections Second Zone speaker B setup ...Switching the speaker system ...Bi-amping your front speakers ...Bi-wiring your speakers ...Multi-room listening ...Making multi-room connections ...Using the multi-room controls ...Connecting an IR receiver ...Connecting additional amplifiers ...Using the USB interface ...Connecting a PC for other components ...Direct function ...Multi Operation and System Off ...Programming a multi-operation...
... audio or a video recording ...Adjusting the delay of external surfaces ...89 89 90 91 92 93 93 94 94 96 96 96 97 98 99 99 10 Other connections Second Zone speaker B setup ...Switching the speaker system ...Bi-amping your front speakers ...Bi-wiring your speakers ...Multi-room listening ...Making multi-room connections ...Using the multi-room controls ...Connecting an IR receiver ...Connecting additional amplifiers ...Using the USB interface ...Connecting a PC for other components ...Direct function ...Multi Operation and System Off ...Programming a multi-operation...
Operating Instructions
Page 11
... effect on -screen Auto Surround setup to your subwoofer and the TV. Make sure you 're not familiar with the TV if you can select. C Where you place the speakers will have one surround back speaker, hook it isn't, press DVD/LD on the remote control to set the receiver to the DVD input. 5 Use the on the sound. See also Making receiver settings from each wire, and the exposed wire strands twisted...
... effect on -screen Auto Surround setup to your subwoofer and the TV. Make sure you 're not familiar with the TV if you can select. C Where you place the speakers will have one surround back speaker, hook it isn't, press DVD/LD on the remote control to set the receiver to the DVD input. 5 Use the on the sound. See also Making receiver settings from each wire, and the exposed wire strands twisted...
Operating Instructions
Page 14
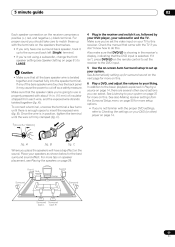
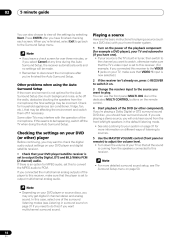
... tuner, then switch to the channel you 're finished, select Exit to go back to the Surround Setup menu. 02 5 minute guide You can use the front panel MULTI JOG dial or the dedicated MULTI CONTROL buttons on the remote control. 4 Start playback of the DVD (or other ) player Before continuing, you connected this receiver to the VIDEO 1 jacks on your system on page 37 for more detailed surround sound setup, see Listening in the default...
... tuner, then switch to the channel you 're finished, select Exit to go back to the Surround Setup menu. 02 5 minute guide You can use the front panel MULTI JOG dial or the dedicated MULTI CONTROL buttons on the remote control. 4 Start playback of the DVD (or other ) player Before continuing, you connected this receiver to the VIDEO 1 jacks on your system on page 37 for more detailed surround sound setup, see Listening in the default...
Operating Instructions
Page 15
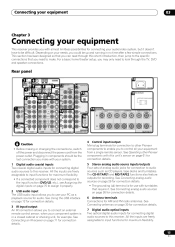
... for connection details. 7 Digital audio optical inputs Two optical digital audio inputs for connecting digital audio sources to this short introduction, then jump to the specific connections that you need to look through this receiver. Rear panel 18 4 19 SWITCHED 100W(0.8A)MAX AC IN Caution • Before making or changing the connections, switch off the power and disconnect the power cord from a single remote sensor. Plugging in no time after a few simple connections. All the inputs are freely assignable to input functions...
... for connection details. 7 Digital audio optical inputs Two optical digital audio inputs for connecting digital audio sources to this short introduction, then jump to the specific connections that you need to look through this receiver. Rear panel 18 4 19 SWITCHED 100W(0.8A)MAX AC IN Caution • Before making or changing the connections, switch off the power and disconnect the power cord from a single remote sensor. Plugging in no time after a few simple connections. All the inputs are freely assignable to input functions...
Operating Instructions
Page 33
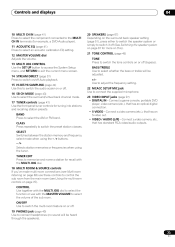
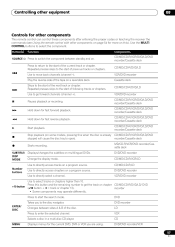
... RCA video/audio outputs. 33 En SELECT Switches between the station memory and frequency select mode when using the - /+ buttons. - /+ Selects station memories or frequencies when using the tuner. Connect a game console, portable DVD player, video camera (etc.), that has an optical digital connection. • S-VIDEO - Use to adjust the frequency setting. 22 MCACC SETUP MIC jack Use to switch the preset station classes. BASS/TREBLE Use to control the sub room from the main room (see Multi-room listening on page 69) use with the MULTI JOG dial. 18 MULTI ROOM & SOURCE controls If...
... RCA video/audio outputs. 33 En SELECT Switches between the station memory and frequency select mode when using the - /+ buttons. - /+ Selects station memories or frequencies when using the tuner. Connect a game console, portable DVD player, video camera (etc.), that has an optical digital connection. • S-VIDEO - Use to adjust the frequency setting. 22 MCACC SETUP MIC jack Use to switch the preset station classes. BASS/TREBLE Use to control the sub room from the main room (see Multi-room listening on page 69) use with the MULTI JOG dial. 18 MULTI ROOM & SOURCE controls If...
Operating Instructions
Page 35
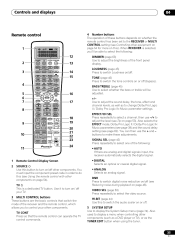
... 3 BASS/TREBLE 4 + 4 5 6 7 8 SIGNAL SEL 5 VIDEO SEL 6 HI-BIT 7 +10 8 DISC ENTER GUIDE TOP MENU 9 SYSTEM SETUP MENU 0 DIRECT ACCESS SEARCH MODE TUNER EDIT ENTER TRACK EXIT 16 17 AUDIO RETURN MPX TUNING DTV ON/OFF BAND DISP MODE SUB TITLE TUNING + STATION + CHANNEL+ STATION CHANNEL DTV MENU CLASS + 9 10 TV VOL TV INPUT INPUT TV CONTROL + VOLUME + TV CH MIDNIGHT 18 19 20 21 22 23 24 MULTI DH INPUT MOVIE MUSIC ACOUSTIC EQ MUTE MODE SURROUND REMOTE SETUP STEREO/ DIRECT SB CH MODE ENTER 11 1 2 Remote Control Display Screen SOURCE Use...
... 3 BASS/TREBLE 4 + 4 5 6 7 8 SIGNAL SEL 5 VIDEO SEL 6 HI-BIT 7 +10 8 DISC ENTER GUIDE TOP MENU 9 SYSTEM SETUP MENU 0 DIRECT ACCESS SEARCH MODE TUNER EDIT ENTER TRACK EXIT 16 17 AUDIO RETURN MPX TUNING DTV ON/OFF BAND DISP MODE SUB TITLE TUNING + STATION + CHANNEL+ STATION CHANNEL DTV MENU CLASS + 9 10 TV VOL TV INPUT INPUT TV CONTROL + VOLUME + TV CH MIDNIGHT 18 19 20 21 22 23 24 MULTI DH INPUT MOVIE MUSIC ACOUSTIC EQ MUTE MODE SURROUND REMOTE SETUP STEREO/ DIRECT SB CH MODE ENTER 11 1 2 Remote Control Display Screen SOURCE Use...
Operating Instructions
Page 36
... programmed the remote to customize remote control functions and the remote control display (see Controlling other equipment on this button will cycle through all Pioneer components in your selection. The are setting up the receiver. 16 TOP MENU/GUIDE Use to display the disc 'top menu' when a DVD player is selected (such as a DVD player, cable tuner, satellite tuner or digital TV tuner), use it may also exit from the menu screen, depending on the maker of the receiver. 20 MIDNIGHT (page 45) Press to switch...
... programmed the remote to customize remote control functions and the remote control display (see Controlling other equipment on this button will cycle through all Pioneer components in your selection. The are setting up the receiver. 16 TOP MENU/GUIDE Use to display the disc 'top menu' when a DVD player is selected (such as a DVD player, cable tuner, satellite tuner or digital TV tuner), use it may also exit from the menu screen, depending on the maker of the receiver. 20 MIDNIGHT (page 45) Press to switch...
Operating Instructions
Page 41
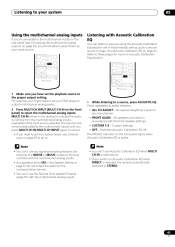
... DVD player to output multichannel analog audio. 2 Press MULTI CH INPUT (MULTI CH IN on the front panel) to select the multichannel analog inputs. The MCACC indicator on the front panel lights when Acoustic Calibration EQ is coming from the multichannel analog inputs, regardless of the input source selected. Switches Acoustic Calibration EQ off. Listening to your system 05 Using the multichannel analog inputs If you've connected to the multichannel inputs on the rear panel (see Channel Level...
... DVD player to output multichannel analog audio. 2 Press MULTI CH INPUT (MULTI CH IN on the front panel) to select the multichannel analog inputs. The MCACC indicator on the front panel lights when Acoustic Calibration EQ is coming from the multichannel analog inputs, regardless of the input source selected. Switches Acoustic Calibration EQ off. Listening to your system 05 Using the multichannel analog inputs If you've connected to the multichannel inputs on the rear panel (see Channel Level...

Operating Instructions
Page 55
... preset code for your DVD player remote control. Repeat steps 4 and 5. • To program signals for another component. VOLUME TV CONT MULTI OPERATION RECEIVER TOP MENU BASS/TREBLE + SETUP +10 SURROUND TUNER MIDNIGHT MULTI DH INPUT INPUT ACOUSTIC CAL VCR1 / DVR OFF REMOTE SETUP ENTER RETURN TRACK MUTE GUIDE EXIT + 2 - 8 inches 4 8 DISC TONE MULTI CONTROL DTV MENU CLASS DTV ON/OFF ENTER BAND TV CONTROL LOUDNESS VIDEO TV/SAT MUSIC TV CH TV INPUT SYSTEM SETUP SOURCE TUNER EDIT SIGNAL SEL VIDEO SEL TV VOL DVD/LD DIMMER CHANNEL AUDIO VCR2...
... preset code for your DVD player remote control. Repeat steps 4 and 5. • To program signals for another component. VOLUME TV CONT MULTI OPERATION RECEIVER TOP MENU BASS/TREBLE + SETUP +10 SURROUND TUNER MIDNIGHT MULTI DH INPUT INPUT ACOUSTIC CAL VCR1 / DVR OFF REMOTE SETUP ENTER RETURN TRACK MUTE GUIDE EXIT + 2 - 8 inches 4 8 DISC TONE MULTI CONTROL DTV MENU CLASS DTV ON/OFF ENTER BAND TV CONTROL LOUDNESS VIDEO TV/SAT MUSIC TV CH TV INPUT SYSTEM SETUP SOURCE TUNER EDIT SIGNAL SEL VIDEO SEL TV VOL DVD/LD DIMMER CHANNEL AUDIO VCR2...
Operating Instructions
Page 57
... a program source. MODE Use to go forward channels (channel +). Number buttons Use to switch the component between sides A & B of the current track or chapter. recorder • Some components may operate differently. Button(s) SOURCE Function Press to directly access chapters on a reversible deck. Repeated presses skips to the start of previous tracks or chapters. Pauses playback or recording. Stop playback (on . Use to open). ì Starts recording. Selects a disc in a multi-disc CD player. Use the MULTI CONTROL buttons...
... a program source. MODE Use to go forward channels (channel +). Number buttons Use to switch the component between sides A & B of the current track or chapter. recorder • Some components may operate differently. Button(s) SOURCE Function Press to directly access chapters on a reversible deck. Repeated presses skips to the start of previous tracks or chapters. Pauses playback or recording. Stop playback (on . Use to open). ì Starts recording. Selects a disc in a multi-disc CD player. Use the MULTI CONTROL buttons...
Operating Instructions
Page 70
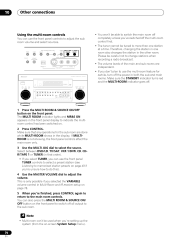
... to change stations when recording a radio broadcast. • The volume levels of the main and sub rooms are done while MULTI-ROOM shows in the display. VSX-9300TX 1 Press the MULTI ROOM & SOURCE ON/OFF button on -screen System Setup menu). 70 En Note • Multi-room can't be used when you're setting up the system (from the on the front panel. Make sure that order). • If you select TUNER...
... to change stations when recording a radio broadcast. • The volume levels of the main and sub rooms are done while MULTI-ROOM shows in the display. VSX-9300TX 1 Press the MULTI ROOM & SOURCE ON/OFF button on -screen System Setup menu). 70 En Note • Multi-room can't be used when you're setting up the system (from the on the front panel. Make sure that order). • If you select TUNER...
Operating Instructions
Page 71
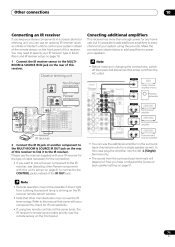
... the MULTI-ROOM & SOURCE IR OUT jack on the rear of your speakers. You may not use , but it to check for IR compatibility. • If using the pre-outs. Cnnecting additional amplifiers This receiver has more than enough power for any home use the IR terminology. ANALOG INPUT Closet or shelving unit IR Non-Pioneer component ANALOG CENTER Center channel amplifier (mono) INPUT IN CONTROL Pioneer component ANALOG INPUT R L Powered subwoofer IN OUT CENTER Front channel amplifier ANALOG INPUT R L Surround channel amplifier ANALOG INPUT R L IR receiver 2 Connect the IR IN jack...
... the MULTI-ROOM & SOURCE IR OUT jack on the rear of your speakers. You may not use , but it to check for IR compatibility. • If using the pre-outs. Cnnecting additional amplifiers This receiver has more than enough power for any home use the IR terminology. ANALOG INPUT Closet or shelving unit IR Non-Pioneer component ANALOG CENTER Center channel amplifier (mono) INPUT IN CONTROL Pioneer component ANALOG INPUT R L Powered subwoofer IN OUT CENTER Front channel amplifier ANALOG INPUT R L Surround channel amplifier ANALOG INPUT R L IR receiver 2 Connect the IR IN jack...
Operating Instructions
Page 75
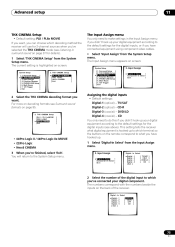
... the buttons on the remote correspond to the default settings for the digital inputs (see Surround sound formats on screen: System Setup 1. THX CINEMA Setup [ [ [ [ PL I I / PL I Ix MOVIE PRO LOGIC NEO:6 CINEMA Exit ] ] ] ] The Input Assign menu You only need to do this if you have hooked up your digital equipment according to which decoding method the receiver will return to the System Setup menu. 2 Select the number of the receiver. Input Assign [Digital-In Select ] [Component-In Select ] ] [Exit 2 Select...
... the buttons on the remote correspond to the default settings for the digital inputs (see Surround sound formats on screen: System Setup 1. THX CINEMA Setup [ [ [ [ PL I I / PL I Ix MOVIE PRO LOGIC NEO:6 CINEMA Exit ] ] ] ] The Input Assign menu You only need to do this if you have hooked up your digital equipment according to which decoding method the receiver will return to the System Setup menu. 2 Select the number of the receiver. Input Assign [Digital-In Select ] [Component-In Select ] ] [Exit 2 Select...
Operating Instructions
Page 78
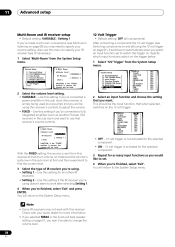
...). 1 Select 'Multi-Room' from the System Setup menu. Surround Setup 2. Function Rename 5. Input Assign 4. Use this setting if you've connected a fully integrated amplifier (such as another Pioneer VSX receiver) in the sub room (this receiver at first and then experiment to find the correct level. 3 Select the type of IR receiver you're using this menu to adjust the volume. • FIXED - DVD/LD TV/SAT VCR1/DVR VCR2 VIDEO PHONO/LINE CD CD-R/TAPE1 MD/TAPE2 USB TUNER...
...). 1 Select 'Multi-Room' from the System Setup menu. Surround Setup 2. Function Rename 5. Input Assign 4. Use this setting if you've connected a fully integrated amplifier (such as another Pioneer VSX receiver) in the sub room (this receiver at first and then experiment to find the correct level. 3 Select the type of IR receiver you're using this menu to adjust the volume. • FIXED - DVD/LD TV/SAT VCR1/DVR VCR2 VIDEO PHONO/LINE CD CD-R/TAPE1 MD/TAPE2 USB TUNER...
Operating Instructions
Page 79
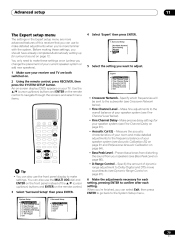
... panel display to the System Setup menu. Input Assign 4. Function Rename 5. Use the / (cursor up/down ) buttons and ENTER on page 81). • Acoustic Cal EQ - Advanced setup 11 The Expert setup menu The settings in the Expert setup menu are both switched on. 2 Using the remote control, press RECEIVER, then press the SYSTEM SETUP button. Make fine adjustments to confirm after each setting. Expert Crossover Network Fine Channel Level Fine Channel Delay Acoustic Cal EQ Bass Peak Level D-Range Control Exit • Crossover...
... panel display to the System Setup menu. Input Assign 4. Function Rename 5. Use the / (cursor up/down ) buttons and ENTER on page 81). • Acoustic Cal EQ - Advanced setup 11 The Expert setup menu The settings in the Expert setup menu are both switched on. 2 Using the remote control, press RECEIVER, then press the SYSTEM SETUP button. Make fine adjustments to confirm after each setting. Expert Crossover Network Fine Channel Level Fine Channel Delay Acoustic Cal EQ Bass Peak Level D-Range Control Exit • Crossover...
Operating Instructions
Page 90
... analog outputs on page 42). • Make sure your speakers. • Set the input signal type to the instruction manual supplied with the DVD player. • The digital output level is wrong. A multi channel DVD source • The source is poorly positioned. • Weak radio signals. • Interference caused by other component neutral position. 12 Additional information Symptom No sound from the equipment causing the noise. No sound is output or a noise is output when Dolby Digital/DTS...
... analog outputs on page 42). • Make sure your speakers. • Set the input signal type to the instruction manual supplied with the DVD player. • The digital output level is wrong. A multi channel DVD source • The source is poorly positioned. • Weak radio signals. • Interference caused by other component neutral position. 12 Additional information Symptom No sound from the equipment causing the noise. No sound is output or a noise is output when Dolby Digital/DTS...
Operating Instructions
Page 91
..., the multi-room feature is copy protected. • The analog REC jacks have been copy protected. • Check your analog connections (see Connecting analog audio sources on page 26). • See Bass Peak Level on page 86 to adjust the setting. • Change your subwoofer setting to one cable type (for example, use mixed cable types (for example RCA standard video to a component video connection), you 're assigned the correct input. Screen noise when playing back • The video source signal has a problem. a video source...
..., the multi-room feature is copy protected. • The analog REC jacks have been copy protected. • Check your analog connections (see Connecting analog audio sources on page 26). • See Bass Peak Level on page 86 to adjust the setting. • Change your subwoofer setting to one cable type (for example, use mixed cable types (for example RCA standard video to a component video connection), you 're assigned the correct input. Screen noise when playing back • The video source signal has a problem. a video source...
Operating Instructions
Page 92
... Connecting your DVD player. Settings Symptom The Auto Surround Setup continually shows an error. Display Symptom The display is actually PCM. During playback of a DTS 96/24 • The receiver's input signal type is hooked up the source and the recorder using a different type of the DVD player only; See also the operating the analog audio jacks of cable to select a different brightness. • Press DIMMER on page 42). When playing Dolby Digital or DTS sources, the receiver's format indicators do not light...
... Connecting your DVD player. Settings Symptom The Auto Surround Setup continually shows an error. Display Symptom The display is actually PCM. During playback of a DTS 96/24 • The receiver's input signal type is hooked up the source and the recorder using a different type of the DVD player only; See also the operating the analog audio jacks of cable to select a different brightness. • Press DIMMER on page 42). When playing Dolby Digital or DTS sources, the receiver's format indicators do not light...


