Owner's Manual
Page 3
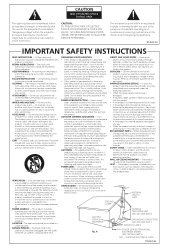
... the product is equipped with a three-wire grounding type plug, a plug having one blade wider than the other controls may expose you are required, be placed in a built-in the literature accompanying the appliance. POWER SOURCES - The power cord of the appliance should be sure the antenna or cable system is left un-used replacement parts specified by placing the product on the...
... the product is equipped with a three-wire grounding type plug, a plug having one blade wider than the other controls may expose you are required, be placed in a built-in the literature accompanying the appliance. POWER SOURCES - The power cord of the appliance should be sure the antenna or cable system is left un-used replacement parts specified by placing the product on the...
Owner's Manual
Page 4
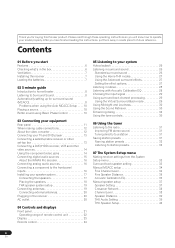
... input signal 29 Using surround back channel processing 29 Using the Virtual Surround Back mode 29 Using Midnight and Loudness 30 Using the Sound Retriever 30 Enhancing dialog 30 Using the tone controls 30 06 Using the tuner Listening to the radio 31 Improving FM stereo sound 31 Tuning directly to a station 31 Saving station presets 31 Naming station presets 32 Listening to station presets 32 07 The System Setup menu Making receiver settings from the System Setup menu 33 Surround back speaker setting 33 Manual MCACC setup 34 Fine Channel Level...
... input signal 29 Using surround back channel processing 29 Using the Virtual Surround Back mode 29 Using Midnight and Loudness 30 Using the Sound Retriever 30 Enhancing dialog 30 Using the tone controls 30 06 Using the tuner Listening to the radio 31 Improving FM stereo sound 31 Tuning directly to a station 31 Saving station presets 31 Naming station presets 32 Listening to station presets 32 07 The System Setup menu Making receiver settings from the System Setup menu 33 Surround back speaker setting 33 Manual MCACC setup 34 Fine Channel Level...
Owner's Manual
Page 5
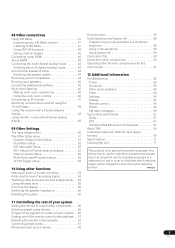
... system Setting the remote to XM Radio 41 Using XM HD Surround 42 Saving channel presets 42 Connecting using HDMI 42 About HDMI 43 Connecting the multichannel analog inputs 43 Selecting the multichannel analog inputs 43 Second Zone speaker B setup 44 Switching the speaker system 44 Bi-amping your front speakers 44 Bi-wiring your XM Radio receiver 41 Listening to control other components . . . . 56 Selecting preset codes directly 56 Programming signals from other remote controls. . . 56 Erasing one of an analog signal 54 Watching video and audio sources...
... system Setting the remote to XM Radio 41 Using XM HD Surround 42 Saving channel presets 42 Connecting using HDMI 42 About HDMI 43 Connecting the multichannel analog inputs 43 Selecting the multichannel analog inputs 43 Second Zone speaker B setup 44 Switching the speaker system 44 Bi-amping your front speakers 44 Bi-wiring your XM Radio receiver 41 Listening to control other components . . . . 56 Selecting preset codes directly 56 Programming signals from other remote controls. . . 56 Erasing one of an analog signal 54 Watching video and audio sources...
Owner's Manual
Page 9
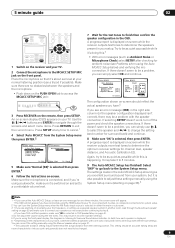
... speaker settings. 5 If you're using the front panel display, the diagram in Listening to Surround Sound above indicates (in the OSD. An on-screen display (OSD) appears on page 37. • The subwoofer distance setting may take 3 to access the MCACC SETUP MIC jack: PHONES SYSTEM SETUP RETURN TONE TUNING/ STATION TUNER EDIT SPEAKERS MULTI JOG S -VIDEO VIDEO/GAME INPUT VIDEO L AUDIO R DIGITAL IN MCACC SETUP MIC 3 Press RECEIVER on -screen should give you are no obstacles between the speakers and the microphone...
... speaker settings. 5 If you're using the front panel display, the diagram in Listening to Surround Sound above indicates (in the OSD. An on-screen display (OSD) appears on page 37. • The subwoofer distance setting may take 3 to access the MCACC SETUP MIC jack: PHONES SYSTEM SETUP RETURN TONE TUNING/ STATION TUNER EDIT SPEAKERS MULTI JOG S -VIDEO VIDEO/GAME INPUT VIDEO L AUDIO R DIGITAL IN MCACC SETUP MIC 3 Press RECEIVER on -screen should give you are no obstacles between the speakers and the microphone...

Owner's Manual
Page 10
... sound (see Listening in surround sound on your listening position. The PHASE CONTROL indicator on the front panel lights. 4 Use the volume control to check the digital audio output settings on your DVD player or source discs, you need to adjust the volume level. Note 1 Make sure that all sound sources. Start by switching on the playback component (for example a DVD player), your TV1 and subwoofer (if you have one), then the receiver (press RECEIVER). • Make sure the setup mic is disconnected. 2 Select the input source...
... sound (see Listening in surround sound on your listening position. The PHASE CONTROL indicator on the front panel lights. 4 Use the volume control to check the digital audio output settings on your DVD player or source discs, you need to adjust the volume level. Note 1 Make sure that all sound sources. Start by switching on the playback component (for example a DVD player), your TV1 and subwoofer (if you have one), then the receiver (press RECEIVER). • Make sure the setup mic is disconnected. 2 Select the input source...
Owner's Manual
Page 11
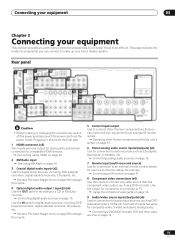
... inputs. 5 Control input/output Use to connect other Pioneer components with many connection possibilities, but it doesn't have to audio sources such as a DVD recorder. Plugging in a multi-room setup, for connection to be the final step. 1 HDMI connectors (x3) Two inputs and one output for digital audio sources, including DVD players/recorders, digital satellite receivers, CD players, etc. See also The Input Assign menu on page 61. 6 Stereo analog audio source inputs/(outputs) (x3) Use for example. Rear panel CENTER L 17 OUTLET 9 S-VIDEO IN IN OUT IN OUT IN SWITCHED...
... inputs. 5 Control input/output Use to connect other Pioneer components with many connection possibilities, but it doesn't have to audio sources such as a DVD recorder. Plugging in a multi-room setup, for connection to be the final step. 1 HDMI connectors (x3) Two inputs and one output for digital audio sources, including DVD players/recorders, digital satellite receivers, CD players, etc. See also The Input Assign menu on page 61. 6 Stereo analog audio source inputs/(outputs) (x3) Use for example. Rear panel CENTER L 17 OUTLET 9 S-VIDEO IN IN OUT IN OUT IN SWITCHED...
Owner's Manual
Page 14
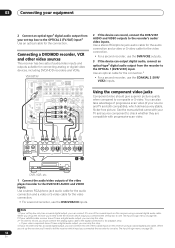
.../ VCR2) inputs. Note 1 If your set -top box to the DVR/VCR1 AUDIO and VIDEO inputs. Connecting a DVD/HDD recorder, VCR and other video sources This receiver has two sets of the video player/recorder to (see also The Input Assign menu on this receiver using a coaxial digital audio cable. Use a stereo RCA/phono jack audio cable for the audio connection and a video or S-video cable for connecting analog or digital video devices, including DVD/HDD recorders and VCRs. Using the component video jacks Component video should give superior picture quality when...
.../ VCR2) inputs. Note 1 If your set -top box to the DVR/VCR1 AUDIO and VIDEO inputs. Connecting a DVD/HDD recorder, VCR and other video sources This receiver has two sets of the video player/recorder to (see also The Input Assign menu on this receiver using a coaxial digital audio cable. Use a stereo RCA/phono jack audio cable for the audio connection and a video or S-video cable for connecting analog or digital video devices, including DVD/HDD recorders and VCRs. Using the component video jacks Component video should give superior picture quality when...

Owner's Manual
Page 16
... front panel inputs comprise a composite video jack (VIDEO), an S-Video jack (S-VIDEO), stereo analog audio inputs (AUDIO L/R) and an optical digital audio input (DIGITAL). Connecting analog audio sources This receiver features two stereo audio-only inputs. FRONT WOOFER ROUND 12V TR (DC OUT IN MONITOR MULT OUT MON OUT OUT IN L CENTER DVR/VCR2 R FRONT SUB WOOFER MULTI CH IN VSX-80TXV PHONES SYSTEM SETUP RETURN TONE TUNING/ STATION TUNER EDIT SPEAKERS MULTI JOG S - You can use with audio recorders. S -VIDEO VIDEO INPUT VIDEO L AUDIO R DIGITAL IN MCACC SETUP MIC...
... front panel inputs comprise a composite video jack (VIDEO), an S-Video jack (S-VIDEO), stereo analog audio inputs (AUDIO L/R) and an optical digital audio input (DIGITAL). Connecting analog audio sources This receiver features two stereo audio-only inputs. FRONT WOOFER ROUND 12V TR (DC OUT IN MONITOR MULT OUT MON OUT OUT IN L CENTER DVR/VCR2 R FRONT SUB WOOFER MULTI CH IN VSX-80TXV PHONES SYSTEM SETUP RETURN TONE TUNING/ STATION TUNER EDIT SPEAKERS MULTI JOG S - You can use with audio recorders. S -VIDEO VIDEO INPUT VIDEO L AUDIO R DIGITAL IN MCACC SETUP MIC...
Owner's Manual
Page 24
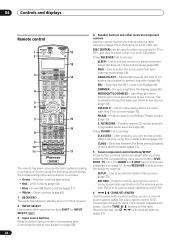
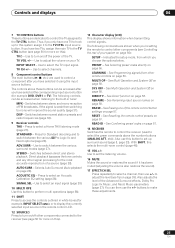
... radio frequencies and use ST / to switch on for this receiver. 2 INPUT SELECT Use to select the input source (use to return to the previous menu with DVDs or to select closed captioning with DTV). 6 (TUNE/ST) /ENTER Use the arrow buttons when setting up your system on page 56). 4 Number buttons and other components (see below) • Red - Use to put the receiver in a multi-CD player. Use Loudness to boost the bass and treble at low volume. RETRIEVER - RETURN - Receiver controls...
... radio frequencies and use ST / to switch on for this receiver. 2 INPUT SELECT Use to select the input source (use to return to the previous menu with DVDs or to select closed captioning with DTV). 6 (TUNE/ST) /ENTER Use the arrow buttons when setting up your system on page 56). 4 Number buttons and other components (see below) • Red - Use to put the receiver in a multi-CD player. Use Loudness to boost the bass and treble at low volume. RETRIEVER - RETURN - Receiver controls...
Owner's Manual
Page 25
... components connected to turn on/off other remote controls on page 56. Use to select an input signal (page 29). 10 MULTI OPE Use this ). 13 Character display (LCD) This display shows information when transmitting control signals. Use to set the listening volume. 16 MUTE Mutes the sound or restores the sound if it using the input source buttons. TV - If the signal is weak then switching to select a Home THX listening mode (page 27). Also adjusts the level of the remote control button settings...
... components connected to turn on/off other remote controls on page 56. Use to select an input signal (page 29). 10 MULTI OPE Use this ). 13 Character display (LCD) This display shows information when transmitting control signals. Use to set the listening volume. 16 MUTE Mutes the sound or restores the sound if it using the input source buttons. TV - If the signal is weak then switching to select a Home THX listening mode (page 27). Also adjusts the level of the remote control button settings...
Owner's Manual
Page 34
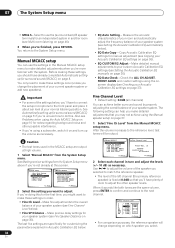
... using a subwoofer, switch it sounds like both tones are specifically for manual adjustment (see Fine Speaker Distance on page 36). • EQ CUSTOM1/2 Adjust - Caution • The test tones used in turn up the volume as necessary. See Automatically setting up for an independent system in the Manual MCACC setup menu to make detailed adjustments that you'll have to connect the setup microphone to do this screen. The following setting can use the (surround back) B speaker terminals for surround sound...
... using a subwoofer, switch it sounds like both tones are specifically for manual adjustment (see Fine Speaker Distance on page 36). • EQ CUSTOM1/2 Adjust - Caution • The test tones used in turn up the volume as necessary. See Automatically setting up for an independent system in the Manual MCACC setup menu to make detailed adjustments that you'll have to connect the setup microphone to do this screen. The following setting can use the (surround back) B speaker terminals for surround sound...
Owner's Manual
Page 43
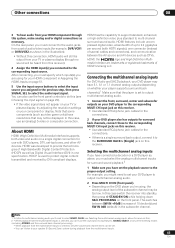
... display (though no sound will still be output from your HDMI component through this system, make analog and/or digital connections as necessary. On the rear panel, you must specify which inputs(s) you connected to the audio jacks from a set -top boxes, and other AV devices. After connecting, you must connect to the corresponding input source. In this case, use the sound processing features, SIGNAL SELECT, or any of the listening modes (including STEREO and the surround back channel...
... display (though no sound will still be output from your HDMI component through this system, make analog and/or digital connections as necessary. On the rear panel, you must specify which inputs(s) you connected to the audio jacks from a set -top boxes, and other AV devices. After connecting, you must connect to the corresponding input source. In this case, use the sound processing features, SIGNAL SELECT, or any of the listening modes (including STEREO and the surround back channel...
Owner's Manual
Page 46
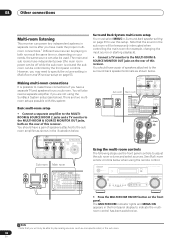
... SETUP RETURN TONE TUNING/ STATION TUNER EDIT SPEAKERS MULTI JOG S - SURROUND WOOFER ROUND BACK MULTI CH IN SEE INSTRUCTION MANUAL SELECTABLE Using the multi-room controls The following steps use this setup. However, you have a pair of speakers attached to the MULTI-ROOM & SOURCE MONITOR OUT jacks, both rooms at the same time or, depending on the front panel. VIDEO VIDEO/GAME INPUT VIDEO L AUDIO R DIGITAL IN MCACC SETUP MIC SIGNAL SB ch SOUND SELECT PROCESSING RETRIEVER MASTER VOLUME 1 Press the MULTI ROOM ON/OFF button on your sub...
... SETUP RETURN TONE TUNING/ STATION TUNER EDIT SPEAKERS MULTI JOG S - SURROUND WOOFER ROUND BACK MULTI CH IN SEE INSTRUCTION MANUAL SELECTABLE Using the multi-room controls The following steps use this setup. However, you have a pair of speakers attached to the MULTI-ROOM & SOURCE MONITOR OUT jacks, both rooms at the same time or, depending on the front panel. VIDEO VIDEO/GAME INPUT VIDEO L AUDIO R DIGITAL IN MCACC SETUP MIC SIGNAL SB ch SOUND SELECT PROCESSING RETRIEVER MASTER VOLUME 1 Press the MULTI ROOM ON/OFF button on your sub...
Owner's Manual
Page 47
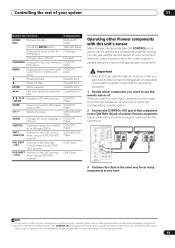
... possible multi-room remote controls: Button What it to change stations when recording a radio broadcast. 2 The volume levels of cable necessary for awhile, turn off in MultiRoom and IR receiver setup on the front panel. 47 En Other connections 08 2 Press CONTROL. Make sure that any operations for the sub room are independent. 3 • You won't be careful not to the IR receiver. You can use the front panel TUNER controls to select a preset station (see Saving station presets...
... possible multi-room remote controls: Button What it to change stations when recording a radio broadcast. 2 The volume levels of cable necessary for awhile, turn off in MultiRoom and IR receiver setup on the front panel. 47 En Other connections 08 2 Press CONTROL. Make sure that any operations for the sub room are independent. 3 • You won't be careful not to the IR receiver. You can use the front panel TUNER controls to select a preset station (see Saving station presets...
Owner's Manual
Page 61
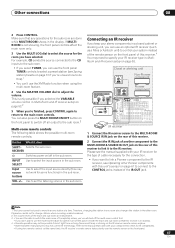
... the corresponding remote control. 2 Connect the CONTROL OUT jack of that you can be able to control this unit using the remote sensor. • See Using this unit's sensor Many Pioneer components have connected a remote control to access the DVD player DVD/DVR setup screen. Player SHIFT Switches to control all your system 11 Button (s) Function Components ENTER/ DISC Chooses the disc. Pauses the tape. VCR/DVD/DVR Player AUDIO Changes the audio language or DVD/DVR channel. IN 1 DIGITAL OPTICAL MULTI-ROOM & SO ROOM 2(ZONE 2) OUT IR...
... the corresponding remote control. 2 Connect the CONTROL OUT jack of that you can be able to control this unit using the remote sensor. • See Using this unit's sensor Many Pioneer components have connected a remote control to access the DVD player DVD/DVR setup screen. Player SHIFT Switches to control all your system 11 Button (s) Function Components ENTER/ DISC Chooses the disc. Pauses the tape. VCR/DVD/DVR Player AUDIO Changes the audio language or DVD/DVR channel. IN 1 DIGITAL OPTICAL MULTI-ROOM & SO ROOM 2(ZONE 2) OUT IR...
Owner's Manual
Page 62
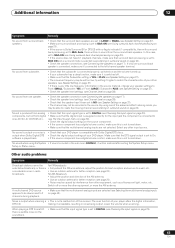
... rear panel or another component. Investigate the other components and electrical appliances being used. the buttons are no stray strands. AMP ERR blinks in another set to an active power outlet. • Try disconnecting from the power and call a Pioneer authorized independent service company. No sound Symptom Remedy No sound is output when an input source is something wrong with SAFETY ON selected, turn on. • Make sure that the Stereo listening mode...
... rear panel or another component. Investigate the other components and electrical appliances being used. the buttons are no stray strands. AMP ERR blinks in another set to an active power outlet. • Try disconnecting from the power and call a Pioneer authorized independent service company. No sound Symptom Remedy No sound is output when an input source is something wrong with SAFETY ON selected, turn on. • Make sure that the Stereo listening mode...
Owner's Manual
Page 63
...; Check the speaker connections (see Channel Level on page 26). Switch off . • Make sure that the Subwoofer setting is • Check that your DVD player. Lower the volume when scanning. No sound is output or a noise is YES or PLUS (see Listening in the source material, change your other input source. Other audio problems Symptom Remedy Broadcast stations cannot be able to SBch ON and a surround mode is compatible with Dolby Digital/DTS discs. For...
...; Check the speaker connections (see Channel Level on page 26). Switch off . • Make sure that the Subwoofer setting is • Check that your DVD player. Lower the volume when scanning. No sound is output or a noise is YES or PLUS (see Listening in the source material, change your other input source. Other audio problems Symptom Remedy Broadcast stations cannot be able to SBch ON and a surround mode is compatible with Dolby Digital/DTS discs. For...
Owner's Manual
Page 64
... level in some video game units, for a delay in the front panel display) volume will have been some low frequency noise in the room and use Auto MCACC Setup again. incorrect. • Depending on the subwoofer, the setting where you will change the speaker setting manually in Speaker Setting on page 37 if this may also depend on the receiver are properly connected to set up your display device. If there is no sound...
... level in some video game units, for a delay in the front panel display) volume will have been some low frequency noise in the room and use Auto MCACC Setup again. incorrect. • Depending on the subwoofer, the setting where you will change the speaker setting manually in Speaker Setting on page 37 if this may also depend on the receiver are properly connected to set up your display device. If there is no sound...
Owner's Manual
Page 65
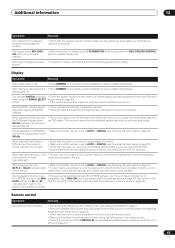
... audio of the receiver's format tracks are selected, select a different input source. Check the disc packaging for more on page 26). After making an adjustment the • Press DIMMER on the remote control repeatedly to AUTO or DIGITAL (see Choosing the input signal on to the AUTO setting, the EX and ES THX Surround EX or Standard EX listening mode (see The Input when using the analog inputs. 96 kHz. The display shows KEY LOCK...
... audio of the receiver's format tracks are selected, select a different input source. Check the disc packaging for more on page 26). After making an adjustment the • Press DIMMER on the remote control repeatedly to AUTO or DIGITAL (see Choosing the input signal on to the AUTO setting, the EX and ES THX Surround EX or Standard EX listening mode (see The Input when using the analog inputs. 96 kHz. The display shows KEY LOCK...
Owner's Manual
Page 66
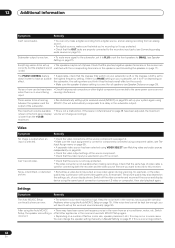
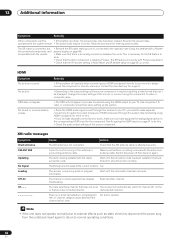
... in Multi-Room and IR receiver setup on this . • Check the audio output settings of the source, or connect using HDMI on page 42 for audio, make separate connections for the component. Make sure that there is nothing unusual with Pioneer equipment. • Check that the XM antenna cable is no artist name/feature, song/program title, or channel category associated with the channel at the current location. Switch the power off...
... in Multi-Room and IR receiver setup on this . • Check the audio output settings of the source, or connect using HDMI on page 42 for audio, make separate connections for the component. Make sure that there is nothing unusual with Pioneer equipment. • Check that the XM antenna cable is no artist name/feature, song/program title, or channel category associated with the channel at the current location. Switch the power off...


