User Guide
Page 5
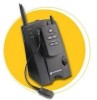
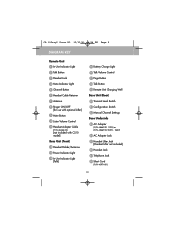
...DIAGRAM KEY Remote Unit 1 In-Use Indicator Light 2 Talk Button 3 Headset Jack 4 Mute Indicator Light 5 Channel Button 6 Headset Cable Retainer 7 Antenna 8 Ringer ON/OFF [for use with optional Lifter] 9 Mute Button 10 Listen Volume Control 11 Headset Adapter Cable (P/N 43446-02) [not included with CS10 model] Base ...Unit (Front) 12 Headset Holder/Antenna 13 Power Indicator Light 14 In-Use Indicator Light [Talk] 15 Battery Charge Light...
...DIAGRAM KEY Remote Unit 1 In-Use Indicator Light 2 Talk Button 3 Headset Jack 4 Mute Indicator Light 5 Channel Button 6 Headset Cable Retainer 7 Antenna 8 Ringer ON/OFF [for use with optional Lifter] 9 Mute Button 10 Listen Volume Control 11 Headset Adapter Cable (P/N 43446-02) [not included with CS10 model] Base ...Unit (Front) 12 Headset Holder/Antenna 13 Power Indicator Light 14 In-Use Indicator Light [Talk] 15 Battery Charge Light...
User Guide
Page 7
This User Guide will help you for selecting the CA10 Cordless Telephone Headset Amplifier from Plantronics. The headset is described in a separate guide which should be read prior to installing the Amplifier. ENGLISH FRANÇAIS ESPAN˜ OL PORTUGUEˆS KOREAN JAPANESE CHINESE CA 10Gray2 Body.r2 12/12/01 6:50 PM Page 1 WELCOME Thank you install your CA10 Amplifier and learn its basic operation.
This User Guide will help you for selecting the CA10 Cordless Telephone Headset Amplifier from Plantronics. The headset is described in a separate guide which should be read prior to installing the Amplifier. ENGLISH FRANÇAIS ESPAN˜ OL PORTUGUEˆS KOREAN JAPANESE CHINESE CA 10Gray2 Body.r2 12/12/01 6:50 PM Page 1 WELCOME Thank you install your CA10 Amplifier and learn its basic operation.
User Guide
Page 10
... off after the Battery is in place. Using the Short Cord 28 provided, plug one end into the CA10 Telephone Jack 27 and the other end into the Retainer 6 . Do not force. Connect your headset to the AC Adapter Jack 24 and into a wall outlet. You may, however, use , the Battery...ESPAN˜ OL PORTUGUEˆS KOREAN JAPANESE CHINESE CA 10Gray2 Body.r2 12/12/01 6:50 PM Page 6 STEP 1 SETUP Connect the CA10 Amplifier to your telephone using a headset whose cable terminates in a Quick Disconnect™ (QD) module, you will operate away from the jack on your telephone base and insert ...
... off after the Battery is in place. Using the Short Cord 28 provided, plug one end into the CA10 Telephone Jack 27 and the other end into the Retainer 6 . Do not force. Connect your headset to the AC Adapter Jack 24 and into a wall outlet. You may, however, use , the Battery...ESPAN˜ OL PORTUGUEˆS KOREAN JAPANESE CHINESE CA 10Gray2 Body.r2 12/12/01 6:50 PM Page 6 STEP 1 SETUP Connect the CA10 Amplifier to your telephone using a headset whose cable terminates in a Quick Disconnect™ (QD) module, you will operate away from the jack on your telephone base and insert ...
User Guide
Page 11
... If you have misplaced the Remote, press the Page Button 17 for 3 seconds and the Remote will go out. STEP 3 RECEIVING A CALL With your headset in position, place the handset off -hook. Press the Talk Button 2 once you do not hear a dial tone, move the Transmit Level Switch to ...Control 16 . Adjust the volume of G an incoming call, place the handset off -hook. The In-Use Indicator Lights 1 14 on page 11. When your headset in position, when your co-worker's voice by using the Listen F Volume Control 10 . Press the Talk Button on . Begin speaking. If you , pressing D...
... If you have misplaced the Remote, press the Page Button 17 for 3 seconds and the Remote will go out. STEP 3 RECEIVING A CALL With your headset in position, place the handset off -hook. Press the Talk Button 2 once you do not hear a dial tone, move the Transmit Level Switch to ...Control 16 . Adjust the volume of G an incoming call, place the handset off -hook. The In-Use Indicator Lights 1 14 on page 11. When your headset in position, when your co-worker's voice by using the Listen F Volume Control 10 . Press the Talk Button on . Begin speaking. If you , pressing D...

User Guide
Page 12
...activated when using Ringer Switch on Remote. (Note: Disabling the audible ringer does not disable the Page Function or the ringing heard through the headset in TALK mode. The Battery Pack must charge for 5 seconds to first use. Adjust the Listen Volume Control 10 . Separate and then reconnect... Well for 8 hours prior to C re-establish a communication link. Mute - On only when transmit audio is placed in TALK mode through the headset whenever the Base or Remote Unit TALK button is activated. Charge - Flashes for 5 seconds to the Base via the AC Power Adapter. Out-of...
...activated when using Ringer Switch on Remote. (Note: Disabling the audible ringer does not disable the Page Function or the ringing heard through the headset in TALK mode. The Battery Pack must charge for 5 seconds to first use. Adjust the Listen Volume Control 10 . Separate and then reconnect... Well for 8 hours prior to C re-establish a communication link. Mute - On only when transmit audio is placed in TALK mode through the headset whenever the Base or Remote Unit TALK button is activated. Charge - Flashes for 5 seconds to the Base via the AC Power Adapter. Out-of...
