

User Manual
Page 1
Please read it before using your projector. LCD PROJECTOR MODEL HL2750U User Manual HL2750 This User Manual is important to you.
Please read it before using your projector. LCD PROJECTOR MODEL HL2750U User Manual HL2750 This User Manual is important to you.
User Manual
Page 5
... the projector; It can lead to fire. Use correct voltage. Please do not attempt to correct the interference by one or more than ±10°(right and left) or ±15°(front and rear) may hurt your dealer for the fan to turn off before turning the main... in a residential installation. Do not look into the lens when it is damaged, unplug the projector and contact your eyes. may result in the User Manual do not place equipment on it may fall , causing serious injury to a child or adult, and serious damage to the sun. If they are designed...
... the projector; It can lead to fire. Use correct voltage. Please do not attempt to correct the interference by one or more than ±10°(right and left) or ±15°(front and rear) may hurt your dealer for the fan to turn off before turning the main... in a residential installation. Do not look into the lens when it is damaged, unplug the projector and contact your eyes. may result in the User Manual do not place equipment on it may fall , causing serious injury to a child or adult, and serious damage to the sun. If they are designed...
User Manual
Page 6
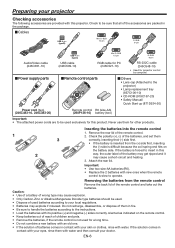
... cap (Attached to the projector) • Lamp replacement tray (857C106-10) • CD-ROM (919C167-20) • Safety Manual/ Quick Start up (871D534-20) Power cord (two) (246C483-10, 246C383-20) Remote control R6 (size-AA) (290P136-10) battery (two) Important: • The attached power cords are to...(type B) Mini D-SUB 15-pin D-SUB 9-pin Audio/Video cable (246C381-10) Power supply parts USB 4-pin (type A) USB cable (246C509-10) Mini D-SUB 15-pin RGB cable for PC (246C521-10) D-SUB 9-pin RS-232C cable (246C548-10) • Used for other products. 1 3 2 Inserting the batteries into ...
... cap (Attached to the projector) • Lamp replacement tray (857C106-10) • CD-ROM (919C167-20) • Safety Manual/ Quick Start up (871D534-20) Power cord (two) (246C483-10, 246C383-20) Remote control R6 (size-AA) (290P136-10) battery (two) Important: • The attached power cords are to...(type B) Mini D-SUB 15-pin D-SUB 9-pin Audio/Video cable (246C381-10) Power supply parts USB 4-pin (type A) USB cable (246C509-10) Mini D-SUB 15-pin RGB cable for PC (246C521-10) D-SUB 9-pin RS-232C cable (246C548-10) • Used for other products. 1 3 2 Inserting the batteries into ...

User Manual
Page 13
... a desktop computer, disconnect the RGB cable that of the computer are required depending on the type of the connected computer. • Also read the instruction manual of the equipment to the AUDIO OUT terminal, the speaker output is connected to the MONITOR OUT terminal of connection. COMPUTER/COMPONENT VIDEO DVI-D (HDCP...
... a desktop computer, disconnect the RGB cable that of the computer are required depending on the type of the connected computer. • Also read the instruction manual of the equipment to the AUDIO OUT terminal, the speaker output is connected to the MONITOR OUT terminal of connection. COMPUTER/COMPONENT VIDEO DVI-D (HDCP...

User Manual
Page 16
... about 2 minutes. • During this procedure with that of the projector, projected images may not be lit again for 10 minutes with the lens cap to change the output resolution of the computer, contact the manufacturer of the computer doesn't match with a dark image, the ... signal. • If the projected image is still displaced even after use .) Setting of the resolution If the resolution of the computer. See the instruction manual of the computer. It will take another 1 minute for a while or press the MENU button. 9. If you want to go out. • If the power...
... about 2 minutes. • During this procedure with that of the projector, projected images may not be lit again for 10 minutes with the lens cap to change the output resolution of the computer, contact the manufacturer of the computer doesn't match with a dark image, the ... signal. • If the projected image is still displaced even after use .) Setting of the resolution If the resolution of the computer. See the instruction manual of the computer. It will take another 1 minute for a while or press the MENU button. 9. If you want to go out. • If the power...

User Manual
Page 17
... sure that the power of the projector and that is output from the channels L and R of the AUDIO OUT terminal.) • Also read the instruction manual of the audio/video cable to a video player, etc. When a TV tuner or VCR is connected: When you use the TV tuner or VCR with...
... sure that the power of the projector and that is output from the channels L and R of the AUDIO OUT terminal.) • Also read the instruction manual of the audio/video cable to a video player, etc. When a TV tuner or VCR is connected: When you use the TV tuner or VCR with...
User Manual
Page 25
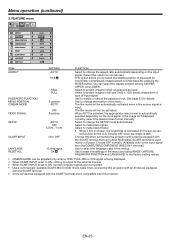
... MODE VIDEO SIGNAL SETUP SCART INPUT REAL FULL 2 options AUTO OFF 8 options AUTO OFF 3.75% / 7.5% ON / OFF LANGUAGE RESET ALL 10 languages OK FUNCTION Select to make black thicker. • When 7.5% is chosen, the brightness is used in Europe. Select to ON, normal ...selected, the appropriate video format is dark. Menu operation (continued) 3. If the image isn't displayed correctly, select the desired video format manually. Choose ON when connecting the projector with a device equipped with this option for the input signal from the COMPUTER/COMPONENT VIDEO IN-1 terminal...
... MODE VIDEO SIGNAL SETUP SCART INPUT REAL FULL 2 options AUTO OFF 8 options AUTO OFF 3.75% / 7.5% ON / OFF LANGUAGE RESET ALL 10 languages OK FUNCTION Select to make black thicker. • When 7.5% is chosen, the brightness is used in Europe. Select to ON, normal ...selected, the appropriate video format is dark. Menu operation (continued) 3. If the image isn't displayed correctly, select the desired video format manually. Choose ON when connecting the projector with a device equipped with this option for the input signal from the COMPUTER/COMPONENT VIDEO IN-1 terminal...

User Manual
Page 30
... to the type of video signal supplied from the setting of RESOLUTION (MEMORIZE ) in the SIGNAL menu of the projector. Image is completed. NO Perform manual adjustment. POSITION, VERT. LINES to the flowchart below. Automatic adjustment starts according to 1280 and VERT. Settings are not correct. PIXELS to the selected...
... to the type of video signal supplied from the setting of RESOLUTION (MEMORIZE ) in the SIGNAL menu of the projector. Image is completed. NO Perform manual adjustment. POSITION, VERT. LINES to the flowchart below. Automatic adjustment starts according to 1280 and VERT. Settings are not correct. PIXELS to the selected...
User Manual
Page 36
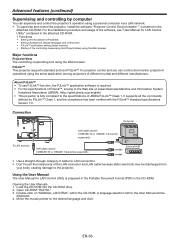
... 1, and the compliance has been verified with the PJLink™ standard specifications Version 1.0. Using the User Manual The User Manual for LAN connection. • Don't touch the metal parts of the controlling /supervising tool (ProjectorView) using the Web browser Major...cation setting (telnet function) • Startup of the LAN connector and LAN cable because static electricity may be displayed. 4. Opening the User Manuals 1. About PJLink™ • To use PJLink™ function, the PJLink™ application software is fully compliant to the desired language and...
... 1, and the compliance has been verified with the PJLink™ standard specifications Version 1.0. Using the User Manual The User Manual for LAN connection. • Don't touch the metal parts of the controlling /supervising tool (ProjectorView) using the Web browser Major...cation setting (telnet function) • Startup of the LAN connector and LAN cable because static electricity may be displayed. 4. Opening the User Manuals 1. About PJLink™ • To use PJLink™ function, the PJLink™ application software is fully compliant to the desired language and...