

User Manual
Page 1
Please read it before using your projector. LCD PROJECTOR MODEL HL2750U User Manual HL2750 This User Manual is important to you.
Please read it before using your projector. LCD PROJECTOR MODEL HL2750U User Manual HL2750 This User Manual is important to you.

User Manual
Page 2
... triangle is intended to alert the user to the presence of uninsulated "dangerous voltage" within the limits of electric shock. When using the projector in the Standard for use another power supply cord, it may be grounded. The electro-magnetic susceptibility has been chosen at a level that... cable and RS-232C cable and the shielded LAN cable with this equipment so as defined in Europe: COMPLIANCE NOTICE This projector complies with radio and television reception. This apparatus must be of sufficient magnitude to the public low voltage power supply system....
... triangle is intended to alert the user to the presence of uninsulated "dangerous voltage" within the limits of electric shock. When using the projector in the Standard for use another power supply cord, it may be grounded. The electro-magnetic susceptibility has been chosen at a level that... cable and RS-232C cable and the shielded LAN cable with this equipment so as defined in Europe: COMPLIANCE NOTICE This projector complies with radio and television reception. This apparatus must be of sufficient magnitude to the public low voltage power supply system....
User Manual
Page 3
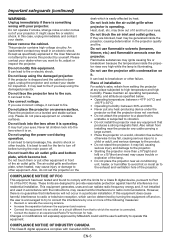
...-of-life, should be recycled and/or reused. Declaration of Conformity Model number: Trade name: Responsible party: Telephone number: HL2750U MITSUBISHI ELECTRIC Mitsubishi Digital Electronics America, Inc. 9351 Jeronimo Road, Irvine, CA 92618 U.S.A +1-(949) 465-6000 This device ... operation. This symbol means that may not cause harmful interference, and (2) this equipment, batteries and accumulators correctly at your projector...10 Viewing computer images ...13 Viewing video images...17 Menu operation ...22 Adjusting projected images...28 Advanced features ...32 Indicators...37 ...
...-of-life, should be recycled and/or reused. Declaration of Conformity Model number: Trade name: Responsible party: Telephone number: HL2750U MITSUBISHI ELECTRIC Mitsubishi Digital Electronics America, Inc. 9351 Jeronimo Road, Irvine, CA 92618 U.S.A +1-(949) 465-6000 This device ... operation. This symbol means that may not cause harmful interference, and (2) this equipment, batteries and accumulators correctly at your projector...10 Viewing computer images ...13 Viewing video images...17 Menu operation ...22 Adjusting projected images...28 Advanced features ...32 Indicators...37 ...

User Manual
Page 4
... regarding your appliance dealer or local power company. 11. Refer all servicing to . 10. EN-4 Ensure that the manufacturer's instructions have fallen into the projector. (c) If the projector does not operate normally after you are not likely to cords at plugs, convenience receptacles...personnel under a carpet. 12. Water and moisture Do not use liquid aerosol cleaners. Any mounting of any kind on the projector. 1. Important safeguards Please read before cleaning it from overheating. Retain instructions The safety and operating instructions should be followed. ...
... regarding your appliance dealer or local power company. 11. Refer all servicing to . 10. EN-4 Ensure that the manufacturer's instructions have fallen into the projector. (c) If the projector does not operate normally after you are not likely to cords at plugs, convenience receptacles...personnel under a carpet. 12. Water and moisture Do not use liquid aerosol cleaners. Any mounting of any kind on the projector. 1. Important safeguards Please read before cleaning it from overheating. Retain instructions The safety and operating instructions should be followed. ...
User Manual
Page 5
... if not installed and used in a residential installation. Place the projection on a solid, vibration free surface; Please do not set the projector on unstable surfaces. Please maintain an operating temperature, humidity, and altitude as specifically explained in a particular installation. This equipment generates... one or more than ±10°(right and left) or ±15°(front and rear) may blow out of the projector. Never let children look into an outlet on it is damaged, unplug the projector and contact your projector. It is easily affected by ...
... if not installed and used in a residential installation. Place the projection on a solid, vibration free surface; Please do not set the projector on unstable surfaces. Please maintain an operating temperature, humidity, and altitude as specifically explained in a particular installation. This equipment generates... one or more than ±10°(right and left) or ±15°(front and rear) may blow out of the projector. Never let children look into an outlet on it is damaged, unplug the projector and contact your projector. It is easily affected by ...
User Manual
Page 6
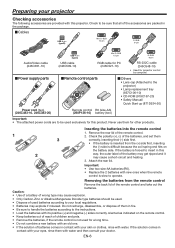
...in contact with your skin or clothes, rinse with water. Remote control parts Others • Lens cap (Attached to the projector) • Lamp replacement tray (857C106-10) • CD-ROM (919C167-20) • Safety Manual/ Quick Start up (871D534-20) Power cord (two) (246C483...1 3 2 Inserting the batteries into the remote control 1. Important: • Use two size-AA batteries (R6). • Replace the 2 batteries with this projector. Do not recharge, disassemble, or dispose of them correctly, inserting their (-) side first. • If the battery is inserted from the remote control...
...in contact with your skin or clothes, rinse with water. Remote control parts Others • Lens cap (Attached to the projector) • Lamp replacement tray (857C106-10) • CD-ROM (919C167-20) • Safety Manual/ Quick Start up (871D534-20) Power cord (two) (246C483...1 3 2 Inserting the batteries into the remote control 1. Important: • Use two size-AA batteries (R6). • Replace the 2 batteries with this projector. Do not recharge, disassemble, or dispose of them correctly, inserting their (-) side first. • If the battery is inserted from the remote control...

User Manual
Page 7
... Terminal board 8 Caution: 9 Do not replace the lamp immediately after using the projector because the lamp would be extremely hot and it may cause burns. Preparating your projector (continued) Overview 6 13 12 11 10 1 Speaker 1 2 Air inlet grille/Filter cover 3 Control area 4 ZOOM ring 2 5 FOCUS ring 3 6 Remote control sensor (Front) 4 7 Air outlet grille...
... Terminal board 8 Caution: 9 Do not replace the lamp immediately after using the projector because the lamp would be extremely hot and it may cause burns. Preparating your projector (continued) Overview 6 13 12 11 10 1 Speaker 1 2 Air inlet grille/Filter cover 3 Control area 4 ZOOM ring 2 5 FOCUS ring 3 6 Remote control sensor (Front) 4 7 Air outlet grille...

User Manual
Page 8
...exposure. • This remote controller cannot be repaired. output: 1 mW, Wavelength: 620-640 nm) Beam Divergence: 6 m distance about 10.0 mm x 10.0 mm (±6.0 mm) Caution: • Pressing the LASER button on the back of the remote control and either of the button.... buttons are 2 types of labels placed on the remote control emits a laser beam. How to misuse of them is placed on it is a Class 2 laser product. (Max. Preparating your projector...
...exposure. • This remote controller cannot be repaired. output: 1 mW, Wavelength: 620-640 nm) Beam Divergence: 6 m distance about 10.0 mm x 10.0 mm (±6.0 mm) Caution: • Pressing the LASER button on the back of the remote control and either of the button.... buttons are 2 types of labels placed on the remote control emits a laser beam. How to misuse of them is placed on it is a Class 2 laser product. (Max. Preparating your projector...
User Manual
Page 9
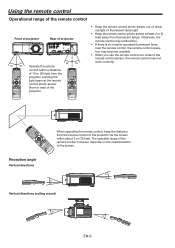
... photo-sensor at the remote control photo-sensor (front or rear) of the projector. • Keep the remote control photo-sensor out of the screen. Reception angle Vertical directions 20° 10° 20° 10° Vertical directions (ceiling mount) 20° 20° EN-9 When...control sensor, the remote control may become unstable. • When you use the remote control too close to the projector via the screen within a distance of 10 m (30 feet) from the projector, pointing the light beam at least 2 m (6 feet) away from fluorescent lamps. Using the remote control...
... photo-sensor at the remote control photo-sensor (front or rear) of the projector. • Keep the remote control photo-sensor out of the screen. Reception angle Vertical directions 20° 10° 20° 10° Vertical directions (ceiling mount) 20° 20° EN-9 When...control sensor, the remote control may become unstable. • When you use the remote control too close to the projector via the screen within a distance of 10 m (30 feet) from the projector, pointing the light beam at least 2 m (6 feet) away from fluorescent lamps. Using the remote control...
User Manual
Page 10
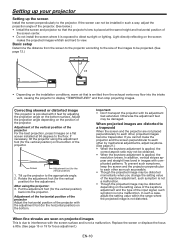
... on the bottom. Rotate the adjustment foot (for the vertical position) for focus adjustment.) EN-10 Put the adjustment foot (for the vertical position) back into the intake vent, causing the projector to the floor. Replace the screen or displace the focus a little. (See page 15...adjustments, adjust keystone. (See page 21.) • When the keystone adjustment is applied, the correct aspect ratio may flow into the projector. and then stop projecting images. Screen Adjustment foot (for the vertical position) on the bottom of the screen center. • Do not install...
... on the bottom. Rotate the adjustment foot (for the vertical position) for focus adjustment.) EN-10 Put the adjustment foot (for the vertical position) back into the intake vent, causing the projector to the floor. Replace the screen or displace the focus a little. (See page 15...adjustments, adjust keystone. (See page 21.) • When the keystone adjustment is applied, the correct aspect ratio may flow into the projector. and then stop projecting images. Screen Adjustment foot (for the vertical position) on the bottom of the screen center. • Do not install...
User Manual
Page 11
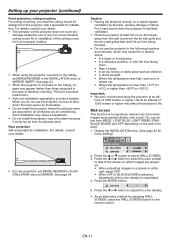
...humid place. • In a sideways position, or with the lens facing down the main power by the breaker. • Do not install the projector where the exhaust vents are projected. • When projecting images on the ceiling, set IMAGE REVERSE in a closed car. • Where the ... dealer. • For rear projection, set IMAGE REVERSE in the case of 1500 meters or higher. Rear projection Ask a specialist for this projector does not cover any damage caused by the fans, causing damage or failure. Press the ENTER button. INSTALLATION WALL SCREEN BEIGE LAMP MODE STANDARD ...
...humid place. • In a sideways position, or with the lens facing down the main power by the breaker. • Do not install the projector where the exhaust vents are projected. • When projecting images on the ceiling, set IMAGE REVERSE in a closed car. • Where the ... dealer. • For rear projection, set IMAGE REVERSE in the case of 1500 meters or higher. Rear projection Ask a specialist for this projector does not cover any damage caused by the fans, causing damage or failure. Press the ENTER button. INSTALLATION WALL SCREEN BEIGE LAMP MODE STANDARD ...

User Manual
Page 12
... 610 Shortest (Wide) inch m 46 1.2 70 1.8 94 2.4 118 3.0 177 4.5 237 6.0 297 7.5 357 9.1 Longest (Tele) inch m 56 1.4 85 2.2 114 2.9 142 3.6 215 5.5 287 7.3 359 9.1 - - Setting up your projector (continued) Screen size and projection distance Refer to the following table to determine the screen size.
... 610 Shortest (Wide) inch m 46 1.2 70 1.8 94 2.4 118 3.0 177 4.5 237 6.0 297 7.5 357 9.1 Longest (Tele) inch m 56 1.4 85 2.2 114 2.9 142 3.6 215 5.5 287 7.3 359 9.1 - - Setting up your projector (continued) Screen size and projection distance Refer to the following table to determine the screen size.

User Manual
Page 13
...terminal of the computer. Connect one end of the supplied RGB cable to a computer Preparation: • Make sure that the power of the projector and that of connection. MONITOR OUT RGB cable • Use of a long cable may decrease the quality of projected images. • ... your dealer for details of the computer are required depending on the type of the connected computer. • Also read the instruction manual of the projector. COMPUTER/COMPONENT VIDEO DVI-D (HDCP) Computer 1 2 To DVI DVI cable (option) For digital connection: 1. Some computers don't have the audio ...
...terminal of the computer. Connect one end of the supplied RGB cable to a computer Preparation: • Make sure that the power of the projector and that of connection. MONITOR OUT RGB cable • Use of a long cable may decrease the quality of projected images. • ... your dealer for details of the computer are required depending on the type of the connected computer. • Also read the instruction manual of the projector. COMPUTER/COMPONENT VIDEO DVI-D (HDCP) Computer 1 2 To DVI DVI cable (option) For digital connection: 1. Some computers don't have the audio ...

User Manual
Page 14
...cord. • Do not plug in the power cord firmly. Viewing computer images (continued) About DDC The COMPUTER/COMPONENT VIDEO IN-1 terminal of this projector. If you use a power supply using other voltage than rated. If the power cord is rated at 120 V. EN-14 Earthing terminal 2 1. Caution: ...• Plug in or out the power cord with the projector, use in the U.S. Plug the attached power cord into a power outlet. 1 Power cord (example) • The power cords for the U.S. If the ...
...cord. • Do not plug in the power cord firmly. Viewing computer images (continued) About DDC The COMPUTER/COMPONENT VIDEO IN-1 terminal of this projector. If you use a power supply using other voltage than rated. If the power cord is rated at 120 V. EN-14 Earthing terminal 2 1. Caution: ...• Plug in or out the power cord with the projector, use in the U.S. Plug the attached power cord into a power outlet. 1 Power cord (example) • The power cords for the U.S. If the ...

User Manual
Page 15
...• Turn on the power of the projector so that the projector and the screen are perpendicular to each other. (See page 10.) • When the projector cannot be positioned perpendicularly to the screen, adjust the projection angle. (See page 10.) 6. The selected signal format is displayed ...on . Adjust the position of the projector to the terminal in the INSTALLATION menu...
...• Turn on the power of the projector so that the projector and the screen are perpendicular to each other. (See page 10.) • When the projector cannot be positioned perpendicularly to the screen, adjust the projection angle. (See page 10.) 6. The selected signal format is displayed ...on . Adjust the position of the projector to the terminal in the INSTALLATION menu...

User Manual
Page 16
... screen will take another 1 minute for a while or press the MENU button. 9. The setting procedure varies depending on , allow the projector to cool down for 10 minutes with that of the projector, projected images may not be lit again for 1 minute after use .) Setting of the resolution If the resolution of the computer...
... screen will take another 1 minute for a while or press the MENU button. 9. The setting procedure varies depending on , allow the projector to cool down for 10 minutes with that of the projector, projected images may not be lit again for 1 minute after use .) Setting of the resolution If the resolution of the computer...

User Manual
Page 17
... end (white and red) of the supplied audio/ video cable to the AUDIO OUT ter- In such a case, set the channels of the projector. 4. Connect one end of a commercially available S-video cable to video equipment Preparation: • Make sure that the power of NO SIGNAL may appear... or VCR is connected: When you change the channel via any channel that is muted. • When connecting a monophonic video device, use this projector with the S-video output terminal, make the connection as follows. 1. Connect the other end (yellow) of the audio/video cable to a video ...
... end (white and red) of the supplied audio/ video cable to the AUDIO OUT ter- In such a case, set the channels of the projector. 4. Connect one end of a commercially available S-video cable to video equipment Preparation: • Make sure that the power of NO SIGNAL may appear... or VCR is connected: When you change the channel via any channel that is muted. • When connecting a monophonic video device, use this projector with the S-video output terminal, make the connection as follows. 1. Connect the other end (yellow) of the audio/video cable to a video ...

User Manual
Page 18
... developed by viewing the image. Equipment having RGB output terminals, set COMPUTER INPUT to output DVI-digital signals. Viewing video images (continued) Projector + DVD player or HDTV decoder Some DVD players have such function, set INPUT LEVEL to encrypt digital video data for the purpose of copy... page 14.) EN-18 G B R HD/CS VD No connection Mini D-SUB 15 pin-BNC Conversion cable (option) COMPUTER/COMPONENT VIDEO IN-1/IN-2 BNC-RCA connector (option) Y CB(PB) CR(PR) Audio cable (option) AUDIO IN-1/IN-2 DVD player or HDTV decoder To audio output terminals • The ...
... developed by viewing the image. Equipment having RGB output terminals, set COMPUTER INPUT to output DVI-digital signals. Viewing video images (continued) Projector + DVD player or HDTV decoder Some DVD players have such function, set INPUT LEVEL to encrypt digital video data for the purpose of copy... page 14.) EN-18 G B R HD/CS VD No connection Mini D-SUB 15 pin-BNC Conversion cable (option) COMPUTER/COMPONENT VIDEO IN-1/IN-2 BNC-RCA connector (option) Y CB(PB) CR(PR) Audio cable (option) AUDIO IN-1/IN-2 DVD player or HDTV decoder To audio output terminals • The ...

User Manual
Page 19
...few minutes and then try again. • Do not cover the lens with which images are perpendicular to each other. (See page 10.) • When the projector cannot be positioned perpendicularly to keep an appropriate projection distance with the lens cap while the lamp is switched between VIDEO and S-VIDEO at... the screen are projected in use. • The input source is on the power of the projector to the screen, adjust the projection angle. (See page 10.) 6. When LAMP MODE has been set to LOW, the lamp mode changes from a DVD player that is plugged. (The STATUS indicator blinks ...
...few minutes and then try again. • Do not cover the lens with which images are perpendicular to each other. (See page 10.) • When the projector cannot be positioned perpendicularly to keep an appropriate projection distance with the lens cap while the lamp is switched between VIDEO and S-VIDEO at... the screen are projected in use. • The input source is on the power of the projector to the screen, adjust the projection angle. (See page 10.) 6. When LAMP MODE has been set to LOW, the lamp mode changes from a DVD player that is plugged. (The STATUS indicator blinks ...

User Manual
Page 20
...the STATUS indicator blinks green. 10.Wait about 10 seconds after the VOLUME button is released. • The VOLUME buttons don't function while the menu selection bar or the menu is being displayed. • When a high-level audio signal, such as the temperature around the projector rises. • Do not... purpose. button to protect it should be distorted. • When the audio cable is displayed. • To cancel the procedure, leave the projector for 1 minute after use may be unplugged accidentally while either the air inlet fan or the air outlet fans are operating or the lamp is...
...the STATUS indicator blinks green. 10.Wait about 10 seconds after the VOLUME button is released. • The VOLUME buttons don't function while the menu selection bar or the menu is being displayed. • When a high-level audio signal, such as the temperature around the projector rises. • Do not... purpose. button to protect it should be distorted. • When the audio cable is displayed. • To cancel the procedure, leave the projector for 1 minute after use may be unplugged accidentally while either the air inlet fan or the air outlet fans are operating or the lamp is...