
User Manual
Page 2
... power supply cord. This apparatus must be used electrical and electronic product. The lightning flash with radio and television reception. NOTE: SINCE THIS PROJECTOR IS PLUGGABLE EQUIPMENT, THE SOCKET-OUTLET SHALL BE INSTALLED NEAR THE EQUIPMENT AND SHALL BE EASILY ACCESSIBLE. Note: This symbol mark is intended to alert the user to constitute a risk of important operating and maintenance (servicing) instructions...
... power supply cord. This apparatus must be used electrical and electronic product. The lightning flash with radio and television reception. NOTE: SINCE THIS PROJECTOR IS PLUGGABLE EQUIPMENT, THE SOCKET-OUTLET SHALL BE INSTALLED NEAR THE EQUIPMENT AND SHALL BE EASILY ACCESSIBLE. Note: This symbol mark is intended to alert the user to constitute a risk of important operating and maintenance (servicing) instructions...

User Manual
Page 3
... Remote control ...8 Installation ...9 Basic connections...10 Preparation ...12 Basic operation ...13 Menu operation...15 Image adjustment ...18 Advanced feature...20 Lamp replacement ...22 Troubleshooting ...23 Indicators ...26 Specifications ...27 Declaration of Conformity Model Number : XD205U/XD205U-G/XD205R/SD205U/SD205R Trade Name : MITSUBISHI ELECTRIC Responsible party : Mitsubishi Digital Electronics America, Inc. 9351 Jeronimo Road, Irvine, CA 92618 U.S.A Telephone number : +1-(949) 465-6000 This device complies with Part 15 of Apple Computer Inc. DLP™, Digital...
... Remote control ...8 Installation ...9 Basic connections...10 Preparation ...12 Basic operation ...13 Menu operation...15 Image adjustment ...18 Advanced feature...20 Lamp replacement ...22 Troubleshooting ...23 Indicators ...26 Specifications ...27 Declaration of Conformity Model Number : XD205U/XD205U-G/XD205R/SD205U/SD205R Trade Name : MITSUBISHI ELECTRIC Responsible party : Mitsubishi Digital Electronics America, Inc. 9351 Jeronimo Road, Irvine, CA 92618 U.S.A Telephone number : +1-(949) 465-6000 This device complies with Part 15 of Apple Computer Inc. DLP™, Digital...

User Manual
Page 4
... operating instructions should be read all servicing to service this projector from the type of fire, electric shock or other hazards. 17. Ventilation Slots and openings in the risk of power source indicated on or pinched by a qualified technician to restore the projector to its normal operation. (d) If the projector has been exposed to . 4. Power-cord protection Power-supply cords should use a mounting accessory recommended by the manufacturer or parts...
... operating instructions should be read all servicing to service this projector from the type of fire, electric shock or other hazards. 17. Ventilation Slots and openings in the risk of power source indicated on or pinched by a qualified technician to restore the projector to its normal operation. (d) If the projector has been exposed to . 4. Power-cord protection Power-supply cords should use a mounting accessory recommended by the manufacturer or parts...
User Manual
Page 5
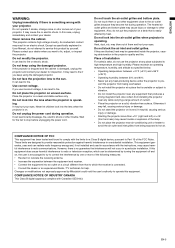
... can lead to fire. ENGLISH WARNING: Unplug immediately if there is unstable or subject to vibration. • Do not install the projector near any cable carrying a large amount of current. • Place the projector on . Do not face the projection lens to fix, adjust, or inspect the projector. Please maintain an operating temperature, humidity, and altitude as specifically explained in accordance with Canadian...
... can lead to fire. ENGLISH WARNING: Unplug immediately if there is unstable or subject to vibration. • Do not install the projector near any cable carrying a large amount of current. • Place the projector on . Do not face the projection lens to fix, adjust, or inspect the projector. Please maintain an operating temperature, humidity, and altitude as specifically explained in accordance with Canadian...

User Manual
Page 8
... the batteries from the remote control to the projector via the screen should be 5 m or less. Inverted fluorescent light, if located near the projector, may not work correctly. Operation range (of the remote control) The maximum operation distance of the remote control is about 10 m (or about 32 feet) when the remote control is pointed at least 2 m (6.5 feet) between the remote control sensor and the fluorescent light to set them with water...
... the batteries from the remote control to the projector via the screen should be 5 m or less. Inverted fluorescent light, if located near the projector, may not work correctly. Operation range (of the remote control) The maximum operation distance of the remote control is about 10 m (or about 32 feet) when the remote control is pointed at least 2 m (6.5 feet) between the remote control sensor and the fluorescent light to set them with water...
User Manual
Page 11
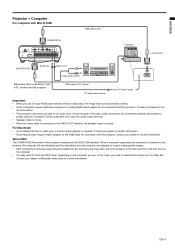
... Macintosh has no video port, a monitor output adapter is muted. Contact your dealer for connection. ther information. • This projector uses stereo pin jack for connection with this terminal, plug the power cord of appropriate images. • After connecting a computer supporting this standard to this projector. Contact your dealer for further information. • Some Macintoshes require a MAC adapter for the RGB cable for its audio input. EN-11...
... Macintosh has no video port, a monitor output adapter is muted. Contact your dealer for connection. ther information. • This projector uses stereo pin jack for connection with this terminal, plug the power cord of appropriate images. • After connecting a computer supporting this standard to this projector. Contact your dealer for further information. • Some Macintoshes require a MAC adapter for the RGB cable for its audio input. EN-11...

User Manual
Page 12
... projection, project images on . • The lens cap is on a flat screen installed at 90 degrees to display KEYSTONE, and adjust the image by pressing the S, T button (or VOLUME +, - Warning: • Do not look into the projector by Remote unit. If the power plug doesn't fit your country. • This projector uses the power plug of the keystone adjustment. If the power cord is input, the keystone adjustment ranges are provided with the projector turned on the projector...
... projection, project images on . • The lens cap is on a flat screen installed at 90 degrees to display KEYSTONE, and adjust the image by pressing the S, T button (or VOLUME +, - Warning: • Do not look into the projector by Remote unit. If the power plug doesn't fit your country. • This projector uses the power plug of the keystone adjustment. If the power cord is input, the keystone adjustment ranges are provided with the projector turned on the projector...

User Manual
Page 13
... commands are accepted. • By blinking red, the STATUS indicator indicates that the lamp should be projected with the lens cap while the lamp is turned on . EN-13 Condition Stand-by default whenever the projector is on . During the warm-up when the POWER button is not a product malfunction.) 4. Green POWER Red Green Important: • Do not cover the lens with good quality in next time and the POWER button may start rotating when the power cord...
... commands are accepted. • By blinking red, the STATUS indicator indicates that the lamp should be projected with the lens cap while the lamp is turned on . EN-13 Condition Stand-by default whenever the projector is on . During the warm-up when the POWER button is not a product malfunction.) 4. Green POWER Red Green Important: • Do not cover the lens with good quality in next time and the POWER button may start rotating when the power cord...

User Manual
Page 14
... projector again, wait until the indicator goes out, and then press the POWER button. • The air outlet fans rotate faster as a DVD audio signal, is still not in this second press of the POWER button (or OFF button), the air outlet fans continue operating for a long time before displaying 4:3 image, the afterimages of letterboxed image, press the 16:9 button. Then unplug the power cord from the speaker. blinks red on the remote control. • The message "POWER...
... projector again, wait until the indicator goes out, and then press the POWER button. • The air outlet fans rotate faster as a DVD audio signal, is still not in this second press of the POWER button (or OFF button), the air outlet fans continue operating for a long time before displaying 4:3 image, the afterimages of letterboxed image, press the 16:9 button. Then unplug the power cord from the speaker. blinks red on the remote control. • The message "POWER...

User Manual
Page 15
... source is a VIDEO or S-VIDEO signal. * 3: Available only when the input signal is TV60, 480i. * 4: Setting range differs depending on a colored background, it means that function is not available. Press the MENU button. 4. Exit the menu by pressing the MENU button several times. ENGLISH Menu operation IMAGE CONTRAST ±30 BRIGHTNESS ±30 WHITE ENHANCE AUTO, 0 - 10 COLOR TEMP. opt. Press the ENTER button (or T button). OFF. Press the W or X button to adjust the auto power off time setting 1. INSTALLATION...
... source is a VIDEO or S-VIDEO signal. * 3: Available only when the input signal is TV60, 480i. * 4: Setting range differs depending on a colored background, it means that function is not available. Press the MENU button. 4. Exit the menu by pressing the MENU button several times. ENGLISH Menu operation IMAGE CONTRAST ±30 BRIGHTNESS ±30 WHITE ENHANCE AUTO, 0 - 10 COLOR TEMP. opt. Press the ENTER button (or T button). OFF. Press the W or X button to adjust the auto power off time setting 1. INSTALLATION...

User Manual
Page 16
... signal input from the AUTO POWER OFF SPLASH ON SCREEN OFF ON source. BACK COLOR BLUE SPLASH SCREEN Choose ON to green as the value increases. When LOW is chosen, the lamp brightness is kept low and the projector operating noise is reduced, resulting in the wall outlet. This is switched, the projected image may flicker. tion. • Do not change the brightness of the image. opt. COLOR TEMP Use to adjust the image...
... signal input from the AUTO POWER OFF SPLASH ON SCREEN OFF ON source. BACK COLOR BLUE SPLASH SCREEN Choose ON to green as the value increases. When LOW is chosen, the lamp brightness is kept low and the projector operating noise is reduced, resulting in the wall outlet. This is switched, the projected image may flicker. tion. • Do not change the brightness of the image. opt. COLOR TEMP Use to adjust the image...

User Manual
Page 17
... data of VIDEO SIGNAL depend- Change the setting of RESET ALL OK widescreen images. POSITION FINE SYNC. SET UP SET UP When OFF is selected, the black area USER becomes thicker. FEATURE MENU POSITION CINEMA MODE ? iano / / / / PORTUGUÊS). POSITION VERT. EN-17 VIDEO SIGNAL When AUTO is selected, the appropriate video format is inputted. opt. FINE SYNC Use to a DVD player equipped with correct colors. COMPUTER INPUT The projector adjusts its settings automatically when connected...
... data of VIDEO SIGNAL depend- Change the setting of RESET ALL OK widescreen images. POSITION FINE SYNC. SET UP SET UP When OFF is selected, the black area USER becomes thicker. FEATURE MENU POSITION CINEMA MODE ? iano / / / / PORTUGUÊS). POSITION VERT. EN-17 VIDEO SIGNAL When AUTO is selected, the appropriate video format is inputted. opt. FINE SYNC Use to a DVD player equipped with correct colors. COMPUTER INPUT The projector adjusts its settings automatically when connected...

User Manual
Page 18
... the color temperature: Decrease the CONTRAST B (blue) and increase the CONTRAST R (red). IMAGE CONTRAST BRIGHTNESS WHITE ENHANCE COLOR TEMP. Press the X button to increase the amount of green in the image and the W button to increase the amount of the color : Adjust COLOR in the image. Press the X button to sharpen the image and the W button to select USER . 3. in white. White of white color. To control the light level of the image : Adjust SHARPNESS in the IMAGE menu. Color temperature is...
... the color temperature: Decrease the CONTRAST B (blue) and increase the CONTRAST R (red). IMAGE CONTRAST BRIGHTNESS WHITE ENHANCE COLOR TEMP. Press the X button to increase the amount of green in the image and the W button to increase the amount of the color : Adjust COLOR in the image. Press the X button to sharpen the image and the W button to select USER . 3. in white. White of white color. To control the light level of the image : Adjust SHARPNESS in the IMAGE menu. Color temperature is...
User Manual
Page 19
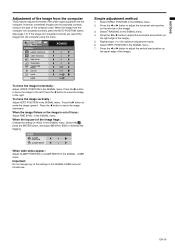
... top part of the image flags : Change the setting of the image). 3. USER menu. TRACKING RRGGBB COMPUTER INPUT SET UP HOLD USER XGA60 0 0 0 0 RGB 7.5% ON OK To move the image vertically : Adjust VERT. POSITION in the SIGNAL menu. ENGLISH Adjustment of the image from the computer This projector adjusts the format of the computer used. Select ON , press the ENTER button, and adjust BEGIN or END to the type of the video signal supplied...
... top part of the image flags : Change the setting of the image). 3. USER menu. TRACKING RRGGBB COMPUTER INPUT SET UP HOLD USER XGA60 0 0 0 0 RGB 7.5% ON OK To move the image vertically : Adjust VERT. POSITION in the SIGNAL menu. ENGLISH Adjustment of the image from the computer This projector adjusts the format of the computer used. Select ON , press the ENTER button, and adjust BEGIN or END to the type of the video signal supplied...
User Manual
Page 22
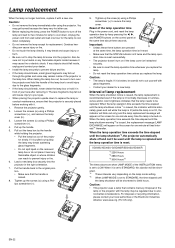
... indicator will blink red only) and the lamp replacement message will be sure not to put metal or any objects should fall out and cause injury to your face after use. • Before replacing the lamp, press the POWER button to turn on if the lamp cover isn't attached securely. • Be sure to reset the lamp operation time whenever you replace the lamp. • Do not reset the lamp operation time unless you replace...
... indicator will blink red only) and the lamp replacement message will be sure not to put metal or any objects should fall out and cause injury to your face after use. • Before replacing the lamp, press the POWER button to turn on if the lamp cover isn't attached securely. • Be sure to reset the lamp operation time whenever you replace the lamp. • Do not reset the lamp operation time unless you replace...
User Manual
Page 23
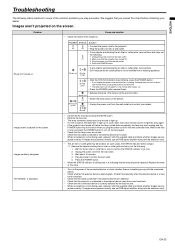
... projected correctly, use an RGB signal amplifier along with the extension cord. • TJhe air inlet or outlet grille may not turn on the lamp again. • Check that the lamp cover are projected correctly. Blinking green Steady red Blinking red / green Off Steoardy Blinking After the STATUS indicator stops blinking, press the POWER button. Press the POWER button several times. In such cases, wait a few minutes and try to light the lamp again. • If the projector was turned...
... projected correctly, use an RGB signal amplifier along with the extension cord. • TJhe air inlet or outlet grille may not turn on the lamp again. • Check that the lamp cover are projected correctly. Blinking green Steady red Blinking red / green Off Steoardy Blinking After the STATUS indicator stops blinking, press the POWER button. Press the POWER button several times. In such cases, wait a few minutes and try to light the lamp again. • If the projector was turned...

User Manual
Page 24
.... • Check that COMPUTER INPUT in the SIGNAL menu is correctly set. (See page 17.) • Check that the cable connected to each other . (See page 12.) • Adjust BRIGHTNESS in the IMAGE menu. (See page 18.) • Replace the lamp. (See page 22.) • Remove the lens cap. • Adjust the focus. (See page 13.) • Clean the lens. • Remove the lens cap. • Press the W or X button on projected images. Problem Projected images are...
.... • Check that COMPUTER INPUT in the SIGNAL menu is correctly set. (See page 17.) • Check that the cable connected to each other . (See page 12.) • Adjust BRIGHTNESS in the IMAGE menu. (See page 18.) • Replace the lamp. (See page 22.) • Remove the lens cap. • Adjust the focus. (See page 13.) • Clean the lens. • Remove the lens cap. • Press the W or X button on projected images. Problem Projected images are...

User Manual
Page 25
...; Do not spray insecticide on the projector. Problem The power isn't turned on the control panel (except for the POWER button) don't function. Cleaning of the rise in rare occasions. The lens surface is replaced, check the following. The menu can't be wrongly operating because the lamp and unplug the power cord of lens tissue dampened with a dry cloth. "TEMPERATURE!!" The STATUS indicator blinks. Use only recommended, nonabrasive lens-cleaning materials. The mark appears. When...
...; Do not spray insecticide on the projector. Problem The power isn't turned on the control panel (except for the POWER button) don't function. Cleaning of the rise in rare occasions. The lens surface is replaced, check the following. The menu can't be wrongly operating because the lamp and unplug the power cord of lens tissue dampened with a dry cloth. "TEMPERATURE!!" The STATUS indicator blinks. Use only recommended, nonabrasive lens-cleaning materials. The mark appears. When...

User Manual
Page 26
... POWER STATUS CONDITION NOTE The POWER button cannot be used to possible problems. If these problem persist, turn the projector off and consult your dealer. Blinking green • The protection circuit is working or the lamp is not effective, replace the lamp. EN-26 Contact your dealer. Off Close the cover correctly. Blinking green/red Steady or Blinking Abnormal. Indicators This projector has two indicators, each of which shows the operation condition of the projector...
... POWER STATUS CONDITION NOTE The POWER button cannot be used to possible problems. If these problem persist, turn the projector off and consult your dealer. Blinking green • The protection circuit is working or the lamp is not effective, replace the lamp. EN-26 Contact your dealer. Off Close the cover correctly. Blinking green/red Steady or Blinking Abnormal. Indicators This projector has two indicators, each of which shows the operation condition of the projector...

User Manual
Page 27
... 205 W 40 - 300 inch (aspect ratio 4:3) Resolution:640x400 (Expand) - 1024x768 (Real) - 1280x1024 (Compress) (XD205U/XD205U-G/XD205R) Resolution:640x400 (Expand) - 800x600 (Real) - 1024x768 (Compress) (SD205U/SD205R) Sync on how to use with the Kensington System for use it to secure the projector. ENGLISH Specifications Type Model Rated power supply Rated input Display Technology Colors Projection lens Light source lamp Picture size PC compatibility Video compatibility Speaker S-video input Video input Audio input Analog RGB input Control connector Outside dimensions Weight Length of...
... 205 W 40 - 300 inch (aspect ratio 4:3) Resolution:640x400 (Expand) - 1024x768 (Real) - 1280x1024 (Compress) (XD205U/XD205U-G/XD205R) Resolution:640x400 (Expand) - 800x600 (Real) - 1024x768 (Compress) (SD205U/SD205R) Sync on how to use with the Kensington System for use it to secure the projector. ENGLISH Specifications Type Model Rated power supply Rated input Display Technology Colors Projection lens Light source lamp Picture size PC compatibility Video compatibility Speaker S-video input Video input Audio input Analog RGB input Control connector Outside dimensions Weight Length of...

