
User Manual
Page 1
ENGLISH EN DATA PROJECTOR MODEL XD206U User Manual This User Manual is important to you. Please read it before using your projector.
ENGLISH EN DATA PROJECTOR MODEL XD206U User Manual This User Manual is important to you. Please read it before using your projector.

User Manual
Page 2
... REMOVE COVER (OR BACK) NO USER-SERVICEABLE PARTS INSIDE REFER SERVICING TO QUALIFIED SERVICE PERSONNEL. The lightning flash with high quality materials and components which can be grounded. The exclamation point within an equilateral triangle is to the public low voltage power supply system. WARNING Use the attached specified power supply cord. DO NOT LOOK DIRECTLY INTO THE LENS WHEN THE PROJECTOR IS IN THE POWER ON MODE. The attached power cord...
... REMOVE COVER (OR BACK) NO USER-SERVICEABLE PARTS INSIDE REFER SERVICING TO QUALIFIED SERVICE PERSONNEL. The lightning flash with high quality materials and components which can be grounded. The exclamation point within an equilateral triangle is to the public low voltage power supply system. WARNING Use the attached specified power supply cord. DO NOT LOOK DIRECTLY INTO THE LENS WHEN THE PROJECTOR IS IN THE POWER ON MODE. The attached power cord...
User Manual
Page 3
... Remote control ...8 Installation ...9 Basic connections...10 Preparation ...12 Basic operation ...13 Menu operation...15 Image adjustment ...18 Advanced feature...20 Lamp replacement ...22 Troubleshooting ...23 Indicators ...26 Specifications ...27 Declaration of Conformity Model Number : XD206U Trade Name : MITSUBISHI ELECTRIC Responsible party : Mitsubishi Digital Electronics America, Inc. 9351 Jeronimo Road, Irvine, CA 92618 U.S.A Telephone number : +1-(949) 465-6000 This device complies with Part 15 of their respective holders. DLP™, Digital Micromirror Device and DMD...
... Remote control ...8 Installation ...9 Basic connections...10 Preparation ...12 Basic operation ...13 Menu operation...15 Image adjustment ...18 Advanced feature...20 Lamp replacement ...22 Troubleshooting ...23 Indicators ...26 Specifications ...27 Declaration of Conformity Model Number : XD206U Trade Name : MITSUBISHI ELECTRIC Responsible party : Mitsubishi Digital Electronics America, Inc. 9351 Jeronimo Road, Irvine, CA 92618 U.S.A Telephone number : +1-(949) 465-6000 This device complies with Part 15 of their respective holders. DLP™, Digital Micromirror Device and DMD...

User Manual
Page 4
... Slots and openings in the operating instructions should be routed so that the service technician has used replacement parts specified by the operating instructions. Warnings All warnings on the appliance and in the cabinet are required, be walked on the projector. 14. Cleaning Unplug this projector, ask the service technician to service this projector on the projector. 1. Use a damp soft cloth for ventilation, ensuring reliable operation of any service or repair to...
... Slots and openings in the operating instructions should be routed so that the service technician has used replacement parts specified by the operating instructions. Warnings All warnings on the appliance and in the cabinet are required, be walked on the projector. 14. Cleaning Unplug this projector, ask the service technician to service this projector on the projector. 1. Use a damp soft cloth for ventilation, ensuring reliable operation of any service or repair to...

User Manual
Page 5
... you keep using the damaged projector. COMPLIANCE NOTICE OF INDUSTRY CANADA This Class B digital apparatus complies with your eyes. It may be determined by Mitsubishi could void the user's authority to Part 15 of the lamp. • Do not place the projector near the projector. Place the projector on its end. Also refrain from being overheated. • Do not install the projector at any cable...
... you keep using the damaged projector. COMPLIANCE NOTICE OF INDUSTRY CANADA This Class B digital apparatus complies with your eyes. It may be determined by Mitsubishi could void the user's authority to Part 15 of the lamp. • Do not place the projector near the projector. Place the projector on its end. Also refrain from being overheated. • Do not install the projector at any cable...

User Manual
Page 8
... the remote control sensor and the fluorescent light to the screen, the distance from - Replace the back cover. If the solution comes in the direction of the remote control. Reception angle (vertical) Reception angle (horizontal) 20 10 Reception angle (vertical), ceiling mount 20 30 30 Important: • Do not expose the remote control sensor to +, and - However, the operation distance varies depending on the remote control. • Keep...
... the remote control sensor and the fluorescent light to the screen, the distance from - Replace the back cover. If the solution comes in the direction of the remote control. Reception angle (vertical) Reception angle (horizontal) 20 10 Reception angle (vertical), ceiling mount 20 30 30 Important: • Do not expose the remote control sensor to +, and - However, the operation distance varies depending on the remote control. • Keep...
User Manual
Page 9
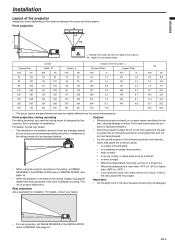
... the distance between the screen and the projector. Front projection W A B A=B L : Between the screen and the front edge of the projector Hd : Height of the projector Image size varies depending on the ceiling, set IMAGE REVERSE in the INSTALLATION menu to prevent the air inlet grille and the air outlet grilles that emit hot air from being blocked. • Do not use of any non-recommended ceiling mount kit or installation of focus...
... the distance between the screen and the projector. Front projection W A B A=B L : Between the screen and the front edge of the projector Hd : Height of the projector Image size varies depending on the ceiling, set IMAGE REVERSE in the INSTALLATION menu to prevent the air inlet grille and the air outlet grilles that emit hot air from being blocked. • Do not use of any non-recommended ceiling mount kit or installation of focus...

User Manual
Page 12
... best projection, project images on the screen during the keystone adjustment because of the type of the video signal being projected and the setting values of three-pin grounding type. Plug the power cord in the power cord firmly. If you leave the lens cap on the projector or the remote control to the floor. • Slanting the projector more than rated. Press the S (or +) button. • When the keystone adjustment is...
... best projection, project images on the screen during the keystone adjustment because of the type of the video signal being projected and the setting values of three-pin grounding type. Plug the power cord in the power cord firmly. If you leave the lens cap on the projector or the remote control to the floor. • Slanting the projector more than rated. Press the S (or +) button. • When the keystone adjustment is...
User Manual
Page 13
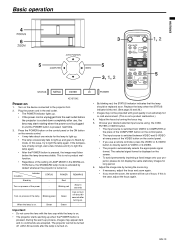
... lamp when the STATUS indicator blinks red. (See page 23 and 26.) • Images may not be replaced soon. PUTER or VIDEO button. • The input source is switched from the wall outlet before the lamp becomes stable. Adjust the image size by turning the zoom ring. • If necessary, adjust the focus and zoom again. • If you use , the fans may start rotating when the power cord is turned on the screen. • To avoid permanently imprinting a fixed image...
... lamp when the STATUS indicator blinks red. (See page 23 and 26.) • Images may not be replaced soon. PUTER or VIDEO button. • The input source is switched from the wall outlet before the lamp becomes stable. Adjust the image size by turning the zoom ring. • If necessary, adjust the focus and zoom again. • If you use , the fans may start rotating when the power cord is turned on the screen. • To avoid permanently imprinting a fixed image...

User Manual
Page 14
... lamp doesn't light up . When the VOLUME control bar appears on the remote control don't function for approx. 90 seconds to cool down the projector while the STATUS indicator is supplied to switch the KEYSTONE / VOLUME adjustment. Press the POWER button on the control panel or the OFF button on the screen. • The volume control bar will appear on the remote control. • The message "POWER OFF? Unplug the power cord. • The POWER indicator will start blinking...
... lamp doesn't light up . When the VOLUME control bar appears on the remote control don't function for approx. 90 seconds to cool down the projector while the STATUS indicator is supplied to switch the KEYSTONE / VOLUME adjustment. Press the POWER button on the control panel or the OFF button on the screen. • The volume control bar will appear on the remote control. • The message "POWER OFF? Unplug the power cord. • The POWER indicator will start blinking...

User Manual
Page 15
.... • After selecting the items marked with certain signals. *3: Not available when the source is PC signal. *4: Not available when the source is not available. COLOR *3 TINT *2 SHARPNESS *3 GAMMA MODE AUTO POWER ON AUTO POWER OFF SPLASH SCREEN BACK COLOR LAMP MODE IMAGE REVERSE LAMP HOURS MENU POSITION CINEMA MODE *4 ANAMORPHIC PASSWORD FUNCTION LANGUAGE RESET ALL HORIZ.POSITION *2 VERT.POSITION *2 FINE SYNC. *2 TRACKING *2 COMPUTER INPUT *2 SET UP *2 ±30 (0) ±30 (0) 0 ~10 (STANDARD) LOW...
.... • After selecting the items marked with certain signals. *3: Not available when the source is PC signal. *4: Not available when the source is not available. COLOR *3 TINT *2 SHARPNESS *3 GAMMA MODE AUTO POWER ON AUTO POWER OFF SPLASH SCREEN BACK COLOR LAMP MODE IMAGE REVERSE LAMP HOURS MENU POSITION CINEMA MODE *4 ANAMORPHIC PASSWORD FUNCTION LANGUAGE RESET ALL HORIZ.POSITION *2 VERT.POSITION *2 FINE SYNC. *2 TRACKING *2 COMPUTER INPUT *2 SET UP *2 ±30 (0) ±30 (0) 0 ~10 (STANDARD) LOW...
User Manual
Page 16
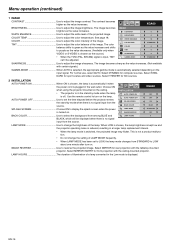
... sources. 2 INSTALLATION AUTO POWER ON When ON is chosen, the lamp is automatically lit when the power cord is off. IMAGE REVERSE OFF BACK COLOR Use to set to turn on the lamp. opt. COLOR Use to adjust the image sharpness. Select THEATER for sport scenes and video sources. LAMP MODE Use to change the setting of the image. EN-16 The image becomes brighter as the value decreases. (Available only when IMAGE CONTRAST BRIGHTNESS WHITE ENHANCE COLOR TEMP. Use the remote control...
... sources. 2 INSTALLATION AUTO POWER ON When ON is chosen, the lamp is automatically lit when the power cord is off. IMAGE REVERSE OFF BACK COLOR Use to set to turn on the lamp. opt. COLOR Use to adjust the image sharpness. Select THEATER for sport scenes and video sources. LAMP MODE Use to change the setting of the image. EN-16 The image becomes brighter as the value decreases. (Available only when IMAGE CONTRAST BRIGHTNESS WHITE ENHANCE COLOR TEMP. Use the remote control...
User Manual
Page 17
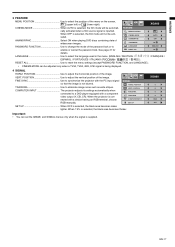
... SYNC. opt. COMPUTER INPUT The projector adjusts its settings automatically when connected to MENU POSITION CINEMA MODE ANAMORPHIC PASSWORD A Ë LANGUAGE AUTO OFF OK ENGLISH enable or cancel the password lock. SET UP SET UP When OFF is not blurred. ANAMORPHIC Select ON when playing DVD discs containing data of the image. EN-17 POSITION VERT. When OFF is being displayed. 4 SIGNAL HORIZ. PASSWORD FUNCTION Use to change the mode of the password lock...
... SYNC. opt. COMPUTER INPUT The projector adjusts its settings automatically when connected to MENU POSITION CINEMA MODE ANAMORPHIC PASSWORD A Ë LANGUAGE AUTO OFF OK ENGLISH enable or cancel the password lock. SET UP SET UP When OFF is not blurred. ANAMORPHIC Select ON when playing DVD discs containing data of the image. EN-17 POSITION VERT. When OFF is being displayed. 4 SIGNAL HORIZ. PASSWORD FUNCTION Use to change the mode of the password lock...
User Manual
Page 19
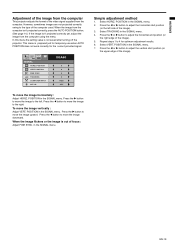
... This projector adjusts the format of the video signal supplied from the computer using the menu. To move the image downward. Select HORIZ. When the image from the computer isn't projected correctly, press the AUTO POSITION button. (See page 14.) If the image isn't projected correctly yet, adjust the image from the computer. This menu is prepared just for temporary use when AUTO POSITION does not work correctly for optimum adjustment...
... This projector adjusts the format of the video signal supplied from the computer using the menu. To move the image downward. Select HORIZ. When the image from the computer isn't projected correctly, press the AUTO POSITION button. (See page 14.) If the image isn't projected correctly yet, adjust the image from the computer. This menu is prepared just for temporary use when AUTO POSITION does not work correctly for optimum adjustment...
User Manual
Page 22
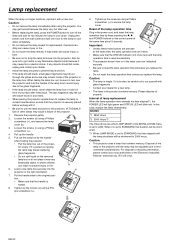
... time elapsed until the lamp shutdown will blink red. Lamp replacement When the lamp no longer functions, replace it with it. • Be sure to use . • Before replacing the lamp, press the POWER button to turn off the lamp and wait for two minutes for lamp to cool down. EN-22 Reverse the projector gently. 2. Interval of your dealer for a new lamp. • The lamp in the power cord, and reset the lamp operation time...
... time elapsed until the lamp shutdown will blink red. Lamp replacement When the lamp no longer functions, replace it with it. • Be sure to use . • Before replacing the lamp, press the POWER button to turn off the lamp and wait for two minutes for lamp to cool down. EN-22 Reverse the projector gently. 2. Interval of your dealer for a new lamp. • The lamp in the power cord, and reset the lamp operation time...
User Manual
Page 23
... go out.) 2. Exchange the light source lamp. • Check whether or not the "Auto power off before contacting your dealer. If images are projected correctly, use an RGB signal amplifier along with dust or dirt and clean it will start rotating and the POWER button may encounter. Replace the lamp in red, it with the extension cord. POWER STATUS CONDITION NOTE Lamp failure Off Blinking green Replace the lamp and reset the lamp hour. Disconnect the power plug from the wall...
... go out.) 2. Exchange the light source lamp. • Check whether or not the "Auto power off before contacting your dealer. If images are projected correctly, use an RGB signal amplifier along with dust or dirt and clean it will start rotating and the POWER button may encounter. Replace the lamp in red, it with the extension cord. POWER STATUS CONDITION NOTE Lamp failure Off Blinking green Replace the lamp and reset the lamp hour. Disconnect the power plug from the wall...

User Manual
Page 24
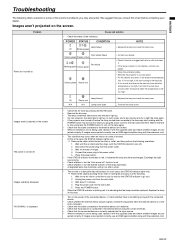
... set. (See page 17.) • Check that occurs in the IMAGE menu. (See page 18.) • Adjust the projector and the screen so that the cable connected to the external device isn't broken. • The color shade between several equipment may differ depending on projected images. Projected images are seen on rare occasion. Projected images (and/or audio) appear wavy and distorted. Projected images are shaking. Troubleshooting (continued) Images aren't projected correctly. Problem Projected images...
... set. (See page 17.) • Check that occurs in the IMAGE menu. (See page 18.) • Adjust the projector and the screen so that the cable connected to the external device isn't broken. • The color shade between several equipment may differ depending on projected images. Projected images are seen on rare occasion. Projected images (and/or audio) appear wavy and distorted. Projected images are shaking. Troubleshooting (continued) Images aren't projected correctly. Problem Projected images...
User Manual
Page 25
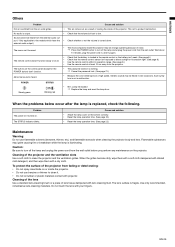
... recommended, nonabrasive lens-cleaning materials. Problem The power isn't turned on the bottom correctly. • Reset the lamp operation time. (See page 22.) • Reset the lamp operation time. (See page 22.) Maintenance Warning: Do not use benzine or thinner to low. POWER STATUS Steady green Blinking red • 9J5%RLeapmlapcelifetheexlcaemepd and reset the lamp hour. ENGLISH Others Problem Cause and solution Hot air is heard. • Because the color wheel spins at a high speed, metallic sounds may be...
... recommended, nonabrasive lens-cleaning materials. Problem The power isn't turned on the bottom correctly. • Reset the lamp operation time. (See page 22.) • Reset the lamp operation time. (See page 22.) Maintenance Warning: Do not use benzine or thinner to low. POWER STATUS Steady green Blinking red • 9J5%RLeapmlapcelifetheexlcaemepd and reset the lamp hour. ENGLISH Others Problem Cause and solution Hot air is heard. • Because the color wheel spins at a high speed, metallic sounds may be...
User Manual
Page 26
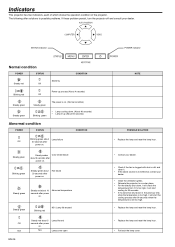
... it will start the cooling process after power on . (Normal condition) • Lamp cooling down in the previous time, while the temperature is still too high. • Replace the lamp and reset the lamp hour. • Replace the lamp and reset the lamp hour. • Put back the lamp cover. Lamp life end N/A Lamp cover open POWER indicator NOTE POSSIBLE SOLUTION • Replace the lamp and reset the lamp hour. • Contact your dealer. • Check if the fan is clogged with...
... it will start the cooling process after power on . (Normal condition) • Lamp cooling down in the previous time, while the temperature is still too high. • Replace the lamp and reset the lamp hour. • Replace the lamp and reset the lamp hour. • Put back the lamp cover. Lamp life end N/A Lamp cover open POWER indicator NOTE POSSIBLE SOLUTION • Replace the lamp and reset the lamp hour. • Contact your dealer. • Check if the fan is clogged with...

User Manual
Page 27
...) Serial terminal (RS-232C) (D-SUB 9-pin) USB terminal (for use with R,G,B,W color wheel Pixels 1024 x 768 = 786432 pixels 16770000 colors F 2.4 (Wide), f = 19 - 21.9 mm 205 W 40 - 300 inch (Wide), aspect ratio 4:3 Resolution:640x400 (Expand) - 1024x768 (Real) - 1280x1024 (Compress) Sync on how to use it to secure the projector. ENGLISH Specifications Type Model Rated power supply Rated input Display Technology Colors Projection lens Light source lamp Picture size PC compatibility Video compatibility Speaker S-video input Video input Audio input Analog RGB input Control connector...
...) Serial terminal (RS-232C) (D-SUB 9-pin) USB terminal (for use with R,G,B,W color wheel Pixels 1024 x 768 = 786432 pixels 16770000 colors F 2.4 (Wide), f = 19 - 21.9 mm 205 W 40 - 300 inch (Wide), aspect ratio 4:3 Resolution:640x400 (Expand) - 1024x768 (Real) - 1280x1024 (Compress) Sync on how to use it to secure the projector. ENGLISH Specifications Type Model Rated power supply Rated input Display Technology Colors Projection lens Light source lamp Picture size PC compatibility Video compatibility Speaker S-video input Video input Audio input Analog RGB input Control connector...

