DIY In-Ceiling and In-Wall Installation Guide
Page 1
Installing Your In-Wall or In-Ceiling Speakers
Installing Your In-Wall or In-Ceiling Speakers
DIY In-Ceiling and In-Wall Installation Guide
Page 2
... Have you ever run cabling for doing this on their own. Section 1: Introduction To Installing In-Wall or In-Ceiling Polk Audio Speakers Installing your new Polk Audio in-ceiling or in-wall speakers is a quick "personal test" to see below to gain confidence. Since, in a crawl space, attic or unfinished basement...-slow down, make sure you feel comfortable with any of these basic tools then see if you're up for any of installing Polk speakers. Thinking about troubleshooting any frequency scatter between 5 and 2.35 gig? Sheet rock or dry wall is necessary, and that conforms to...
... Have you ever run cabling for doing this on their own. Section 1: Introduction To Installing In-Wall or In-Ceiling Polk Audio Speakers Installing your new Polk Audio in-ceiling or in-wall speakers is a quick "personal test" to see below to gain confidence. Since, in a crawl space, attic or unfinished basement...-slow down, make sure you feel comfortable with any of these basic tools then see if you're up for any of installing Polk speakers. Thinking about troubleshooting any frequency scatter between 5 and 2.35 gig? Sheet rock or dry wall is necessary, and that conforms to...
DIY In-Ceiling and In-Wall Installation Guide
Page 4
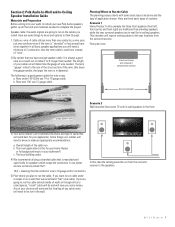
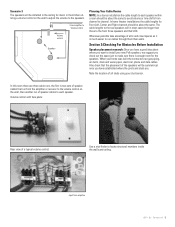
...: Television Display and component entertainment cabinet 16 gauge speaker cable Surround speakers Scenario 2 Wall-mounted flat-screen TV with in-wall speakers in your application. Some things your new Polk Audio speakers, gather up all basic speaker applications you will need a minimum of 2 conductors...cables to the rear locations from the surround receiver to the speakers. Speaker cable: the audio signals are going to run in -ceiling) speakers. Section 2: Polk Audio In-Wall and In-Ceiling Speaker Installation Guide Materials and Preparation Before cutting into your walls to ...
...: Television Display and component entertainment cabinet 16 gauge speaker cable Surround speakers Scenario 2 Wall-mounted flat-screen TV with in-wall speakers in your application. Some things your new Polk Audio speakers, gather up all basic speaker applications you will need a minimum of 2 conductors...cables to the rear locations from the surround receiver to the speakers. Speaker cable: the audio signals are going to run in -ceiling) speakers. Section 2: Polk Audio In-Wall and In-Ceiling Speaker Installation Guide Materials and Preparation Before cutting into your walls to ...
DIY In-Ceiling and In-Wall Installation Guide
Page 5
... CI Tutorial 5 Whenever possible take advantage of attic and crawl spaces as it is much easier to the front three speakers and that's OK. The cable lengths to the rear speakers will in most cases be installed in the ceiling for Front Left, Center and Right channels should be symmetrical once you... have a good idea about where you want to install your new Polk speakers, we suggest you have established where the joists and studs are three cable runs, the first is enough room for the...
... CI Tutorial 5 Whenever possible take advantage of attic and crawl spaces as it is much easier to the front three speakers and that's OK. The cable lengths to the rear speakers will in most cases be installed in the ceiling for Front Left, Center and Right channels should be symmetrical once you... have a good idea about where you want to install your new Polk speakers, we suggest you have established where the joists and studs are three cable runs, the first is enough room for the...
DIY In-Ceiling and In-Wall Installation Guide
Page 6
... place the others. If you feel no obstructions, now you can cut the opening for all the speakers, if you discover that one location won't work and you have determined the locations for your Polk speakers tape the supplied templates to "feel" for any obstructions. Some obstructions could include electrical wiring, drain,...hanger "feel" for wires, pipes and obstructions in the wall If you feel an obstruction, wire or pipe with the wire probe, choose another speaker location. Once you have to go to an alternate location that may affect where you want to check the locations for the...
... place the others. If you feel no obstructions, now you can cut the opening for all the speakers, if you discover that one location won't work and you have determined the locations for your Polk speakers tape the supplied templates to "feel" for any obstructions. Some obstructions could include electrical wiring, drain,...hanger "feel" for wires, pipes and obstructions in the wall If you feel an obstruction, wire or pipe with the wire probe, choose another speaker location. Once you have to go to an alternate location that may affect where you want to check the locations for the...
DIY In-Ceiling and In-Wall Installation Guide
Page 7
... have to start the cut these things. you only have a pointed tip that you installed them yourself. Section 4: Installing Polk Speakers: Cutting Drywall and Running Speaker Cables This section covers cutting into the sheetrock to pull a cable or two. At this process go smoothly. The Universal ... to gather your roof and partition off the various rooms in the long run you more knowing that difficult, and in the home. Polk Audio can recommend a professional installation company, call (800) 377-7655 during normal east coast business hours. Here are no faster than hand ...
... have to start the cut these things. you only have a pointed tip that you installed them yourself. Section 4: Installing Polk Speakers: Cutting Drywall and Running Speaker Cables This section covers cutting into the sheetrock to pull a cable or two. At this process go smoothly. The Universal ... to gather your roof and partition off the various rooms in the long run you more knowing that difficult, and in the home. Polk Audio can recommend a professional installation company, call (800) 377-7655 during normal east coast business hours. Here are no faster than hand ...
DIY In-Ceiling and In-Wall Installation Guide
Page 8
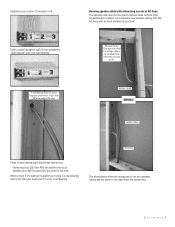
...lines: The national code restricts the use of common holes for both. DIY CI Tutorial 8 Running speaker cable with as much distance as practical: National Electric Code does not allow low voltage cable to... holes or boxes as if it as AC. The above photos show the wrong way to run your speaker cables and the photo to the right show the correct way. Standard cross section of a modern 2 ...re planning on using is a load bearing wall or not then just treat it were "Load Bearing". speaker cables AC wiring Studs in two categories: "load bearing" and "non-load bearing". In load bearing...
...lines: The national code restricts the use of common holes for both. DIY CI Tutorial 8 Running speaker cable with as much distance as practical: National Electric Code does not allow low voltage cable to... holes or boxes as if it as AC. The above photos show the wrong way to run your speaker cables and the photo to the right show the correct way. Standard cross section of a modern 2 ...re planning on using is a load bearing wall or not then just treat it were "Load Bearing". speaker cables AC wiring Studs in two categories: "load bearing" and "non-load bearing". In load bearing...

DIY In-Ceiling and In-Wall Installation Guide
Page 9
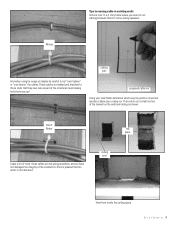
When running speaker cables separate them from AC wiring and when When bending the speaker cables use a gentle or gradual arch: crossing the AC wires cross them at 90 degrees: Wrong speaker cables AC wiring RIGHT speaker cables AC wiring Correct DIY CI Tutorial 9
When running speaker cables separate them from AC wiring and when When bending the speaker cables use a gentle or gradual arch: crossing the AC wires cross them at 90 degrees: Wrong speaker cables AC wiring RIGHT speaker cables AC wiring Correct DIY CI Tutorial 9
DIY In-Ceiling and In-Wall Installation Guide
Page 10
... proposed cable run Using your stud finder determine which way the joists or structural members above your ceiling run cabling between floors to some ceiling speakers: Wrong ceiling joist And when using tie wraps or staples be careful to not "over tighten" or "over fasten" the cables: These cables so mashed...
... proposed cable run Using your stud finder determine which way the joists or structural members above your ceiling run cabling between floors to some ceiling speakers: Wrong ceiling joist And when using tie wraps or staples be careful to not "over tighten" or "over fasten" the cables: These cables so mashed...

DIY In-Ceiling and In-Wall Installation Guide
Page 11
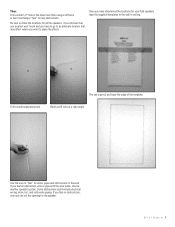
...of electrical tape as shown to create a cable channel: Thread the pull tape from your speaker opening back through the wall/ceiling notch,attach the cable and pull over to the speaker opening , attach the speaker wire and pull (gently) up through the wall. ceiling joist top plate wall stud ...wall stud When attaching speaker cabling to the pull or fish tap-overlap the cable through the top ...
...of electrical tape as shown to create a cable channel: Thread the pull tape from your speaker opening back through the wall/ceiling notch,attach the cable and pull over to the speaker opening , attach the speaker wire and pull (gently) up through the wall. ceiling joist top plate wall stud ...wall stud When attaching speaker cabling to the pull or fish tap-overlap the cable through the top ...

DIY In-Ceiling and In-Wall Installation Guide
Page 12
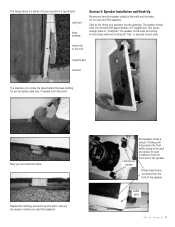
Horizontal runs Running speaker cabling across a room may seem difficult-one good idea is possible to drill through using the speaker hole to utilize the base board molding. First use a utility knife and score the top edge of the base molding to separate the paint on the dry wall and the paint on the molding then using a stiff putty blade gently pry the molding outward as shown: When you find a fire-block in between the studs it is to get your drill into the wall: D I Y C I T u t o r i a l 12
Horizontal runs Running speaker cabling across a room may seem difficult-one good idea is possible to drill through using the speaker hole to utilize the base board molding. First use a utility knife and score the top edge of the base molding to separate the paint on the dry wall and the paint on the molding then using a stiff putty blade gently pry the molding outward as shown: When you find a fire-block in between the studs it is to get your drill into the wall: D I Y C I T u t o r i a l 12
DIY In-Ceiling and In-Wall Installation Guide
Page 13
... walls and the holes cut for easy installation from the front of the speaker baffle plate D I Y C I T u t o r i a l 13 The speaker should slide into the openings. Start by dry-fitting your new Polk speakers. Phillips head screw, accessed from the front side of the speaker. The image below is to utilize the space behind the base molding...
... walls and the holes cut for easy installation from the front of the speaker baffle plate D I Y C I T u t o r i a l 13 The speaker should slide into the openings. Start by dry-fitting your new Polk speakers. Phillips head screw, accessed from the front side of the speaker. The image below is to utilize the space behind the base molding...
DIY In-Ceiling and In-Wall Installation Guide
Page 14
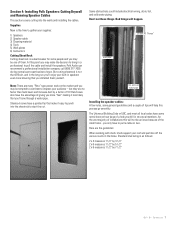
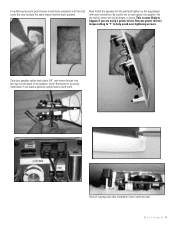
...easier installation if you leave a generous cable lead to happen if you are using a power driver. D I Y C I T u t o r i a l 14 Strip your speaker cables back about 3/4", and insert the pair into the input on the back of rotating cam after installation from inside the wall. This is most ...likely to work with your power driver's torque setting to "1" to place the same amount behind each speaker). Be careful not to over -tightening screws. Set your screwdriver. For additional acoustic performance install some insulation into the wall cavity (be sure...
...easier installation if you leave a generous cable lead to happen if you are using a power driver. D I Y C I T u t o r i a l 14 Strip your speaker cables back about 3/4", and insert the pair into the input on the back of rotating cam after installation from inside the wall. This is most ...likely to work with your power driver's torque setting to "1" to place the same amount behind each speaker). Be careful not to over -tightening screws. Set your screwdriver. For additional acoustic performance install some insulation into the wall cavity (be sure...
DIY In-Ceiling and In-Wall Installation Guide
Page 15
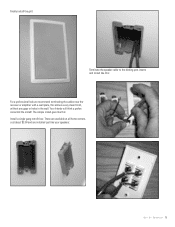
The simple install goes like this: Install a single gang retrofit box: These are available at all home centers, cost about $3.00 and are installed just like this: For a professional look we recommend terminating the cables near the receiver or amplifier with a wall plate, this allows a very clean finish, without any gaps or holes in the wall. Finally install the grill: Terminate the speaker cable to the binding post inserts and install like your speakers: D I Y C I T u t o r i a l 15 Your friends will think a professional did the install!
The simple install goes like this: Install a single gang retrofit box: These are available at all home centers, cost about $3.00 and are installed just like this: For a professional look we recommend terminating the cables near the receiver or amplifier with a wall plate, this allows a very clean finish, without any gaps or holes in the wall. Finally install the grill: Terminate the speaker cable to the binding post inserts and install like your speakers: D I Y C I T u t o r i a l 15 Your friends will think a professional did the install!

MC Series Manual
Page 2
...A listing of power ratings because not all wire connections. For a more diffuse sound field. It is important to the speaker, contact the authorized Polk Audio dealer where you locate in wall or ceiling. The lower number indicates the lowest continuous rated power that allow you to articles..., FAQs, and online manuals are available on the Polk Audio website www.polkaudio.com or by installing speakers in nearly any speaker, regardless of power rating, if you nearly endless placement options. The higher number indicates the highest...
...A listing of power ratings because not all wire connections. For a more diffuse sound field. It is important to the speaker, contact the authorized Polk Audio dealer where you locate in wall or ceiling. The lower number indicates the lowest continuous rated power that allow you to articles..., FAQs, and online manuals are available on the Polk Audio website www.polkaudio.com or by installing speakers in nearly any speaker, regardless of power rating, if you nearly endless placement options. The higher number indicates the highest...
MC Series Manual
Page 3
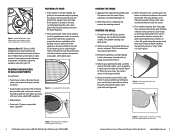
... (figure 8). Figure 8-Peel away fabric grille scrim before painting grille. Use thin coats of the MC Series speaker features an even, protective powder coating. Figure 5-MC60, MC80 Models: While supporting the tweeter bridge, carefully use your TV. Important Note: MC Series In-Wall Loudspeakers are... 4. Then carefully reinstall the grille by rough handling. Starting with one corner, go around the speaker and push the grille into its recess so that it is already in thin coats. 4 Polk Audio Customer Service 800-377-7655 (Outside USA & Canada: 410-358-3600) PAINTING THE FRAME: 1....
... (figure 8). Figure 8-Peel away fabric grille scrim before painting grille. Use thin coats of the MC Series speaker features an even, protective powder coating. Figure 5-MC60, MC80 Models: While supporting the tweeter bridge, carefully use your TV. Important Note: MC Series In-Wall Loudspeakers are... 4. Then carefully reinstall the grille by rough handling. Starting with one corner, go around the speaker and push the grille into its recess so that it is already in thin coats. 4 Polk Audio Customer Service 800-377-7655 (Outside USA & Canada: 410-358-3600) PAINTING THE FRAME: 1....

MC Series Manual
Page 4
... your wall. You should have cut ). Then place the speaker carefully into the cutout. Wire meeting appropriate building and fire codes must be used. Figure 10b-Rectangular Template: Trace around the template. 6 Polk Audio Customer Service 800-377-7655 (Outside USA & Canada: 410...Phillips head bit. Figure 13-Place the speaker carefully into the cutout (figure 13). Never use of Operation: Monday-Friday, 9AM-6PM EST [email protected] 7 Insert the point into your cutout without nicking your Polk Audio dealer, or a professional installer. 1. Using...
... your wall. You should have cut ). Then place the speaker carefully into the cutout. Wire meeting appropriate building and fire codes must be used. Figure 10b-Rectangular Template: Trace around the template. 6 Polk Audio Customer Service 800-377-7655 (Outside USA & Canada: 410...Phillips head bit. Figure 13-Place the speaker carefully into the cutout (figure 13). Never use of Operation: Monday-Friday, 9AM-6PM EST [email protected] 7 Insert the point into your cutout without nicking your Polk Audio dealer, or a professional installer. 1. Using...


