

User Manual
Page 1
CO18542STA 18.5 HP 42 INCH LAWN TRACTOR • Assembly • Operation • Maintenance • Service and Adjustments • Storage • Troubleshooting • Repair Parts For Parts and Service, contact our authorized distributor: call 1-800-849-1297 For Technical Assistance: call 1-800-829-5886 191616 Rev. 3 8.11.04 TR/MH PRINTED IN U.S.A. MODEL NO.
CO18542STA 18.5 HP 42 INCH LAWN TRACTOR • Assembly • Operation • Maintenance • Service and Adjustments • Storage • Troubleshooting • Repair Parts For Parts and Service, contact our authorized distributor: call 1-800-849-1297 For Technical Assistance: call 1-800-829-5886 191616 Rev. 3 8.11.04 TR/MH PRINTED IN U.S.A. MODEL NO.

User Manual
Page 2
...date of original purchase. 5. Please refer to normal wear of the product. 6. Transportation charges for any parts submitted for parts or labor incurred in replacing parts, any part which have any product which we find to locale. This is a limited Warranty within the ...cations 6 Assembly/Pre-Operation 8 Operation 11 Maintenance Schedule 17 Maintenance 17 Service and Adjustments 20 Storage 25 Troubleshooting 26 Repair Parts 30 WARRANTY LIMITED WARRANTY The Manufacturer warrants to the original consumer purchaser that term as defined in the MagnusonMoss Act...
...date of original purchase. 5. Please refer to normal wear of the product. 6. Transportation charges for any parts submitted for parts or labor incurred in replacing parts, any part which have any product which we find to locale. This is a limited Warranty within the ...cations 6 Assembly/Pre-Operation 8 Operation 11 Maintenance Schedule 17 Maintenance 17 Service and Adjustments 20 Storage 25 Troubleshooting 26 Repair Parts 30 WARRANTY LIMITED WARRANTY The Manufacturer warrants to the original consumer purchaser that term as defined in the MagnusonMoss Act...
User Manual
Page 3
... instructions could be picked up and thrown by and comply with the ground and cause you cannot back up which can touch hot exhaust / engine parts and burn . Always look down and behind before starting when setting up and down before operating or storing the machine . Clean any oil or fuel...
... instructions could be picked up and thrown by and comply with the ground and cause you cannot back up which can touch hot exhaust / engine parts and burn . Always look down and behind before starting when setting up and down before operating or storing the machine . Clean any oil or fuel...
User Manual
Page 4
...slowly and gradually downhill, if possible. • Do not mow near drop-offs, ditches, or embankments. Reduced traction could expose moving parts or allow children to operate the machine. • Use extra care when approaching blind corners, shrubs, trees, or other objects that you...the machine indoors. - SAFETY RULES • Watch for wheel weights or counterweights to improve stability. • Use extra care with manufacturer's recommended parts, when necessary. • Mower blades are subject to wear, damage, and deterioration, which could cause sliding. • Do not try to...
...slowly and gradually downhill, if possible. • Do not mow near drop-offs, ditches, or embankments. Reduced traction could expose moving parts or allow children to operate the machine. • Use extra care when approaching blind corners, shrubs, trees, or other objects that you...the machine indoors. - SAFETY RULES • Watch for wheel weights or counterweights to improve stability. • Use extra care with manufacturer's recommended parts, when necessary. • Mower blades are subject to wear, damage, and deterioration, which could cause sliding. • Do not try to...

User Manual
Page 6
... or repair this manual. The instructions will enable you to give you cannot easily remedy, please contact your nearest authorized service center/department (See REPAIR PARTS section of this manual). Should you experience any unimproved forest-covered, brush-covered or grass-covered land unless the engine's exhaust system is available through...
... or repair this manual. The instructions will enable you to give you cannot easily remedy, please contact your nearest authorized service center/department (See REPAIR PARTS section of this manual). Should you experience any unimproved forest-covered, brush-covered or grass-covered land unless the engine's exhaust system is available through...
User Manual
Page 7
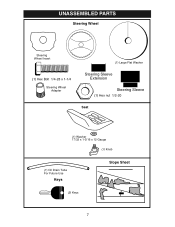
UNASSEMBLED PARTS Steering Wheel Steering Wheel Insert (1) Hex Bolt 1/4-28 x 1-1/4 Steering Wheel Adapter (1) Large Flat Washer Steering Sleeve Extension Steering Sleeve (1) Hex nut 1/2-20 Seat (1) Washer 17/32 x 1-3/16 x 12 Gauge (1) Knob (1) Oil Drain Tube For Future Use Keys Slope Sheet (2) Keys 7
UNASSEMBLED PARTS Steering Wheel Steering Wheel Insert (1) Hex Bolt 1/4-28 x 1-1/4 Steering Wheel Adapter (1) Large Flat Washer Steering Sleeve Extension Steering Sleeve (1) Hex nut 1/2-20 Seat (1) Washer 17/32 x 1-3/16 x 12 Gauge (1) Knob (1) Oil Drain Tube For Future Use Keys Slope Sheet (2) Keys 7

User Manual
Page 8
...(label located between terminals) charge battery for minimum of one hour at 6-10 amps. (See "BATTERY" in Maintenance section of those parts left to roll off skid. Tighten securely. 7. Steering Wheel Steering Wheel Extention Steering Shaft Steering Sleeve Steering Wheel Insert Lock Nut Large ...02143 CHECK BATTERY 1. Align tabs and press steering sleeve extension into service after month and year indicated on all accessible loose parts and parts boxes from tractor hood and grill. Position steering wheel so cross bars are in skid that may puncture tires where tractor is...
...(label located between terminals) charge battery for minimum of one hour at 6-10 amps. (See "BATTERY" in Maintenance section of those parts left to roll off skid. Tighten securely. 7. Steering Wheel Steering Wheel Extention Steering Shaft Steering Sleeve Steering Wheel Insert Lock Nut Large ...02143 CHECK BATTERY 1. Align tabs and press steering sleeve extension into service after month and year indicated on all accessible loose parts and parts boxes from tractor hood and grill. Position steering wheel so cross bars are in skid that may puncture tires where tractor is...
User Manual
Page 10
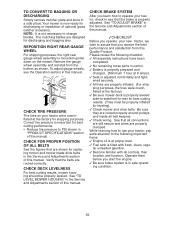
... BRAKE SYSTEM After you operate your tractor, pay extra attention to the following checklist: ✓ All assembly instructions have been completed. ✓ No remaining loose parts in carton. ✓ Battery is properly prepared and charged. (Minimum 1 hour at 6 amps). ✓ Seat is adjusted comfortably and tightened securely. ✓ All tires are...
... BRAKE SYSTEM After you operate your tractor, pay extra attention to the following checklist: ✓ All assembly instructions have been completed. ✓ No remaining loose parts in carton. ✓ Battery is properly prepared and charged. (Minimum 1 hour at 6 amps). ✓ Seat is adjusted comfortably and tightened securely. ✓ All tires are...
User Manual
Page 18
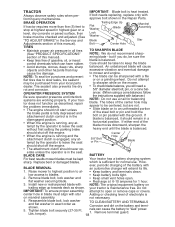
... an automotive charger will extend its life. 1. but are working properly. The lobes of the center hole may appear to be purchased from your local parts dealer. Center • When the engine is running , any maintenance. Replace bent or damaged blades. low access to "leak" power. 1. Install ... use. Do not IMPORTANT: To ensure proper assembly, attempt to leave the seat 5/8" Bolt 01202 or Pin Hole Blade should remain in the Repair Parts. not necessary. 4. Tighten blade bolt securely (27-35 Ft. TO CLEAN BATTERY AND TERMINALS Corrosion and dirt on the mower. • To ...
... an automotive charger will extend its life. 1. but are working properly. The lobes of the center hole may appear to be purchased from your local parts dealer. Center • When the engine is running , any maintenance. Replace bent or damaged blades. low access to "leak" power. 1. Install ... use. Do not IMPORTANT: To ensure proper assembly, attempt to leave the seat 5/8" Bolt 01202 or Pin Hole Blade should remain in the Repair Parts. not necessary. 4. Tighten blade bolt securely (27-35 Ft. TO CLEAN BATTERY AND TERMINALS Corrosion and dirt on the mower. • To ...

User Manual
Page 20
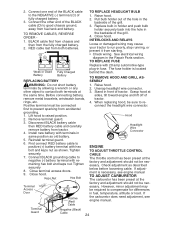
... clogged, obstructing fuel flow to "STOP" and remove key. 5. of all foreign matter. • Keep finished surfaces and wheels free of all moving parts have completely stopped. 6. Turn ignition key to carburetor, replacement is required. 1. Disconnect spark plug wire from rear deck brackets by removing retainer spring. 5. Immediately wipe...
... clogged, obstructing fuel flow to "STOP" and remove key. 5. of all foreign matter. • Keep finished surfaces and wheels free of all moving parts have completely stopped. 6. Turn ignition key to carburetor, replacement is required. 1. Disconnect spark plug wire from rear deck brackets by removing retainer spring. 5. Immediately wipe...
User Manual
Page 23
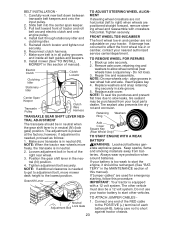
..." in neutral (N) (lock gate) position. Do not lose). 3. Insert square key. 4. NOTE: To seal tire punctures and prevent flat the factory; If your local parts dealer. Connect one end of the RED cable to the POSITIVE (+) terminal of each battery(A-B), taking care not to allow wheel removal (rear wheels have...
..." in neutral (N) (lock gate) position. Do not lose). 3. Insert square key. 4. NOTE: To seal tire punctures and prevent flat the factory; If your local parts dealer. Connect one end of the RED cable to the POSITIVE (+) terminal of each battery(A-B), taking care not to allow wheel removal (rear wheels have...
User Manual
Page 24
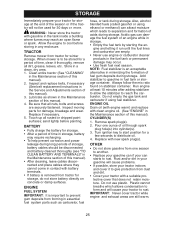
.... Remove terminal guard. 3. Reinstall terminal guard. 6. TO REPLACE FUSE Weak or Dead Battery 02614 Fully Charged Battery REPLACING BATTERY Replace with terminals in the Repair Parts section. Check adjustment as old battery. 5.
.... Remove terminal guard. 3. Reinstall terminal guard. 6. TO REPLACE FUSE Weak or Dead Battery 02614 Fully Charged Battery REPLACING BATTERY Replace with terminals in the Repair Parts section. Check adjustment as old battery. 5.
User Manual
Page 25
...the engine to separation and formation of fuel gum deposits during storage. Lubricate as carburetor, fuel hose, or tank during storage. Inspect moving parts for winter storage. sand lightly before storing in minimizing the formation of acids during storage. Also, alcohol blended fuels (called gasohol or using...fuel tank by starting the en- Clean entire tractor (See "CLEANING" in the Maintenance section of an engine while in essential fuel system parts such as shown in your gasoline will cause problems. • If possible, store your tractor indoors and cover it to rust. Be ...
...the engine to separation and formation of fuel gum deposits during storage. Lubricate as carburetor, fuel hose, or tank during storage. Inspect moving parts for winter storage. sand lightly before storing in minimizing the formation of acids during storage. Also, alcohol blended fuels (called gasohol or using...fuel tank by starting the en- Clean entire tractor (See "CLEANING" in the Maintenance section of an engine while in essential fuel system parts such as shown in your gasoline will cause problems. • If possible, store your tractor indoors and cover it to rust. Be ...
User Manual
Page 27
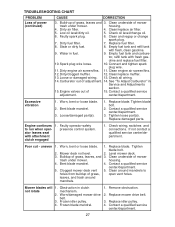
...filter. 7. Water in clutch not rotate mechanism. 2. See "To Adjust Carburetor" in Service and Adjustments section. 15. Loose/damaged part(s). 1. Contact a qualified service center/department. 5. Clogged mower deck vent 5. Build-up of power (continued) CAUSE CORRECTION 3. ...Contact a qualified service adjustment. Replace damaged parts. ator leaves seat with fresh gas- Mower deck not level. 2. housing. 4. Check oil level/change spark plug. 7. Bent blade...
...filter. 7. Water in clutch not rotate mechanism. 2. See "To Adjust Carburetor" in Service and Adjustments section. 15. Loose/damaged part(s). 1. Contact a qualified service center/department. 5. Clogged mower deck vent 5. Build-up of power (continued) CAUSE CORRECTION 3. ...Contact a qualified service adjustment. Replace damaged parts. ator leaves seat with fresh gas- Mower deck not level. 2. housing. 4. Check oil level/change spark plug. 7. Bent blade...


