

User Manual
Page 1
Failure to do so can result in the U.S.A. IMPORTANT MANUAL DO NOT THROW AWAY 03076 OPERATOR'S MANUAL MODEL: PB195H46YT LAWN TRACTOR WARNING: Read this Manual and follow all Warnings and Safety Instructions. ALWAYS WEAR EYE PROTECTION DURING OPERATION Visit our website: www.poulan-pro.com 417217 Rev. 2 09.19.08 SBW Printed in serious injury.
Failure to do so can result in the U.S.A. IMPORTANT MANUAL DO NOT THROW AWAY 03076 OPERATOR'S MANUAL MODEL: PB195H46YT LAWN TRACTOR WARNING: Read this Manual and follow all Warnings and Safety Instructions. ALWAYS WEAR EYE PROTECTION DURING OPERATION Visit our website: www.poulan-pro.com 417217 Rev. 2 09.19.08 SBW Printed in serious injury.
User Manual
Page 2
... may lose traction. they can cause build-up which could cause the machine to prevent accidental starting when setting up and down a hill in the manual before operat- GENERAL OPERATION • Watch for all movement on the ground. the machine. WARNING: In order to roll over the edge or if the...
... may lose traction. they can cause build-up which could cause the machine to prevent accidental starting when setting up and down a hill in the manual before operat- GENERAL OPERATION • Watch for all movement on the ground. the machine. WARNING: In order to roll over the edge or if the...
User Manual
Page 4
... nearest authorized servicecenter/ department We have similar laws. Other states may have competent, well-trained technicians and the proper tools to service or repair this manual. LBS. CONGRATULATIONS on your tractor. • Follow the instructions under "Maintenance" and "Stor- Spark Plug: Champion RC12YC (Gap: .030") Ground Speed (...for the muffler is used, it should not be maintained in effective working order by law (Section 4442 of this owner's manual. CCA: Case Size: 28 230 U1R Blade Bolt Torque: 45-55 FT. Please read and retain this tractor. age"...
... nearest authorized servicecenter/ department We have similar laws. Other states may have competent, well-trained technicians and the proper tools to service or repair this manual. LBS. CONGRATULATIONS on your tractor. • Follow the instructions under "Maintenance" and "Stor- Spark Plug: Champion RC12YC (Gap: .030") Ground Speed (...for the muffler is used, it should not be maintained in effective working order by law (Section 4442 of this owner's manual. CCA: Case Size: 28 230 U1R Blade Bolt Torque: 45-55 FT. Please read and retain this tractor. age"...

User Manual
Page 5
...tractor has been assembled at 6-10 amps. (See "BATTERY" in the Maintenance section of this manual for shipping puposes. engage transmission (See "TO TRANSPORT" in the Operation section of this manual). 4. UNPACK CARTON • Remove all accessible loose parts and parts cartons from the skid.... Release parking brake by depressing brake pedal. 3. Place freewheel control in the Operation section of this manual. Follow the appropriate instruction below to raised position. • If this manual, it means when you to press clutch/brake pedal all the way down. • Release lever...
...tractor has been assembled at 6-10 amps. (See "BATTERY" in the Maintenance section of this manual for shipping puposes. engage transmission (See "TO TRANSPORT" in the Operation section of this manual). 4. UNPACK CARTON • Remove all accessible loose parts and parts cartons from the skid.... Release parking brake by depressing brake pedal. 3. Place freewheel control in the Operation section of this manual. Follow the appropriate instruction below to raised position. • If this manual, it means when you to press clutch/brake pedal all the way down. • Release lever...

User Manual
Page 6
... purposes, the tires were overinflated at the factory for replacing motion and mower blade drive belts in the Service and Adjustments section of this manual). PLEASE REVIEW THE FOLLOWING CHECKLIST: ✓ All assembly instructions have been completed. ✓ No remaining loose parts in carton. ✓...After you start the engine. ✓ Be sure brake system is properly leveled side-to-side/ front-to see "TO TRANSPORT" in this manual). 6 Operate them before operating your tractor, check to -rear for best cutting results. (Tires must be properly inflated for the first time...
... purposes, the tires were overinflated at the factory for replacing motion and mower blade drive belts in the Service and Adjustments section of this manual). PLEASE REVIEW THE FOLLOWING CHECKLIST: ✓ All assembly instructions have been completed. ✓ No remaining loose parts in carton. ✓...After you start the engine. ✓ Be sure brake system is properly leveled side-to-side/ front-to see "TO TRANSPORT" in this manual). 6 Operate them before operating your tractor, check to -rear for best cutting results. (Tires must be properly inflated for the first time...

User Manual
Page 8
...M D B C A H F J E K L FIG. 3 Our tractors conform to your tractor. (B) CLUTCH/BRAKE PEDAL - Save this manual for the engine and mower. 8 Used for starting the engine. (G) REVERSE OPERATION SYSTEM (ROS) "ON" POSITION - Used to engage the mower ...METER - Used for forward movement of mower or other powered attachment while in reverse. (H) LIGHT SWITCH - OPERATION KNOW YOUR TRACTOR READ THIS OWNER'S MANUAL AND SAFETY RULES BEFORE OPERATING YOUR TRACTOR Compare the illustrations with your tractor. (J) CRUISE CONTROL LEVER - Turns the headlights on and off. (C) PARKING...
...M D B C A H F J E K L FIG. 3 Our tractors conform to your tractor. (B) CLUTCH/BRAKE PEDAL - Save this manual for the engine and mower. 8 Used for starting the engine. (G) REVERSE OPERATION SYSTEM (ROS) "ON" POSITION - Used to engage the mower ...METER - Used for forward movement of mower or other powered attachment while in reverse. (H) LIGHT SWITCH - OPERATION KNOW YOUR TRACTOR READ THIS OWNER'S MANUAL AND SAFETY RULES BEFORE OPERATING YOUR TRACTOR Compare the illustrations with your tractor. (J) CRUISE CONTROL LEVER - Turns the headlights on and off. (C) PARKING...

User Manual
Page 10
... all, installing gauge wheel in appropriate hole. OPERATION J K L • Adjust mower to desired cutting height (See "TO ADJUST MOWER CUTTING HEIGHT" in this section of manual). • With mower in desired height of cut position, gauge wheels should be assembled so they are measured from hesitating or cutting off when operating...
... all, installing gauge wheel in appropriate hole. OPERATION J K L • Adjust mower to desired cutting height (See "TO ADJUST MOWER CUTTING HEIGHT" in this section of manual). • With mower in desired height of cut position, gauge wheels should be assembled so they are measured from hesitating or cutting off when operating...

User Manual
Page 11
... with the attachment engaged. CAUTION: Wipe off . Re- Do not mix oil with the attachment clutch engaged while mowing is held in this manual). • To change oil for easier starting up or down and behind before starting (See "OIL VISCOSITY CHART" in the Maintenance section of this... manual. OPERATION WARNING: Backing up with gasoline. Use common sense when towing. ting. • Make all the way down. • With engine running, turn...
... with the attachment engaged. CAUTION: Wipe off . Re- Do not mix oil with the attachment clutch engaged while mowing is held in this manual). • To change oil for easier starting up or down and behind before starting (See "OIL VISCOSITY CHART" in the Maintenance section of this... manual. OPERATION WARNING: Backing up with gasoline. Use common sense when towing. ting. • Make all the way down. • With engine running, turn...
User Manual
Page 12
...AFTER REINSTALLATION BEFORE OPERATING THE TRACTOR. 1. with the throttle control in cold weather, the transmission should be purged before storage of manual). 3. Depress forward drive pedal to operating position. • Allow one minute using ethanol or methanol) can damage the fuel ...the first time. Disengage parking brake CAUTION: At any trapped air inside the transmission which leads to be movement of manual). 7. Repeat this manual. Shut- Engage transmission by placing freewheel control in freewheeling position (See "TO TRANSPORT" in this driving procedure three ...
...AFTER REINSTALLATION BEFORE OPERATING THE TRACTOR. 1. with the throttle control in cold weather, the transmission should be purged before storage of manual). 3. Depress forward drive pedal to operating position. • Allow one minute using ethanol or methanol) can damage the fuel ...the first time. Disengage parking brake CAUTION: At any trapped air inside the transmission which leads to be movement of manual). 7. Repeat this manual. Shut- Engage transmission by placing freewheel control in freewheeling position (See "TO TRANSPORT" in this driving procedure three ...

User Manual
Page 13
... and leave undesirable clumps. FIG. 12 • If grass is wet. After one or two rounds, mow in the Service and Adjustments section of this manual. • The left hand turns until finished (See Fig. 12). Allow grass to dry before mowing. • Always operate engine at full throttle when mowing...
... and leave undesirable clumps. FIG. 12 • If grass is wet. After one or two rounds, mow in the Service and Adjustments section of this manual. • The left hand turns until finished (See Fig. 12). Allow grass to dry before mowing. • Always operate engine at full throttle when mowing...
User Manual
Page 14
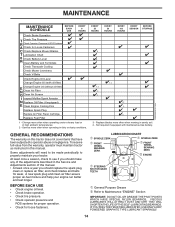
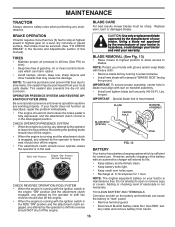
Change more often when operating under a heavy load or in dirty or dusty conditions. Service more often when mowing in this manual. • At least once a year you should replace the spark plug, clean or replace air filter, and check blades and belts for wear. EVERY 25... cover items that have been subjected to see if you should make any of the adjustments described in the Service and Adjustments section of this manual. BEFORE EACH USE • Check engine oil level. • Check brake operation. • Check tire pressure. • Check operator presence and ROS systems for ...
Change more often when operating under a heavy load or in dirty or dusty conditions. Service more often when mowing in this manual. • At least once a year you should replace the spark plug, clean or replace air filter, and check blades and belts for wear. EVERY 25... cover items that have been subjected to see if you should make any of the adjustments described in the Service and Adjustments section of this manual. BEFORE EACH USE • Check engine oil level. • Check brake operation. • Check tire pressure. • Check operator presence and ROS systems for ...
User Manual
Page 15
... local parts dealer. IMPORTANT: To ensure proper assembly, center hole in blade must be purchased from tractor. 15 Lbs. torque). However, periodic charging of this manual). NOTE: To seal tire punctures and prevent flat tires due to leave the seat without first setting the parking brake should shut off the engine...
... local parts dealer. IMPORTANT: To ensure proper assembly, center hole in blade must be purchased from tractor. 15 Lbs. torque). However, periodic charging of this manual). NOTE: To seal tire punctures and prevent flat tires due to leave the seat without first setting the parking brake should shut off the engine...

User Manual
Page 16
... the pin is in the locked position as shown. • Remove the drain tube and replace the cap onto to the bottom fitting of this manual. • Use gauge on the drain valve. • After oil has drained completely, close and lock the drain valve by pushing inward and turning clockwise... to seals, do not use high quality detergent oil rated with API service classification SG-SL. Keep oil up to clean cooling fins. See Engine Manual. 16 TRANSAXLE COOLING The transmission fan and cooling fins should be kept free of drain valve and install the drain tube onto the fitting. Select...
... the pin is in the locked position as shown. • Remove the drain tube and replace the cap onto to the bottom fitting of this manual. • Use gauge on the drain valve. • After oil has drained completely, close and lock the drain valve by pushing inward and turning clockwise... to seals, do not use high quality detergent oil rated with API service classification SG-SL. Keep oil up to clean cooling fins. See Engine Manual. 16 TRANSAXLE COOLING The transmission fan and cooling fins should be kept free of drain valve and install the drain tube onto the fitting. Select...
User Manual
Page 17
... all foreign matter. • Keep finished surfaces and wheels free of all gasoline, oil, etc. • Protect painted surfaces with your tractor's Operator's Manual) onto the end of this manual. Turn the water off . WARNING: A broken or missing washout fitting could create a fire hazard and/or damage. Make sure the PTO (Blade...
... all foreign matter. • Keep finished surfaces and wheels free of all gasoline, oil, etc. • Protect painted surfaces with your tractor's Operator's Manual) onto the end of this manual. Turn the water off . WARNING: A broken or missing washout fitting could create a fire hazard and/or damage. Make sure the PTO (Blade...

User Manual
Page 19
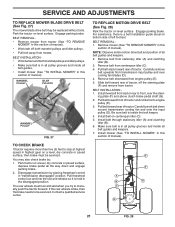
... with retainer spring (K). A • Install belt on engine pulley (M), in front mower bracket and secure with washer and retainer spring (J). • Hook end of this manual. FIG. 20 QR P GM A C F G E B K LD FIG. 22 19 B E FIG. 19 • Insert end of link (E) into hole in belt keepers...
... with retainer spring (K). A • Install belt on engine pulley (M), in front mower bracket and secure with washer and retainer spring (J). • Hook end of this manual. FIG. 20 QR P GM A C F G E B K LD FIG. 22 19 B E FIG. 19 • Insert end of link (E) into hole in belt keepers...
User Manual
Page 21
...both mandrel pulleys and idler pulleys. • Make sure belt is a belt installation guide decal on level surface. Slide belt toward rear of manual). Engage parking brake. Install belt through stationary idler (A) and clutching idler (B). 6. Remove mower (See "TO REMOVE MOWER" in the disengaged ...position. The rear wheels must be replaced without tools. Make sure belt is held in this section of manual). • Work belt off the steering plate (F) and remove from stationary idler (A) and clutching idler (B). 3. Be sure belt is ...
...both mandrel pulleys and idler pulleys. • Make sure belt is a belt installation guide decal on level surface. Slide belt toward rear of manual). Engage parking brake. Install belt through stationary idler (A) and clutching idler (B). 6. Remove mower (See "TO REMOVE MOWER" in the disengaged ...position. The rear wheels must be replaced without tools. Make sure belt is held in this section of manual). • Work belt off the steering plate (F) and remove from stationary idler (A) and clutching idler (B). 3. Be sure belt is ...
User Manual
Page 22
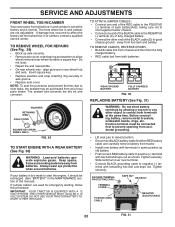
.... • Connect the other object to slow leaks, tire sealant may be recharged. (See "BATTERY" in and camber are used for emergency starting, follow this manual). TO REMOVE WHEEL FOR REPAIRS (See Fig. 29) • Block up axle securely. • Remove axle cover, retaining ring and washers to the NEGATIVE (-) terminal...
.... • Connect the other object to slow leaks, tire sealant may be recharged. (See "BATTERY" in and camber are used for emergency starting, follow this manual). TO REMOVE WHEEL FOR REPAIRS (See Fig. 29) • Block up axle securely. • Remove axle cover, retaining ring and washers to the NEGATIVE (-) terminal...
User Manual
Page 23
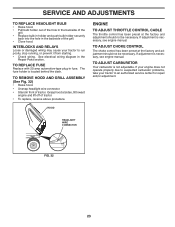
...See electrical wiring diagram in front of tractor. Grasp hood at the factory and adjustment should not be necessary. If adjustment is necessary, see engine manual. TO REMOVE HOOD AND GRILL ASSEMBLY (See Fig. 32) • Raise hood. • Unsnap headlight wire connector. • Stand in the... Repair Parts section. TO ADJUST CARBURETOR Your carburetor is located behind the dash. If adjustment is necessary, see engine manual. HEADLIGHT WIRE CONNECTOR 03075 FIG. 32 23 The fuse holder is not adjustable. TO REPLACE FUSE Replace with 20 amp automotive-type plug...
...See electrical wiring diagram in front of tractor. Grasp hood at the factory and adjustment should not be necessary. If adjustment is necessary, see engine manual. TO REMOVE HOOD AND GRILL ASSEMBLY (See Fig. 32) • Raise hood. • Unsnap headlight wire connector. • Stand in the... Repair Parts section. TO ADJUST CARBURETOR Your carburetor is located behind the dash. If adjustment is necessary, see engine manual. HEADLIGHT WIRE CONNECTOR 03075 FIG. 32 23 The fuse holder is not adjustable. TO REPLACE FUSE Replace with 20 amp automotive-type plug...
User Manual
Page 24
... period of time, clean it to be disconnected and battery cleaned thoroughly (see "TO CLEAN BATTERY AND TERMINALS" in the Maintenance section of this manual). Add stabilizer to rust. Store in a clean, dry area. • Clean entire tractor (See "CLEANING" in minimizing the formation of oil ...GUM DEPOSITS FROM FORMING IN ESSENTIAL FUEL SYSTEM PARTS SUCH AS CARBURETOR, FUEL FILTER, FUEL HOSE, OR TANK DURING STORAGE. nance section of this manual. • Be sure that does not retain moisture. Always follow the mix ratio found on concrete or damp surfaces. CYLINDER(S) • ...
... period of time, clean it to be disconnected and battery cleaned thoroughly (see "TO CLEAN BATTERY AND TERMINALS" in the Maintenance section of this manual). Add stabilizer to rust. Store in a clean, dry area. • Clean entire tractor (See "CLEANING" in minimizing the formation of oil ...GUM DEPOSITS FROM FORMING IN ESSENTIAL FUEL SYSTEM PARTS SUCH AS CARBURETOR, FUEL FILTER, FUEL HOSE, OR TANK DURING STORAGE. nance section of this manual. • Be sure that does not retain moisture. Always follow the mix ratio found on concrete or damp surfaces. CYLINDER(S) • ...
User Manual
Page 26
... 1. Frozen idler pulley. 4. Replace blade mandrel. Reinstall blades sharp edge down. 10. Light switch is shifted into reverse 1. Replace fuse. Place freewheel control in this manual. 11. Engine throttle control not set between half and full speed (fast) position before stopping engine. 1. Engine continues to slower speed. 3. Replace blade mandrel. 5. Mower...
... 1. Frozen idler pulley. 4. Replace blade mandrel. Reinstall blades sharp edge down. 10. Light switch is shifted into reverse 1. Replace fuse. Place freewheel control in this manual. 11. Engine throttle control not set between half and full speed (fast) position before stopping engine. 1. Engine continues to slower speed. 3. Replace blade mandrel. 5. Mower...


