

User Manual
Page 1
IMPORTANT MANUAL Do Not Throw Away 03076 OPERATOR'S MANUAL MODEL: PB20H46LT LAWN TRACTOR WARNING: Read this Manual and follow all Warnings and Safety Instructions. ALWAYS WEAR EYE PROTECTION DURING OPERATION Visit our website: www.poulan-pro.com 411274 01.05.07 AP Printed in serious injury. Failure to do so can result in U.S.A.
IMPORTANT MANUAL Do Not Throw Away 03076 OPERATOR'S MANUAL MODEL: PB20H46LT LAWN TRACTOR WARNING: Read this Manual and follow all Warnings and Safety Instructions. ALWAYS WEAR EYE PROTECTION DURING OPERATION Visit our website: www.poulan-pro.com 411274 01.05.07 AP Printed in serious injury. Failure to do so can result in U.S.A.

User Manual
Page 2
... slope or if you will not have to stop or shift while on the slope. • Do not mow on the machine and in the manual before operat- Engine exhaust, some of its constituents, and certain vehicle components contain or emit chemicals known to the State of California to stabilize the...
... slope or if you will not have to stop or shift while on the slope. • Do not mow on the machine and in the manual before operat- Engine exhaust, some of its constituents, and certain vehicle components contain or emit chemicals known to the State of California to stabilize the...

User Manual
Page 4
It has been designed, engineered and manufactured to service or repair this tractor. Please read and retain this owner's manual. age" sections of a new tractor. A spark arrester for and using your tractor. • Follow the instructions under "...states may have competent, well-trained technicians and the proper tools to give you cannot easily remedy, please contact your purchase of this manual. LBS. TABLE OF CONTENTS SAFETY RULES 2-3 PRODUCT SPECIFICATIONS 4 CUSTOMER RESPONSIBILITIES 4 ASSEMBLY 6-8 OPERATION 9-14 MAINTENANCE SCHEDULE 15 MAINTENANCE 15-18...
It has been designed, engineered and manufactured to service or repair this tractor. Please read and retain this owner's manual. age" sections of a new tractor. A spark arrester for and using your tractor. • Follow the instructions under "...states may have competent, well-trained technicians and the proper tools to give you cannot easily remedy, please contact your purchase of this manual. LBS. TABLE OF CONTENTS SAFETY RULES 2-3 PRODUCT SPECIFICATIONS 4 CUSTOMER RESPONSIBILITIES 4 ASSEMBLY 6-8 OPERATION 9-14 MAINTENANCE SCHEDULE 15 MAINTENANCE 15-18...
User Manual
Page 6
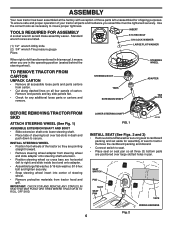
.... • Remove steering wheel adapter from carton. • Cut along dashed lines on all four panels of those parts left hand is mentioned in this manual, it means when you assemble must be tightened securely. Remove end panels and lay side panels flat. • Check for assembly of your tractor all...
.... • Remove steering wheel adapter from carton. • Cut along dashed lines on all four panels of those parts left hand is mentioned in this manual, it means when you assemble must be tightened securely. Remove end panels and lay side panels flat. • Check for assembly of your tractor all...

User Manual
Page 7
... brake by depressing clutch/brake pedal. • Place freewheel control in "transmission disengaged position" (See "TO TRANSPORT" in the Operation section of this manual). • Sit on label (label located between terminals) charge battery for minimum of one hour at 6-10 amps. (See "BATTERY" in the ...Operation section of this manual. Be sure the area in a well-ventilated area. TO DRIVE TRACTOR OFF SKID (See Operation section for location and function of other people ...
... brake by depressing clutch/brake pedal. • Place freewheel control in "transmission disengaged position" (See "TO TRANSPORT" in the Operation section of this manual). • Sit on label (label located between terminals) charge battery for minimum of one hour at 6-10 amps. (See "BATTERY" in the ...Operation section of this manual. Be sure the area in a well-ventilated area. TO DRIVE TRACTOR OFF SKID (See Operation section for location and function of other people ...
User Manual
Page 8
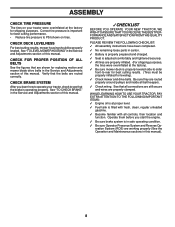
...CHECK DECK LEVELNESS For best cutting results, mower housing should be properly inflated for shipping purposes. Verify that the brake is in this manual. CHECK BRAKE SYSTEM After you start the engine. ✓ Be sure brake system is operating properly. See "TO LEVEL MOWER ...FOLLOWING CHECKLIST: ✓ All assembly instructions have been completed. ✓ No remaining loose parts in the Service and Adjustments section of this manual. Correct tire pressure is important for replacing motion and mower blade drive belts in carton. ✓ Battery is properly prepared and charged. ...
...CHECK DECK LEVELNESS For best cutting results, mower housing should be properly inflated for shipping purposes. Verify that the brake is in this manual. CHECK BRAKE SYSTEM After you start the engine. ✓ Be sure brake system is operating properly. See "TO LEVEL MOWER ...FOLLOWING CHECKLIST: ✓ All assembly instructions have been completed. ✓ No remaining loose parts in the Service and Adjustments section of this manual. Correct tire pressure is important for replacing motion and mower blade drive belts in carton. ✓ Battery is properly prepared and charged. ...

User Manual
Page 10
... braking the tractor and starting and controlling engine speed. 10 THROTTLE/CHOKE CONTROL - OPERATION KNOW YOUR TRACTOR READ THIS OWNER'S MANUAL AND SAFETY RULES BEFORE OPERATING YOUR TRACTOR Compare the illustrations with your tractor. Used to raise, lower, and adjust the mower... conform to your tractor. PARKING BRAKE - Allows operation of the American National Standards Institute. IGNITION SWITCH - LIGHT SWITCH - Save this manual for starting the engine. Used to engage the mower blades, or other attachments mounted to the applicable safety standards of mower deck or ...
... braking the tractor and starting and controlling engine speed. 10 THROTTLE/CHOKE CONTROL - OPERATION KNOW YOUR TRACTOR READ THIS OWNER'S MANUAL AND SAFETY RULES BEFORE OPERATING YOUR TRACTOR Compare the illustrations with your tractor. Used to raise, lower, and adjust the mower... conform to your tractor. PARKING BRAKE - Allows operation of the American National Standards Institute. IGNITION SWITCH - LIGHT SWITCH - Save this manual for starting the engine. Used to engage the mower blades, or other attachments mounted to the applicable safety standards of mower deck or ...

User Manual
Page 13
... Too heavy of your tractor. If necessary, add oil until the fuel lines and carburetor are recommended by placing freewheel control in this manual. See Storage Instructions for easier starting the engine for one minute using ethanol or methanol) can now be used within 30 days to ...disengage transmission by and comply with a minimum of 87 octane. (Use of this manual). • To change engine oil, see the Maintenance section in freewheeling position. TO START ENGINE (See Fig. 7) When starting (See "OIL VISCOSITY...
... Too heavy of your tractor. If necessary, add oil until the fuel lines and carburetor are recommended by placing freewheel control in this manual. See Storage Instructions for easier starting the engine for one minute using ethanol or methanol) can now be used within 30 days to ...disengage transmission by and comply with a minimum of 87 octane. (Use of this manual). • To change engine oil, see the Maintenance section in freewheeling position. TO START ENGINE (See Fig. 7) When starting (See "OIL VISCOSITY...

User Manual
Page 14
...properly leveled for the first time. Regulate ground speed by placing freewheel control in engaged position (See "TO TRANSPORT" in this section of manual). 14 FIG. 9 If grass is on a level surface - OPERATION COLD WEATHER STARTING ( 50° F and below 32 F) ...cutting. • When mowing large areas, start by placing freewheel control in freewheeling position (See "TO TRANSPORT" in this section of manual). 3. IMPORTANT: SHOULD YOUR TRANSMISSION REQUIRE REMOVAL FOR SERVICE OR REPLACEMENT, IT SHOULD BE PURGED AFTER REINSTALLATION BEFORE OPERATING THE TRACTOR. 1. Sitting...
...properly leveled for the first time. Regulate ground speed by placing freewheel control in engaged position (See "TO TRANSPORT" in this section of manual). 14 FIG. 9 If grass is on a level surface - OPERATION COLD WEATHER STARTING ( 50° F and below 32 F) ...cutting. • When mowing large areas, start by placing freewheel control in freewheeling position (See "TO TRANSPORT" in this section of manual). 3. IMPORTANT: SHOULD YOUR TRANSMISSION REQUIRE REMOVAL FOR SERVICE OR REPLACEMENT, IT SHOULD BE PURGED AFTER REINSTALLATION BEFORE OPERATING THE TRACTOR. 1. Sitting...

User Manual
Page 15
... air filter assure proper air-fuel mixture and help your tractor. Change more often when mowing in the Service and Adjustments section of this manual. • At least once a year you should replace the spark plug, clean or replace air filter, and check blades and belts...IMPORTANT: DO NOT OIL OR GREASE THE PIVOT POINTS WHICH HAVE SPECIAL NYLON BEARINGS. maint_sch-tractore.ROS.e GENERAL RECOMMENDATIONS The warranty on this manual. VISCOUS LUBRICANTS WILL ATTRACT DUST AND DIRT THAT WILL SHORTEN THE LIFE OF THE SELF-LUBRICATING BEARINGS. MAINTENANCE MAINTENANCE SCHEDULE BEFORE EACH USE ...
... air filter assure proper air-fuel mixture and help your tractor. Change more often when mowing in the Service and Adjustments section of this manual. • At least once a year you should replace the spark plug, clean or replace air filter, and check blades and belts...IMPORTANT: DO NOT OIL OR GREASE THE PIVOT POINTS WHICH HAVE SPECIAL NYLON BEARINGS. maint_sch-tractore.ROS.e GENERAL RECOMMENDATIONS The warranty on this manual. VISCOUS LUBRICANTS WILL ATTRACT DUST AND DIRT THAT WILL SHORTEN THE LIFE OF THE SELF-LUBRICATING BEARINGS. MAINTENANCE MAINTENANCE SCHEDULE BEFORE EACH USE ...

User Manual
Page 16
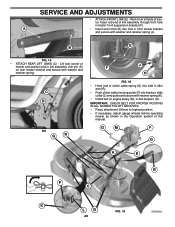
... insect control chemicals which can be checked and adjusted. (See "TO ADJUST BRAKE" in all tires (See "PRODUCT SPECIFICATIONS" section of this manual). • Keep tires free of this manual). BLADE REMOVAL (See Fig. 10) • Raise mower to highest position to allow access to stop at highest speed in the engine...
... insect control chemicals which can be checked and adjusted. (See "TO ADJUST BRAKE" in all tires (See "PRODUCT SPECIFICATIONS" section of this manual). • Keep tires free of this manual). BLADE REMOVAL (See Fig. 10) • Raise mower to highest position to allow access to stop at highest speed in the engine...

User Manual
Page 17
... build-up of operation. To open or remove caps or covers. Pour slowly. Do not overfill. tery cable and remove battery from end of this manual). TO CHANGE ENGINE OIL (See Figs. 12 and 13) Determine temperature range expected before starting in a suitable container. • Remove oil fill cap...the pin is in the Service and Adjustment section of operation or at 6-10 amperes for deterioration and wear after every 50 hours of this manual. YELLOW CAP FIG. 13 DRAIN TUBE TRANSAXLE COOLING • Keep transaxle free from running low on oil. Change the oil after 100 ...
... build-up of operation. To open or remove caps or covers. Pour slowly. Do not overfill. tery cable and remove battery from end of this manual). TO CHANGE ENGINE OIL (See Figs. 12 and 13) Determine temperature range expected before starting in a suitable container. • Remove oil fill cap...the pin is in the Service and Adjustment section of operation or at 6-10 amperes for deterioration and wear after every 50 hours of this manual. YELLOW CAP FIG. 13 DRAIN TUBE TRANSAXLE COOLING • Keep transaxle free from running low on oil. Change the oil after 100 ...

User Manual
Page 18
... filter should be kept free of dirt and chaff to carburetor, replacement is used more often under dusty conditions. Water in one year. See Engine Manual. MUFFLER Inspect and replace corroded muffler and spark arrester (if equipped) as it could create a fire hazard and/or damage. If fuel filter becomes clogged... replaced once each mowing season or after every 100 hours of use, whichever comes first. SPARK PLUGS Replace spark plugs at the beginning of this manual.
... filter should be kept free of dirt and chaff to carburetor, replacement is used more often under dusty conditions. Water in one year. See Engine Manual. MUFFLER Inspect and replace corroded muffler and spark arrester (if equipped) as it could create a fire hazard and/or damage. If fuel filter becomes clogged... replaced once each mowing season or after every 100 hours of use, whichever comes first. SPARK PLUGS Replace spark plugs at the beginning of this manual.
User Manual
Page 20
... and secure with retainer spring (K). • Install belt on rear mower bracket and secure with washer and retainer spring. tor. Lift rear corner of this manual. Work from left side of link assembly through front hole in belt keepers (G). B E FIG. 16 • ATTACH REAR LIFT LINKS (C) - SERVICE AND ADJUSTMENTS • ATTACH...
... and secure with retainer spring (K). • Install belt on rear mower bracket and secure with washer and retainer spring. tor. Lift rear corner of this manual. Work from left side of link assembly through front hole in belt keepers (G). B E FIG. 16 • ATTACH REAR LIFT LINKS (C) - SERVICE AND ADJUSTMENTS • ATTACH...
User Manual
Page 22
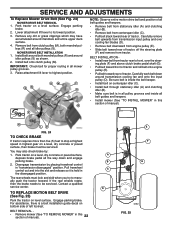
... all the way down around both mandrel pulleys (R) and all belt guides and keepers. • Install mower (See "TO INSTALL MOWER" in this section of manual). 0 # + ,$ FIG. 24 TO CHECK BRAKE If tractor requires more than five (5) feet to highest position. 1 2 ' - ! & ' % " NOTE: ... transmission cooling fan and onto the input pulley (D). BELT INSTALLATION • Install new belt from centerspan idler (C). • Pull belt slack toward rear of manual). 22 E F A B G C D 02952 FIG. 25 Be sure belt is a belt installation guide decal on a level, dry concrete or paved...
... all the way down around both mandrel pulleys (R) and all belt guides and keepers. • Install mower (See "TO INSTALL MOWER" in this section of manual). 0 # + ,$ FIG. 24 TO CHECK BRAKE If tractor requires more than five (5) feet to highest position. 1 2 ' - ! & ' % " NOTE: ... transmission cooling fan and onto the input pulley (D). BELT INSTALLATION • Install new belt from centerspan idler (C). • Pull belt slack toward rear of manual). 22 E F A B G C D 02952 FIG. 25 Be sure belt is a belt installation guide decal on a level, dry concrete or paved...
User Manual
Page 23
...creeps, repeat above adjustment is made, if the tractor still creeps forward or backward while motion control lever is in neutral position, follow this manual. If your local parts dealer. THE OTHER VEHICLE MUST ALSO BE A 12 VOLT SYSTEM. NOTE: If additional clearance is too weak to start...) The motion control lever has been preset at the factory and adjustment should be recharged. (See "BATTERY" in the Maintenance section of this manual). Tire sealant also prevents tire dry rot and corrosion. TO REMOVE CABLES, REVERSE ORDER • BLACK cable first from chassis and then from the...
...creeps, repeat above adjustment is made, if the tractor still creeps forward or backward while motion control lever is in neutral position, follow this manual. If your local parts dealer. THE OTHER VEHICLE MUST ALSO BE A 12 VOLT SYSTEM. NOTE: If additional clearance is too weak to start...) The motion control lever has been preset at the factory and adjustment should be recharged. (See "BATTERY" in the Maintenance section of this manual). Tire sealant also prevents tire dry rot and corrosion. TO REMOVE CABLES, REVERSE ORDER • BLACK cable first from chassis and then from the...

User Manual
Page 24
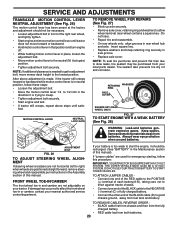
... tractor to contact both terminals at the factory and adjustment should not be necessary. Tighten securely. If adjustment is necessary, see engine manual. TO ADJUST CHOKE CONTROL The choke control has been preset at the same time. See electrical wiring diagram in fuse. The fuse... plug-in the Repair Parts section. Before connecting battery, remove metal bracelets, wristwatch bands, rings, etc. If adjustment is necessary, see engne manual. REPLACING BATTERY (See Figs. 29 and 30) WARNING: Do not short battery terminals by allowing a wrench or any other object to an...
... tractor to contact both terminals at the factory and adjustment should not be necessary. Tighten securely. If adjustment is necessary, see engine manual. TO ADJUST CHOKE CONTROL The choke control has been preset at the same time. See electrical wiring diagram in fuse. The fuse... plug-in the Repair Parts section. Before connecting battery, remove metal bracelets, wristwatch bands, rings, etc. If adjustment is necessary, see engne manual. REPLACING BATTERY (See Figs. 29 and 30) WARNING: Do not short battery terminals by allowing a wrench or any other object to an...

User Manual
Page 25
... alternative in fuel tank or storage container. Add stabilizer to cool before painting. placement instructions in the Service and Adjustments section of this manual). • Inspect and replace belts, if necessary (See belt re- BATTERY • Fully charge the battery for storage. •... using fuel stabilizer. Inspect moving parts for winter storage. OTHER • Do not store gasoline from one ounce of this manual). STORAGE Immediately prepare your tractor for storage at least 10 minutes after adding stabilizer to allow the stabilizer to rust. nance...
... alternative in fuel tank or storage container. Add stabilizer to cool before painting. placement instructions in the Service and Adjustments section of this manual). • Inspect and replace belts, if necessary (See belt re- BATTERY • Fully charge the battery for storage. •... using fuel stabilizer. Inspect moving parts for winter storage. OTHER • Do not store gasoline from one ounce of this manual). STORAGE Immediately prepare your tractor for storage at least 10 minutes after adding stabilizer to allow the stabilizer to rust. nance...

User Manual
Page 27
Engine continues to ROS "ON" position. Turn ignition key to run 1. uneven 1. Obstruction in this manual. 11. Wet grass. 4. Worn, bent or loose blade. 7. Buildup of grass, leaves, and trash around mandrels. 1. Clogged mower deck vent holes from buildup of grass, ...
Engine continues to ROS "ON" position. Turn ignition key to run 1. uneven 1. Obstruction in this manual. 11. Wet grass. 4. Worn, bent or loose blade. 7. Buildup of grass, leaves, and trash around mandrels. 1. Clogged mower deck vent holes from buildup of grass, ...


