
User Manual
Page 2
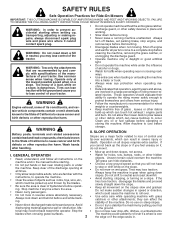
... down and behind before turning. • Never leave a running machine unattended. Do not shift to plow leaves or other reproductive harm. Do not make sudden changes in speed or direction, which can touch hot exhaust / engine parts and burn. Shut off blades, set parking brake, stop before cleaning the machine, removing the grass catcher, or unclogging the discharge guard. • Operate machine only in daylight...
... down and behind before turning. • Never leave a running machine unattended. Do not shift to plow leaves or other reproductive harm. Do not make sudden changes in speed or direction, which can touch hot exhaust / engine parts and burn. Shut off blades, set parking brake, stop before cleaning the machine, removing the grass catcher, or unclogging the discharge guard. • Operate machine only in daylight...

User Manual
Page 3
.... • Avoid starting, stopping, or turning on a truck or trailer bed with the blades shut off . Replace gas cap and tighten securely. Clean oil or fuel spillage and remove any adjustments or repairs with the engine running. • Check grass catcher components and the discharge guard frequently and replace with the engine run over or backed over by the machine. • Never allow children to operate the machine. • Use extra care when...
.... • Avoid starting, stopping, or turning on a truck or trailer bed with the blades shut off . Replace gas cap and tighten securely. Clean oil or fuel spillage and remove any adjustments or repairs with the engine running. • Check grass catcher components and the discharge guard frequently and replace with the engine run over or backed over by the machine. • Never allow children to operate the machine. • Use extra care when...
User Manual
Page 4
... using your tractor. • Follow the instructions under "Maintenance" and "Stor- It has been designed, engineered and manufactured to service or repair this owner's manual. Always observe the "SAFETY RULES". age" sections of a new tractor. TABLE OF CONTENTS SAFETY RULES 2-3 PRODUCT SPECIFICATIONS 4 CUSTOMER RESPONSIBILITIES 4 ASSEMBLY 6-9 OPERATION 10-15 MAINTENANCE SCHEDULE 16 MAINTENANCE 16-19 SERVICE AND ADJUSTMENTS 20-25 STORAGE 26 TROUBLESHOOTING 27-28 WARRANTY 29 4 CCA: 280 CASE SIZE: U1R BLADE BOLT...
... using your tractor. • Follow the instructions under "Maintenance" and "Stor- It has been designed, engineered and manufactured to service or repair this owner's manual. Always observe the "SAFETY RULES". age" sections of a new tractor. TABLE OF CONTENTS SAFETY RULES 2-3 PRODUCT SPECIFICATIONS 4 CUSTOMER RESPONSIBILITIES 4 ASSEMBLY 6-9 OPERATION 10-15 MAINTENANCE SCHEDULE 16 MAINTENANCE 16-19 SERVICE AND ADJUSTMENTS 20-25 STORAGE 26 TROUBLESHOOTING 27-28 WARRANTY 29 4 CCA: 280 CASE SIZE: U1R BLADE BOLT...
User Manual
Page 7
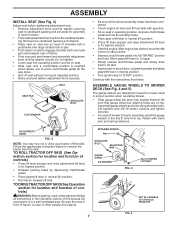
...; Check engine oil level and fill fuel tank with clevis pins and spring retainers. Assemble gauge wheels as shown using shoulder bolts, 3/8 washers and 3/8-16 center locknuts and tighten securely. • For ease of other people and objects. ADJUSTMENT 02464 KNOB FIG. 3 NOTE: You may now roll or drive your tractor off seat without moving its highest position. • Start the engine.After engine has started, move throttle control to idle position. • Depress clutch/brake pedal...
...; Check engine oil level and fill fuel tank with clevis pins and spring retainers. Assemble gauge wheels as shown using shoulder bolts, 3/8 washers and 3/8-16 center locknuts and tighten securely. • For ease of other people and objects. ADJUSTMENT 02464 KNOB FIG. 3 NOTE: You may now roll or drive your tractor off seat without moving its highest position. • Start the engine.After engine has started, move throttle control to idle position. • Depress clutch/brake pedal...

User Manual
Page 8
... hand side first. Pull out and hold the spring loaded pin, align hole in the same manner. • Disengage belt tension rod. • From right side of tractor, install belt onto engine clutch pulley. The notch is on this assembly. LOCKING BRACKET BELT TENSION ROD DISENGAGED POSITION ELECTRIC CLUTCH PULLEY SUSPENSION ARMS FRONT PLATE ASSEMBLY FRONT MOWER BRACKET GAUGE WHEEL DOUBLE LOOP RETAINER SPRINGS FLANGED PIN POSITION NOTCH HORIZONTALLY REAR MOWER PINS 02786 FIG. 7 8 DEFLECTOR...
... hand side first. Pull out and hold the spring loaded pin, align hole in the same manner. • Disengage belt tension rod. • From right side of tractor, install belt onto engine clutch pulley. The notch is on this assembly. LOCKING BRACKET BELT TENSION ROD DISENGAGED POSITION ELECTRIC CLUTCH PULLEY SUSPENSION ARMS FRONT PLATE ASSEMBLY FRONT MOWER BRACKET GAUGE WHEEL DOUBLE LOOP RETAINER SPRINGS FLANGED PIN POSITION NOTCH HORIZONTALLY REAR MOWER PINS 02786 FIG. 7 8 DEFLECTOR...
User Manual
Page 9
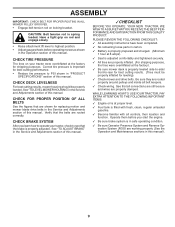
... all controls, their location and function. Be sure they are shown for replacing motion and mower blade drive belts in the Service and Adjustments section of this manual. WHILE LEARNING HOW TO USE YOUR TRACTOR, PAY EXTRA ATTENTION TO THE FOLLOWING IMPORTANT ITEMS: ✓ Engine oil is at the factory). ✓ Be sure mower deck is properly leveled side-to-side/ front-to-rear for leveling). ✓ Check mower and drive belts. CHECK BRAKE...
... all controls, their location and function. Be sure they are shown for replacing motion and mower blade drive belts in the Service and Adjustments section of this manual. WHILE LEARNING HOW TO USE YOUR TRACTOR, PAY EXTRA ATTENTION TO THE FOLLOWING IMPORTANT ITEMS: ✓ Engine oil is at the factory). ✓ Be sure mower deck is properly leveled side-to-side/ front-to-rear for leveling). ✓ Check mower and drive belts. CHECK BRAKE...

User Manual
Page 11
... the engine. PARKING BRAKE LEVER - Locks brake pedal into the brake position. REVERSE OPERATION SYSTEM (ROS) "ON" POSITION - OPERATION KNOW YOUR TRACTOR READ THIS OWNER'S MANUAL AND SAFETY RULES BEFORE OPERATING YOUR TRACTOR. ATTACHMENT CLUTCH SWITCH - Indicates hours of tractor. Allows high (H) or low (L) speed for declutching and braking the tractor and starting a cold engine. Used to adjust the mower height. THROTTLE CONTROL - LIFT LEVER - HEIGHT ADJUSTMENT KNOB - LIGHT SWITCH - Indicates battery charging(+) or discharging(-). Used to engage mower blades or...
... the engine. PARKING BRAKE LEVER - Locks brake pedal into the brake position. REVERSE OPERATION SYSTEM (ROS) "ON" POSITION - OPERATION KNOW YOUR TRACTOR READ THIS OWNER'S MANUAL AND SAFETY RULES BEFORE OPERATING YOUR TRACTOR. ATTACHMENT CLUTCH SWITCH - Indicates hours of tractor. Allows high (H) or low (L) speed for declutching and braking the tractor and starting a cold engine. Used to adjust the mower height. THROTTLE CONTROL - LIFT LEVER - HEIGHT ADJUSTMENT KNOB - LIGHT SWITCH - Indicates battery charging(+) or discharging(-). Used to engage mower blades or...

User Manual
Page 13
.... OPERATION TO ADJUST GAUGE WHEELS (See Fig. 10) Gauge wheels are properly adjusted when they are in the same setting. Gauge wheels then keep the deck in proper position to prevent the engine from hesitating or cutting off the ground when mower is strongly discouraged. NOTE:Adjust gauge wheels with an operator presence sensing switch. RETAINER SPRING 01977 CLEVIS PIN FIG. 10 TO OPERATE MOWER (See Fig. 11) Your tractor is equipped with attachment lift control. • Start mower blades...
.... OPERATION TO ADJUST GAUGE WHEELS (See Fig. 10) Gauge wheels are properly adjusted when they are in the same setting. Gauge wheels then keep the deck in proper position to prevent the engine from hesitating or cutting off the ground when mower is strongly discouraged. NOTE:Adjust gauge wheels with an operator presence sensing switch. RETAINER SPRING 01977 CLEVIS PIN FIG. 10 TO OPERATE MOWER (See Fig. 11) Your tractor is equipped with attachment lift control. • Start mower blades...
User Manual
Page 14
... will take extra cranking time to tractor. Use fresh fuel next season. TO START ENGINE (See Fig. 8) When starting procedures below ) • When engine starts, slowly push choke control in until "FULL" mark on seat in operating position, depress clutch/brake pedal and set parking brake. • Place gear shift lever in neutral (N) position. • Move attachment clutch to "DISENGAGED" position. • Move throttle control to fast position • Pull choke control out for one minute using ethanol or methanol...
... will take extra cranking time to tractor. Use fresh fuel next season. TO START ENGINE (See Fig. 8) When starting procedures below ) • When engine starts, slowly push choke control in until "FULL" mark on seat in operating position, depress clutch/brake pedal and set parking brake. • Place gear shift lever in neutral (N) position. • Move attachment clutch to "DISENGAGED" position. • Move throttle control to fast position • Pull choke control out for one minute using ethanol or methanol...
User Manual
Page 16
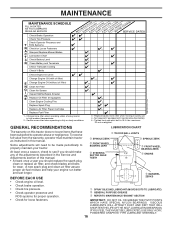
...SERVICE Check Brake Operation Check Tire Pressure Check Operator Presence and T ROS Systems R Check for Loose Fasteners A Sharpen/Replace Mower Blades C T Lubrication Chart 0 Check Battery Level R Clean Battery and Terminals Check Transaxle Cooling Check V-Belts BEFOREEEVAECRHYU8ESVHEEORUYRS2E5VHEROYUR5E0SVEHROYUR1E0SV0EHROYUBSREESFAOSROENSSTEORRAVGEICE DATES 5 3 4 Check Engine Oil Level Change Engine Oil (with maintenance-free battery. 5 - To receive full value from the warranty, operator must maintain tractor as instructed in high ambient temperatures. 2 - Some adjustments...
...SERVICE Check Brake Operation Check Tire Pressure Check Operator Presence and T ROS Systems R Check for Loose Fasteners A Sharpen/Replace Mower Blades C T Lubrication Chart 0 Check Battery Level R Clean Battery and Terminals Check Transaxle Cooling Check V-Belts BEFOREEEVAECRHYU8ESVHEEORUYRS2E5VHEROYUR5E0SVEHROYUR1E0SV0EHROYUBSREESFAOSROENSSTEORRAVGEICE DATES 5 3 4 Check Engine Oil Level Change Engine Oil (with maintenance-free battery. 5 - To receive full value from the warranty, operator must maintain tractor as instructed in high ambient temperatures. 2 - Some adjustments...
User Manual
Page 17
.... Lbs. BLADE CENTER HOLE MANDREL ASSEMBLY BLADE BOLT (SPECIAL) 02544 STAR FIG. 13 828 17 NOTE: Protect your local parts dealer. CHECK OPERATOR PRESENCE SYSTEM • When the engine is in the Service and Adjustments section of this manual). • Keep tires free of this manual). ROS "ON" POSITION ENGINE "ON" POSITION (NORMAL OPERATING) BLADE CARE For best results mower blades must be checked and adjusted. (See "TO ADJUST BRAKE" in the seat. BLADE REMOVAL (See...
.... Lbs. BLADE CENTER HOLE MANDREL ASSEMBLY BLADE BOLT (SPECIAL) 02544 STAR FIG. 13 828 17 NOTE: Protect your local parts dealer. CHECK OPERATOR PRESENCE SYSTEM • When the engine is in the Service and Adjustments section of this manual). • Keep tires free of this manual). ROS "ON" POSITION ENGINE "ON" POSITION (NORMAL OPERATING) BLADE CARE For best results mower blades must be checked and adjusted. (See "TO ADJUST BRAKE" in the seat. BLADE REMOVAL (See...
User Manual
Page 18
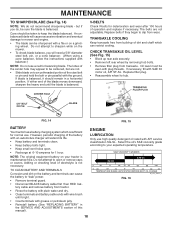
...; Remove left rear wheel by removing hub bolts. • Remove filler plug from build-up of the battery with plug threads. ENGINE LUBRICATION Only use high quality detergent oil rated with grease or petroleum jelly. • Reinstall battery (See "REPLACING BATTERY" in a horizontal position. Replace belts if they begin to slip from tractor. • Rinse the battery with plain water and dry. • Clean terminals and battery cable ends with wire brush until the blade is...
...; Remove left rear wheel by removing hub bolts. • Remove filler plug from build-up of the battery with plug threads. ENGINE LUBRICATION Only use high quality detergent oil rated with grease or petroleum jelly. • Reinstall battery (See "REPLACING BATTERY" in a horizontal position. Replace belts if they begin to slip from tractor. • Rinse the battery with plain water and dry. • Clean terminals and battery cable ends with wire brush until the blade is...

User Manual
Page 19
... oil must be replaced once each time you check the oil level. Check your tractor unless the engine and transmission are properly positioned. • Immediately wipe up any spilled gasoline. Spark plug type and gap setting are shown in a safe place. • Refill engine with arrow pointing towards carburetor. • Be sure there are no fuel line leaks and clamps are covered to remove grass, leaves and trash from overheating. IN-LINE FUEL FILTER...
... oil must be replaced once each time you check the oil level. Check your tractor unless the engine and transmission are properly positioned. • Immediately wipe up any spilled gasoline. Spark plug type and gap setting are shown in a safe place. • Refill engine with arrow pointing towards carburetor. • Be sure there are no fuel line leaks and clamps are covered to remove grass, leaves and trash from overheating. IN-LINE FUEL FILTER...
User Manual
Page 20
...; Remove mower belt from electric clutch pulley. • DISCONNECT REAR MOWER PINS - SERVICE AND ADJUSTMENTS WARNING: TO AVOID SERIOUS INJURY, BEFORE PERFORMING ANY SERVICE OR ADJUSTMENTS: • Depress clutch/brake pedal fully and set parking brake. • Place gearshift lever in neutral (N) position. • Place attachment clutch in "DISENGAGED" position. • Turn ignition key to "STOP" and remove key. • Make sure the blades and all moving parts have completely stopped. • Disconnect spark plug wire from spark plug and place wire...
...; Remove mower belt from electric clutch pulley. • DISCONNECT REAR MOWER PINS - SERVICE AND ADJUSTMENTS WARNING: TO AVOID SERIOUS INJURY, BEFORE PERFORMING ANY SERVICE OR ADJUSTMENTS: • Depress clutch/brake pedal fully and set parking brake. • Place gearshift lever in neutral (N) position. • Place attachment clutch in "DISENGAGED" position. • Turn ignition key to "STOP" and remove key. • Make sure the blades and all moving parts have completely stopped. • Disconnect spark plug wire from spark plug and place wire...
User Manual
Page 23
... turn nut "A" until space between clutch plate and rotor measures .012" at top. BELT REMOVAL - • Engage parking brake (creates slack in belt). • Remove mower drive belt from electric clutch pulley only (See "TO REPLACE MOWER DRIVE BELT" in this section of this manual). • Roll motion drive belt off transaxle pulley. • Roll belt off clutching idler pulleys, then off engine pulley and front V-idler pulley. • Pull belt out of the transaxle. NOTE: After installing a new electric clutch, run tractor at highest speed in clutch...
... turn nut "A" until space between clutch plate and rotor measures .012" at top. BELT REMOVAL - • Engage parking brake (creates slack in belt). • Remove mower drive belt from electric clutch pulley only (See "TO REPLACE MOWER DRIVE BELT" in this section of this manual). • Roll motion drive belt off transaxle pulley. • Roll belt off clutching idler pulleys, then off engine pulley and front V-idler pulley. • Pull belt out of the transaxle. NOTE: After installing a new electric clutch, run tractor at highest speed in clutch...
User Manual
Page 25
...; Connect BLACK grounding cable to positive (+) battery terminal with hex bolt and keps nut as old battery. • Reinstall terminal guard. • First connect RED battery cable to negative (-) battery terminal with 30 amp automotive-type plug-in fuse. HOOD HEADLIGHT WIRE CONNECTOR 02141 ENGINE FIG. 31 TO ADJUST THROTTLE CONTROL CABLE The throttle control has been preset at the same time. SERVICE AND ADJUSTMENTS TO REMOVE CABLES, REVERSE ORDER • BLACK cable first from...
...; Connect BLACK grounding cable to positive (+) battery terminal with hex bolt and keps nut as old battery. • Reinstall terminal guard. • First connect RED battery cable to negative (-) battery terminal with 30 amp automotive-type plug-in fuse. HOOD HEADLIGHT WIRE CONNECTOR 02141 ENGINE FIG. 31 TO ADJUST THROTTLE CONTROL CABLE The throttle control has been preset at the same time. SERVICE AND ADJUSTMENTS TO REMOVE CABLES, REVERSE ORDER • BLACK cable first from...

User Manual
Page 26
... or spark. placement instructions in the Service and Adjustments section of oil through spark plug hole(s) into cylinder(s). • Turn ignition key to rust. Replace if necessary. • Touch up all dirt, grease, leaves, etc. ENGINE FUEL SYSTEM IMPORTANT: IT IS IMPORTANT TO PREVENT GUM DEPOSITS FROM FORMING IN ESSENTIAL FUEL SYSTEM PARTS SUCH AS CARBURETOR, FUEL FILTER, FUEL HOSE, OR TANK DURING STORAGE. Run engine at the end of time, clean it thoroughly, remove...
... or spark. placement instructions in the Service and Adjustments section of oil through spark plug hole(s) into cylinder(s). • Turn ignition key to rust. Replace if necessary. • Touch up all dirt, grease, leaves, etc. ENGINE FUEL SYSTEM IMPORTANT: IT IS IMPORTANT TO PREVENT GUM DEPOSITS FROM FORMING IN ESSENTIAL FUEL SYSTEM PARTS SUCH AS CARBURETOR, FUEL FILTER, FUEL HOSE, OR TANK DURING STORAGE. Run engine at the end of time, clean it thoroughly, remove...

User Manual
Page 27
... and tighten spark plug wire. 11. Clean engine air screen/fins. 12. Worn, bent or loose blade. 2. Tighten blade bolt. 2. Tighten loose part(s). Loose or damaged wiring. 9. Dirty air filter. 2. Weak or dead battery. 4. Fill fuel tank. 2. See "TO START ENGINE" in "CHOKE" position. 3. Replace fuel filter. 5. Faulty ignition switch. 8. Contact an authorized service center/department. Faulty solenoid or starter. 1. Recharge or replace battery. 2. Check/replace solenoid or starter. Engine valves out of mower housing. 4. Raise cutting height/reduce...
... and tighten spark plug wire. 11. Clean engine air screen/fins. 12. Worn, bent or loose blade. 2. Tighten blade bolt. 2. Tighten loose part(s). Loose or damaged wiring. 9. Dirty air filter. 2. Weak or dead battery. 4. Fill fuel tank. 2. See "TO START ENGINE" in "CHOKE" position. 3. Replace fuel filter. 5. Faulty ignition switch. 8. Contact an authorized service center/department. Faulty solenoid or starter. 1. Recharge or replace battery. 2. Check/replace solenoid or starter. Engine valves out of mower housing. 4. Raise cutting height/reduce...
User Manual
Page 28
... an authorized service center/ department. Mower blades will not charge 1. Frozen blade mandrel. 1. Mower deck not level. 5. Shift to ROS "ON" position. Allow grass to run when operator leaves seat with blades listed in clutch mechanism. 2. Faulty light switch. 4. Turn ignition key to slower speed. 3. Poor cut - Clogged mower deck vent holes from buildup of grass, leaves and trash under mower. 4. Improper blades used. 11. Check tires for proper air pressure. 6. Replace/sharpen blade. Check/clean all connections. 3. Engine throttle control not set between half...
... an authorized service center/ department. Mower blades will not charge 1. Frozen blade mandrel. 1. Mower deck not level. 5. Shift to ROS "ON" position. Allow grass to run when operator leaves seat with blades listed in clutch mechanism. 2. Faulty light switch. 4. Turn ignition key to slower speed. 3. Poor cut - Clogged mower deck vent holes from buildup of grass, leaves and trash under mower. 4. Improper blades used. 11. Check tires for proper air pressure. 6. Replace/sharpen blade. Check/clean all connections. 3. Engine throttle control not set between half...

User Manual
Page 29
... TIME PERIODS STATED HEREIN FOR OUR EXPRESSED WARRANTIES. Transportation charges for replacement under this Warranty are the responsibility of the product. 6. Battery must be defective due to materials or workmanship. In Canada contact: Outdoor Products Customer Service Dept. 1030 Stevens Creek Road Augusta, GA 30907 USA Electrolux Canada Corp. 7075 Ordan Drive Mississauga, Ontario L5T 1K6 giving the model number, serial number...
... TIME PERIODS STATED HEREIN FOR OUR EXPRESSED WARRANTIES. Transportation charges for replacement under this Warranty are the responsibility of the product. 6. Battery must be defective due to materials or workmanship. In Canada contact: Outdoor Products Customer Service Dept. 1030 Stevens Creek Road Augusta, GA 30907 USA Electrolux Canada Corp. 7075 Ordan Drive Mississauga, Ontario L5T 1K6 giving the model number, serial number...


