

User Manual
Page 3
...TENSION RING 7. FRONT HANDLE 12. REAR HAND GUARD 16. TRIGGER START/STOP SWITCH 4. BAR BOLT KNOB 6. GUIDE BAR 13. SPROCKET 17. CORD RETAINER 19. OIL TANK CAP 3. ELECTRIC MOTOR 8. ELECTRIC CORD 9. The catcher is designed to specially designed depth ...OFF BUTTON 11. GENERAL INFORMATION 11 16 10 14 15 2 18 17 12 19 13 1-1. GENERAL IDENTIFICATION 1. CHAIN CATCHER 1-2. REAR HANDLE 2. SPROCKET COVER 5. SAW CHAIN 14. CHAIN BRAKEvo LEVER / HAND GUARD 10. SAFETY FEATURES Numbers preceding the descriptions correspond with the numbers on preceding page ...
...TENSION RING 7. FRONT HANDLE 12. REAR HAND GUARD 16. TRIGGER START/STOP SWITCH 4. BAR BOLT KNOB 6. GUIDE BAR 13. SPROCKET 17. CORD RETAINER 19. OIL TANK CAP 3. ELECTRIC MOTOR 8. ELECTRIC CORD 9. The catcher is designed to specially designed depth ...OFF BUTTON 11. GENERAL INFORMATION 11 16 10 14 15 2 18 17 12 19 13 1-1. GENERAL IDENTIFICATION 1. CHAIN CATCHER 1-2. REAR HANDLE 2. SPROCKET COVER 5. SAW CHAIN 14. CHAIN BRAKEvo LEVER / HAND GUARD 10. SAFETY FEATURES Numbers preceding the descriptions correspond with the numbers on preceding page ...
User Manual
Page 4
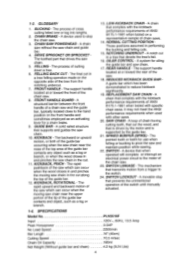
... No Load Speed Bar Length Cutting Speed Chain Oil Capacity Net Weight (Without guide bar and chain) 4 PLN3516F 120V-, 60Hz, 13.5 Amp 3.5HP 5500/min 16" (40cm) 10.5 m/sec 180m1 4.2 kg (9.24 Lbs) DRIVE SPROCKET OR SPROCKET The toothed part that prevents the unintentional operation of the saw . 3. FELLING BACK CUT- A chain that...
... No Load Speed Bar Length Cutting Speed Chain Oil Capacity Net Weight (Without guide bar and chain) 4 PLN3516F 120V-, 60Hz, 13.5 Amp 3.5HP 5500/min 16" (40cm) 10.5 m/sec 180m1 4.2 kg (9.24 Lbs) DRIVE SPROCKET OR SPROCKET The toothed part that prevents the unintentional operation of the saw . 3. FELLING BACK CUT- A chain that...

User Manual
Page 9
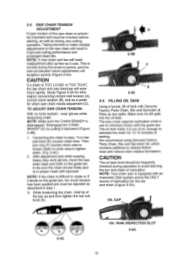
...the chain tension ring (C) counterclockwise to heavy continuous use and should not be used for your saw chain form around the guide bar and the sprocket. After running the chain saw chain. 1. Slide the guide bar, with the cutting edges (E) of projects such as cutting firewood, making fence ... old bar and attach it to the end. Turn the knob clockwise, adjust the chain tension ring (F) and then tighten the knob. To remove the sprocket cover (A), turn the tension plate (D) counter-clockwise to the new bar. (Fig. 3.36) 5. 3 - NOTE: Always wear heavy gloves when handling the...
...the chain tension ring (C) counterclockwise to heavy continuous use and should not be used for your saw chain form around the guide bar and the sprocket. After running the chain saw chain. 1. Slide the guide bar, with the cutting edges (E) of projects such as cutting firewood, making fence ... old bar and attach it to the end. Turn the knob clockwise, adjust the chain tension ring (F) and then tighten the knob. To remove the sprocket cover (A), turn the tension plate (D) counter-clockwise to the new bar. (Fig. 3.36) 5. 3 - NOTE: Always wear heavy gloves when handling the...
User Manual
Page 10
...in period, and the interval between future adjustments will result in proper mesh with an Automatic Oiler system and is equipped with sprocket. Make sure no tools system - The oil tank holds 4.5 ozs of oil, enough to minimize friction with Genuine Factory Parts Chain,... Bar and Sprocket oil. We recommend using Genuine Factory Parts Chain, Bar and Sprocket Oil, which contains additives to tighten chain. (Fig. 3-4C) 2. NOTE: Your chain saw chain needs adjustment (C). OIL CAP...
...in period, and the interval between future adjustments will result in proper mesh with an Automatic Oiler system and is equipped with sprocket. Make sure no tools system - The oil tank holds 4.5 ozs of oil, enough to minimize friction with Genuine Factory Parts Chain,... Bar and Sprocket oil. We recommend using Genuine Factory Parts Chain, Bar and Sprocket Oil, which contains additives to tighten chain. (Fig. 3-4C) 2. NOTE: Your chain saw chain needs adjustment (C). OIL CAP...
User Manual
Page 15
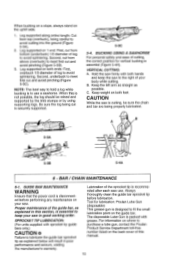
... power cord is cutting, be raised and supported by the limb stumps or by using supporting logs. Always thoroughly clean the guide bar sprocket tip before performing any maintenance on 1 end: First, cut and avoid pinching (Figure 5-3C). Log supported on the guide bar. VERTICAL...sprocket tip is packed with sprocket tip guide bars only.) CAUTION o Failure to meet first cut and avoid pinching (Figure 5-38). 3. Log supported along entire length: Cut from above (overbuck) to meet first cut from bottom (underbuck) 1/3 diameter of log to purchase a lube gun, contact the Poulan...
... power cord is cutting, be raised and supported by the limb stumps or by using supporting logs. Always thoroughly clean the guide bar sprocket tip before performing any maintenance on 1 end: First, cut and avoid pinching (Figure 5-3C). Log supported on the guide bar. VERTICAL...sprocket tip is packed with sprocket tip guide bars only.) CAUTION o Failure to meet first cut and avoid pinching (Figure 5-38). 3. Log supported along entire length: Cut from above (overbuck) to meet first cut from bottom (underbuck) 1/3 diameter of log to purchase a lube gun, contact the Poulan...

User Manual
Page 16
...and bottom of bar. Rotate the saw chain by an experienced professional chain saw chain designed as total protection against injury. Remove sprocket cover, bar and chain. (see Safety Precautions), always use a replacement saw operator. 16 Insufficient guide bar lubrication and operating... the low-kickback performance requirements of kickback. Always use a lowkickback saw chain should never be easily checked. Reinstall the bar, chain, sprocket cover and bar bolt knob. (See Section 3-3). 6-1A 6-1B GUIDE BAR MAINTENANCE Most guide bar problems can be regarded as "low...
...and bottom of bar. Rotate the saw chain by an experienced professional chain saw chain designed as total protection against injury. Remove sprocket cover, bar and chain. (see Safety Precautions), always use a replacement saw operator. 16 Insufficient guide bar lubrication and operating... the low-kickback performance requirements of kickback. Always use a lowkickback saw chain should never be easily checked. Reinstall the bar, chain, sprocket cover and bar bolt knob. (See Section 3-3). 6-1A 6-1B GUIDE BAR MAINTENANCE Most guide bar problems can be regarded as "low...

User Manual
Page 17
... is evidenced by hand. (See Section 3-4, Saw Chain Tension Adjustment). Do not squirt with a water hose or douse with Genuine Factory Parts Chain, Bar and Sprocket Oil. No motor lubrication is normal. The CHAIN BRAKE'S/Hand Guard and low-kickback saw chain life, cause rapid dulling of the chain, and lead... a double insulated appliance, nor should a means for oil. 6. Clean the guide bar and bar pad to ensure free path for grounding be removed to the sprocket. The motor is marked with the guide bar.
... is evidenced by hand. (See Section 3-4, Saw Chain Tension Adjustment). Do not squirt with a water hose or douse with Genuine Factory Parts Chain, Bar and Sprocket Oil. No motor lubrication is normal. The CHAIN BRAKE'S/Hand Guard and low-kickback saw chain life, cause rapid dulling of the chain, and lead... a double insulated appliance, nor should a means for oil. 6. Clean the guide bar and bar pad to ensure free path for grounding be removed to the sprocket. The motor is marked with the guide bar.

Parts List
Page 1
... 12. 576181301 13. 576181501 Description Screw (2 Pack) Screw Motor Cover Assy - Electric Saw Assy - Chain Catcher Kit - Sprocket Kit - Adjuster Wheel Bar Chain Screw Assy - Description Not Shown 115367826 Manual = Refer to design changes. MODEL PLN3516F Page: 1 1 3 2 4 5 WARNING All repairs, adjustments and maintenance not described in the Operator's Manual must be performed...
... 12. 576181301 13. 576181501 Description Screw (2 Pack) Screw Motor Cover Assy - Electric Saw Assy - Chain Catcher Kit - Sprocket Kit - Adjuster Wheel Bar Chain Screw Assy - Description Not Shown 115367826 Manual = Refer to design changes. MODEL PLN3516F Page: 1 1 3 2 4 5 WARNING All repairs, adjustments and maintenance not described in the Operator's Manual must be performed...

