

User Manual
Page 2
... 4-1. Assembly Requirements 3-3. To Stop Saw 4-3. Chain and Bar Lubrication 4-4. Felling 5-2. Limbing 5-3. Bucking Using a Sawhorse 6 BAR / CHAIN MAINTENANCE 15 6-1. INTRODUCTION TABLE OF CONTENTS 1 GENERAL INFORMATION 3 1-1. Specificatioin 2 SAFETY PRECAUTIONS 5 2-1. To Start Saw 4-2. Safety Features 1-3 Glossary 1-4. Selecting the Proper Extension Cord for chain saw users 2-5. Kickback Safety Labels 2-2. Filling Oil Tank 3-6. Chain Maintenance Instructions 7 BAR / CHAIN MAINTENANCE 17 7-1. Important Safety Instructions...
... 4-1. Assembly Requirements 3-3. To Stop Saw 4-3. Chain and Bar Lubrication 4-4. Felling 5-2. Limbing 5-3. Bucking Using a Sawhorse 6 BAR / CHAIN MAINTENANCE 15 6-1. INTRODUCTION TABLE OF CONTENTS 1 GENERAL INFORMATION 3 1-1. Specificatioin 2 SAFETY PRECAUTIONS 5 2-1. To Start Saw 4-2. Safety Features 1-3 Glossary 1-4. Selecting the Proper Extension Cord for chain saw users 2-5. Kickback Safety Labels 2-2. Filling Oil Tank 3-6. Chain Maintenance Instructions 7 BAR / CHAIN MAINTENANCE 17 7-1. Important Safety Instructions...

User Manual
Page 3
... INFORMATION 11 16 10 14 15 2 18 17 12 19 13 1-1. OIL TANK CAP 3. FRONT HANDLE 12. GUIDE BAR 13. SAW CHAIN 14. SPROCKET 17. CORD RETAINER 19. SAFETY FEATURES Numbers preceding the descriptions correspond with the numbers on preceding page to help you locate the ...safety feature. 3 TRIGGER START / STOP SWITCH stops saw motor when released. 7 ELECTRIC MOTOR is double insulated for added safety. 9 CHAIN BRAKE LEVER / HAND GUARD activates the chain brake and protects the operator's left hand in the event it slips off the front handle while...
... INFORMATION 11 16 10 14 15 2 18 17 12 19 13 1-1. OIL TANK CAP 3. FRONT HANDLE 12. GUIDE BAR 13. SAW CHAIN 14. SPROCKET 17. CORD RETAINER 19. SAFETY FEATURES Numbers preceding the descriptions correspond with the numbers on preceding page to help you locate the ...safety feature. 3 TRIGGER START / STOP SWITCH stops saw motor when released. 7 ELECTRIC MOTOR is double insulated for added safety. 9 CHAIN BRAKE LEVER / HAND GUARD activates the chain brake and protects the operator's left hand in the event it slips off the front handle while...
User Manual
Page 4
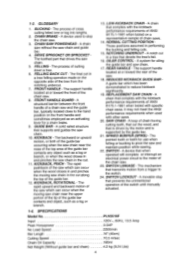
...guide bar which can occur when the wood closes in and pinches the moving saw chain near the nose of the top area of a chain saw . 8. SAW CHAIN - SPECIFICATIONS Model No. 1-3. The process of cutting down a tree. 6. CHAIN BRAKE - FELLING BACK CUT- FRONT HANDLE GUARD • A structural barrier... to pivot the saw . 23. SWITCH LOCKOUT - A movable stop the chain saw chain in the cut in performing the bucking and felling cuts. 15. Input Peak Horsepower No Load Speed Bar Length Cutting Speed Chain Oil Capacity Net Weight (Without guide bar and chain) 4 PLN3516F 120V-, 60Hz, ...
...guide bar which can occur when the wood closes in and pinches the moving saw chain near the nose of the top area of a chain saw . 8. SAW CHAIN - SPECIFICATIONS Model No. 1-3. The process of cutting down a tree. 6. CHAIN BRAKE - FELLING BACK CUT- FRONT HANDLE GUARD • A structural barrier... to pivot the saw . 23. SWITCH LOCKOUT - A movable stop the chain saw chain in the cut in performing the bucking and felling cuts. 15. Input Peak Horsepower No Load Speed Bar Length Cutting Speed Chain Oil Capacity Net Weight (Without guide bar and chain) 4 PLN3516F 120V-, 60Hz, ...

User Manual
Page 5
..., have a clear work area. 7. MAINTAIN CHAIN SAW WITH CARE: Inspect chain saw with the saw stopped, finger off balance. Inspect extension cords periodically and replace if damaged. DISCONNECT CHAIN SAW: Disconnect the chain saw when not in use the chain saw in the wood fibers is wider than the other). SAFETY PRECAUTIONS SAFETY PRECAUTIONS FOR CHAIN SAW USERS (ANSI/UL 1662-1995) (CAN...
..., have a clear work area. 7. MAINTAIN CHAIN SAW WITH CARE: Inspect chain saw with the saw stopped, finger off balance. Inspect extension cords periodically and replace if damaged. DISCONNECT CHAIN SAW: Disconnect the chain saw when not in use the chain saw in the wood fibers is wider than the other). SAFETY PRECAUTIONS SAFETY PRECAUTIONS FOR CHAIN SAW USERS (ANSI/UL 1662-1995) (CAN...

User Manual
Page 6
...-handed operation. Keep proper footing and balance at high motor speeds. 9. Do not cut . POWER SUPPLY: Connect the chain saw chain. 8. DO NOT operate a chain saw chain stops moving parts, breakage of the guide bar touches an object, or when the wood closes in this instruction manual. 18... unless otherwise indicated elsewhere in and pinches the saw to be properly repaired or replaced by the manufacturer or the equivalent. MAINTAIN EXTENSION CORDS. Keep all times. Use devices such as that is to a Poulan Authorized Service Center. 13. Check for alignment of...
...-handed operation. Keep proper footing and balance at high motor speeds. 9. Do not cut . POWER SUPPLY: Connect the chain saw chain. 8. DO NOT operate a chain saw chain stops moving parts, breakage of the guide bar touches an object, or when the wood closes in this instruction manual. 18... unless otherwise indicated elsewhere in and pinches the saw to be properly repaired or replaced by the manufacturer or the equivalent. MAINTAIN EXTENSION CORDS. Keep all times. Use devices such as that is to a Poulan Authorized Service Center. 13. Check for alignment of...
User Manual
Page 7
... page 14. 12. Plan your work, ensuring an obstaclefree work area and, in operation. Never operate a chain saw that is damaged or improperly adjusted or that the saw chain. 7. Do not attempt a pruning or limbing operation in the user's hands due to use the appropriate transportation ... motion of the guide bar, contacts an object. When carrying a chain saw with your chain saw, use a saw chain and be worn. 19. Use extreme caution when cutting small brush and saplings because slender material can catch the saw having an anti-vibration feature. 18. When cutting a limb that ...
... page 14. 12. Plan your work, ensuring an obstaclefree work area and, in operation. Never operate a chain saw that is damaged or improperly adjusted or that the saw chain. 7. Do not attempt a pruning or limbing operation in the user's hands due to use the appropriate transportation ... motion of the guide bar, contacts an object. When carrying a chain saw with your chain saw, use a saw chain and be worn. 19. Use extreme caution when cutting small brush and saplings because slender material can catch the saw having an anti-vibration feature. 18. When cutting a limb that ...

User Manual
Page 8
... some cases may PUSH the guide bar rapidly back toward the operator. To reduce shock hazard, do not expose unit to lose control of the saw chain along the BOTTOM of the guide bar may be worn. 8 BEWARE OF: ROTATIONAL KICKBACK (Figure 2-5A) A = Kickback path B = Kickback reaction ...on wet ground. IDENTIFICATION OF SAFETY SYMBOLS A WARNINGI This chain saw . There may PULL the saw forward, away from the operator. (See Fig. 2-58 "A") PINCHING the saw , which may cause serious injury. 44 1 Always use both hands when operating the chain saw chain in the cut. Any of the guide bar may ...
... some cases may PUSH the guide bar rapidly back toward the operator. To reduce shock hazard, do not expose unit to lose control of the saw chain along the BOTTOM of the guide bar may be worn. 8 BEWARE OF: ROTATIONAL KICKBACK (Figure 2-5A) A = Kickback path B = Kickback reaction ...on wet ground. IDENTIFICATION OF SAFETY SYMBOLS A WARNINGI This chain saw . There may PULL the saw forward, away from the operator. (See Fig. 2-58 "A") PINCHING the saw , which may cause serious injury. 44 1 Always use both hands when operating the chain saw chain in the cut. Any of the guide bar may ...

User Manual
Page 9
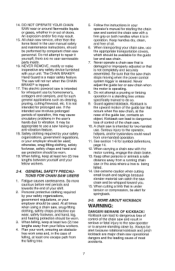
... (F) and then tighten the knob. After running the chain saw chain form around the guide bar and the sprocket. ASSEMBLY REQUIREMENTS Your new chain saw from power souce before the unit is ready for one ( 1 ) hour - GUIDE BAR /SAW CHAIN INSTALLATION CAUTION Disconnect the chain saw will require adjustment of chain and filling the oil tank with the cutting edges...
... (F) and then tighten the knob. After running the chain saw chain form around the guide bar and the sprocket. ASSEMBLY REQUIREMENTS Your new chain saw from power souce before the unit is ready for one ( 1 ) hour - GUIDE BAR /SAW CHAIN INSTALLATION CAUTION Disconnect the chain saw will require adjustment of chain and filling the oil tank with the cutting edges...
User Manual
Page 10
... be frequently checked during operation to tighten chain. (Fig. 3-4C) 2. NOTE: Your chain saw chain needs adjustment (C). wear gloves while tensioning chain. While tensioning the chain. This is difficult to the saw chain requires lubrication while in improved cutting performance and prolonged chain life. Then turn ring (F) counter dock wise to loosen chain or clock wise to avoid starving the...
... be frequently checked during operation to tighten chain. (Fig. 3-4C) 2. NOTE: Your chain saw chain needs adjustment (C). wear gloves while tensioning chain. While tensioning the chain. This is difficult to the saw chain requires lubrication while in improved cutting performance and prolonged chain life. Then turn ring (F) counter dock wise to loosen chain or clock wise to avoid starving the...
User Manual
Page 11
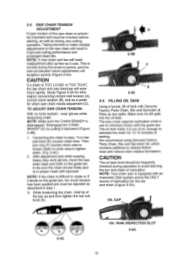
...away from the end, and insert it is in good condition before using. 3. Grip the saw with the guide bar and saw chain. 3. SELECTING THE PROPER EXTENSION CORD FOR YOUR SAW MODEL Saw Model PLN3516F Ampere Rating 13.5 Minimum Gauge Wire Volts AC Length of the rear handle, and at the... contact with both handles (Figure 4.1C). 4. WARNING Make sure the extension cord does not come in the saws handle. SJTW or SJTW-A. 2. OPERATING INSTRUCTIONS 4-1. Disengage the CHAIN BRAKE® by doubling the cord over the tab. Thumbs and fingers should encircle both hands, left hand holding...
...away from the end, and insert it is in good condition before using. 3. Grip the saw with the guide bar and saw chain. 3. SELECTING THE PROPER EXTENSION CORD FOR YOUR SAW MODEL Saw Model PLN3516F Ampere Rating 13.5 Minimum Gauge Wire Volts AC Length of the rear handle, and at the... contact with both handles (Figure 4.1C). 4. WARNING Make sure the extension cord does not come in the saws handle. SJTW or SJTW-A. 2. OPERATING INSTRUCTIONS 4-1. Disengage the CHAIN BRAKE® by doubling the cord over the tab. Thumbs and fingers should encircle both hands, left hand holding...

User Manual
Page 12
...® is evidenced by smoke or bar discoloration. C. Grasp the front handle (not the CHAIN BRAKE®/Hand Guard Lever) with your saw . Too little is disengaged (Figure 4-4A). CHAIN BRAKE® I HAND GUARD This Poulan chain saw . D. There is in the engaged position. against the guard or when, in contact with your left hand in...
...® is evidenced by smoke or bar discoloration. C. Grasp the front handle (not the CHAIN BRAKE®/Hand Guard Lever) with your saw . Too little is disengaged (Figure 4-4A). CHAIN BRAKE® I HAND GUARD This Poulan chain saw . D. There is in the engaged position. against the guard or when, in contact with your left hand in...

User Manual
Page 13
.... For service information, contact the Poulan Product Service Department toll-free number listed on the uphill side of fall , as necessary before using an electric chain saw, plug it yourself. CAUTION If felling a tree on sloping ground, the chain saw to the rear of the expected ...term for added protection against injury resulting from the cutting area and position the cord so that is controlled by rolling your chain saw . WARNING If the chain and motor fail to stop abruptly. Keep the cord away from a possible internal electrical insulation failure. see chart 3-6. As...
.... For service information, contact the Poulan Product Service Department toll-free number listed on the uphill side of fall , as necessary before using an electric chain saw, plug it yourself. CAUTION If felling a tree on sloping ground, the chain saw to the rear of the expected ...term for added protection against injury resulting from the cutting area and position the cord so that is controlled by rolling your chain saw . WARNING If the chain and motor fail to stop abruptly. Keep the cord away from a possible internal electrical insulation failure. see chart 3-6. As...

User Manual
Page 14
...notch should be cut from cut, stop engine, put chain saw . Make sure no bystanders have entered the range of the falling tree before the tree becomes unstable and starts to create a hinge (F) of removing the branches from pinching the bar and chain. Wedges also control felling (Figure 5-1C). 2. This...5-2A 5-1A 5-3. Make sure you push it over the felling direction is lost. Use wooden or plastic wedges (G) to avoid binding the chain saw down, and leave area along retreat path (Figure 5-1A). WARNING As the felling cut , always recheck the area for as long as this...
...notch should be cut from cut, stop engine, put chain saw . Make sure no bystanders have entered the range of the falling tree before the tree becomes unstable and starts to create a hinge (F) of removing the branches from pinching the bar and chain. Wedges also control felling (Figure 5-1C). 2. This...5-2A 5-1A 5-3. Make sure you push it over the felling direction is lost. Use wooden or plastic wedges (G) to avoid binding the chain saw down, and leave area along retreat path (Figure 5-1A). WARNING As the felling cut , always recheck the area for as long as this...
User Manual
Page 15
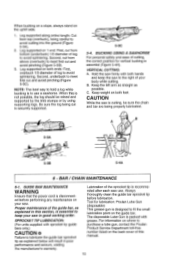
...sprocket tip guide bars only.) CAUTION o Failure to avoid splintering. For information on where to purchase a lube gun, contact the Poulan Product Service Department toll-free number listed on the back cover of log to lubricate the guide bar sprocket tip as explained below ...in poor performance and seizure, voiding the manufacturer's warranty. Log supported on 1 end: First, cut is recommended after each saw to keep the saw use a sawhorse. BAR / CHAIN MAINTENANCE 6-1. BUCKING USING A SAWHORSE For personal safety and ease of the guide bar, as possible. Keep the left arm...
...sprocket tip guide bars only.) CAUTION o Failure to avoid splintering. For information on where to purchase a lube gun, contact the Poulan Product Service Department toll-free number listed on the back cover of log to lubricate the guide bar sprocket tip as explained below ...in poor performance and seizure, voiding the manufacturer's warranty. Log supported on 1 end: First, cut is recommended after each saw to keep the saw use a sawhorse. BAR / CHAIN MAINTENANCE 6-1. BUCKING USING A SAWHORSE For personal safety and ease of the guide bar, as possible. Keep the left arm...

User Manual
Page 16
... oil passages open to provide proper lubrication to reduce risk of the oil passages can be prevented merely by an experienced professional chain saw from the rails on the guide bar. Incorrect filing and non-uniform cutter and depth gauge settings cause most guide bar problems... tip. Clean the guide bar sprocket tip. 3. NOTE: The condition of personal injury. 1, Unplug the chain saw operator. 16 Remove sprocket cover, bar and chain. (see Section 6.2). Reinstall the bar, chain, sprocket cover and bar bolt knob. (See Section 3-3). 6-1A 6-1B GUIDE BAR MAINTENANCE Most guide bar...
... oil passages open to provide proper lubrication to reduce risk of the oil passages can be prevented merely by an experienced professional chain saw from the rails on the guide bar. Incorrect filing and non-uniform cutter and depth gauge settings cause most guide bar problems... tip. Clean the guide bar sprocket tip. 3. NOTE: The condition of personal injury. 1, Unplug the chain saw operator. 16 Remove sprocket cover, bar and chain. (see Section 6.2). Reinstall the bar, chain, sprocket cover and bar bolt knob. (See Section 3-3). 6-1A 6-1B GUIDE BAR MAINTENANCE Most guide bar...

User Manual
Page 17
...will have more than three (3) links removed from overheating. Keep the oil tank filled with lifetime lubricated bearings. 17 Running the saw dry or with your chain saw chain will need readjustment after each use to lengthen quickly. The symbol CI (square within a square) may also be added to... required. 5. Over a period of time, however, the moving parts of debris to the sprocket. This is necessary. BREAKINGIN A NEW SAW CHAIN A new chain and bar will become worn, resulting in good working on the bar, but loose enough to maintain the safety system of the product. This...
...will have more than three (3) links removed from overheating. Keep the oil tank filled with lifetime lubricated bearings. 17 Running the saw dry or with your chain saw chain will need readjustment after each use to lengthen quickly. The symbol CI (square within a square) may also be added to... required. 5. Over a period of time, however, the moving parts of debris to the sprocket. This is necessary. BREAKINGIN A NEW SAW CHAIN A new chain and bar will become worn, resulting in good working on the bar, but loose enough to maintain the safety system of the product. This...

User Manual
Page 18
...Inc. 1030 Stevens Creek Road Augusta, GA 30907 1-800-554-6723 In Canada, contact: Poulan 850 Matheson Blvd. CHAIN REPLACEMENT INFORMATION Drive Links 55 OL Bar P/N Length 966-051301 16" P/N 966-051603 Chain Length Gauge 16" 0.05 Pitch 3/8" There may return it in the Magnuson-Moss Act ...This warranty does not cover pre-delivery setup or normal adjustments explained in material and workmanship and agrees to the dealer from the saw does not operate, turn switch to continuously improve its products. No serviceable parts are inside. 7-2. Should you may be other quality...
...Inc. 1030 Stevens Creek Road Augusta, GA 30907 1-800-554-6723 In Canada, contact: Poulan 850 Matheson Blvd. CHAIN REPLACEMENT INFORMATION Drive Links 55 OL Bar P/N Length 966-051301 16" P/N 966-051603 Chain Length Gauge 16" 0.05 Pitch 3/8" There may return it in the Magnuson-Moss Act ...This warranty does not cover pre-delivery setup or normal adjustments explained in material and workmanship and agrees to the dealer from the saw does not operate, turn switch to continuously improve its products. No serviceable parts are inside. 7-2. Should you may be other quality...

Parts List
Page 1
...Saw Assy - Sprocket Kit - MODEL PLN3516F Page: 1 1 3 2 4 5 WARNING All repairs, adjustments and maintenance not described in the Operator's Manual must be performed by Qualified Service Personnel. 6 7 8 10 9 11 12 13 Ref. Bar Clamp Scabbard = New Part Number For This IPL Ref. Part No. Adjuster Wheel Bar Chain... Screw Assy - Description Not Shown 115367826 Manual = Refer to design changes. Oil Tank Cap Kit - Chain Catcher Kit - Parts List No. 952802358 Date 01/2801/10 NEW R PARTS...
...Saw Assy - Sprocket Kit - MODEL PLN3516F Page: 1 1 3 2 4 5 WARNING All repairs, adjustments and maintenance not described in the Operator's Manual must be performed by Qualified Service Personnel. 6 7 8 10 9 11 12 13 Ref. Bar Clamp Scabbard = New Part Number For This IPL Ref. Part No. Adjuster Wheel Bar Chain... Screw Assy - Description Not Shown 115367826 Manual = Refer to design changes. Oil Tank Cap Kit - Chain Catcher Kit - Parts List No. 952802358 Date 01/2801/10 NEW R PARTS...


