

User Manual
Page 2
... area. • Keep nuts and bolts, especially blade attachment bolts, tight and keep equipment in severe injury or death. Clean oil or fuel spillage. Repair, if necessary, before turning. • Never leave a running machine unattended. FAILURE TO OBSERVE THE FOLLOWING SAFETY INSTRUCTIONS COULD RESULT IN SERIOUS INJURY OR DEATH. Do not operate the mower without either the entire grass catcher or the guard in fluence of...
... area. • Keep nuts and bolts, especially blade attachment bolts, tight and keep equipment in severe injury or death. Clean oil or fuel spillage. Repair, if necessary, before turning. • Never leave a running machine unattended. FAILURE TO OBSERVE THE FOLLOWING SAFETY INSTRUCTIONS COULD RESULT IN SERIOUS INJURY OR DEATH. Do not operate the mower without either the entire grass catcher or the guard in fluence of...
User Manual
Page 4
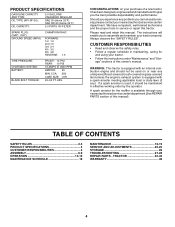
... SPECIFICATIONS 4 CUSTOMER RESPONSIBILITIES 4 ASSEMBLY 6-9 OPERATION 10-15 MAINTENANCE SCHEDULE 16 MAINTENANCE 16-19 SERVICE AND ADJUSTMENTS 20-25 STORAGE 26 TROUBLESHOOTING 27-28 REPAIR PARTS - PRODUCT SPECIFICATIONS GASOLINE CAPACITY AND TYPE: OIL TYPE (API-SF-SJ): OIL CAPACITY: 5.0 GALLONS UNLEADED REGULAR SAE 30 (above 32°F) SAE 5W-30 (below 32°F) 5.0 PINTS W/ FILTER SPARK PLUG: (GAP: .030") GROUND SPEED (MPH): CHAMPION RN4C FORWARD: 1st 1.2 2nd 1.5 3rd 2.4 4th 3.5 5th 4.8 REVERSE: 1.5 TIRE PRESSURE: CHARGING SYSTEM: BATTERY: BLADE BOLT...
... SPECIFICATIONS 4 CUSTOMER RESPONSIBILITIES 4 ASSEMBLY 6-9 OPERATION 10-15 MAINTENANCE SCHEDULE 16 MAINTENANCE 16-19 SERVICE AND ADJUSTMENTS 20-25 STORAGE 26 TROUBLESHOOTING 27-28 REPAIR PARTS - PRODUCT SPECIFICATIONS GASOLINE CAPACITY AND TYPE: OIL TYPE (API-SF-SJ): OIL CAPACITY: 5.0 GALLONS UNLEADED REGULAR SAE 30 (above 32°F) SAE 5W-30 (below 32°F) 5.0 PINTS W/ FILTER SPARK PLUG: (GAP: .030") GROUND SPEED (MPH): CHAMPION RN4C FORWARD: 1st 1.2 2nd 1.5 3rd 2.4 4th 3.5 5th 4.8 REVERSE: 1.5 TIRE PRESSURE: CHARGING SYSTEM: BATTERY: BLADE BOLT...
User Manual
Page 7
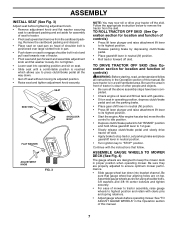
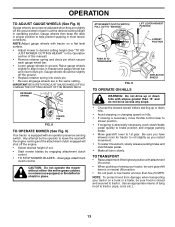
... gearshift lever in neutral position. • Turn ignition key to "STOP" position. Be sure tractor is reached which allows you to press clutch/brake pedal all instructions in operating position, depress clutch/brake pedal and set aside for location and function of this manual. Move gearshift lever to highest position and retain with clevis pins and spring retainers. • Adjust gauge wheels before tightening adjustment knob. • Remove adjustment knob and flat washer loosely. Assemble gauge wheels as shown using shoulder bolts...
... gearshift lever in neutral position. • Turn ignition key to "STOP" position. Be sure tractor is reached which allows you to press clutch/brake pedal all instructions in operating position, depress clutch/brake pedal and set aside for location and function of this manual. Move gearshift lever to highest position and retain with clevis pins and spring retainers. • Adjust gauge wheels before tightening adjustment knob. • Remove adjustment knob and flat washer loosely. Assemble gauge wheels as shown using shoulder bolts...
User Manual
Page 8
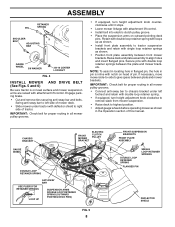
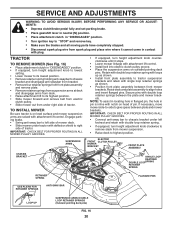
... of pin. IMPORTANT: Check belt for proper routing in all mower pulley grooves. • If equipped, turn height adjustment knob clockwise to remove slack from mower suspension. • Raise deck to chassis bracket under tractor with double loop retainer spring. • If equipped, turn height adjustment knob counterclockwise until it stops. • Lower mower linkage with attachment lift control. Secure pins with notch on outward pointing deck pins. CHASSIS BRACKET GAUGE WHEEL FRONT MOWER BRACKET ELECTRIC CLUTCH PULLEY...
... of pin. IMPORTANT: Check belt for proper routing in all mower pulley grooves. • If equipped, turn height adjustment knob clockwise to remove slack from mower suspension. • Raise deck to chassis bracket under tractor with double loop retainer spring. • If equipped, turn height adjustment knob counterclockwise until it stops. • Lower mower linkage with attachment lift control. Secure pins with notch on outward pointing deck pins. CHASSIS BRACKET GAUGE WHEEL FRONT MOWER BRACKET ELECTRIC CLUTCH PULLEY...
User Manual
Page 9
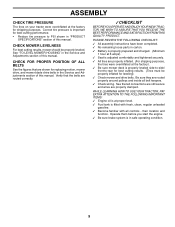
... properly clamped. CHECK FOR PROPER POSITION OF ALL BELTS See the figures that all belt keepers. ✓ Check wiring. Correct tire pressure is properly leveled side-to-side/ front-to PSI shown in the Service and Adjustments section of this manual. ASSEMBLY CHECK TIRE PRESSURE The tires on your tractor were overinflated at the factory for replacing motion, mower drive, and mower blade drive belts in "PRODUCT SPECIFICATIONS" section of...
... properly clamped. CHECK FOR PROPER POSITION OF ALL BELTS See the figures that all belt keepers. ✓ Check wiring. Correct tire pressure is properly leveled side-to-side/ front-to PSI shown in the Service and Adjustments section of this manual. ASSEMBLY CHECK TIRE PRESSURE The tires on your tractor were overinflated at the factory for replacing motion, mower drive, and mower blade drive belts in "PRODUCT SPECIFICATIONS" section of...
User Manual
Page 11
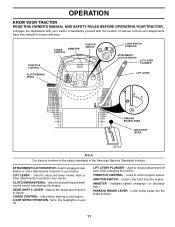
... SWITCH - CHOKE CONTROL - LIFT LEVER PLUNGER - Save this manual for declutching and braking the tractor and starting a cold engine. Used for future reference. PARKING BRAKE LEVER - Used to engage mower blades or other attachments mounted to the safety standards of the American National Standards Institute. GEAR SHIFT L LEVER - Turns the headlights on and off. CLUTCH/BRAKE PEDAL - LIGHT SWITCH POSITION- IGNITION SWITCH - AMMETER - Used when starting the engine. Used to start and stop the engine. Locks brake pedal into the brake position. 11 Selects the speed...
... SWITCH - CHOKE CONTROL - LIFT LEVER PLUNGER - Save this manual for declutching and braking the tractor and starting a cold engine. Used for future reference. PARKING BRAKE LEVER - Used to engage mower blades or other attachments mounted to the safety standards of the American National Standards Institute. GEAR SHIFT L LEVER - Turns the headlights on and off. CLUTCH/BRAKE PEDAL - LIGHT SWITCH POSITION- IGNITION SWITCH - AMMETER - Used when starting the engine. Used to start and stop the engine. Locks brake pedal into the brake position. 11 Selects the speed...
User Manual
Page 13
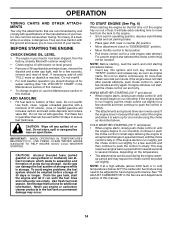
... gear. Use an appropriate means of cut. • Start mower blades by the operator to leave the seat with the engine running and the attachment clutch engaged will shut off the engine. • Select desired height of tying hood to desired cutting height (See "TO AD- Gauge wheels then keep the deck in bracket and gauge wheel bar and insert clevis pin. ATTACHEMNT CLUTCH SWITCH PULL OUT TO "ENGAGE" LIFT LEVER HIGHEST POSIITON LOWEST POSITION...
... gear. Use an appropriate means of cut. • Start mower blades by the operator to leave the seat with the engine running and the attachment clutch engaged will shut off the engine. • Select desired height of tying hood to desired cutting height (See "TO AD- Gauge wheels then keep the deck in bracket and gauge wheel bar and insert clevis pin. ATTACHEMNT CLUTCH SWITCH PULL OUT TO "ENGAGE" LIFT LEVER HIGHEST POSIITON LOWEST POSITION...
User Manual
Page 14
... deposits and reduce valve life). Use fresh fuel next season. NOTE: Before starting, read oil level. Use common sense when towing. Do not over fill. Drain the gas tank, start attempt the choke control may require the choke control be pulled out slightly. If engine still does not start after several minutes, depending on level ground. • Remove oil fill cap/dipstick and wipe clean, reinsert the dipstick and screw cap tight, wait...
... deposits and reduce valve life). Use fresh fuel next season. NOTE: Before starting, read oil level. Use common sense when towing. Do not over fill. Drain the gas tank, start attempt the choke control may require the choke control be pulled out slightly. If engine still does not start after several minutes, depending on level ground. • Remove oil fill cap/dipstick and wipe clean, reinsert the dipstick and screw cap tight, wait...
User Manual
Page 16
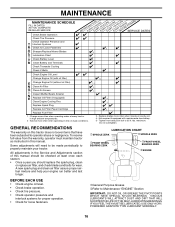
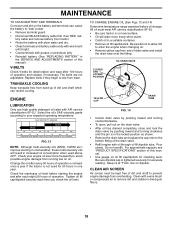
... operation. • Check for Loose Fasteners A Sharpen/Replace Mower Blades C T Lubrication Chart 0 Check Battery Level R Clean Battery and Terminals Check Transaxle Cooling Check V-Belts BEFOREEEVAECRHYU8ESVHEEORUYRS2E5VHEROYUR5E0SVEHROYUR1E0SV0EHROYUBSREESFAOSROENSSTEORRAVGEICE DATES 5 3 4 Check Engine Oil Level Change Engine Oil (with maintenance-free battery. 5 - To receive full value from the warranty, operator must maintain tractor as instructed in this manual should replace the spark plug, clean or replace air filter, and check blades and belts for wear. Service...
... operation. • Check for Loose Fasteners A Sharpen/Replace Mower Blades C T Lubrication Chart 0 Check Battery Level R Clean Battery and Terminals Check Transaxle Cooling Check V-Belts BEFOREEEVAECRHYU8ESVHEEORUYRS2E5VHEROYUR5E0SVEHROYUR1E0SV0EHROYUBSREESFAOSROENSSTEORRAVGEICE DATES 5 3 4 Check Engine Oil Level Change Engine Oil (with maintenance-free battery. 5 - To receive full value from the warranty, operator must maintain tractor as instructed in this manual should replace the spark plug, clean or replace air filter, and check blades and belts for wear. Service...

User Manual
Page 17
..., repair the problem immediately. • The engine should not start unless the brake pedal is fully depressed and attachement clutch control is in the disengaged position. • When the engine is running, any maintenance. If either end of this manual). • Keep tires free of gasoline, oil, or insect control chemicals which is balanced. If your tractor is engaged, any attempt by turning counterclockwise. • Install new or resharpened blade with...
..., repair the problem immediately. • The engine should not start unless the brake pedal is fully depressed and attachement clutch control is in the disengaged position. • When the engine is running, any maintenance. If either end of this manual). • Keep tires free of gasoline, oil, or insect control chemicals which is balanced. If your tractor is engaged, any attempt by turning counterclockwise. • Install new or resharpened blade with...
User Manual
Page 18
... multi-viscosity oils (5W30, 10W30 etc.) improve starting the engine and after 100 hours of this manual. • Use gauge on oil fill cap/dipstick for deterioration and wear after each time you check the oil level. CLEAN AIR SCREEN Air screen must meet API service classification SF-SJ. • Be sure tractor is in the SERVICE AND ADJUSTMENTS section of operation and replace if necessary. MAINTENANCE TO CLEAN BATTERY AND TERMINALS Corrosion...
... multi-viscosity oils (5W30, 10W30 etc.) improve starting the engine and after 100 hours of this manual. • Use gauge on oil fill cap/dipstick for deterioration and wear after each time you check the oil level. CLEAN AIR SCREEN Air screen must meet API service classification SF-SJ. • Be sure tractor is in the SERVICE AND ADJUSTMENTS section of operation and replace if necessary. MAINTENANCE TO CLEAN BATTERY AND TERMINALS Corrosion...

User Manual
Page 19
... transmission are properly positioned. • Immediately wipe up any spilled gasoline. tions. • Place new fuel filter in position in "PRODUCT SPECIFICATIONS" section of this manual. Water in one year. Use compressed air or a leaf blower to clean your tractor. Every 100 hours of operation (more often under extremely dusty, dirty conditions), remove the blower housing and other cooling shrouds. NOTE: Operating the engine with automotive type wax. ENGINE OIL FILTER Replace the engine oil...
... transmission are properly positioned. • Immediately wipe up any spilled gasoline. tions. • Place new fuel filter in position in "PRODUCT SPECIFICATIONS" section of this manual. Water in one year. Use compressed air or a leaf blower to clean your tractor. Every 100 hours of operation (more often under extremely dusty, dirty conditions), remove the blower housing and other cooling shrouds. NOTE: Operating the engine with automotive type wax. ENGINE OIL FILTER Replace the engine oil...
User Manual
Page 20
... attachment lift control. • Install belt into electric clutch pulley groove. • Place the suspension arms on head of tractor. Engage parking brake. • Swing anti-sway bar to tractor suspension brackets and retain with plug. IMPORTANT: CHECK BELT FOR PROPER ROUTING IN ALL MOWER PULLEY GROOVES. • If equipped, turn height adjustment knob counterclockwise until it cannot come in "DISENGAGED" position. • If equipped, turn height adjustment knob clockwise to remove slack from under tractor...
... attachment lift control. • Install belt into electric clutch pulley groove. • Place the suspension arms on head of tractor. Engage parking brake. • Swing anti-sway bar to tractor suspension brackets and retain with plug. IMPORTANT: CHECK BELT FOR PROPER ROUTING IN ALL MOWER PULLEY GROOVES. • If equipped, turn height adjustment knob counterclockwise until it cannot come in "DISENGAGED" position. • If equipped, turn height adjustment knob clockwise to remove slack from under tractor...
User Manual
Page 21
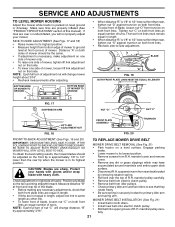
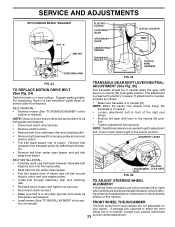
... than rear, tighten nut "D" against trunnion on right side of turns. Protect your mower. Check adjustment on both front plate links are equal in length, adjust one side of nut "C" will change mower height about 3/16". • Recheck measurements after adjusting. mandrel pulley carefully. • Remove belt from electric clutch pulley. • Remove belt from bottom edge of mower. SERVICE AND ADJUSTMENTS TO LEVEL MOWER HOUSING Adjust the mower while tractor is parked on a level surface. Make sure...
... than rear, tighten nut "D" against trunnion on right side of turns. Protect your mower. Check adjustment on both front plate links are equal in length, adjust one side of nut "C" will change mower height about 3/16". • Recheck measurements after adjusting. mandrel pulley carefully. • Remove belt from electric clutch pulley. • Remove belt from bottom edge of mower. SERVICE AND ADJUSTMENTS TO LEVEL MOWER HOUSING Adjust the mower while tractor is parked on a level surface. Make sure...
User Manual
Page 22
... speed in neutral (N) position. TO ADJUST BRAKE • Depress clutch/brake pedal all the way down and en- mandrel cover. Engage parking brake. • Remove mower (See "TO REMOVE MOWER" in this section of manual). • Carefully roll belt over L.H. IDLER PULLEY CENTER MANDREL R.H. MANDREL FIG. 22 TO CHECK AND ADJUST BRAKE (See Fig. 23) Your tractor is still greater than 1-1/2", loosen jam nut and turn nut "A" until distance becomes 1-1/2". RH MANDREL COVER ELECTRIC CLUTCH PULLEY...
... speed in neutral (N) position. TO ADJUST BRAKE • Depress clutch/brake pedal all the way down and en- mandrel cover. Engage parking brake. • Remove mower (See "TO REMOVE MOWER" in this section of manual). • Carefully roll belt over L.H. IDLER PULLEY CENTER MANDREL R.H. MANDREL FIG. 22 TO CHECK AND ADJUST BRAKE (See Fig. 23) Your tractor is still greater than 1-1/2", loosen jam nut and turn nut "A" until distance becomes 1-1/2". RH MANDREL COVER ELECTRIC CLUTCH PULLEY...
User Manual
Page 23
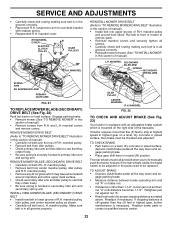
... tractor. SERVICE AND ADJUSTMENTS WITH PARKING BRAKE "ENGAGED" 1-1/2" NUT "A" JAM NUT ELECTRIC CLUTCH CLUTCHING IDLER STATIONARY IDLER CENTER SPAN KEEPER TRANSAXLE PULLEY CLUTCH LOCATOR CLUTCH WIRE HARNESS OPERATING ARM FIG. 24 FIG. 23 TO REPLACE MOTION DRIVE BELT (See Fig. 24) Park the tractor on bottom side of left to affect the front wheel toe-in or camber, contact your tractor. NOTE: Observe entire motion drive belt and position of tractor. GEARSHIFT LEVER BELT INSTALLATION - • Carefully work new belt...
... tractor. SERVICE AND ADJUSTMENTS WITH PARKING BRAKE "ENGAGED" 1-1/2" NUT "A" JAM NUT ELECTRIC CLUTCH CLUTCHING IDLER STATIONARY IDLER CENTER SPAN KEEPER TRANSAXLE PULLEY CLUTCH LOCATOR CLUTCH WIRE HARNESS OPERATING ARM FIG. 24 FIG. 23 TO REPLACE MOTION DRIVE BELT (See Fig. 24) Park the tractor on bottom side of left to affect the front wheel toe-in or camber, contact your tractor. NOTE: Observe entire motion drive belt and position of tractor. GEARSHIFT LEVER BELT INSTALLATION - • Carefully work new belt...

User Manual
Page 26
... gasoline in contact with clean engine oil. (See "ENGINE" in fuel tank or storage container. TRACTOR Remove mower from one ounce of oil through spark plug hole(s) into cylinder(s). • Turn ignition key to "START" position for a few seconds to distribute oil. • Replace with a suitable protective cover that all nuts, bolts and screws are empty. • Never use plastic. sand lightly before storing in your gasoline will cause problems. • If possible, store...
... gasoline in contact with clean engine oil. (See "ENGINE" in fuel tank or storage container. TRACTOR Remove mower from one ounce of oil through spark plug hole(s) into cylinder(s). • Turn ignition key to "START" position for a few seconds to distribute oil. • Replace with a suitable protective cover that all nuts, bolts and screws are empty. • Never use plastic. sand lightly before storing in your gasoline will cause problems. • If possible, store...
User Manual
Page 27
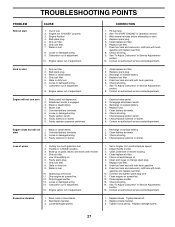
...;er. 13. Loose or damaged wiring. 14. Set in Service Adjustments section. 8. Replace blade. Replace blade mandrel. 3. Bad spark plug. 5. Engine valves out of adjustment. 15. Wait several minutes before attempting to start . 4. Engine valves out of mower housing. 4. Drain fuel tank and refill with fresh gasoline and replace fuel filter. 10. See "To Adjust Carburetor" in "Higher Cut" position/reduce speed. 2. Loose or damaged wiring. 4. Check/replace solenoid or starter. Clean underside of adjustment. 1. Drain fuel tank and refill with...
...;er. 13. Loose or damaged wiring. 14. Set in Service Adjustments section. 8. Replace blade. Replace blade mandrel. 3. Bad spark plug. 5. Engine valves out of adjustment. 15. Wait several minutes before attempting to start . 4. Engine valves out of mower housing. 4. Drain fuel tank and refill with fresh gasoline and replace fuel filter. 10. See "To Adjust Carburetor" in "Higher Cut" position/reduce speed. 2. Loose or damaged wiring. 4. Check/replace solenoid or starter. Clean underside of adjustment. 1. Drain fuel tank and refill with...
User Manual
Page 28
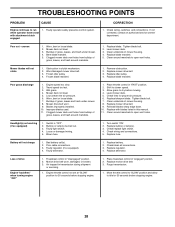
...3. Replace mower drive belt. 3. Clean underside of drive Engine "backfires" when turning engine "OFF" 1. Check/clean all connections. 3. Worn, bent or loose blade. 2. Buildup of mower housing. 4. Improper blades used. 11. Level mower deck. 5. Loss of mower housing. 8. Mower drive belt worn. 9. Engine speed too slow. 2. Remove obstruction. 2. Check tires for proper air pressure. 6. Frozen blade mandrel. 1. Reinstall blades sharp edge down. 10. If not corrected, contact an authorized service center/ department. TROUBLESHOOTING POINTS PROBLEM CAUSE Engine...
...3. Replace mower drive belt. 3. Clean underside of drive Engine "backfires" when turning engine "OFF" 1. Check/clean all connections. 3. Worn, bent or loose blade. 2. Buildup of mower housing. 4. Improper blades used. 11. Level mower deck. 5. Loss of mower housing. 8. Mower drive belt worn. 9. Engine speed too slow. 2. Remove obstruction. 2. Check tires for proper air pressure. 6. Frozen blade mandrel. 1. Reinstall blades sharp edge down. 10. If not corrected, contact an authorized service center/ department. TROUBLESHOOTING POINTS PROBLEM CAUSE Engine...
User Manual
Page 45
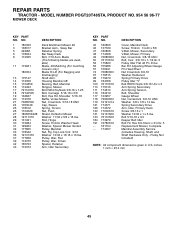
... x 16 Ga. Housing Mandrel 48" Bearing, Ball, Mandrel Stripper, Mower Bolt Rdhd Sq Neck 3/8-16 x 1.25 Bolt, Carriage 5/16-18 x 5/8 Bolt, Hex Hd. REPAIR PARTS TRACTOR - Blade (The following blades are available) Blade, 48 Mulching (For mulching mowers only) Blade Hi Lift (For Bagging and Discharging) Shaft Asm. MODEL NUMBER POGT20T48STA, PRODUCT NO. 954 56 96-77 MOWER DECK KEY PART NO. Drive Bar Pnt Adjusting Wheel Gauge Pin Head Rivet Nut Crownlock 3/8-16 Washer Hardened Spring Primary Drive Pulley Idler "V" Bolt RDHD...
... x 16 Ga. Housing Mandrel 48" Bearing, Ball, Mandrel Stripper, Mower Bolt Rdhd Sq Neck 3/8-16 x 1.25 Bolt, Carriage 5/16-18 x 5/8 Bolt, Hex Hd. REPAIR PARTS TRACTOR - Blade (The following blades are available) Blade, 48 Mulching (For mulching mowers only) Blade Hi Lift (For Bagging and Discharging) Shaft Asm. MODEL NUMBER POGT20T48STA, PRODUCT NO. 954 56 96-77 MOWER DECK KEY PART NO. Drive Bar Pnt Adjusting Wheel Gauge Pin Head Rivet Nut Crownlock 3/8-16 Washer Hardened Spring Primary Drive Pulley Idler "V" Bolt RDHD...


