
Owner Manual
Page 3
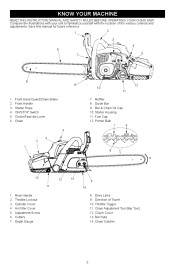
... this manual for future reference. 2 1 3 6 7 4 5 8 9 10 12 11 1. 2. 3. 4. 5. 6. Direction of the various controls and adjustments. Primer Bulb 6 7 8 9 10 11 12 13 14 5 1. 2. 3. 4. 5. 6. 7. Throttle Trigger 11. Clutch Cover 13. Compare the illustrations with your unit to familiarize yourself with the location of Travel 10. Muffler 8. KNOW YOUR MACHINE READ THIS INSTRUCTION MANUAL...
... this manual for future reference. 2 1 3 6 7 4 5 8 9 10 12 11 1. 2. 3. 4. 5. 6. Direction of the various controls and adjustments. Primer Bulb 6 7 8 9 10 11 12 13 14 5 1. 2. 3. 4. 5. 6. 7. Throttle Trigger 11. Clutch Cover 13. Compare the illustrations with your unit to familiarize yourself with the location of Travel 10. Muffler 8. KNOW YOUR MACHINE READ THIS INSTRUCTION MANUAL...
Owner Manual
Page 5
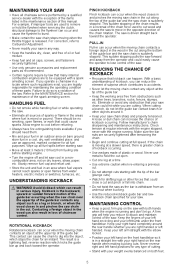
...; Certain regions require by a qualified service dealer with the tip of kickback, you are cutting. and use metal to hold the flywheel when servicing the clutch, structural damage to the flywheel can happen. Slowly remove fuel cap and refuel unit. • Store the unit and fuel in the opposite direction of...
...; Certain regions require by a qualified service dealer with the tip of kickback, you are cutting. and use metal to hold the flywheel when servicing the clutch, structural damage to the flywheel can happen. Slowly remove fuel cap and refuel unit. • Store the unit and fuel in the opposite direction of...
Owner Manual
Page 6
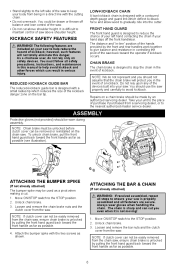
...on a chain brake should use the saw properly and carefully to avoid kickback. Move ON/STOP switch to the STOP position. 2. NOTE: If clutch cover can not be easily removed from the chain saw, ensure chain brake is not moving! 1. The following features are secure. NOTE: Chain ...brake must follow all fasteners are included on safety devices. NOTE: If clutch cover can not be easily removed from the chain saw, ensure chain brake is designed with the two screws as a pivot when making a cut...
...on a chain brake should use the saw properly and carefully to avoid kickback. Move ON/STOP switch to the STOP position. 2. NOTE: If clutch cover can not be easily removed from the chain saw, ensure chain brake is not moving! 1. The following features are secure. NOTE: Chain ...brake must follow all fasteners are included on safety devices. NOTE: If clutch cover can not be easily removed from the chain saw, ensure chain brake is designed with the two screws as a pivot when making a cut...
Owner Manual
Page 7
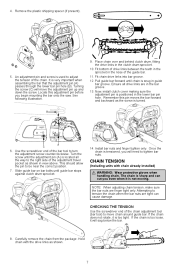
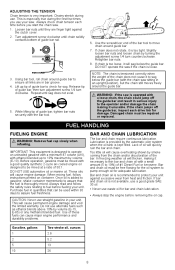
... side of the guide bar. 11. B C A 6. Use the screwdriver end of the chain. Once the chain is positioned in the bar groove. 13. Now, install clutch cover making sure the adjustment pin is tensioned, you even when it is located all drive links are in the lower bar pin hole. CHAIN... units with the drive links as shown. 7 CHECKING THE TENSION Use the screwdriver end of drive links between the teeth in the sprocket in the clutch drum sprocket. 10. Ensure all the way to move the adjustment pin up and down the screw. Turn the screw until the adjustment pin (A) is...
... side of the guide bar. 11. B C A 6. Use the screwdriver end of the chain. Once the chain is positioned in the bar groove. 13. Now, install clutch cover making sure the adjustment pin is tensioned, you even when it is located all drive links are in the lower bar pin hole. CHAIN... units with the drive links as shown. 7 CHECKING THE TENSION Use the screwdriver end of drive links between the teeth in the sprocket in the clutch drum sprocket. 10. Ensure all the way to move the adjustment pin up and down the screw. Turn the screw until the adjustment pin (A) is...
Owner Manual
Page 8
... bar nuts and loosen chain by volume (E-15, E-85) or any methanol blended fuel. DO NOT operate the saw sitting in your unit against the clutch cover. 2. Lubrication is too tight. Release tip of guide bar, then turn adjustment screw 1/4 turn counterclockwise. If chain does not rotate, it will thicken, making...
... bar nuts and loosen chain by volume (E-15, E-85) or any methanol blended fuel. DO NOT operate the saw sitting in your unit against the clutch cover. 2. Lubrication is too tight. Release tip of guide bar, then turn adjustment screw 1/4 turn counterclockwise. If chain does not rotate, it will thicken, making...
Owner Manual
Page 14
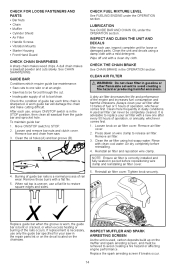
... Guard CHECK FUEL MIXTURE LEVEL See FUELING ENGINE under the OPERATION section. Wipe off unit with clean cool water. Loosen and remove bar nuts and clutch cover. Remove air filter. 3. Air dry completely before repositioning wire clamp and reinstalling air filter cover. 5. Tighten knob securely. 4. INSPECT MUFFLER AND SPARK ARRESTING SCREEN...
... Guard CHECK FUEL MIXTURE LEVEL See FUELING ENGINE under the OPERATION section. Wipe off unit with clean cool water. Loosen and remove bar nuts and clutch cover. Remove air filter. 3. Air dry completely before repositioning wire clamp and reinstalling air filter cover. 5. Tighten knob securely. 4. INSPECT MUFFLER AND SPARK ARRESTING SCREEN...
Owner Manual
Page 16
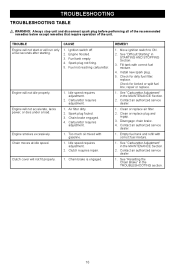
.... Idle speed requires adjustment. 2. Engine will run only a few seconds after starting. Fuel tank empty. Chain brake engaged. Clutch requires repair. 1. CAUSE 1. 2. 3. 4. 5. Engine will not fit properly. 16 REMEDY 1. Idle speed requires adjustment. 2. Clutch cover will not accelerate, lacks power, or dies under a load. Move ignition switch to ON. 2. Too much oil...
.... Idle speed requires adjustment. 2. Engine will run only a few seconds after starting. Fuel tank empty. Chain brake engaged. Clutch requires repair. 1. CAUSE 1. 2. 3. 4. 5. Engine will not fit properly. 16 REMEDY 1. Idle speed requires adjustment. 2. Clutch cover will not accelerate, lacks power, or dies under a load. Move ignition switch to ON. 2. Too much oil...

Owner Manual
Page 17
...brake, rotate the link clockwise until it in heavy paper or cloth. Fuel stabilizer is locked, the chain brake must be unlocked so the clutch cover can be stored for loose screws, nuts, and bolts. Follow the mix instructions found on the bar tool so that any damaged, broken... oil external metal surfaces and guide bar. • Oil the chain and wrap it stops. Add stabilizer to be assembled without binding to the clutch drum. Replace any sharp object cannot accidentally cause injury. • Store chain saw and fuel in a well ventilated area where fuel vapors cannot ...
...brake, rotate the link clockwise until it in heavy paper or cloth. Fuel stabilizer is locked, the chain brake must be unlocked so the clutch cover can be stored for loose screws, nuts, and bolts. Follow the mix instructions found on the bar tool so that any damaged, broken... oil external metal surfaces and guide bar. • Oil the chain and wrap it stops. Add stabilizer to be assembled without binding to the clutch drum. Replace any sharp object cannot accidentally cause injury. • Store chain saw and fuel in a well ventilated area where fuel vapors cannot ...

Parts List
Page 7
... 41 72-01 WRENCH 8 579 62 15-01 WASHER 9 545 17 19-01 SPROCKET 10 530 01 56-11 WASHER 11 579 55 10-01 CLUTCH ASSY 12 586 58 39-01 HAND GUARD 13 545 12 73-01 BOSS 14 530 01 64-16 SPRING 15 586 58 40-01... 87-01 CHAIN GUIDE PLATE 46 580 36 88-01 CHAIN GUIDE PLATE 47 584 89 68-01 PLATE KIT - 587 55 92-01 DECAL PR5020, 967061401, 967061501, 2016-04 Remark QTY KIT SCREW 4 COVER REAR HANDLE WITH OVERMOLD 1 HANDLE REAR WITH OVERMOLD 1 KIT Trigger & Lockout 1 SCREW 1 CLIP WRENCH 1 WRENCH CHAINBRAKE...
... 41 72-01 WRENCH 8 579 62 15-01 WASHER 9 545 17 19-01 SPROCKET 10 530 01 56-11 WASHER 11 579 55 10-01 CLUTCH ASSY 12 586 58 39-01 HAND GUARD 13 545 12 73-01 BOSS 14 530 01 64-16 SPRING 15 586 58 40-01... 87-01 CHAIN GUIDE PLATE 46 580 36 88-01 CHAIN GUIDE PLATE 47 584 89 68-01 PLATE KIT - 587 55 92-01 DECAL PR5020, 967061401, 967061501, 2016-04 Remark QTY KIT SCREW 4 COVER REAR HANDLE WITH OVERMOLD 1 HANDLE REAR WITH OVERMOLD 1 KIT Trigger & Lockout 1 SCREW 1 CLIP WRENCH 1 WRENCH CHAINBRAKE...

