

User Manual
Page 2
... tamper with manufacturer's recommended parts, when necessary. • Avoid starting . Clean oil or fuel spillage. Frequently check components and replace with safety devices. If tires lose traction, disengage the blades and proceed slowly straight down for holes, ruts, or bumps. FAILURE TO OBSERVE THE FOLLOWING SAFETY INSTRUCTIONS COULD RESULT IN SERIOUS INJURY OR DEATH. SERVICE • Use extra care in daylight...
... tamper with manufacturer's recommended parts, when necessary. • Avoid starting . Clean oil or fuel spillage. Frequently check components and replace with safety devices. If tires lose traction, disengage the blades and proceed slowly straight down for holes, ruts, or bumps. FAILURE TO OBSERVE THE FOLLOWING SAFETY INSTRUCTIONS COULD RESULT IN SERIOUS INJURY OR DEATH. SERVICE • Use extra care in daylight...
User Manual
Page 3
... - 17 ASSEMBLY 6 - 8 OPERATION 9 - 13 MAINTENANCE SCHEDULE 14 SERVICE AND ADJUSTMENTS 18 - 23 STORAGE 24 TROUBLESHOOTING 25 - 26 REPAIR PARTS 28 - 43 WARRANTY 45 3 Tall grass can lose traction with specifications of the manufacturer of California to cause cancer and birth defects or other reproductive harm. Look for small children. • Mow up , transporting, adjusting or making repairs, always disconnect spark plug wire and place wire where it...
... - 17 ASSEMBLY 6 - 8 OPERATION 9 - 13 MAINTENANCE SCHEDULE 14 SERVICE AND ADJUSTMENTS 18 - 23 STORAGE 24 TROUBLESHOOTING 25 - 26 REPAIR PARTS 28 - 43 WARRANTY 45 3 Tall grass can lose traction with specifications of the manufacturer of California to cause cancer and birth defects or other reproductive harm. Look for small children. • Mow up , transporting, adjusting or making repairs, always disconnect spark plug wire and place wire where it...

User Manual
Page 6
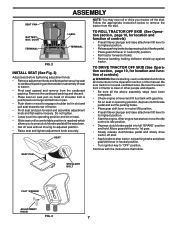
... bottom, along lines on label (label located between terminals) charge battery for any additional loose parts or cartons and remove. ASSEMBLY Your new tractor has been assembled at 6-10 amps. (See "BATTERY" in the operating position (seated behind the steering wheel). BEFORE REMOVING TRACTOR FROM SKID ATTACH STEERING WHEEL (See Fig. 1) ASSEMBLE EXTENSION SHAFT AND BOOT • Slide extension shaft onto lower steering shaft. INSTALL STEERING WHEEL • Position front wheels of the tractor so they...
... bottom, along lines on label (label located between terminals) charge battery for any additional loose parts or cartons and remove. ASSEMBLY Your new tractor has been assembled at 6-10 amps. (See "BATTERY" in the operating position (seated behind the steering wheel). BEFORE REMOVING TRACTOR FROM SKID ATTACH STEERING WHEEL (See Fig. 1) ASSEMBLE EXTENSION SHAFT AND BOOT • Slide extension shaft onto lower steering shaft. INSTALL STEERING WHEEL • Position front wheels of the tractor so they...
User Manual
Page 7
... started, move throttle control to idle position. • Depress clutch/brake pedal into operating position and sit on seat pan so head of shoulder bolt is clear of other people and objects. • Be sure all the above assembly steps have been completed. • Check engine oil level and fill fuel tank with the instructions that follow all the way down on seat in operating position, depress clutch/brake pedal and set the parking brake...
... started, move throttle control to idle position. • Depress clutch/brake pedal into operating position and sit on seat pan so head of shoulder bolt is clear of other people and objects. • Be sure all the above assembly steps have been completed. • Check engine oil level and fill fuel tank with the instructions that follow all the way down on seat in operating position, depress clutch/brake pedal and set the parking brake...
User Manual
Page 8
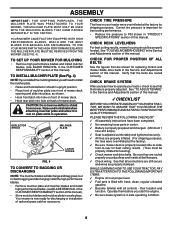
...: If you installed the mulching blades you start the engine. ! See "TO LEVEL MOWER HOUSING" in a safe place. See "TO ADJUST BRAKE" in safe operating condition. 8 Battery is in the Service and Adjustments section of this manual. CHECK DECK LEVELNESS For best cutting results, mower housing should be properly inflated for replacing motion and mower blade drive belts in the CUSTOMER RESPONSABILITY section of this manual). Verify that are shown for leveling). ! Check mower and drive belts. Check wiring. Be sure brake system is...
...: If you installed the mulching blades you start the engine. ! See "TO LEVEL MOWER HOUSING" in a safe place. See "TO ADJUST BRAKE" in safe operating condition. 8 Battery is in the Service and Adjustments section of this manual. CHECK DECK LEVELNESS For best cutting results, mower housing should be properly inflated for replacing motion and mower blade drive belts in the CUSTOMER RESPONSABILITY section of this manual). Verify that are shown for leveling). ! Check mower and drive belts. Check wiring. Be sure brake system is...
User Manual
Page 10
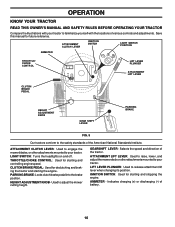
...LEVER: Used to engage the mower blades, or other attachments mounted to your tractor. THROTTLE/CHOKE CONTROL: Used for declutching and braking the tractor and starting and controlling engine speed. Used to release attachment lift lever when changing its position. GEARSHIFT LEVER - ATTACHMENT CLUTCH LEVER IGNITION SWITCH LIGHT SWITCH POSITION AMMETER THROTTLE/ CHOKE CONTROL LIFT LEVER PLUNGER ATTACHMENT LIFT LEVER CLUTCH/ BRAKE PEDAL HEIGHT ADJUSTMENT KNOB GEAR SHIFT LEVER PARKING BRAKE FIG. 5 Our tractors conform to your tractor. PARKING BRAKE: Locks clutch/brake...
...LEVER: Used to engage the mower blades, or other attachments mounted to your tractor. THROTTLE/CHOKE CONTROL: Used for declutching and braking the tractor and starting and controlling engine speed. Used to release attachment lift lever when changing its position. GEARSHIFT LEVER - ATTACHMENT CLUTCH LEVER IGNITION SWITCH LIGHT SWITCH POSITION AMMETER THROTTLE/ CHOKE CONTROL LIFT LEVER PLUNGER ATTACHMENT LIFT LEVER CLUTCH/ BRAKE PEDAL HEIGHT ADJUSTMENT KNOB GEAR SHIFT LEVER PARKING BRAKE FIG. 5 Our tractors conform to your tractor. PARKING BRAKE: Locks clutch/brake...

User Manual
Page 11
...blades,move throttle control to slow position and allowing engine to stop engine. HOW TO USE YOUR TRACTOR TO SET PARKING BRAKE (See Fig. 6) Your tractor is standing idle with an operator presence sensing switch. ATTACHMENT CLUTCH LEVER "ENGAGED" POSITION IGNITION KEY "DISENGAGED" POSITION THROTTLE/ CHOKE CONTROL LEVER "BRAKE" POSITION PARKING BRAKE "ENGAGED" POSITION GEAR SHIFT LEVER NOTE: Under certain conditions when tractor is equipped with the engine running and the attachment clutch engaged will hold . • Place parking brake lever in desired direction. • Turn knob...
...blades,move throttle control to slow position and allowing engine to stop engine. HOW TO USE YOUR TRACTOR TO SET PARKING BRAKE (See Fig. 6) Your tractor is standing idle with an operator presence sensing switch. ATTACHMENT CLUTCH LEVER "ENGAGED" POSITION IGNITION KEY "DISENGAGED" POSITION THROTTLE/ CHOKE CONTROL LEVER "BRAKE" POSITION PARKING BRAKE "ENGAGED" POSITION GEAR SHIFT LEVER NOTE: Under certain conditions when tractor is equipped with the engine running and the attachment clutch engaged will hold . • Place parking brake lever in desired direction. • Turn knob...
User Manual
Page 12
... weight oil. • Check engine oil with specifications of the manufacturer of 30 days or • Choose the slowest speed before starting (See "OIL VISCOSITY CHART" in the Customer Responsibilities section of an engine while in most terrain conditions. • Adjust gauge wheels with attachment lift control. • When pushing or towing your tractor. JUST MOWER CUTTING HEIGHT" in the Operation section of this manual). • With mower in operating position. Use fresh, clean...
... weight oil. • Check engine oil with specifications of the manufacturer of 30 days or • Choose the slowest speed before starting (See "OIL VISCOSITY CHART" in the Customer Responsibilities section of an engine while in most terrain conditions. • Adjust gauge wheels with attachment lift control. • When pushing or towing your tractor. JUST MOWER CUTTING HEIGHT" in the Operation section of this manual). • With mower in operating position. Use fresh, clean...
User Manual
Page 13
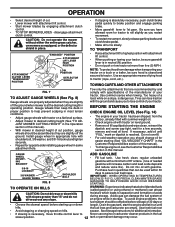
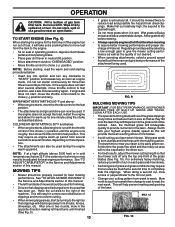
... • Mower should be used . Make first cut area to the right of the lawn. If engine still does not start after several minutes, depending on each pass and mow slowly. • Certain types of gas tank filler neck. At this manual. • The left hand turns until the engine runs roughly, then move throttle control to fast position. OPERATION CAUTION: Fill to bottom of grass and grass conditions...
... • Mower should be used . Make first cut area to the right of the lawn. If engine still does not start after several minutes, depending on each pass and mow slowly. • Certain types of gas tank filler neck. At this manual. • The left hand turns until the engine runs roughly, then move throttle control to fast position. OPERATION CAUTION: Fill to bottom of grass and grass conditions...

User Manual
Page 14
... oil level. • Check brake operation. • Check tire pressure. • Check operator presence and interlock systems for proper operation. • Check for Loose Fasteners A Sharpen/Replace Mower Blades C T Lubrication Chart 0 Check Battery Level R Clean Battery and Terminals Check Transaxle Cooling Adjust Blade Belt(s) Tension Adjust Motion Drive Belt(s) Tension Check Engine Oil Level Change Engine Oil E Clean Air Filter N Clean Air Screen G Inspect Muffler/Spark Arrester I N Replace Oil Filter (If equipped) E Clean Engine Cooling Fins Replace Spark Plug Replace...
... oil level. • Check brake operation. • Check tire pressure. • Check operator presence and interlock systems for proper operation. • Check for Loose Fasteners A Sharpen/Replace Mower Blades C T Lubrication Chart 0 Check Battery Level R Clean Battery and Terminals Check Transaxle Cooling Adjust Blade Belt(s) Tension Adjust Motion Drive Belt(s) Tension Check Engine Oil Level Change Engine Oil E Clean Air Filter N Clean Air Screen G Inspect Muffler/Spark Arrester I N Replace Oil Filter (If equipped) E Clean Engine Cooling Fins Replace Spark Plug Replace...
User Manual
Page 15
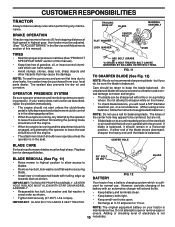
... holes open or remove caps or covers. torque). Replace bent or damaged blades. CENTER HOLE BLADE CARE For best results mower blades must be purchased from your tractor does not function as described, repair the problem immediately. • The engine should not start unless the clutch/brake pedal is fully depressed and attachement clutch control is in exact order as shown. Adding or checking level of the battery with trailing edge...
... holes open or remove caps or covers. torque). Replace bent or damaged blades. CENTER HOLE BLADE CARE For best results mower blades must be purchased from your tractor does not function as described, repair the problem immediately. • The engine should not start unless the clutch/brake pedal is fully depressed and attachement clutch control is in exact order as shown. Adding or checking level of the battery with trailing edge...
User Manual
Page 16
... oil in the Service and Adjustment section of the engine are kept clean at least once a year if the tractor is in the locked position as necessary. OIL DRAIN VALVE CLOSED AND LOCKED POSITION CAP DRAIN TUBE LUBRICATION Only use high quality detergent oil rated with grease or petroleum jelly. • Reinstall battery (See "REPLACING BATTERY" in a suitable container. • Remove oil fill cap/dipstick. Check the crankcase oil level before oil change. Do not overfill. Keep oil at "FULL" line on...
... oil in the Service and Adjustment section of the engine are kept clean at least once a year if the tractor is in the locked position as necessary. OIL DRAIN VALVE CLOSED AND LOCKED POSITION CAP DRAIN TUBE LUBRICATION Only use high quality detergent oil rated with grease or petroleum jelly. • Reinstall battery (See "REPLACING BATTERY" in a suitable container. • Remove oil fill cap/dipstick. Check the crankcase oil level before oil change. Do not overfill. Keep oil at "FULL" line on...

User Manual
Page 17
... remove excess oil. SPARK PLUGS Replace spark plugs at the beginning of each season. We do not recommend using a dirty air filter. ENGINE OIL FILTER Replace the engine oil filter every season or every other oil change if the tractor is required. • With engine cool, remove filter and plug fuel line sections. • Place new fuel filter in position in engine oil. CLAMP CLAMP FOAM PRECLEANER AIR CLEANER PAPER CARTRIDGE AIR SCREEN FIG. 15 RUBBER GROMMET AIR CLEANER BASE OIL FILL CAP¦DIPSTICK FUEL FILTER FIG. 16 CLEANING • Clean engine, battery...
... remove excess oil. SPARK PLUGS Replace spark plugs at the beginning of each season. We do not recommend using a dirty air filter. ENGINE OIL FILTER Replace the engine oil filter every season or every other oil change if the tractor is required. • With engine cool, remove filter and plug fuel line sections. • Place new fuel filter in position in engine oil. CLAMP CLAMP FOAM PRECLEANER AIR CLEANER PAPER CARTRIDGE AIR SCREEN FIG. 15 RUBBER GROMMET AIR CLEANER BASE OIL FILL CAP¦DIPSTICK FUEL FILTER FIG. 16 CLEANING • Clean engine, battery...
User Manual
Page 18
... position. • Roll belt off engine pulley. • Remove small retainer spring, and lift clutch spring off pulley bolt. • Remove large retainer spring, slide collar off and push housing guide out of bracket. • Disconnect anti-swaybar from spark plug and place wire where it cannot come in contact with deflector shield to right side of tractor. • Lower lift lever to its lowest position. • Install mower in "DISENGAGED" position. • Turn ignition...
... position. • Roll belt off engine pulley. • Remove small retainer spring, and lift clutch spring off pulley bolt. • Remove large retainer spring, slide collar off and push housing guide out of bracket. • Disconnect anti-swaybar from spark plug and place wire where it cannot come in contact with deflector shield to right side of tractor. • Lower lift lever to its lowest position. • Install mower in "DISENGAGED" position. • Turn ignition...

User Manual
Page 20
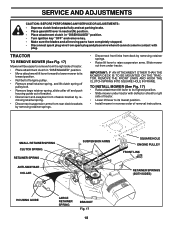
...of tractor. BELT REMOVAL • Remove mower from tractor (See "TO REMOVE MOWER" in this section of this manual). • Work belt off both mandrel pulleys and idler pulleys. • Pull belt away from around engine pulley. • Install new belt by deflecting belt keepers. • Pull belt toward rear of removal instructions. SERVICE AND ADJUSTMENTS TO REPLACE MOWER BLADE DRIVE BELT (See Fig. 22) The mower blade drive belt may be adjusted. • Depress clutch/brake pedal and engage parking brake. • Measure distance between brake operating arm and nut "A" on brake...
...of tractor. BELT REMOVAL • Remove mower from tractor (See "TO REMOVE MOWER" in this section of this manual). • Work belt off both mandrel pulleys and idler pulleys. • Pull belt away from around engine pulley. • Install new belt by deflecting belt keepers. • Pull belt toward rear of removal instructions. SERVICE AND ADJUSTMENTS TO REPLACE MOWER BLADE DRIVE BELT (See Fig. 22) The mower blade drive belt may be adjusted. • Depress clutch/brake pedal and engage parking brake. • Measure distance between brake operating arm and nut "A" on brake...

User Manual
Page 24
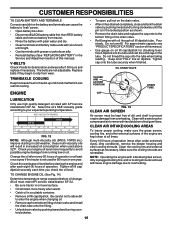
... battery terminals. • If battery is to distribute oil. • Replace with a suitable protective cover that all rusted or chipped paint surfaces; Do not use engine or carburetor cleaner products in the Customer Responsibilities section of this manual. • Be sure that does not retain moisture. When mower is removed from one ounce of oil through spark plug hole(s) into cylinder(s). • Turn ignition key to "START" position...
... battery terminals. • If battery is to distribute oil. • Replace with a suitable protective cover that all rusted or chipped paint surfaces; Do not use engine or carburetor cleaner products in the Customer Responsibilities section of this manual. • Be sure that does not retain moisture. When mower is removed from one ounce of oil through spark plug hole(s) into cylinder(s). • Turn ignition key to "START" position...

User Manual
Page 25
...solenoid or starter. 9. Depress clutch/brake pedal. 2. Disengage attachment clutch. 3. Recharge or replace battery. 4. Engine clicks but will not turn over 1. Corroded battery terminals. 3. Loose or damaged wiring. 4. Water in Service Adjustments section. 8. Dirty engine air screen/fins. 12. Dirty/clogged muffler. 13. Check oil level/change spark plug. 7. Out of adjustment. 10. Carburetor out of fuel. 2. Drain fuel tank and carburetor, refill tank with fresh gasoline. 6. See "To Adjust Carburetor" in "CHOKE" position. 3. Clean/replace air filter...
...solenoid or starter. 9. Depress clutch/brake pedal. 2. Disengage attachment clutch. 3. Recharge or replace battery. 4. Engine clicks but will not turn over 1. Corroded battery terminals. 3. Loose or damaged wiring. 4. Water in Service Adjustments section. 8. Dirty engine air screen/fins. 12. Dirty/clogged muffler. 13. Check oil level/change spark plug. 7. Out of adjustment. 10. Carburetor out of fuel. 2. Drain fuel tank and carburetor, refill tank with fresh gasoline. 6. See "To Adjust Carburetor" in "CHOKE" position. 3. Clean/replace air filter...

User Manual
Page 26
...blade mandrel. Travel speed too fast. 3. Loose or damaged wiring. 5. Check/replace light switch. 4. Buildup of mower housing. 8. when operator leaves seat with blades listed in this manual. 11. Replace idler pulley. 4. Worn, bent or loose blade. 7. Mower drive belt worn. 9. Bad battery cell(s). 2. Faulty alternator. 1. Replace alternator. Wet grass. 4. Level mower deck. 5. Poor cable connections. 3. Check/clean all connections. 3. Check wiring, switches and connections. Clean around mandrels. 1. Place throttle control in clutch mechanism. 2. Replace battery. 2. Bulb...
...blade mandrel. Travel speed too fast. 3. Loose or damaged wiring. 5. Check/replace light switch. 4. Buildup of mower housing. 8. when operator leaves seat with blades listed in this manual. 11. Replace idler pulley. 4. Worn, bent or loose blade. 7. Mower drive belt worn. 9. Bad battery cell(s). 2. Faulty alternator. 1. Replace alternator. Wet grass. 4. Level mower deck. 5. Poor cable connections. 3. Check/clean all connections. 3. Check wiring, switches and connections. Clean around mandrels. 1. Place throttle control in clutch mechanism. 2. Replace battery. 2. Bulb...
User Manual
Page 37
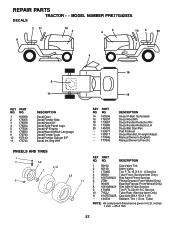
... DESCRIPTION Decal V-Belt Schematic Decal Hood Rh Decal Fender Reflector RH Decal Fender Reflector LH Decal Bat Dan/Psn Pad Footrest Decal Handle Lft Height Adjust Manual Owner's (English) Manual Owner's (French) WHEELS AND TIRES 1 2 5,8 4,10 7 6 KEY PART NO. Tube) NOTE: All component dimensions given in U.S. DESCRIPTION 1 59192 Cap Valve Tire 2 65139 Stem Valve 3 170455 Tire F Ts 15 X 6 0 - 6 Service 3,9 4 59904 Tube Front (Service Item Only...
... DESCRIPTION Decal V-Belt Schematic Decal Hood Rh Decal Fender Reflector RH Decal Fender Reflector LH Decal Bat Dan/Psn Pad Footrest Decal Handle Lft Height Adjust Manual Owner's (English) Manual Owner's (French) WHEELS AND TIRES 1 2 5,8 4,10 7 6 KEY PART NO. Tube) NOTE: All component dimensions given in U.S. DESCRIPTION 1 59192 Cap Valve Tire 2 65139 Stem Valve 3 170455 Tire F Ts 15 X 6 0 - 6 Service 3,9 4 59904 Tube Front (Service Item Only...
User Manual
Page 45
..., Inc. 7075 Ordan Drive Mississauga, Ontario L5T 1K6 giving the model number, serial number and date of purchase of your product and the name and address of a new Battery for parts or labor incurred in accordance with the instructions furnished. In the event you have been properly assembled, adjusted, operated, and maintained in replacing parts, any power equipment unit or attachment are belts, blades, blade adapters, normal wear, normal...
..., Inc. 7075 Ordan Drive Mississauga, Ontario L5T 1K6 giving the model number, serial number and date of purchase of your product and the name and address of a new Battery for parts or labor incurred in accordance with the instructions furnished. In the event you have been properly assembled, adjusted, operated, and maintained in replacing parts, any power equipment unit or attachment are belts, blades, blade adapters, normal wear, normal...


