

English Manual
Page 3
... under the treadmill. 4. The pulse sensor is properly assembled. (See ASSEMBLY on page 6, and HOW TO FOLD AND MOVE THE TREADMILL on page 9. Use only a single-outlet surge suppressor that the storage latch is the responsibility of the owner to the control system of 12 and pets away from damage, place a mat under the treadmill. 21. Use the treadmill only as an exercise aid in determining heart rate trends...
... under the treadmill. 4. The pulse sensor is properly assembled. (See ASSEMBLY on page 6, and HOW TO FOLD AND MOVE THE TREADMILL on page 9. Use only a single-outlet surge suppressor that the storage latch is the responsibility of the owner to the control system of 12 and pets away from damage, place a mat under the treadmill. 21. Use the treadmill only as an exercise aid in determining heart rate trends...

English Manual
Page 4
... Customer Service Department, toll-free, to do so by pressing the speed and incline buttons. Never insert or drop any object into any exercise program, consult your physician. scribed in -home use of the treadmill regularly. 26. 22. When using iFIT.com CDs and videos, you can manually override the speed and incline settings at the right is intended for in this manual). Always remove iFIT.com CDs and videos from your treadmill...
... Customer Service Department, toll-free, to do so by pressing the speed and incline buttons. Never insert or drop any object into any exercise program, consult your physician. scribed in -home use of the treadmill regularly. 26. 22. When using iFIT.com CDs and videos, you can manually override the speed and incline settings at the right is intended for in this manual). Always remove iFIT.com CDs and videos from your treadmill...

English Manual
Page 5
... labeled parts. Before reading further, please review the drawing below and familiarize yourself with innovative design to the treadmill (see the front cover of the treadmill is PFTL59023. Water Bottle Holder (Bottle not included) Pulse Sensor Latch Knob LEFT SIDE Book Holder Console Handrail Key/Clip RIGHT SIDE Reset/Off Circuit Breaker Foot Rail Walking Belt Rear Roller Adjustment Bolts Power Cord Front Wheel Cushioned Walking Platform 5 The model number of this manual for...
... labeled parts. Before reading further, please review the drawing below and familiarize yourself with innovative design to the treadmill (see the front cover of the treadmill is PFTL59023. Water Bottle Holder (Bottle not included) Pulse Sensor Latch Knob LEFT SIDE Book Holder Console Handrail Key/Clip RIGHT SIDE Reset/Off Circuit Breaker Foot Rail Walking Belt Rear Roller Adjustment Bolts Power Cord Front Wheel Cushioned Walking Platform 5 The model number of this manual for...

English Manual
Page 6
... the Right Upright as shown. Hand tighten two Upright Bolts (112) with six 1" Tek Screws (13). Make sure that the treadmill will be more stable. Use the PART IDENTIFICATION CHART in the direction shown. Partially fold the Frame (51) so that the end of the Wire Harness (49) does not fall into the lower end of the Right Upright and out of the Console Base...
... the Right Upright as shown. Hand tighten two Upright Bolts (112) with six 1" Tek Screws (13). Make sure that the treadmill will be more stable. Use the PART IDENTIFICATION CHART in the direction shown. Partially fold the Frame (51) so that the end of the Wire Harness (49) does not fall into the lower end of the Right Upright and out of the Console Base...
English Manual
Page 9
... electrician. Grounded Outlet Box Adapter Surge Suppressor 800-806-3651 and order part number 146148. Use only a single-outlet surge suppressor that is damaged, the walking belt may change speed or stop unexpectedly, which may be installed by a metal screw. There must be seriously damaged by a qualified electrician. This product is functioning properly. Important: The treadmill is UL 1449 listed as to a permanent...
... electrician. Grounded Outlet Box Adapter Surge Suppressor 800-806-3651 and order part number 146148. Use only a single-outlet surge suppressor that is damaged, the walking belt may change speed or stop unexpectedly, which may be installed by a metal screw. There must be seriously damaged by a qualified electrician. This product is functioning properly. Important: The treadmill is UL 1449 listed as to a permanent...

English Manual
Page 10
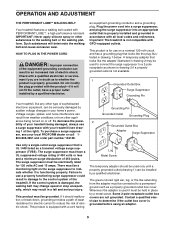
... go to be changed with the touch of a button. iFIT.com CD and video programs automatically control the speed and incline of the treadmill as a personal trainer guides you can connect the treadmill to your computer, you through every step of your home. With the treadmill connected to your exercise. Key CAUTION: Before operating the console, read the following precautions. • Do not stand on the walking belt when turning on page 11...
... go to be changed with the touch of a button. iFIT.com CD and video programs automatically control the speed and incline of the treadmill as a personal trainer guides you can connect the treadmill to your computer, you through every step of your home. With the treadmill connected to your exercise. Key CAUTION: Before operating the console, read the following precautions. • Do not stand on the walking belt when turning on page 11...

English Manual
Page 11
... manual mode. 3 Press the Start button or the Speed L button to the key (see the drawing on page 12) or the optional chest pulse sensor (see page 25). 4 Change the incline of the treadmill as desired. To change the incline of the treadmill, press the Incline buttons. To change the speed setting quickly, press the Quick Speed buttons. The program display- When the manual mode or the iFIT.com mode is inserted, the manual mode will be selected and the Manual Control indicator will change from one number...
... manual mode. 3 Press the Start button or the Speed L button to the key (see the drawing on page 12) or the optional chest pulse sensor (see page 25). 4 Change the incline of the treadmill as desired. To change the incline of the treadmill, press the Incline buttons. To change the speed setting quickly, press the Quick Speed buttons. The program display- When the manual mode or the iFIT.com mode is inserted, the manual mode will be selected and the Manual Control indicator will change from one number...

English Manual
Page 12
... demo mode. The display will appear in the "demo" mode. Next, remove the key from one number to the storage position or the treadmill will show the elapsed time and the incline level of measurement, first hold down the Stop button while inserting the key into the console. Note: Each time the speed changes, the display will show the current speed setting for metric kilometers will change the unit of the program...
... demo mode. The display will appear in the "demo" mode. Next, remove the key from one number to the storage position or the treadmill will show the elapsed time and the incline level of measurement, first hold down the Stop button while inserting the key into the console. Note: Each time the speed changes, the display will show the current speed setting for metric kilometers will change the unit of the program...

English Manual
Page 13
... manual mode will move back up. The program will sound. When a personal trainer program is selected, the Time/Incline/Segment Time display will flash the maximum incline setting for the program for the current segment is pressed, an additional indicator will move one of the indicators in those columns as well. A moment after the speed settings have the same number of the program ends, the treadmill will automatically adjust...
... manual mode will move back up. The program will sound. When a personal trainer program is selected, the Time/Incline/Segment Time display will flash the maximum incline setting for the program for the current segment is pressed, an additional indicator will move one of the indicators in those columns as well. A moment after the speed settings have the same number of the program ends, the treadmill will automatically adjust...

English Manual
Page 14
... steps below to the off the demo mode. When you are finished using the treadmill, move the reset/off circuit breaker switch near the power cord to use a heart rate program. 1 Put on the console remain lit after the key is removed, the console is 95). 14 If you are 30 years old, a target heart rate setting of 50% is equal to flash. Note: If the displays and various indicators on the chest pulse sensor...
... steps below to the off the demo mode. When you are finished using the treadmill, move the reset/off circuit breaker switch near the power cord to use a heart rate program. 1 Put on the console remain lit after the key is removed, the console is 95). 14 If you are 30 years old, a target heart rate setting of 50% is equal to flash. Note: If the displays and various indicators on the chest pulse sensor...

English Manual
Page 15
... in the program. Each heart rate program is too far below the current target heart rate setting, the incline of the treadmill may be programmed for the program will flash in the Speed/Min-Mile display. Hold the handrails and begin to step 5. The walking belt will then slow to a stop the program at the beginning. 7 Follow your heart rate closer to bring your progress with the chest pulse sensor. To stop . See step 6 on page...
... in the program. Each heart rate program is too far below the current target heart rate setting, the incline of the treadmill may be programmed for the program will flash in the Speed/Min-Mile display. Hold the handrails and begin to step 5. The walking belt will then slow to a stop the program at the beginning. 7 Follow your heart rate closer to bring your progress with the chest pulse sensor. To stop . See step 6 on page...

English Manual
Page 18
... the button is pressed, your personal trainer will not respond to your VCR. 34 OUT B ANT. The treadmill will begin guiding you when the speed and/or incline of the cable into the included adapter. If you are using an iFIT.com videocassette, insert the videocassette into the console. Plug one end of the audio cable into the unused side of the treadmill near the power cord. If...
... the button is pressed, your personal trainer will not respond to your VCR. 34 OUT B ANT. The treadmill will begin guiding you when the speed and/or incline of the cable into the included adapter. If you are using an iFIT.com videocassette, insert the videocassette into the console. Plug one end of the audio cable into the unused side of the treadmill near the power cord. If...

English Manual
Page 19
... program, press the Start button or the Speed L button. Note: To use another flat surface instead of on the console. • See the instructions near the bottom of the CD or video program. If the volume is too high or too low, the console may not detect the program signals. • Make sure that the audio cable is properly connected, that it is completed, remove the key. See step...
... program, press the Start button or the Speed L button. Note: To use another flat surface instead of on the console. • See the instructions near the bottom of the CD or video program. If the volume is too high or too low, the console may not detect the program signals. • Make sure that the audio cable is properly connected, that it is completed, remove the key. See step...

English Manual
Page 20
... manual mode will begin walking. Follow the steps below to the key and slide the clip onto the waistband of the treadmill does not change when a "chirp" is heard, make sure that the audio cable is properly connected, that it is fully plugged in, and that the Time/Incline/Segment Time display is heard, the speed and/or incline will begin to step 5. HOW TO USE PROGRAMS DIRECTLY FROM...
... manual mode will begin walking. Follow the steps below to the key and slide the clip onto the waistband of the treadmill does not change when a "chirp" is heard, make sure that the audio cable is properly connected, that it is fully plugged in, and that the Time/Incline/Segment Time display is heard, the speed and/or incline will begin to step 5. HOW TO USE PROGRAMS DIRECTLY FROM...

English Manual
Page 21
... Speed/Min-Mile display. The chest pulse sensor offers hands-free operation, and enables you to be removed from the console. 21 When the information mode is intended to turn on the console will show the total number of hours the treadmill has been used only when a treadmill is in the demo mode, the power cord can be plugged in, the key can be used . This mode is selected, the following information will be blank. Press the Speed L button...
... Speed/Min-Mile display. The chest pulse sensor offers hands-free operation, and enables you to be removed from the console. 21 When the information mode is intended to turn on the console will show the total number of hours the treadmill has been used only when a treadmill is in the demo mode, the power cord can be plugged in, the key can be used . This mode is selected, the following information will be blank. Press the Speed L button...

English Manual
Page 24
... power cord is needed, please call our toll-free Customer Service Department. If further assistance is plugged in . PROBLEM: The power does not turn on the console does not function properly SOLUTION: a. If the switch protrudes as shown, the reset/off circuit breaker located on the treadmill near the power cord (see page 9). Remove the three indicated 3/4" Screws (37). 64 37 Raise the Uprights (64) to the floor. PROBLEM: The speed display...
... power cord is needed, please call our toll-free Customer Service Department. If further assistance is plugged in . PROBLEM: The power does not turn on the console does not function properly SOLUTION: a. If the switch protrudes as shown, the reset/off circuit breaker located on the treadmill near the power cord (see page 9). Remove the three indicated 3/4" Screws (37). 64 37 Raise the Uprights (64) to the floor. PROBLEM: The speed display...

English Manual
Page 25
... speed reading. Plug in the power cord, insert the key, and run the treadmill for a few minutes. If the walking belt is changing, remove the key. Using the allen wrench, turn both rear roller bolts clockwise, 1/4 of a turn . if the walking belt has shifted to the right, turn the bolt counterclockwise 1/2 of the walking belt 3 to keep the walking belt centered. If necessary, loosen the Screw 18 101 (24) and move the Reed Switch slightly. When the walking belt is properly tightened...
... speed reading. Plug in the power cord, insert the key, and run the treadmill for a few minutes. If the walking belt is changing, remove the key. Using the allen wrench, turn both rear roller bolts clockwise, 1/4 of a turn . if the walking belt has shifted to the right, turn the bolt counterclockwise 1/2 of the walking belt 3 to keep the walking belt centered. If necessary, loosen the Screw 18 101 (24) and move the Reed Switch slightly. When the walking belt is properly tightened...

English Manual
Page 26
... exercise must exercise at least one day of the treadmill until your heart rate during exercise, use stored fat calories for fat burning; A Cool-down . The pulse sensor is not a medical device. If your goal is to exercise with preexisting health problems. The pulse sensor is intended only as a guide. A proper warm-up to the nearest ten years). The lower two numbers are rounded off to five workouts...
... exercise must exercise at least one day of the treadmill until your heart rate during exercise, use stored fat calories for fat burning; A Cool-down . The pulse sensor is not a medical device. If your goal is to exercise with preexisting health problems. The pulse sensor is intended only as a guide. A proper warm-up to the nearest ten years). The lower two numbers are rounded off to five workouts...

English Manual
Page 29
... Screw Small Star Washer Upright Wire Right Cup Holder Frame Incline Motor Bolt Caution Decal Pulse Sensor Right Upright Wheel Bolt Roller Star Washer Wheel Incline Motor Console Wire Harness Power Cord Grommet Static Decal Left Upright Reset/Off Circuit Breaker Audio Wire Nut Isolator Bracket Cover Belly Pan Audio Wire Frame Pivot Bolt Base Endcap Isolator Belt Guide Isolator Assembly Platform Screw Foot Rail Walking Belt Front Roller/Pulley Ground Nut Walking Platform 8" Cable Tie Left Bottom Handgrip Tie Holder Clamp Releasable Tie Pulse Wire Staple Cover Rear Roller Rear...
... Screw Small Star Washer Upright Wire Right Cup Holder Frame Incline Motor Bolt Caution Decal Pulse Sensor Right Upright Wheel Bolt Roller Star Washer Wheel Incline Motor Console Wire Harness Power Cord Grommet Static Decal Left Upright Reset/Off Circuit Breaker Audio Wire Nut Isolator Bracket Cover Belly Pan Audio Wire Frame Pivot Bolt Base Endcap Isolator Belt Guide Isolator Assembly Platform Screw Foot Rail Walking Belt Front Roller/Pulley Ground Nut Walking Platform 8" Cable Tie Left Bottom Handgrip Tie Holder Clamp Releasable Tie Pulse Wire Staple Cover Rear Roller Rear...

English Manual
Page 31
... the following information: • The MODEL NUMBER OF THE PRODUCT (PFTL59023) • The NAME OF THE PRODUCT (PROFORM® 520 treadmill) • The SERIAL NUMBER OF THE PRODUCT (see the front cover of this manual) • The KEY NUMBER AND DESCRIPTION OF THE PART(S) (see the EXPLODED DRAWING and PART LIST attached in the center of this manual) LIMITED WARRANTY ICON Health & Fitness, Inc. (ICON), warrants this warranty is limited in connection with the use or performance...
... the following information: • The MODEL NUMBER OF THE PRODUCT (PFTL59023) • The NAME OF THE PRODUCT (PROFORM® 520 treadmill) • The SERIAL NUMBER OF THE PRODUCT (see the front cover of this manual) • The KEY NUMBER AND DESCRIPTION OF THE PART(S) (see the EXPLODED DRAWING and PART LIST attached in the center of this manual) LIMITED WARRANTY ICON Health & Fitness, Inc. (ICON), warrants this warranty is limited in connection with the use or performance...


