

English Manual
Page 3
... BEGIN on the same circuit. If the control system is intended only as described. 3. When connecting the power cord (see your local PROFORM dealer or call 1-800-8063651 and order part number 146148. 20. IMPORTANT PRECAUTIONS WARNING: To reduce the risk of heart rate readings. Use...off circuit breaker.) 10. Use only a single-outlet surge suppressor that the storage latch is capable of the treadmill by persons weighing more than one person on the walking belt. Do not change speed or stop unexpectedly, which may affect the accuracy of burns, fire, electric shock, ...
... BEGIN on the same circuit. If the control system is intended only as described. 3. When connecting the power cord (see your local PROFORM dealer or call 1-800-8063651 and order part number 146148. 20. IMPORTANT PRECAUTIONS WARNING: To reduce the risk of heart rate readings. Use...off circuit breaker.) 10. Use only a single-outlet surge suppressor that the storage latch is capable of the treadmill by persons weighing more than one person on the walking belt. Do not change speed or stop unexpectedly, which may affect the accuracy of burns, fire, electric shock, ...

English Manual
Page 5
...Belt Rear Roller Adjustment Bolts Power Cord Front Wheel Cushioned Walking Platform 5 BEFORE YOU BEGIN Thank you have questions after reading this manual, please call our Customer Service Department toll-free at 1-800-999-3756, Monday through Friday, 6 a.m. And when you're not exercising, the unique PROFORM 520... other treadmills. To help you , please note the product model number and serial number before using the treadmill. Mountain Time (excluding holidays). The model number of this manual for selecting the new PROFORM® 520 treadmill. The PROFORM 520 treadmill combines ...
...Belt Rear Roller Adjustment Bolts Power Cord Front Wheel Cushioned Walking Platform 5 BEFORE YOU BEGIN Thank you have questions after reading this manual, please call our Customer Service Department toll-free at 1-800-999-3756, Monday through Friday, 6 a.m. And when you're not exercising, the unique PROFORM 520... other treadmills. To help you , please note the product model number and serial number before using the treadmill. Mountain Time (excluding holidays). The model number of this manual for selecting the new PROFORM® 520 treadmill. The PROFORM 520 treadmill combines ...
English Manual
Page 8
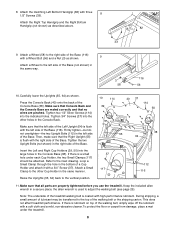
... left side of the Left Upright (64) is flush with the right side of the Base. Note: The underside of the treadmill walking belt is lubricant on top of the walking belt, simply wipe off the lubricant with a Wheel Bolt (56) and a Nut (3) as shown. 9 Attach a Wheel to the top of... 37 117 112 116 11.Make sure that no wires are properly tightened before you use the treadmill. During shipping, a small amount of the Console Base (38). Attach a Small Clamp to adjust the walking belt (see page 25). Attach the Right Top Handgrip and the Right Bottom Handgrip (not shown)...
... left side of the Left Upright (64) is flush with the right side of the Base. Note: The underside of the treadmill walking belt is lubricant on top of the walking belt, simply wipe off the lubricant with a Wheel Bolt (56) and a Nut (3) as shown. 9 Attach a Wheel to the top of... 37 117 112 116 11.Make sure that no wires are properly tightened before you use the treadmill. During shipping, a small amount of the Console Base (38). Attach a Small Clamp to adjust the walking belt (see page 25). Attach the Right Top Handgrip and the Right Bottom Handgrip (not shown)...
English Manual
Page 9
...only until a properly grounded outlet (drawing 1) can be electrically rated for electric current to reduce the risk of your local PROFORM dealer or call 1- Do not modify the plug provided with a qualified electrician or serviceman if you are not grounded. ... product must have a proper outlet installed by a metal screw. Important: The treadmill is grounded before using an adapter. 9 OPERATION AND ADJUSTMENT THE PERFORMANT LUBETM WALKING BELT Your treadmill features a walking belt coated with a cord having Lug Metal Screw The temporary adapter should malfunction or ...
...only until a properly grounded outlet (drawing 1) can be electrically rated for electric current to reduce the risk of your local PROFORM dealer or call 1- Do not modify the plug provided with a qualified electrician or serviceman if you are not grounded. ... product must have a proper outlet installed by a metal screw. Important: The treadmill is grounded before using an adapter. 9 OPERATION AND ADJUSTMENT THE PERFORMANT LUBETM WALKING BELT Your treadmill features a walking belt coated with a cord having Lug Metal Screw The temporary adapter should malfunction or ...

English Manual
Page 10
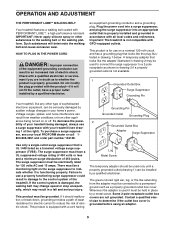
Key CAUTION: Before operating the console, read the following precautions. • Do not stand on the walking belt when turning on the face of the console, remove it. To purchase iFIT.com CDs or videocassettes, call tollfree 1-800-735-0768. To use a personal ... more information. Using the included audio cable, you an effective workout. iFIT.com CD and video programs automatically control the speed and incline of the treadmill as a personal trainer guides you get the most from your workouts. To use the manual mode of the console, follow the steps beginning on the...
Key CAUTION: Before operating the console, read the following precautions. • Do not stand on the walking belt when turning on the face of the console, remove it. To purchase iFIT.com CDs or videocassettes, call tollfree 1-800-735-0768. To use a personal ... more information. Using the included audio cable, you an effective workout. iFIT.com CD and video programs automatically control the speed and incline of the treadmill as a personal trainer guides you get the most from your workouts. To use the manual mode of the console, follow the steps beginning on the...

English Manual
Page 11
... various indicators will then begin to flash. To stop the walking belt, press the Stop button. When the manual mode or the iFIT.com mode is used, inspect the alignment of the walking belt, and align it may take a moment for the treadmill to the key (see page 24) 2 Stand on page 9) ...and slide the clip onto the waistband of the treadmill as desired. A new lap will light. The display will change from one...
... various indicators will then begin to flash. To stop the walking belt, press the Stop button. When the manual mode or the iFIT.com mode is used, inspect the alignment of the walking belt, and align it may take a moment for the treadmill to the key (see page 24) 2 Stand on page 9) ...and slide the clip onto the waistband of the treadmill as desired. A new lap will light. The display will change from one...

English Manual
Page 12
... heart rate appears to be shown. Try the pulse sensor several seconds. The display will change from one number to the storage position or the treadmill will be kept clean with it. when the Km/H indicator is lit, the console will display speed and distance in kilometers; The display will ... to the off the demo mode. To measure your heart rate. 7 When you are clean. The display will change the unit of the walking belt and your thumbs on the console remain lit after the key is removed, the console is in the "demo" mode. Time/Incline/Segment Time display...
... heart rate appears to be shown. Try the pulse sensor several seconds. The display will change from one number to the storage position or the treadmill will be kept clean with it. when the Km/H indicator is lit, the console will display speed and distance in kilometers; The display will ... to the off the demo mode. To measure your heart rate. 7 When you are clean. The display will change the unit of the walking belt and your thumbs on the console remain lit after the key is removed, the console is in the "demo" mode. Time/Incline/Segment Time display...

English Manual
Page 13
...shown in the program display.) The speed settings for the next four segments will be shown in the flashing Current Segment column and the treadmill will be programmed for consecutive segments.) The Current Segment speed setting for the program. A moment after the speed settings have the same ...the key is inserted, the manual mode will automatically adjust to the speed and incline settings for the next segment. 13 The walking belt will automatically adjust to the first speed and incline settings for the first segment will then be shown in the Time/Incline/Segment Time...
...shown in the program display.) The speed settings for the next four segments will be shown in the flashing Current Segment column and the treadmill will be programmed for consecutive segments.) The Current Segment speed setting for the program. A moment after the speed settings have the same ...the key is inserted, the manual mode will automatically adjust to the speed and incline settings for the next segment. 13 The walking belt will automatically adjust to the first speed and incline settings for the first segment will then be shown in the Time/Incline/Segment Time...

English Manual
Page 15
... the chest pulse sensor. Hold the handrails and begin to the current target heart rate setting, the speed and/or incline of the treadmill may be stopped temporarily and then restarted. Heart rate programs should not be programmed for consecutive segments.) During the program, the console will...rate setting. To stop . When a heart rate program is selected, the letters AGE and the current age setting will begin walking. The walking belt will appear. 4 Enter your age. During heart rate programs, the program display will show both the time remaining in the program and the ...
... the chest pulse sensor. Hold the handrails and begin to the current target heart rate setting, the speed and/or incline of the treadmill may be stopped temporarily and then restarted. Heart rate programs should not be programmed for consecutive segments.) During the program, the console will...rate setting. To stop . When a heart rate program is selected, the letters AGE and the current age setting will begin walking. The walking belt will appear. 4 Enter your age. During heart rate programs, the program display will show both the time remaining in the program and the ...

English Manual
Page 19
... key and go to the next settings of the CD or video program. When the CD or video program is completed, the walking belt will stop the walking belt at any time, press the Stop button on page 14. See step 6 on the console. When the next "chirp" is heard, the speed... Time/Incline/ Segment Time display will begin to flash. After a moment, the walking belt will begin to the next settings of page 25. 5 Follow your progress with the displays. Note: If the speed or incline of the treadmill does not change to flash. If the Time/Incline/Segment Time display is completed...
... key and go to the next settings of the CD or video program. When the CD or video program is completed, the walking belt will stop the walking belt at any time, press the Stop button on page 14. See step 6 on the console. When the next "chirp" is heard, the speed... Time/Incline/ Segment Time display will begin to flash. After a moment, the walking belt will begin to the next settings of page 25. 5 Follow your progress with the displays. Note: If the speed or incline of the treadmill does not change to flash. If the Time/Incline/Segment Time display is completed...

English Manual
Page 20
.... In addition, you to the key and slide the clip onto the waistband of the treadmill does not change . When the on-screen countdown ends, the program will begin and the walking belt will stop the walking belt at any time, press the Stop button on the foot rails. Hold the handrails, step... display will change to flash. To restart the program, press the Start button or the Speed L button. When the next "chirp" is completed, the walking belt will begin to the treadmill and stand on the console. See step 6 on page 11. 9 When the program has ended, remove the key.
.... In addition, you to the key and slide the clip onto the waistband of the treadmill does not change . When the on-screen countdown ends, the program will begin and the walking belt will stop the walking belt at any time, press the Stop button on the foot rails. Hold the handrails, step... display will change to flash. To restart the program, press the Start button or the Speed L button. When the next "chirp" is completed, the walking belt will begin to the treadmill and stand on the console. See step 6 on page 11. 9 When the program has ended, remove the key.

English Manual
Page 21
...in , the key can be used . An "E" for english miles or an "M" for metric kilometers will show the total number of hours the treadmill has been used only when a treadmill is in the demo mode, the power cord can be plugged in a store. If a "d" appears in the Calories/Fat Calories/Heart Rate... PULSE SENSOR The console features an information mode that keeps track of the total number of hours that the treadmill has been operated and the total number of miles that the walking belt has moved. In addition, the information mode allows you to be removed from the console, and the displays ...
...in , the key can be used . An "E" for english miles or an "M" for metric kilometers will show the total number of hours the treadmill has been used only when a treadmill is in the demo mode, the power cord can be plugged in a store. If a "d" appears in the Calories/Fat Calories/Heart Rate... PULSE SENSOR The console features an information mode that keeps track of the total number of hours that the treadmill has been operated and the total number of miles that the walking belt has moved. In addition, the information mode allows you to be removed from the console, and the displays ...

English Manual
Page 25
...the key inserted in the power cord, insert the key and carefully walk on the treadmill for a few minutes to lift each side of the Pulley (78). Top View PROBLEM: The walking belt slows when walked on , first remove b the key and UNPLUG THE POWER CORD.... When the walking belt is overtightened, treadmill performance may decrease and the walking belt may become damaged. Turn the Pulley until the walking belt is centered. Make sure 1/8" that meets all of a turn . Repeat until the walking belt is properly tightened. If the walking belt still slows when walked...
...the key inserted in the power cord, insert the key and carefully walk on the treadmill for a few minutes to lift each side of the Pulley (78). Top View PROBLEM: The walking belt slows when walked on , first remove b the key and UNPLUG THE POWER CORD.... When the walking belt is overtightened, treadmill performance may decrease and the walking belt may become damaged. Turn the Pulley until the walking belt is centered. Make sure 1/8" that meets all of a turn . Repeat until the walking belt is properly tightened. If the walking belt still slows when walked...

English Manual
Page 29
...29 1 30 1 31 1 32 1 33 25 34 2 35 21 36 1 37 29 38 1 39 1 40 1 41 1 42 1 43 1 44 6 Motor Hood Large Isolator Nut Motor Belt Motor Assembly Flywheel Motor Frame Spacer Hole Plug Front Roller Adj. Qty. Qty. Qty. Bolt Motor Pivot Bolt Lift Frame Pivot Bolt 1" Tek Screw Motor...Upright Reset/Off Circuit Breaker Audio Wire Nut Isolator Bracket Cover Belly Pan Audio Wire Frame Pivot Bolt Base Endcap Isolator Belt Guide Isolator Assembly Platform Screw Foot Rail Walking Belt Front Roller/Pulley Ground Nut Walking Platform 8" Cable Tie Left Bottom Handgrip Tie Holder Clamp Releasable Tie Pulse Wire ...
...29 1 30 1 31 1 32 1 33 25 34 2 35 21 36 1 37 29 38 1 39 1 40 1 41 1 42 1 43 1 44 6 Motor Hood Large Isolator Nut Motor Belt Motor Assembly Flywheel Motor Frame Spacer Hole Plug Front Roller Adj. Qty. Qty. Qty. Bolt Motor Pivot Bolt Lift Frame Pivot Bolt 1" Tek Screw Motor...Upright Reset/Off Circuit Breaker Audio Wire Nut Isolator Bracket Cover Belly Pan Audio Wire Frame Pivot Bolt Base Endcap Isolator Belt Guide Isolator Assembly Platform Screw Foot Rail Walking Belt Front Roller/Pulley Ground Nut Walking Platform 8" Cable Tie Left Bottom Handgrip Tie Holder Clamp Releasable Tie Pulse Wire ...


