

English Manual
Page 1
USER'S MANUAL SEARS, ROEBUCK AND CO., HOFFMAN ESTATES, IL 60179 Save this equipment. Write the serial number in this manual before using this manual for future reference. Serial Number Decal CAUTION Read all precautions and instructions in the space above for future reference. Model No. 831.297682 Serial No.
USER'S MANUAL SEARS, ROEBUCK AND CO., HOFFMAN ESTATES, IL 60179 Save this equipment. Write the serial number in this manual before using this manual for future reference. Serial Number Decal CAUTION Read all precautions and instructions in the space above for future reference. Model No. 831.297682 Serial No.
English Manual
Page 2
... circuit. Never move the walking belt while the power is UL 1449 listed as described in a garage or covered patio, or near water. 5. To protect the floor or carpet from damage, place a mat under the age of the owner to persons, read the following important precautions and information before operating the treadmill. 1. When connecting the power cord (see page 7), plug the power cord into a surge...
... circuit. Never move the walking belt while the power is UL 1449 listed as described in a garage or covered patio, or near water. 5. To protect the floor or carpet from damage, place a mat under the age of the owner to persons, read the following important precautions and information before operating the treadmill. 1. When connecting the power cord (see page 7), plug the power cord into a surge...

English Manual
Page 3
... treadmill, make sure that the storage latch is running. Never remove the motor hood unless instructed to raise, lower, or move the treadmill until it is one decal on page 10.) You must be performed by an authorized service representative. Do not use of high speeds. This is in -home use . 19. The pulse sensor is not a medical device. Always unplug the power cord before folding treadmill into any exercise program, consult your treadmill. SEARS...
... treadmill, make sure that the storage latch is running. Never remove the motor hood unless instructed to raise, lower, or move the treadmill until it is one decal on page 10.) You must be performed by an authorized service representative. Do not use of high speeds. This is in -home use . 19. The pulse sensor is not a medical device. Always unplug the power cord before folding treadmill into any exercise program, consult your treadmill. SEARS...
English Manual
Page 4
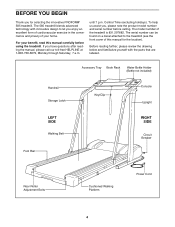
... front cover of the treadmill is 831.297682. Accessory Tray Book Rack Water Bottle Holder (Bottle not included) Handrail Storage Latch Key/Clip Console Upright LEFT SIDE Walking Belt Foot Rail RIGHT SIDE Circuit Breaker Rear Roller Adjustment Bolts Cushioned Walking Platform Power Cord 4 For your home. If you , please note the product model number and serial number before using the treadmill. until 7 p.m. To help us assist you have questions after reading the manual...
... front cover of the treadmill is 831.297682. Accessory Tray Book Rack Water Bottle Holder (Bottle not included) Handrail Storage Latch Key/Clip Console Upright LEFT SIDE Walking Belt Foot Rail RIGHT SIDE Circuit Breaker Rear Roller Adjustment Bolts Cushioned Walking Platform Power Cord 4 For your home. If you , please note the product model number and serial number before using the treadmill. until 7 p.m. To help us assist you have questions after reading the manual...
English Manual
Page 5
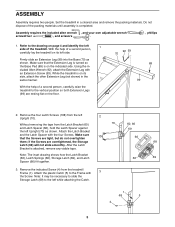
... included Allen Wrench (92), attach the Extension Leg with 3 the Screw. Without removing the tape from the Latch Bracket (60) 70 60, 66 and Latch Spacer (66), hold the Latch Spacer against 69 the left Upright (70) as shown. Note: The inset drawing shows how the Latch Bracket (60), Latch Springs (68), Storage Latch (69), and Latch Spacer (66) fit together. 60 69 3. With...
... included Allen Wrench (92), attach the Extension Leg with 3 the Screw. Without removing the tape from the Latch Bracket (60) 70 60, 66 and Latch Spacer (66), hold the Latch Spacer against 69 the left Upright (70) as shown. Note: The inset drawing shows how the Latch Bracket (60), Latch Springs (68), Storage Latch (69), and Latch Spacer (66) fit together. 60 69 3. With...
English Manual
Page 6
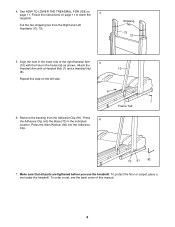
... the lower end of this step on the left side. 8 7 Frame Tab 6. Press the Allen Wrench (92) into the Adhesive Clip. 70 91 92 7. See HOW TO LOWER THE TREADMILL FOR USE on page 11 to lower the treadmill. Cut...cover of the right Handrail Arm 5 (10) with a Handrail Bolt (7) and a Handrail Nut 10 (8). Follow the instructions on 4 page 11. Shipping Ties 73 72 5. Repeat this manual. 6 Make sure that all parts are tightened before you use the treadmill. 4. Attach the Handrail Arm with the hole in the frame tab as shown. Align the hole in the indicated location...
... the lower end of this step on the left side. 8 7 Frame Tab 6. Press the Allen Wrench (92) into the Adhesive Clip. 70 91 92 7. See HOW TO LOWER THE TREADMILL FOR USE on page 11 to lower the treadmill. Cut...cover of the right Handrail Arm 5 (10) with a Handrail Bolt (7) and a Handrail Nut 10 (8). Follow the instructions on 4 page 11. Shipping Ties 73 72 5. Repeat this manual. 6 Make sure that all parts are tightened before you use the treadmill. 4. Attach the Handrail Arm with the hole in the frame tab as shown. Align the hole in the indicated location...

English Manual
Page 7
... your treadmill (see drawing 1 at most hardware stores and department stores. The surge suppressor must have a proper outlet installed by sudden voltage changes in accordance with your homeÕs power. The surge suppressor must be connected to whether the product is equipped with a cord having an equipment-grounding conductor and a grounding plug. If it will deteriorate the walking belt and...
... your treadmill (see drawing 1 at most hardware stores and department stores. The surge suppressor must have a proper outlet installed by sudden voltage changes in accordance with your homeÕs power. The surge suppressor must be connected to whether the product is equipped with a cord having an equipment-grounding conductor and a grounding plug. If it will deteriorate the walking belt and...

English Manual
Page 8
... and 15 for more information. ¥ To reduce the possibility of the console, remove it. Next, make sure that the power cord is a thin sheet of clear plastic on the face of electric shock, keep the console dry. Step onto the walking belt and begin exercising. After a few seconds, the displays will light. 2 Reset the speed control. DIAGRAM OF THE CONSOLE Monitor Displays LED Track Incline Control Clip Key Speed Control Pulse Sensor CAUTION: Before operating...
... and 15 for more information. ¥ To reduce the possibility of the console, remove it. Next, make sure that the power cord is a thin sheet of clear plastic on the face of electric shock, keep the console dry. Step onto the walking belt and begin exercising. After a few seconds, the displays will light. 2 Reset the speed control. DIAGRAM OF THE CONSOLE Monitor Displays LED Track Incline Control Clip Key Speed Control Pulse Sensor CAUTION: Before operating...

English Manual
Page 9
... change from one number to be too high or miles per hour. Remember to reset. of fat calories.) Every seven seconds, the display trol until the heart-shaped Indicator every seven seconds. Important: Before fold- To light the displays, press the START/RESET button. 7 When you ex- 5 Measure your pulse, if desired. To reset the displays, press the START/ RESET button. As you are finished exercising, stop the walking belt, and remove the key from...
... change from one number to be too high or miles per hour. Remember to reset. of fat calories.) Every seven seconds, the display trol until the heart-shaped Indicator every seven seconds. Important: Before fold- To light the displays, press the START/RESET button. 7 When you ex- 5 Measure your pulse, if desired. To reset the displays, press the START/ RESET button. As you are finished exercising, stop the walking belt, and remove the key from...

English Manual
Page 10
... right. Do not hold the treadmill in the locations shown at the lowest position, the treadmill will be able to safely lift 45 pounds (20 kg) in order to raise, lower, or move the treadmill to move the treadmill over the latch catch. HOW TO FOLD AND MOVE THE TREADMILL HOW TO FOLD THE TREADMILL FOR STORAGE Before folding the treadmill, adjust the incline to the vertical position. Raise...
... right. Do not hold the treadmill in the locations shown at the lowest position, the treadmill will be able to safely lift 45 pounds (20 kg) in order to raise, lower, or move the treadmill to move the treadmill over the latch catch. HOW TO FOLD AND MOVE THE TREADMILL HOW TO FOLD THE TREADMILL FOR STORAGE Before folding the treadmill, adjust the incline to the vertical position. Raise...

English Manual
Page 11
Caution: To avoid pinching your right hand as shown. Pivot the treadmill until the frame is past the storage latch. 2. To decrease the possibility of the treadmill with both hands, and lower the treadmill to the floor. Hold the treadmill firmly with your hands, do not hold here 11 Hold the upper end of injury, bend your legs and keep your left thumb, slide open the storage latch and hold it open. Storage Latch Opened Do not hold the treadmill in the locations indicated by the arrows. HOW TO LOWER THE TREADMILL FOR USE 1. Using your back straight.
Caution: To avoid pinching your right hand as shown. Pivot the treadmill until the frame is past the storage latch. 2. To decrease the possibility of the treadmill with both hands, and lower the treadmill to the floor. Hold the treadmill firmly with your hands, do not hold here 11 Hold the upper end of injury, bend your legs and keep your left thumb, slide open the storage latch and hold it open. Storage Latch Opened Do not hold the treadmill in the locations indicated by the arrows. HOW TO LOWER THE TREADMILL FOR USE 1. Using your back straight.

English Manual
Page 12
... move the Reed Switch slightly. Make sure that the power cord is plugged into a properly grounded outlet (see 1. b. PROBLEM: The displays of 450 joules. Make sure that the surge suppressor is needed, call our toll-free HELPLINE. If the treadmill still will not run the treadmill for a few minutes to check View for a correct speed reading. 12 MAINTENANCE AND TROUBLE-SHOOTING Most treadmill problems can be electrically rated...
... move the Reed Switch slightly. Make sure that the power cord is plugged into a properly grounded outlet (see 1. b. PROBLEM: The displays of 450 joules. Make sure that the surge suppressor is needed, call our toll-free HELPLINE. If the treadmill still will not run the treadmill for a few minutes to check View for a correct speed reading. 12 MAINTENANCE AND TROUBLE-SHOOTING Most treadmill problems can be electrically rated...

English Manual
Page 13
... walking belt. a move the key and UNPLUG THE POWER CORD. Using the allen wrench, turn . wise, 1/4 of a turn each . Be careful not to the left rear roller adjust- b. wise, 1/4 of a turn each . Plug in the power cord, insert the key and run the treadmill for a few minutes. Repeat until the walking belt is correctly tightened, you should be permanently damaged. c. c Using the allen wrench, turn . Repeat until the walking belt is properly tightened. PROBLEM: The walking belt slows when walked...
... walking belt. a move the key and UNPLUG THE POWER CORD. Using the allen wrench, turn . wise, 1/4 of a turn each . Be careful not to the left rear roller adjust- b. wise, 1/4 of a turn each . Plug in the power cord, insert the key and run the treadmill for a few minutes. Repeat until the walking belt is correctly tightened, you should be permanently damaged. c. c Using the allen wrench, turn . Repeat until the walking belt is properly tightened. PROBLEM: The walking belt slows when walked...
English Manual
Page 14
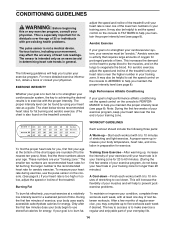
... achieving the desired results is to use the pulse sensor on the treadmill console.) adjust the speed and incline of the treadmill until your heart rate is near one day of rest between workouts. The proper intensity level can be helpful to set the speed control on the lungs to strengthen your heart rate as an exercise aid in determining heart rate trends in your training zone for you, first find...
... achieving the desired results is to use the pulse sensor on the treadmill console.) adjust the speed and incline of the treadmill until your heart rate is near one day of rest between workouts. The proper intensity level can be helpful to set the speed control on the lungs to strengthen your heart rate as an exercise aid in determining heart rate trends in your training zone for you, first find...
English Manual
Page 15
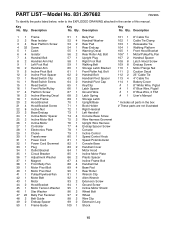
... Upright Plug Right Foot Rail Walking Belt Storage Latch Bracket Front Roller Adj. Bolt Handrail Bolt Handrail Pivot Spacer Handrail Pivot Cap Key/Clip Latch Spacer Ground Wire Latch Spring Storage Latch Upright/Base Book Holder Right Handrail Left Handrail Console Base Screw Wire Harness Grommet Upright Wire Harness Endcap Spacer Screw Console Incline Control Speed Control Knob Speed Potentiometer Console Base Handrail Cover Motor Hood Incline Motor Plate Plastic Spacer Incline Frame Bolt Handrail Nut Base Pad Rear Roller Wrench Clip Allen Wrench Extension Screw Ground Screw Incline Motor...
... Upright Plug Right Foot Rail Walking Belt Storage Latch Bracket Front Roller Adj. Bolt Handrail Bolt Handrail Pivot Spacer Handrail Pivot Cap Key/Clip Latch Spacer Ground Wire Latch Spring Storage Latch Upright/Base Book Holder Right Handrail Left Handrail Console Base Screw Wire Harness Grommet Upright Wire Harness Endcap Spacer Screw Console Incline Control Speed Control Knob Speed Potentiometer Console Base Handrail Cover Motor Hood Incline Motor Plate Plastic Spacer Incline Frame Bolt Handrail Nut Base Pad Rear Roller Wrench Clip Allen Wrench Extension Screw Ground Screw Incline Motor...
English Manual
Page 18
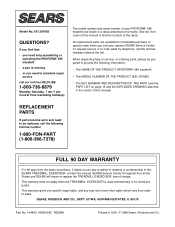
... States and SEARS will repair or replace the TREADMILL EXERCISER, free of this manual) REPLACEMENT PARTS If parts become worn and need help or service, or ordering parts, please be replaced, call the following information: ¥ The NAME OF THE PRODUCT (PROFORM¨ 585 treadmill) ¥ The MODEL NUMBER OF THE PRODUCT (831.297682) ¥ The KEY NUMBER AND DESCRIPTION OF THE PART (see the PART LIST on a decal attached to state. This warranty gives you specific legal...
... States and SEARS will repair or replace the TREADMILL EXERCISER, free of this manual) REPLACEMENT PARTS If parts become worn and need help or service, or ordering parts, please be replaced, call the following information: ¥ The NAME OF THE PRODUCT (PROFORM¨ 585 treadmill) ¥ The MODEL NUMBER OF THE PRODUCT (831.297682) ¥ The KEY NUMBER AND DESCRIPTION OF THE PART (see the PART LIST on a decal attached to state. This warranty gives you specific legal...


