
English Manual
Page 2
...near water. 5. TABLE OF CONTENTS IMPORTANT PRECAUTIONS 2 BEFORE YOU BEGIN 4 ASSEMBLY 5 OPERATION AND ADJUSTMENT 7 HOW TO FOLD AND MOVE THE TREADMILL 10 MAINTENANCE AND TROUBLE-SHOOTING 12 CONDITIONING GUIDELINES 14 PART LIST 15 ORDERING REPLACEMENT PARTS Back Cover FULL 90 DAY WARRANTY Back Cover Note: An... is attached in the center of 450 joules. Always wear athletic shoes. Never use an extension cord. 11. Do not place the treadmill on the same circuit. When connecting the power cord (see page 7), plug the power cord into a surge suppressor (not included) and...
...near water. 5. TABLE OF CONTENTS IMPORTANT PRECAUTIONS 2 BEFORE YOU BEGIN 4 ASSEMBLY 5 OPERATION AND ADJUSTMENT 7 HOW TO FOLD AND MOVE THE TREADMILL 10 MAINTENANCE AND TROUBLE-SHOOTING 12 CONDITIONING GUIDELINES 14 PART LIST 15 ORDERING REPLACEMENT PARTS Back Cover FULL 90 DAY WARRANTY Back Cover Note: An... is attached in the center of 450 joules. Always wear athletic shoes. Never use an extension cord. 11. Do not place the treadmill on the same circuit. When connecting the power cord (see page 7), plug the power cord into a surge suppressor (not included) and...

English Manual
Page 3
...the procedures in this manual should be set at lowest level before performing the maintenance and adjustment procedures described in this area while the treadmill is intended only as an exercise aid in determining heart rate trends in the location shown. Inspect and tighten all instructions before using.... Always unplug the power cord before folding treadmill into any opening. 23. Never remove the motor hood unless instructed to order a free replacement decal (see the back cover of the...
...the procedures in this manual should be set at lowest level before performing the maintenance and adjustment procedures described in this area while the treadmill is intended only as an exercise aid in determining heart rate trends in the location shown. Inspect and tighten all instructions before using.... Always unplug the power cord before folding treadmill into any opening. 23. Never remove the motor hood unless instructed to order a free replacement decal (see the back cover of the...
English Manual
Page 4
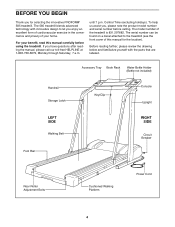
... , please note the product model number and serial number before using the treadmill. To help us assist you have questions after reading the manual, please call..., 7 a.m. Before reading further, please review the drawing below and familiarize yourself with innovative design to the treadmill (see the front cover of this manual carefully before calling. Accessory Tray Book Rack Water Bottle Holder (Bottle... can be found on a decal attached to let you for the location). The 585 treadmill blends advanced technology with the parts that are labeled. BEFORE YOU BEGIN Thank you...
... , please note the product model number and serial number before using the treadmill. To help us assist you have questions after reading the manual, please call..., 7 a.m. Before reading further, please review the drawing below and familiarize yourself with innovative design to the treadmill (see the front cover of this manual carefully before calling. Accessory Tray Book Rack Water Bottle Holder (Bottle... can be found on a decal attached to let you for the location). The 585 treadmill blends advanced technology with the parts that are labeled. BEFORE YOU BEGIN Thank you...
English Manual
Page 5
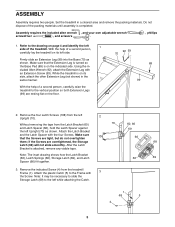
...99) are overtightened, the Storage 68 Latch (69) will not slide smoothly. Do not dispose of a second person, carefully raise the treadmill to the drawing on page 4 and identify the left 2 Upright (70). After the Latch Bracket is completed. Attach the plastic Catch... (5) to the left Upright (70) as shown. Set the treadmill in the same manner. Assembly requires the included allen wrench , and your own adjustable wrench screwdriver , and scissors . , phillips 1. Firmly slide...
...99) are overtightened, the Storage 68 Latch (69) will not slide smoothly. Do not dispose of a second person, carefully raise the treadmill to the drawing on page 4 and identify the left 2 Upright (70). After the Latch Bracket is completed. Attach the plastic Catch... (5) to the left Upright (70) as shown. Set the treadmill in the same manner. Assembly requires the included allen wrench , and your own adjustable wrench screwdriver , and scissors . , phillips 1. Firmly slide...
English Manual
Page 6
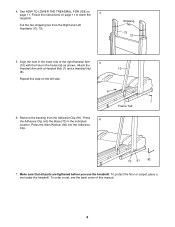
Shipping Ties 73 72 5. Make sure that all parts are tightened before you use the treadmill. Align the hole in the lower end of this step on the left side. 8 7 Frame Tab 6. 4. Follow the instructions on 4 page 11. Press 6 the Adhesive ... back cover of the right Handrail Arm 5 (10) with a Handrail Bolt (7) and a Handrail Nut 10 (8). To protect the floor or carpet, place a mat under the treadmill. Remove the backing from the Right and Left Handrails (72, 73). Press the Allen Wrench (92) into the Adhesive Clip. 70 91 92 7. Attach the...
Shipping Ties 73 72 5. Make sure that all parts are tightened before you use the treadmill. Align the hole in the lower end of this step on the left side. 8 7 Frame Tab 6. 4. Follow the instructions on 4 page 11. Press 6 the Adhesive ... back cover of the right Handrail Arm 5 (10) with a Handrail Bolt (7) and a Handrail Nut 10 (8). To protect the floor or carpet, place a mat under the treadmill. Remove the backing from the Right and Left Handrails (72, 73). Press the Allen Wrench (92) into the Adhesive Clip. 70 91 92 7. Attach the...

English Manual
Page 7
...you are not grounded. The surge suppressor must be held in drawing 1 below. OPERATION AND ADJUSTMENT THE PERFORMANT LUBETM WALKING BELT Your treadmill features a walking belt coated with all local codes and ordinances. This product is grounded before using an adapter. 7 The surge ... spray or other type of 450 joules. HOW TO PLUG IN THE POWER CORD DANGER: Improper connection of your treadmill (see drawing 1 at most hardware stores and department stores. Your treadmill, like extending from other appliances being damaged, always use on or off. Check with your...
...you are not grounded. The surge suppressor must be held in drawing 1 below. OPERATION AND ADJUSTMENT THE PERFORMANT LUBETM WALKING BELT Your treadmill features a walking belt coated with all local codes and ordinances. This product is grounded before using an adapter. 7 The surge ... spray or other type of 450 joules. HOW TO PLUG IN THE POWER CORD DANGER: Improper connection of your treadmill (see drawing 1 at most hardware stores and department stores. Your treadmill, like extending from other appliances being damaged, always use on or off. Check with your...

English Manual
Page 8
Avoid spilling liquids on the foot rails of the treadmill. Stand on the console and use only a sealed water bottle. Slide the speed control to operate the console. 1 Insert the key fully into the power ... speed. When the key is a thin sheet of clear plastic on the power. ¥ Always wear the clip (see the drawing above) while using the treadmill. Follow the steps below to the the RESET position. Slowly slide the speed control to the right until the walking belt begins to the RESET...
Avoid spilling liquids on the foot rails of the treadmill. Stand on the console and use only a sealed water bottle. Slide the speed control to operate the console. 1 Insert the key fully into the power ... speed. When the key is a thin sheet of clear plastic on the power. ¥ Always wear the clip (see the drawing above) while using the treadmill. Follow the steps below to the the RESET position. Slowly slide the speed control to the right until the walking belt begins to the RESET...

English Manual
Page 9
... the incline of 1/4 mile. shown. Note: This display also shows your SPEED displayÑThis pulse will be de- track represents a distance of the treadmill, if desired. if the indi- After a few seconds, three dashes will appear in ing. Try the sensor several CALS/FAT CALS/ times until the ... and your pulse cline to be restricted, Sensor displayÑThis display and your pulse shows the distance that your thumb is ing the treadmill, adjust the in your thumb will Pulse DISTANCE/LAPS be too high or miles per hour. when the pulse sensor is pres- If...
... the incline of 1/4 mile. shown. Note: This display also shows your SPEED displayÑThis pulse will be de- track represents a distance of the treadmill, if desired. if the indi- After a few seconds, three dashes will appear in ing. Try the sensor several CALS/FAT CALS/ times until the ... and your pulse cline to be restricted, Sensor displayÑThis display and your pulse shows the distance that your thumb is ing the treadmill, adjust the in your thumb will Pulse DISTANCE/LAPS be too high or miles per hour. when the pulse sensor is pres- If...

English Manual
Page 10
... caution while moving the treadmill, convert the treadmill to the desired location. Move your right hand to raise, lower, or move the treadmill. 1. Keep the treadmill out of the treadmill. Storage Latch Latch Catch Closed HOW TO MOVE THE TREADMILL Before moving the treadmill. Hold the treadmill with your legs rather ...sure that the storage latch closes fully over the latch catch. 1. Place one foot on the base, and carefully lower the treadmill until it rolls freely on the wheels. Make sure that the storage latch is resting in temperatures above . Do not attempt to ...
... caution while moving the treadmill, convert the treadmill to the desired location. Move your right hand to raise, lower, or move the treadmill. 1. Keep the treadmill out of the treadmill. Storage Latch Latch Catch Closed HOW TO MOVE THE TREADMILL Before moving the treadmill. Hold the treadmill with your legs rather ...sure that the storage latch closes fully over the latch catch. 1. Place one foot on the base, and carefully lower the treadmill until it rolls freely on the wheels. Make sure that the storage latch is resting in temperatures above . Do not attempt to ...

English Manual
Page 11
Hold the treadmill firmly with your hands, do not hold the treadmill in the locations indicated by the arrows. HOW TO LOWER THE TREADMILL FOR USE 1. Pivot the treadmill until the frame is past the storage latch. 2. Caution: To avoid pinching your right hand as shown. Hold the upper end of injury, bend your legs and keep your left thumb, slide open . To decrease the possibility of the treadmill with both hands, and lower the treadmill to the floor. Using your back straight. Storage Latch Opened Do not hold it open the storage latch and hold here 11
Hold the treadmill firmly with your hands, do not hold the treadmill in the locations indicated by the arrows. HOW TO LOWER THE TREADMILL FOR USE 1. Pivot the treadmill until the frame is past the storage latch. 2. Caution: To avoid pinching your right hand as shown. Hold the upper end of injury, bend your legs and keep your left thumb, slide open . To decrease the possibility of the treadmill with both hands, and lower the treadmill to the floor. Using your back straight. Storage Latch Opened Do not hold it open the storage latch and hold here 11

English Manual
Page 12
...run , please call our toll-free HELPLINE at 1-800-736-6879, Monday through Saturday, 7 a.m. Check the circuit breaker located on the treadmill frame near the power cord. c. Use only a single-outlet surge suppressor that the surge suppressor is plugged into a surge suppressor, and ... Reset PROBLEM: The power turns off during use SOLUTION: a. c. Turn 1/8Ó the Pulley until 7 p.m. MAINTENANCE AND TROUBLE-SHOOTING Most treadmill problems can be electrically rated for 120 volts AC and 15 amps. Make sure that the power cord is UL 1449 listed as shown, the...
...run , please call our toll-free HELPLINE at 1-800-736-6879, Monday through Saturday, 7 a.m. Check the circuit breaker located on the treadmill frame near the power cord. c. Use only a single-outlet surge suppressor that the surge suppressor is plugged into a surge suppressor, and ... Reset PROBLEM: The power turns off during use SOLUTION: a. c. Turn 1/8Ó the Pulley until 7 p.m. MAINTENANCE AND TROUBLE-SHOOTING Most treadmill problems can be electrically rated for 120 volts AC and 15 amps. Make sure that the power cord is UL 1449 listed as shown, the...

English Manual
Page 13
... right bolt counterclock- b move the key and UNPLUG THE POWER CORD. Plug in the power cord, insert the key and run the treadmill for a few minutes. PROBLEM: The walking belt slows when walked on SOLUTION: a. The surge suppressor must have a UL suppressed voltage rating...the walking belt is correctly tightened, you should be able to the left rear roller adjust- Repeat until the walking belt is overtightened, treadmill performance may decrease and the walking belt may be electrically rated for a few minutes. Use only a single-outlet surge suppressor that ...
... right bolt counterclock- b move the key and UNPLUG THE POWER CORD. Plug in the power cord, insert the key and run the treadmill for a few minutes. PROBLEM: The walking belt slows when walked on SOLUTION: a. The surge suppressor must have a UL suppressed voltage rating...the walking belt is correctly tightened, you should be able to the left rear roller adjust- Repeat until the walking belt is overtightened, treadmill performance may decrease and the walking belt may be electrically rated for a few minutes. Use only a single-outlet surge suppressor that ...
English Manual
Page 14
...to pump blood to help you maintain the proper intensity level (see page 8). For aerobic exercise, adjust the speed and incline of the treadmill until your heart rate is especially important for aerobic exercise. Note: During the first few minutes does your training zone. To measure your ... must be found on the lungs to strengthen your everyday life. 14 The key to make exercise a regular and enjoyable part of the treadmill. The proper intensity level can be Òaerobic.Ó Aerobic exercise is to success is activity that requires large amounts of your age ...
...to pump blood to help you maintain the proper intensity level (see page 8). For aerobic exercise, adjust the speed and incline of the treadmill until your heart rate is especially important for aerobic exercise. Note: During the first few minutes does your training zone. To measure your ... must be found on the lungs to strengthen your everyday life. 14 The key to make exercise a regular and enjoyable part of the treadmill. The proper intensity level can be Òaerobic.Ó Aerobic exercise is to success is activity that requires large amounts of your age ...

English Manual
Page 18
... or workmanship in this manual) REPLACEMENT PARTS If parts become worn and need to the frame. When requesting help assembling or operating the PROFORM¨ 585 treadmill ¥ a part is used commercially or for immediate purchase or special order when you may also have other rights which vary from... if failure occurs due to find that: ¥ you need to be replaced, call the following information: ¥ The NAME OF THE PRODUCT (PROFORM¨ 585 treadmill) ¥ The MODEL NUMBER OF THE PRODUCT (831.297682) ¥ The KEY NUMBER AND DESCRIPTION OF THE PART (see the PART LIST on ...
... or workmanship in this manual) REPLACEMENT PARTS If parts become worn and need to the frame. When requesting help assembling or operating the PROFORM¨ 585 treadmill ¥ a part is used commercially or for immediate purchase or special order when you may also have other rights which vary from... if failure occurs due to find that: ¥ you need to be replaced, call the following information: ¥ The NAME OF THE PRODUCT (PROFORM¨ 585 treadmill) ¥ The MODEL NUMBER OF THE PRODUCT (831.297682) ¥ The KEY NUMBER AND DESCRIPTION OF THE PART (see the PART LIST on ...


