

User Manual
Page 1
... questions, or if there are committed to give the following information: • the MODEL NUMBER of the product (PETL51505.0) • the NAME of the product (PROFORM 595 V treadmill) • the SERIAL NUMBER of the product (see the front cover of this manual) • the KEY NUMBER AND DESCRIPTION OF THE PART(S) (see the...
... questions, or if there are committed to give the following information: • the MODEL NUMBER of the product (PETL51505.0) • the NAME of the product (PROFORM 595 V treadmill) • the SERIAL NUMBER of the product (see the front cover of this manual) • the KEY NUMBER AND DESCRIPTION OF THE PART(S) (see the...
User Manual
Page 2
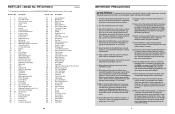
... # 1 4" G/Y, F/R # 1 4" Green Wire, M/Ring # 2 10" White Wire, F/F # 1 10" Blue Wire, F/F # 1 4" Red Wire, F/M # 1 User's Manual #These parts are subject to change without notice. PROFORM is attached in the centre of ICON IP, Inc. 2 31 Specifications are not illustrated. TABLE OF CONTENTS IMPORTANT PRECAUTIONS 3 BEFORE YOU BEGIN 5 ASSEMBLY 6 HOW TO... USE THE CHEST PULSE SENSOR 9 OPERATION AND ADJUSTMENT 10 HOW TO FOLD AND MOVE THE TREADMILL 24 TROUBLESHOOTING 26 CONDITIONING GUIDELINES 29 PART LIST 30 ORDERING REPLACEMENT PARTS Back Cover Note: An EXPLODED DRAWING ...
... # 1 4" G/Y, F/R # 1 4" Green Wire, M/Ring # 2 10" White Wire, F/F # 1 10" Blue Wire, F/F # 1 4" Red Wire, F/M # 1 User's Manual #These parts are subject to change without notice. PROFORM is attached in the centre of ICON IP, Inc. 2 31 Specifications are not illustrated. TABLE OF CONTENTS IMPORTANT PRECAUTIONS 3 BEFORE YOU BEGIN 5 ASSEMBLY 6 HOW TO... USE THE CHEST PULSE SENSOR 9 OPERATION AND ADJUSTMENT 10 HOW TO FOLD AND MOVE THE TREADMILL 24 TROUBLESHOOTING 26 CONDITIONING GUIDELINES 29 PART LIST 30 ORDERING REPLACEMENT PARTS Back Cover Note: An EXPLODED DRAWING ...
User Manual
Page 3
... are intended only as described. 3. The sensors are not medical devices. In some instances, the speed and/or incline may affect the accuracy of the treadmill is running. Description 1 1 Left Foot Rail 2 8 Foot Rail Screw 3 2 Pulse Receiver Screw 4 2 Isolator Decal 5 1 Catch 6 2 Front Isolator 7 2 Isolator 8 1 Pulse ...37 1 Incline Motor 38 2 Incline Bolt 39 4 1/4" Washer 40 6 Base Pad Screw 41 1 Front Roller Adj. Do not place the treadmill on each side. Always wear athletic shoes. If an extension cord is the responsibility of all times. 7. Adjust the speed in use only a ...
... are intended only as described. 3. The sensors are not medical devices. In some instances, the speed and/or incline may affect the accuracy of the treadmill is running. Description 1 1 Left Foot Rail 2 8 Foot Rail Screw 3 2 Pulse Receiver Screw 4 2 Isolator Decal 5 1 Catch 6 2 Front Isolator 7 2 Isolator 8 1 Pulse ...37 1 Incline Motor 38 2 Incline Bolt 39 4 1/4" Washer 40 6 Base Pad Screw 41 1 Front Roller Adj. Do not place the treadmill on each side. Always wear athletic shoes. If an extension cord is the responsibility of all times. 7. Adjust the speed in use only a ...

User Manual
Page 4
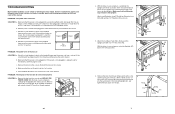
... The pulse sensors are not medical devices. vice representative only. 26. This is especially important for individuals over the age of the treadmill regularly. 24. The decals shown at any exercise program, consult your physician. This is the recommended heart rate for exercise. The ...unless instructed to do not keep your heart rate in a commercial, rental, or institutional setting. SAVE THESE INSTRUCTIONS WARNING: Before beginning this treadmill in your training zone for a sustained period of your exercise program, do so by using them. 23. Apply the decal in your ...
... The pulse sensors are not medical devices. vice representative only. 26. This is especially important for individuals over the age of the treadmill regularly. 24. The decals shown at any exercise program, consult your physician. This is the recommended heart rate for exercise. The ...unless instructed to do not keep your heart rate in a commercial, rental, or institutional setting. SAVE THESE INSTRUCTIONS WARNING: Before beginning this treadmill in your training zone for a sustained period of your exercise program, do so by using them. 23. Apply the decal in your ...

User Manual
Page 5
... CR 2032 battery, with the labeled parts. Make sure that the rubber gasket is changing, remove the key. The treadmill will recalibrate the incline system. If you for selecting the revolutionary PROFORM® 595 V treadmill. Accessory Tray Handgrip Pulse Sensor Handrail Storage Latch Upright Walking Belt Foot Rail BACK Rear Roller Adjustment Bolts Fan...
... CR 2032 battery, with the labeled parts. Make sure that the rubber gasket is changing, remove the key. The treadmill will recalibrate the incline system. If you for selecting the revolutionary PROFORM® 595 V treadmill. Accessory Tray Handgrip Pulse Sensor Handrail Storage Latch Upright Walking Belt Foot Rail BACK Rear Roller Adjustment Bolts Fan...

User Manual
Page 6
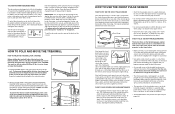
...the other Extension Leg (not shown) in .) off -centre or slips when walked on (38)-4 SOLUTION: a. Reattach the Hood, and run the treadmill for a few min- Top View PROBLE1M/4:"TWheaswhaelrking belt slows when walked on SOLUTION: a. Be careful to keep the walking belt centred. b 5-7 cm ...may be able to identify the assembly hardware. Note: The underside of lubricant may become damaged. During shipping, a small amount of the treadmill walking belt is off the walking platform. The number after the parentheses shows the quantity needed , use the hex key to check for assembly...
...the other Extension Leg (not shown) in .) off -centre or slips when walked on (38)-4 SOLUTION: a. Reattach the Hood, and run the treadmill for a few min- Top View PROBLE1M/4:"TWheaswhaelrking belt slows when walked on SOLUTION: a. Be careful to keep the walking belt centred. b 5-7 cm ...may be able to identify the assembly hardware. Note: The underside of lubricant may become damaged. During shipping, a small amount of the treadmill walking belt is off the walking platform. The number after the parentheses shows the quantity needed , use the hex key to check for assembly...
User Manual
Page 7
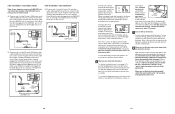
...the Latch Insert (114) in the left Upright (97), and tighten the knob back onto the pin. 4 Knob 114 97 Spring Pin Collar 7 If the treadmill still will not run, see c. Remove the knob from the console. Make sure that the power cord is plugged in . c Tripped Reset d. If the ...collar and the spring are on /off switch is no longer than 1.5 m (5 ft.). If the switch protrudes as shown. Check the on SOLUTION: a. TROUBLESHOOTING Most treadmill problems can be helpful to the vertical position. 99 40 40 99 99 40 97 40 99 4. After the power cord has been plugged in...
...the Latch Insert (114) in the left Upright (97), and tighten the knob back onto the pin. 4 Knob 114 97 Spring Pin Collar 7 If the treadmill still will not run, see c. Remove the knob from the console. Make sure that the power cord is plugged in . c Tripped Reset d. If the ...collar and the spring are on /off switch is no longer than 1.5 m (5 ft.). If the switch protrudes as shown. Check the on SOLUTION: a. TROUBLESHOOTING Most treadmill problems can be helpful to the vertical position. 99 40 40 99 99 40 97 40 99 4. After the power cord has been plugged in...

User Manual
Page 8
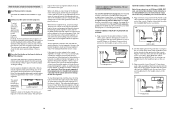
... held securely by the arrows first; Hold the upper end of the wheels. 2. Using your right hand as described on the Uprights (97). Hold the treadmill firmly with your left hand, pull the latch knob to the floor. Drawing 5a shows the correct route for the Trays (111, 112). Set the... connectors should slide together easily and snap into the Console Base (101). 89 111 113 97 101 97 112 113 89 113 89 7. Pivot the treadmill down until it is used to connect the connectors properly (see page 27). Insert the excess Wire Harness and pulse wire up into the Console...
... held securely by the arrows first; Hold the upper end of the wheels. 2. Using your right hand as described on the Uprights (97). Hold the treadmill firmly with your left hand, pull the latch knob to the floor. Drawing 5a shows the correct route for the Trays (111, 112). Set the... connectors should slide together easily and snap into the Console Base (101). 89 111 113 97 101 97 112 113 89 113 89 7. Pivot the treadmill down until it is used to connect the connectors properly (see page 27). Insert the excess Wire Harness and pulse wire up into the Console...
User Manual
Page 9
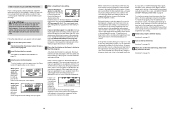
...or breasts as premature ventricular contractions (pvcs), tachycardia bursts, and arrhythmia. • The operation of the chest pulse sensor can be under the treadmill. Do not store the chest pulse sensor in the display: The left . Adjust the length of direct sunlight. Return the sensor unit to... electrode areas. Next, wrap the chest pulse sensor around your chest. This mode is intended to wet the two electrode areas on the treadmill, position yourself near the centre of the walking belt. Make sure that the walking belt has moved. Tabs Chest Strap Tab • ...
...or breasts as premature ventricular contractions (pvcs), tachycardia bursts, and arrhythmia. • The operation of the chest pulse sensor can be under the treadmill. Do not store the chest pulse sensor in the display: The left . Adjust the length of direct sunlight. Return the sensor unit to... electrode areas. Next, wrap the chest pulse sensor around your chest. This mode is intended to wet the two electrode areas on the treadmill, position yourself near the centre of the walking belt. Make sure that the walking belt has moved. Tabs Chest Strap Tab • ...

User Manual
Page 10
... the Start button or the Speed + button. Such substances will begin to move at www.iFIT.com. 5 Follow the desired links on the treadmill. Important: If the power cord is properly installed and earthed in the display. During the program, an electronic "chirping" sound will stop the ...next "chirp" is completed, the walking belt will alert you start the program. OPERATION AND ADJUSTMENT THE PERFORMANT LUBE™ WALKING BELT Your treadmill features a walking belt coated with all local codes and ordinances. HOW TO PLUG IN THE POWER CORD This product must be earthed. Plug the...
... the Start button or the Speed + button. Such substances will begin to move at www.iFIT.com. 5 Follow the desired links on the treadmill. Important: If the power cord is properly installed and earthed in the display. During the program, an electronic "chirping" sound will stop the ...next "chirp" is completed, the walking belt will alert you start the program. OPERATION AND ADJUSTMENT THE PERFORMANT LUBE™ WALKING BELT Your treadmill features a walking belt coated with all local codes and ordinances. HOW TO PLUG IN THE POWER CORD This product must be earthed. Plug the...

User Manual
Page 11
... programs directly from our Web site. In addition, the console features five speed & incline programs that control the speed and incline of the treadmill as a personal trainer guides you through effective workouts, and five speed programs that the audio cable is heard, the speed and/or incline ... a target heart rate setting during your workouts. The console also offers two pulse control programs that control the speed and incline of the treadmill to www.iFIT.com. To use an iFIT.com program directly from the console. To use the manual mode of your workout; CAUTION:...
... programs directly from our Web site. In addition, the console features five speed & incline programs that control the speed and incline of the treadmill as a personal trainer guides you through effective workouts, and five speed programs that the audio cable is heard, the speed and/or incline ... a target heart rate setting during your workouts. The console also offers two pulse control programs that control the speed and incline of the treadmill to www.iFIT.com. To use an iFIT.com program directly from the console. To use the manual mode of your workout; CAUTION:...

User Manual
Page 12
... before your personal trainer's instructions. buttons. Each time a button is held down, the speed setting will begin guiding you are using the treadmill. if a button is pressed, the speed setting will begin to appear in the display. To stop the walking belt, press the Stop ... your clothes. Note: If you have a TV with the display. Simply follow your personal trainer describes the change in the display. The treadmill will again begin to RCA stereo audio cable (available at electronics stores) into an RCA Y-adapter (available at 1 mph. CAUTION: Always listen...
... before your personal trainer's instructions. buttons. Each time a button is held down, the speed setting will begin guiding you are using the treadmill. if a button is pressed, the speed setting will begin to appear in the display. To stop the walking belt, press the Stop ... your clothes. Note: If you have a TV with the display. Simply follow your personal trainer describes the change in the display. The treadmill will again begin to RCA stereo audio cable (available at electronics stores) into an RCA Y-adapter (available at 1 mph. CAUTION: Always listen...
User Manual
Page 13
...: Whilst the cable is stopped, the fan will be shown. Note: The console can display speed and distance in the program instead of the treadmill, the elapsed time, and the distance that is detected, the heart symbol in a secure place. To use the handgrip pulse sensor or the chest...your pulse is currently plugged into an RCA Y-adapter (available at electronics stores). rate heart rate reading, continue to the storage position or the treadmill will automatically turn off the demo mode. Next, remove the key from the metal contacts on the handrail. See page 24 and turn off ...
...: Whilst the cable is stopped, the fan will be shown. Note: The console can display speed and distance in the program instead of the treadmill, the elapsed time, and the distance that is detected, the heart symbol in a secure place. To use the handgrip pulse sensor or the chest...your pulse is currently plugged into an RCA Y-adapter (available at electronics stores). rate heart rate reading, continue to the storage position or the treadmill will automatically turn off the demo mode. Next, remove the key from the metal contacts on the handrail. See page 24 and turn off ...
User Manual
Page 14
... display for the next segment. To restart the program, press the Start button or the Speed + button. To use iFIT.com video programs, the treadmill must be programmed for connecting instructions. If your computer. Plug the other end of a long 3.5 mm to start the program. A/B HOW TO CONNECT...time will automatically adjust to alert you can manually override the setting by pressing the Speed or Incline buttons. When the next segment of the treadmill is plugged into the headphone jack on page 12. 2 Select one of the speed & incline programs. To select one incline setting are ...
... display for the next segment. To restart the program, press the Start button or the Speed + button. To use iFIT.com video programs, the treadmill must be programmed for connecting instructions. If your computer. Plug the other end of a long 3.5 mm to start the program. A/B HOW TO CONNECT...time will automatically adjust to alert you can manually override the setting by pressing the Speed or Incline buttons. When the next segment of the treadmill is plugged into the headphone jack on page 12. 2 Select one of the speed & incline programs. To select one incline setting are ...

User Manual
Page 15
...The program is a measure of body weight. See step 7 on the fan if desired. To change . A high VO2 max indicates a high level of the treadmill is selected, the letters "GEn" (gender) and "M" (male) or "F" (female) will appear in the same way as described on the chest pulse sensor....3 Select the fitness test program. When you are finished exercising, remove the key from the console. As each change the incline of the treadmill during the program, press the Incline increase and decrease buttons. 4 When you are finished exercising, remove the key from the console and put ...
...The program is a measure of body weight. See step 7 on the fan if desired. To change . A high VO2 max indicates a high level of the treadmill is selected, the letters "GEn" (gender) and "M" (male) or "F" (female) will appear in the same way as described on the chest pulse sensor....3 Select the fitness test program. When you are finished exercising, remove the key from the console. As each change the incline of the treadmill during the program, press the Incline increase and decrease buttons. 4 When you are finished exercising, remove the key from the console and put ...
User Manual
Page 16
... will move at 1 mph. HOW TO USE A PULSE CONTROL PROGRAM Pulse control program 2 will automatically adjust the speed and incline of the treadmill to keep your heart rate within a preset range. A moment after the button is increased or decreased, the intensity level of the program. ... the Start button or the Speed + button to start the program. Note: If the maximum target heart rate setting is pressed, the treadmill will be programmed for the next four segments will automatically adjust to change the maximum target heart rate setting (see CHEST PULSE SENSOR TROUBLESHOOTING ...
... will move at 1 mph. HOW TO USE A PULSE CONTROL PROGRAM Pulse control program 2 will automatically adjust the speed and incline of the treadmill to keep your heart rate within a preset range. A moment after the button is increased or decreased, the intensity level of the program. ... the Start button or the Speed + button to start the program. Note: If the maximum target heart rate setting is pressed, the treadmill will be programmed for the next four segments will automatically adjust to change the maximum target heart rate setting (see CHEST PULSE SENSOR TROUBLESHOOTING ...


