
Uk Manual
Page 1
... satisfaction. Serial Number Decal QUESTIONS? USER'S MANUAL Visit our website at www.iconeurope.com Customer Service Department Unit 4 Revie Road Industrial Estate Revie Road, Beeston Leeds, LS118JG UK email: [email protected] CAUTION Read all precautions and instructions in this manual before using this manual for future reference. Save this equipment. As a manufacturer, we are missing or damaged parts, please...
... satisfaction. Serial Number Decal QUESTIONS? USER'S MANUAL Visit our website at www.iconeurope.com Customer Service Department Unit 4 Revie Road Industrial Estate Revie Road, Beeston Leeds, LS118JG UK email: [email protected] CAUTION Read all precautions and instructions in this manual before using this manual for future reference. Save this equipment. As a manufacturer, we are missing or damaged parts, please...

Uk Manual
Page 2
TABLE OF CONTENTS IMPORTANT PRECAUTIONS 3 BEFORE YOU BEGIN 5 ASSEMBLY 6 OPERATION AND ADJUSTMENT 9 HOW TO FOLD AND MOVE THE TREADMILL 12 TROUBLESHOOTING 13 CONDITIONING GUIDELINES 15 ORDERING REPLACEMENT PARTS Back Cover Note: An EXPLODED DRAWING and a PART LIST are attached in the centre of ICON Health & Fitness, Inc. 2 PROFORM is registered trademark of this manual.
TABLE OF CONTENTS IMPORTANT PRECAUTIONS 3 BEFORE YOU BEGIN 5 ASSEMBLY 6 OPERATION AND ADJUSTMENT 9 HOW TO FOLD AND MOVE THE TREADMILL 12 TROUBLESHOOTING 13 CONDITIONING GUIDELINES 15 ORDERING REPLACEMENT PARTS Back Cover Note: An EXPLODED DRAWING and a PART LIST are attached in the centre of ICON Health & Fitness, Inc. 2 PROFORM is registered trademark of this manual.
Uk Manual
Page 3
... walking belt. Never move the treadmill until it is properly assembled. (See ASSEMBLY on page 6, and HOW TO FOLD AND MOVE THE TREADMILL on any surface that blocks air openings. The pulse sensor is intended only as described. 3. It is the responsibility of the treadmill regularly. 3 Use the treadmill only as an exercise aid in determining heart rate trends in speed. 16. Do not wear loose clothing that the storage latch...
... walking belt. Never move the treadmill until it is properly assembled. (See ASSEMBLY on page 6, and HOW TO FOLD AND MOVE THE TREADMILL on any surface that blocks air openings. The pulse sensor is intended only as described. 3. It is the responsibility of the treadmill regularly. 3 Use the treadmill only as an exercise aid in determining heart rate trends in speed. 16. Do not wear loose clothing that the storage latch...
Uk Manual
Page 4
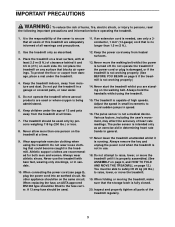
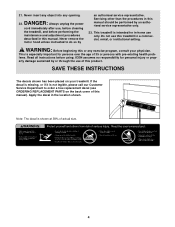
... this or any opening. Note: The decal is intended for in-home use , before cleaning the treadmill, and before using. DANGER: 22. Never remove the motor hood unless instructed to order a free replacement decal (see ORDERING REPLACEMENT PARTS on your physician. Do not use of 35 or persons with pre-existing health problems. Read all instructions before performing the maintenance and adjustment procedures described in the location shown. This is...
... this or any opening. Note: The decal is intended for in-home use , before cleaning the treadmill, and before using. DANGER: 22. Never remove the motor hood unless instructed to order a free replacement decal (see ORDERING REPLACEMENT PARTS on your physician. Do not use of 35 or persons with pre-existing health problems. Read all instructions before performing the maintenance and adjustment procedures described in the location shown. This is...
Uk Manual
Page 5
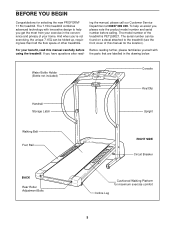
... exercise in the drawing below. the parts that are labelled in the convenience and privacy of this manual carefully before calling. Water Bottle Holder (Bottle not included) Console Key/Clip Handrail Storage Latch Upright Walking Belt Foot Rail RIGHT SIDE Circuit Breaker BACK Rear Roller Adjustment Bolts Cushioned Walking Platform for selecting the new PROFORM® 7.15Q treadmill. And when you have questions after read this manual for the location...
... exercise in the drawing below. the parts that are labelled in the convenience and privacy of this manual carefully before calling. Water Bottle Holder (Bottle not included) Console Key/Clip Handrail Storage Latch Upright Walking Belt Foot Rail RIGHT SIDE Circuit Breaker BACK Rear Roller Adjustment Bolts Cushioned Walking Platform for selecting the new PROFORM® 7.15Q treadmill. And when you have questions after read this manual for the location...

Uk Manual
Page 6
... the treadmill walking belt is completed. Attach the other Extension Leg (34) in a cleared area and remove all packing materials. Be sure to push on the head of lubricant may be transferred to tip the Uprights [11] in the direction shown by the arrow as you insert the Extension Leg.) Make sure that the Base Pad (40) is in the power 1 cord...
... the treadmill walking belt is completed. Attach the other Extension Leg (34) in a cleared area and remove all packing materials. Be sure to push on the head of lubricant may be transferred to tip the Uprights [11] in the direction shown by the arrow as you insert the Extension Leg.) Make sure that the Base Pad (40) is in the power 1 cord...
Uk Manual
Page 7
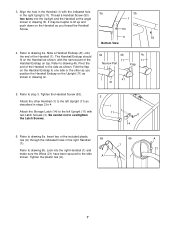
...Handrail (1) with 11 two Latch Screws (3). Insert two of the Handrail to drawing 6b. Tighten the plastic ties (A). Fold the flap on the Handrail Endcap to one side or the other Handrail (1) to the left Upright (11) as described in steps 2 to 4. 5 1 Attach the Storage Latch (14) to lift ...4c. 4a 4b 11 Narrow Part 4c 11 Flap 1 41 41 5. The Handrail Endcap should fit on the Handrail as shown, with the narrow part of the Handrail (1). A 1 7 3. Thread a Handrail Screw (53) two turns into the right Handrail (1) and make sure the Wires (21) have been secured to...
...Handrail (1) with 11 two Latch Screws (3). Insert two of the Handrail to drawing 6b. Tighten the plastic ties (A). Fold the flap on the Handrail Endcap to one side or the other Handrail (1) to the left Upright (11) as described in steps 2 to 4. 5 1 Attach the Storage Latch (14) to lift ...4c. 4a 4b 11 Narrow Part 4c 11 Flap 1 41 41 5. The Handrail Endcap should fit on the Handrail as shown, with the narrow part of the Handrail (1). A 1 7 3. Thread a Handrail Screw (53) two turns into the right Handrail (1) and make sure the Wires (21) have been secured to...
Uk Manual
Page 8
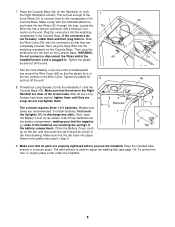
... the negative (-) ends of the screw holes. Tighten the plastic tie 8 and cut off the end. 8. The console requires three 1.5 V batteries. Place the Console Base (46) on the Console Base. To install batteries, first touch the Uprights (11) to adjust the walking belt (see page 14). WARNING: Do not connect or disconnect the Wires whilst the 66 treadmill power cord is shown). Tighten the plastic tie and cut...
... the negative (-) ends of the screw holes. Tighten the plastic tie 8 and cut off the end. 8. The console requires three 1.5 V batteries. Place the Console Base (46) on the Console Base. To install batteries, first touch the Uprights (11) to adjust the walking belt (see page 14). WARNING: Do not connect or disconnect the Wires whilst the 66 treadmill power cord is shown). Tighten the plastic tie and cut...

Uk Manual
Page 9
... Outlet If the power cord is properly installed and earthed in accordance with GFCI- OPERATION AND ADJUSTMENT THE PERFORMANT LUBETM WALKING BELT Your treadmill features a walking belt coated with the product-if it will not fit the outlet, have a proper outlet installed by a qualified electrician. 9 IMPORTANT: Never apply silicone spray or other substances to drawing 2. Do not modify the plug provided with...
... Outlet If the power cord is properly installed and earthed in accordance with GFCI- OPERATION AND ADJUSTMENT THE PERFORMANT LUBETM WALKING BELT Your treadmill features a walking belt coated with the product-if it will not fit the outlet, have a proper outlet installed by a qualified electrician. 9 IMPORTANT: Never apply silicone spray or other substances to drawing 2. Do not modify the plug provided with...
Uk Manual
Page 10
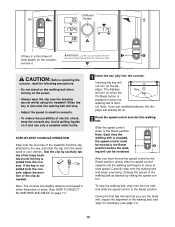
... above) whilst using the treadmill. Clip sole. Note: The console can be restarted. Inserting the key will turn on when the On/Reset button is pressed or when the walking belt is pulled from the con- The displays Key will not turn on the dis- ed. Carefully step onto the walking belt and begin exercising. Slide the speed control down to the Reset position. CAUTION: Before operating the console, read the...
... above) whilst using the treadmill. Clip sole. Note: The console can be restarted. Inserting the key will turn on when the On/Reset button is pressed or when the walking belt is pulled from the con- The displays Key will not turn on the dis- ed. Carefully step onto the walking belt and begin exercising. Slide the speed control down to the Reset position. CAUTION: Before operating the console, read the...
Uk Manual
Page 11
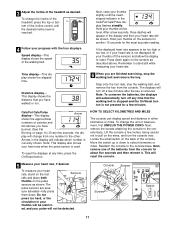
..., press the On/Reset button. The pulse sensors are finished exercising, stop the walking belt, and remove the key from the console for the most accurate reading. Next, remove the screws attaching the console to pull on the sensors for another 15 seconds for about five seconds and then reinsert it. Move the switch up or down . 3 Adjust the incline of the treadmill as described above. Reattach the console to select kilometres or miles. Locate...
..., press the On/Reset button. The pulse sensors are finished exercising, stop the walking belt, and remove the key from the console for the most accurate reading. Next, remove the screws attaching the console to pull on the sensors for another 15 seconds for about five seconds and then reinsert it. Move the switch up or down . 3 Adjust the incline of the treadmill as described above. Reattach the console to select kilometres or miles. Locate...
Uk Manual
Page 12
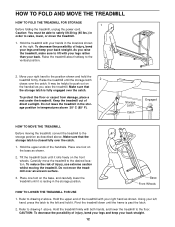
... must be helpful to the left and hold the treadmill firmly. HOW TO FOLD AND MOVE THE TREADMILL HOW TO FOLD THE TREADMILL FOR STORAGE 1 Before folding the treadmill, unplug the power cord. Hold the treadmill with your legs rather than your hands in order to drawing 2 above . Base Front Wheels HOW TO LOWER THE TREADMILL FOR USE 1. Hold the upper end of injury, bend your...
... must be helpful to the left and hold the treadmill firmly. HOW TO FOLD AND MOVE THE TREADMILL HOW TO FOLD THE TREADMILL FOR STORAGE 1 Before folding the treadmill, unplug the power cord. Hold the treadmill with your legs rather than your hands in order to drawing 2 above . Base Front Wheels HOW TO LOWER THE TREADMILL FOR USE 1. Hold the upper end of injury, bend your...
Uk Manual
Page 13
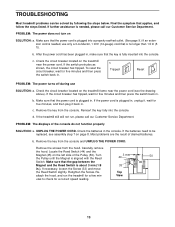
... that is plugged into the console. If the batteries need to check for five minutes and then press the switch back in , make sure that the power cord is no longer than 1.5 m (5 ft.). Reinsert the key fully into a properly earthed outlet. (See page 9.) If an extension cord is needed , use SOLUTION: a. PROBLEM: The displays of drained batteries. Carefully remove the hood. Retighten the Screw. TROUBLESHOOTING Most treadmill problems can be replaced, see...
... that is plugged into the console. If the batteries need to check for five minutes and then press the switch back in , make sure that the power cord is no longer than 1.5 m (5 ft.). Reinsert the key fully into a properly earthed outlet. (See page 9.) If an extension cord is needed , use SOLUTION: a. PROBLEM: The displays of drained batteries. Carefully remove the hood. Retighten the Screw. TROUBLESHOOTING Most treadmill problems can be replaced, see...
Uk Manual
Page 14
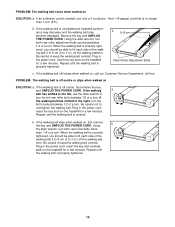
.... form. Be careful to keep the walking belt centred. When the walking belt is off the walking platform. PROBLEM: The walking belt is correctly tightened, you should be able to lift each side of a turn . Plug in the power cord, insert the key and run the treadmill for a few minutes. b. PROBLEM: The walking belt slows when walked on SOLUTION: a. If the walking belt still slows when walked on, call our Customer Service Department, toll-free.
.... form. Be careful to keep the walking belt centred. When the walking belt is off the walking platform. PROBLEM: The walking belt is correctly tightened, you should be able to lift each side of a turn . Plug in the power cord, insert the key and run the treadmill for a few minutes. b. PROBLEM: The walking belt slows when walked on SOLUTION: a. If the walking belt still slows when walked on, call our Customer Service Department, toll-free.

Uk Manual
Page 15
... as an exercise aid in determining heart rate trends in your training zone for 20 to strengthen your heart rate during exercise, use stored fat calories for a sustained period of rest between workouts. During the first few months, you exercise- The chart below shows recommended heart rates for energy. If your goal is to burn fat, adjust the speed and incline of the treadmill until your heart rate is...
... as an exercise aid in determining heart rate trends in your training zone for 20 to strengthen your heart rate during exercise, use stored fat calories for a sustained period of rest between workouts. During the first few months, you exercise- The chart below shows recommended heart rates for energy. If your goal is to burn fat, adjust the speed and incline of the treadmill until your heart rate is...
Uk Manual
Page 16
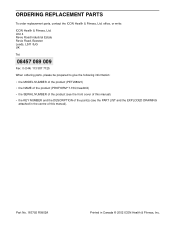
... of the product (PROFORM® 7.15Q treadmill) • the SERIAL NUMBER of the product (see the front cover of the part(s) (see the PART LIST and the EXPLODED DRAWING attached in Canada © 2002 ICON Health & Fitness, Inc. office, or write: ICON Health & Fitness, Ltd. ORDERING REPLACEMENT PARTS To order replacement parts, contact the ICON Health & Fitness, Ltd. Part No. 183792 R0902A Printed in the centre of this manual) • the KEY NUMBER and the DESCRIPTION of...
... of the product (PROFORM® 7.15Q treadmill) • the SERIAL NUMBER of the product (see the front cover of the part(s) (see the PART LIST and the EXPLODED DRAWING attached in Canada © 2002 ICON Health & Fitness, Inc. office, or write: ICON Health & Fitness, Ltd. ORDERING REPLACEMENT PARTS To order replacement parts, contact the ICON Health & Fitness, Ltd. Part No. 183792 R0902A Printed in the centre of this manual) • the KEY NUMBER and the DESCRIPTION of...
Uk Manual
Page 17
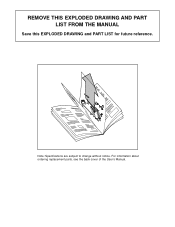
For information about ordering replacement parts, see the back cover of the User's Manual. 34 Note: Specifications are subject to change without notice. REMOVE THIS EXPLODED DRAWING AND PART LIST FROM THE MANUAL Save this EXPLODED DRAWING and PART LIST for future reference.
For information about ordering replacement parts, see the back cover of the User's Manual. 34 Note: Specifications are subject to change without notice. REMOVE THIS EXPLODED DRAWING AND PART LIST FROM THE MANUAL Save this EXPLODED DRAWING and PART LIST for future reference.
Uk Manual
Page 18
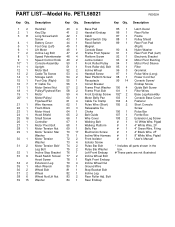
... Belt Guide Wire Cover Walking Belt Walking Platform Belly Pan Electronics Screw Incline Wire Harness Front Isolator Isolator Screw Pulse Bar Bolt Pulse Bar Washer Left Front Endcap Incline Wheel Bolt Right Front Endcap Incline Wheel Nut Ground Wire Stop Bracket Bolt Incline Leg Rear Roller Adj. Handrail 40 4 Key/Clip 41 2 Long Screw/Latch 42 1 Screw 43 1 Battery Cover 44 1 Foot Grip (Left) 45 1 Lift Motor 46 1 Incline Leg Bolt 47 2 Speed Potentiometer 48 4 Speed Control Knob 49 2 Console Assembly 50 1 Upright 51 1 Motor Belt 52 2 Cable Tie Screw 53 4 Storage Latch...
... Belt Guide Wire Cover Walking Belt Walking Platform Belly Pan Electronics Screw Incline Wire Harness Front Isolator Isolator Screw Pulse Bar Bolt Pulse Bar Washer Left Front Endcap Incline Wheel Bolt Right Front Endcap Incline Wheel Nut Ground Wire Stop Bracket Bolt Incline Leg Rear Roller Adj. Handrail 40 4 Key/Clip 41 2 Long Screw/Latch 42 1 Screw 43 1 Battery Cover 44 1 Foot Grip (Left) 45 1 Lift Motor 46 1 Incline Leg Bolt 47 2 Speed Potentiometer 48 4 Speed Control Knob 49 2 Console Assembly 50 1 Upright 51 1 Motor Belt 52 2 Cable Tie Screw 53 4 Storage Latch...

