

English Manual
Page 1
Sears, Roebuck and Co., Hoffman Estates, IL 60179 Write the serial number in this manual before using this manual for future reference. Model No. 831.294880 Serial No. Serial Number Decal TREADMILL EXERCISER User's Manual • Assembly • Operation • Maintenance • Part List and Drawing CAUTION Read all precautions and instructions in the space above for future reference. Save this equipment.
Sears, Roebuck and Co., Hoffman Estates, IL 60179 Write the serial number in this manual before using this manual for future reference. Model No. 831.294880 Serial No. Serial Number Decal TREADMILL EXERCISER User's Manual • Assembly • Operation • Maintenance • Part List and Drawing CAUTION Read all precautions and instructions in the space above for future reference. Save this equipment.
English Manual
Page 3
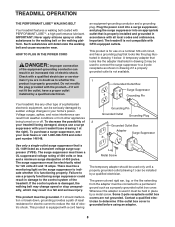
... control system is capable of all users of this manual. 11. Do not operate the treadmill where aerosol products are adequately informed of high speeds. Wear appropriate exercise clothes when using the treadmill. 6. Never use . (See the drawing on page 8. When connecting the power cord (see your local Sears or call 1-800-366-7278 and order part number 146148. 15. The treadmill is damaged, the walking belt may change speed or stop...
... control system is capable of all users of this manual. 11. Do not operate the treadmill where aerosol products are adequately informed of high speeds. Wear appropriate exercise clothes when using the treadmill. 6. Never use . (See the drawing on page 8. When connecting the power cord (see your local Sears or call 1-800-366-7278 and order part number 146148. 15. The treadmill is damaged, the walking belt may change speed or stop...
English Manual
Page 4
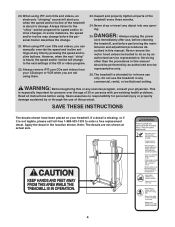
... health problems. Read all parts of the CD or video program. 22. Note: The decals are not using iFIT.com CDs and videos, an electronic "chirping" sound will change . Never drop or insert any object into any time by an authorized service representative. tenance and adjustment procedures de- Never remove the motor hood unless instructed to change to order a free replacement decal. Always unplug the power cord immediately after use the treadmill...
... health problems. Read all parts of the CD or video program. 22. Note: The decals are not using iFIT.com CDs and videos, an electronic "chirping" sound will change . Never drop or insert any object into any time by an authorized service representative. tenance and adjustment procedures de- Never remove the motor hood unless instructed to change to order a free replacement decal. Always unplug the power cord immediately after use the treadmill...
English Manual
Page 5
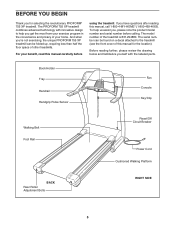
... attached to help us assist you get the most from your exercise program in the convenience and privacy of the treadmill is 831.294880. For your home. BEFORE YOU BEGIN Thank you have questions after reading this manual carefully before calling. Book Holder Tray Handrail Handgrip Pulse Sensor Fan Console Key/Clip Walking Belt Foot Rail Reset/Off Circuit Breaker Power Cord Cushioned Walking Platform BACK Rear Roller Adjustment Bolts...
... attached to help us assist you get the most from your exercise program in the convenience and privacy of the treadmill is 831.294880. For your home. BEFORE YOU BEGIN Thank you have questions after reading this manual carefully before calling. Book Holder Tray Handrail Handgrip Pulse Sensor Fan Console Key/Clip Walking Belt Foot Rail Reset/Off Circuit Breaker Power Cord Cushioned Walking Platform BACK Rear Roller Adjustment Bolts...
English Manual
Page 6
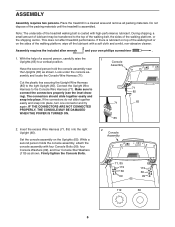
... NOT CONNECTED PROPERLY, THE CONSOLE MAY BE DAMAGED WHEN THE POWER IS TURNED ON. 71 85 71 65 85 2. Insert the excess Wire Harness (71, 85) into the right Upright (65). Firmly tighten the Console Bolts. 2 Console Assembly 71, 85 119 119 69 69 99 99 65 119 69 6 Make sure to the right Upright (65). Set the console assembly on the sides of the treadmill walking belt...
... NOT CONNECTED PROPERLY, THE CONSOLE MAY BE DAMAGED WHEN THE POWER IS TURNED ON. 71 85 71 65 85 2. Insert the excess Wire Harness (71, 85) into the right Upright (65). Firmly tighten the Console Bolts. 2 Console Assembly 71, 85 119 119 69 69 99 99 65 119 69 6 Make sure to the right Upright (65). Set the console assembly on the sides of the treadmill walking belt...
English Manual
Page 8
... Adapter Surge Suppressor Use only a single-outlet surge suppressor that is UL 1449 listed as a properly grounded outlet box cover. If it is not available. 1 Grounded Outlet Box Surge Suppressor Grounding Pin Your treadmill, like extending from other appliances being damaged, always use a surge suppressor with all local codes and ordinances. Important: The treadmill is damaged, the walking belt may change speed or stop...
... Adapter Surge Suppressor Use only a single-outlet surge suppressor that is UL 1449 listed as a properly grounded outlet box cover. If it is not available. 1 Grounded Outlet Box Surge Suppressor Grounding Pin Your treadmill, like extending from other appliances being damaged, always use a surge suppressor with all local codes and ordinances. Important: The treadmill is damaged, the walking belt may change speed or stop...
English Manual
Page 9
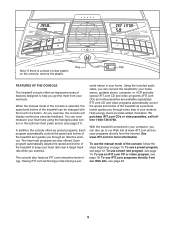
... to your home. See www.iFIT.com for more information. High-energy music provides added motivation. To use an iFIT.com CD or video program, see page 20. 9 To use a preset program, see page 21). To use the manual mode of features designed to your heart rate using the handgrip pulse sensor or the optional chest pulse sensor (see page 12. With the treadmill connected to help you exercise, the console will display continuous exercise feedback.
... to your home. See www.iFIT.com for more information. High-energy music provides added motivation. To use an iFIT.com CD or video program, see page 20. 9 To use a preset program, see page 21). To use the manual mode of features designed to your heart rate using the handgrip pulse sensor or the optional chest pulse sensor (see page 12. With the treadmill connected to help you exercise, the console will display continuous exercise feedback.
English Manual
Page 10
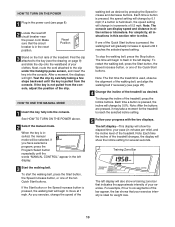
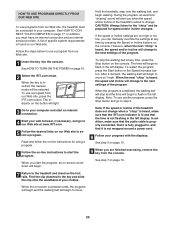
... page 8). 2 Locate the reset/off circuit breaker near the power cord. Each time a button is pressed, the incline will change the incline of the treadmill, press the Incline buttons. To restart the walking belt, press the Start button, the Speed increase button, or one of the Quick Start buttons. Each time a button is pressed, the speed setting will change the speed of the walking belt as desired. Note: Each time the incline of the treadmill changes, the display will light. If you exercise, change by carefully...
... page 8). 2 Locate the reset/off circuit breaker near the power cord. Each time a button is pressed, the incline will change the incline of the treadmill, press the Incline buttons. To restart the walking belt, press the Start button, the Speed increase button, or one of the Quick Start buttons. Each time a button is pressed, the speed setting will change the speed of the walking belt as desired. Note: Each time the incline of the treadmill changes, the display will light. If you exercise, change by carefully...
English Manual
Page 11
... moving your heart rate when you have completed, the speed of the walking belt, and the approximate numbers of calories and fat calories you use the handgrip pulse sensor or the optional chest pulse sensor. To turn on page 21. Step onto the foot rails, press the Stop button, and adjust the incline of the treadmill to be damaged. Next, remove the key from the console. In addition, during heart rate programs the right display will show a heart rate bar that...
... moving your heart rate when you have completed, the speed of the walking belt, and the approximate numbers of calories and fat calories you use the handgrip pulse sensor or the optional chest pulse sensor. To turn on page 21. Step onto the foot rails, press the Stop button, and adjust the incline of the treadmill to be damaged. Next, remove the key from the console. In addition, during heart rate programs the right display will show a heart rate bar that...
English Manual
Page 12
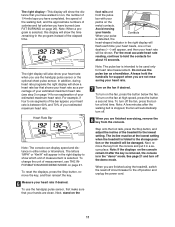
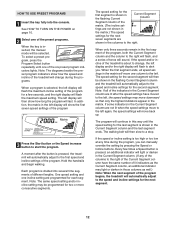
... pressed, an additional indicator will last. Hold the handrails and begin walking. HOW TO USE PRESET PROGRAMS 1 Insert the key fully into several time segments of different lengths. Note: The diagrams beside the preset program indicators show how the speed and incline of the treadmill will change , the left again, the speed settings will automatically adjust to the first speed and incline settings of the program begins, the treadmill...
... pressed, an additional indicator will last. Hold the handrails and begin walking. HOW TO USE PRESET PROGRAMS 1 Insert the key fully into several time segments of different lengths. Note: The diagrams beside the preset program indicators show how the speed and incline of the treadmill will change , the left again, the speed settings will automatically adjust to the first speed and incline settings of the program begins, the treadmill...
English Manual
Page 13
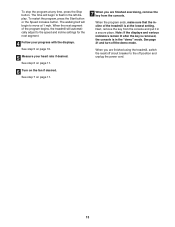
... treadmill, switch the reset/off circuit breaker to the speed and incline settings for the next segment. 4 Follow your heart rate if desired. See step 5 on the fan if desired. The time will begin to move at any time, press the Stop button. See step 7 on page 11. 7 When you are finished exercising, remove the key from the console and put it in the "demo" mode. To restart the program, press the Start button...
... treadmill, switch the reset/off circuit breaker to the speed and incline settings for the next segment. 4 Follow your heart rate if desired. See step 5 on the fan if desired. The time will begin to move at any time, press the Stop button. See step 7 on page 11. 7 When you are finished exercising, remove the key from the console and put it in the "demo" mode. To restart the program, press the Start button...
English Manual
Page 14
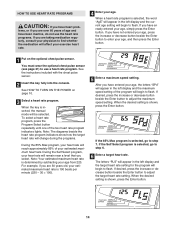
... a heart rate program. If you have been inactive, do not use a heart rate program. See the instructions included with the chest pulse sensor. 2 Insert the key fully into the console. lems, or if you are over 60 years of the program will begin to flash. See HOW TO TURN ON THE POWER on the optional chest pulse sensor. If desired, press the increase or decrease button beside the Enter button to use the heart rate programs...
... a heart rate program. If you have been inactive, do not use a heart rate program. See the instructions included with the chest pulse sensor. 2 Insert the key fully into the console. lems, or if you are over 60 years of the program will begin to flash. See HOW TO TURN ON THE POWER on the optional chest pulse sensor. If desired, press the increase or decrease button beside the Enter button to use the heart rate programs...
English Manual
Page 15
... the speed and incline of the treadmill will then slow to a stop the program at any time, press the Stop button. One target heart rate is not detected during the program, you are finished exercising, remove the key from the console. If the speed reaches the maximum speed setting of the program (see the instructions included with the displays. The walking belt will also increase to bring your heart rate closer to the target heart rate. See step...
... the speed and incline of the treadmill will then slow to a stop the program at any time, press the Stop button. One target heart rate is not detected during the program, you are finished exercising, remove the key from the console. If the speed reaches the maximum speed setting of the program (see the instructions included with the displays. The walking belt will also increase to bring your heart rate closer to the target heart rate. See step...
English Manual
Page 18
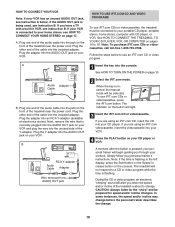
... display, press the Start button or the Speed increase button on the front of the treadmill near the power cord. Plug the other end of the cable into the included adapter. Follow the steps below . The indicator on page 10. 2 Select the iFIT.com mode. CAUTION: Always listen for speed and/or incline changes. A. B ANT. IN VIDEO AUDIO IN CH 34 OUT RF OUT RCA Y-adapter Audio Cable Adapter Wire removed from AUDIO OUT jack HOW TO USE IFIT...
... display, press the Start button or the Speed increase button on the front of the treadmill near the power cord. Plug the other end of the cable into the included adapter. Follow the steps below . The indicator on page 10. 2 Select the iFIT.com mode. CAUTION: Always listen for speed and/or incline changes. A. B ANT. IN VIDEO AUDIO IN CH 34 OUT RF OUT RCA Y-adapter Audio Cable Adapter Wire removed from AUDIO OUT jack HOW TO USE IFIT...
English Manual
Page 19
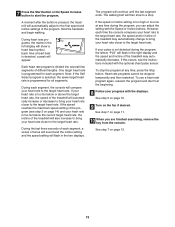
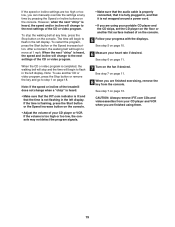
... fully plugged in the left display. If the volume is too high or too low, the console may not detect the program signals. • Make sure that the audio cable is properly connected, that it is heard, the speed and incline will stop the walking belt at any time by pressing the Speed or Incline buttons on page 11. 8 When you are finished exercising, remove the key from your...
... fully plugged in the left display. If the volume is too high or too low, the console may not detect the program signals. • Make sure that the audio cable is properly connected, that it is heard, the speed and incline will stop the walking belt at any time by pressing the Speed or Incline buttons on page 11. 8 When you are finished exercising, remove the key from your...
English Manual
Page 20
... is fully plugged in the left display. When the key is found on -line instructions to the next settings of the treadmill does not change to use another program, press the Stop button and go to our Web site at 1 mph. If the speed or incline settings are finished exercising, remove the key from our Web site, press the iFIT.com button. HOW TO USE PROGRAMS DIRECTLY FROM OUR WEB SITE To use programs from our...
... is fully plugged in the left display. When the key is found on -line instructions to the next settings of the treadmill does not change to use another program, press the Stop button and go to our Web site at 1 mph. If the speed or incline settings are finished exercising, remove the key from our Web site, press the iFIT.com button. HOW TO USE PROGRAMS DIRECTLY FROM OUR WEB SITE To use programs from our...
English Manual
Page 21
... change the unit of hours that the treadmill has been used only when a treadmill is selected, press the Speed decrease button. The chest pulse sensor provides hands-free operation and allows the console's heart rate programs to turn on and turn off the demo mode. The right display will not operate. When the demo mode is selected, the power cord can be plugged in a preset sequence, although the buttons on the console will automatically light in , the key...
... change the unit of hours that the treadmill has been used only when a treadmill is selected, press the Speed decrease button. The chest pulse sensor provides hands-free operation and allows the console's heart rate programs to turn on and turn off the demo mode. The right display will not operate. When the demo mode is selected, the power cord can be plugged in a preset sequence, although the buttons on the console will automatically light in , the key...
English Manual
Page 24
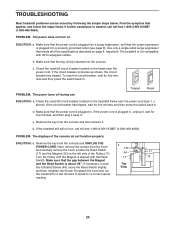
... Pulley until the Magnet is not compatible with the Reed 17 12 Switch. Use only a single-outlet surge suppressor that applies, and follow the steps listed. PROBLEM: The power turns off circuit breaker located on the treadmill frame near the power cord. Check the reset/off circuit breaker located on the frame near the power cord (see page 8). Remove the key from the hood a 1/8" and carefully remove the hood. PROBLEM: The displays of the specifications...
... Pulley until the Magnet is not compatible with the Reed 17 12 Switch. Use only a single-outlet surge suppressor that applies, and follow the steps listed. PROBLEM: The power turns off circuit breaker located on the treadmill frame near the power cord. Check the reset/off circuit breaker located on the frame near the power cord (see page 8). Remove the key from the hood a 1/8" and carefully remove the hood. PROBLEM: The displays of the specifications...

English Manual
Page 26
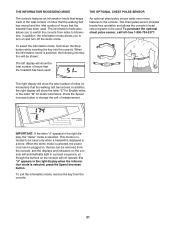
..., your training zone. Training Zone Exercise-After warming up to five workouts each workout with 5 to cool down -Finish each week, with preexisting health problems. The pulse sensor is near the highest number in your training zone for 20 to 60 minutes. (During the first few months, you to burn fat, adjust the speed or incline of the chart (ages are recommended heart rates for energy. EXERCISE FREQUENCY...
..., your training zone. Training Zone Exercise-After warming up to five workouts each workout with 5 to cool down -Finish each week, with preexisting health problems. The pulse sensor is near the highest number in your training zone for 20 to 60 minutes. (During the first few months, you to burn fat, adjust the speed or incline of the chart (ages are recommended heart rates for energy. EXERCISE FREQUENCY...
English Manual
Page 27
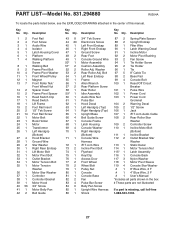
... 1 Reset/Off Circuit Breaker 101 1 Pulse Wire 102 1 Power Cord 103 1 Power Cord Grommet 104 2 Warning Decal 105 2 1/2" Screw 106 1 Jack 107 1 iFIT.com Audio Cable 108 2 Rear Roller Star Washer 109 2 Controller Screw 110 1 Incline Motor Bolt (Bottom) 111 1 Incline Bracket 112 2 Outlet Bracket Star Washer 113 1 Static Decal 114 1 Motor Tension Nut 115* 1 Latch Assembly 116 1 Console Back 117 3 Nylon Washer 118 1 Motor Pivot Sleeve 119 4 Console Star Washer # 1 8" Blue Wire, 2 F # 1 4" Blue Wire, 2 F # 1 User's Manual *Includes all parts...
... 1 Reset/Off Circuit Breaker 101 1 Pulse Wire 102 1 Power Cord 103 1 Power Cord Grommet 104 2 Warning Decal 105 2 1/2" Screw 106 1 Jack 107 1 iFIT.com Audio Cable 108 2 Rear Roller Star Washer 109 2 Controller Screw 110 1 Incline Motor Bolt (Bottom) 111 1 Incline Bracket 112 2 Outlet Bracket Star Washer 113 1 Static Decal 114 1 Motor Tension Nut 115* 1 Latch Assembly 116 1 Console Back 117 3 Nylon Washer 118 1 Motor Pivot Sleeve 119 4 Console Star Washer # 1 8" Blue Wire, 2 F # 1 4" Blue Wire, 2 F # 1 User's Manual *Includes all parts...

