
English Manual
Page 2
¨ TABLE OF CONTENTS IMPORTANT PRECAUTIONS 3 BEFORE YOU BEGIN 5 ASSEMBLY 6 OPERATION AND ADJUSTMENT 7 HOW TO FOLD AND MOVE THE TREADMILL 15 MAINTENANCE AND TROUBLE-SHOOTING 17 CONDITIONING GUIDELINES 19 PART LIST 22 ORDERING REPLACEMENT PARTS Back Cover LIMITED WARRANTY Back Cover Note: An EXPLODED DRAWING is attached in the center of this manual. 2
¨ TABLE OF CONTENTS IMPORTANT PRECAUTIONS 3 BEFORE YOU BEGIN 5 ASSEMBLY 6 OPERATION AND ADJUSTMENT 7 HOW TO FOLD AND MOVE THE TREADMILL 15 MAINTENANCE AND TROUBLE-SHOOTING 17 CONDITIONING GUIDELINES 19 PART LIST 22 ORDERING REPLACEMENT PARTS Back Cover LIMITED WARRANTY Back Cover Note: An EXPLODED DRAWING is attached in the center of this manual. 2
English Manual
Page 3
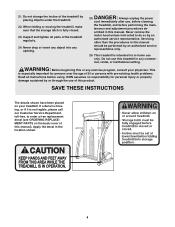
... extension cord. 11. The pulse sensor is running on any surface that blocks air openings. The pulse sensor is turned off switch.) 20. IMPORTANT PRECAUTIONS DANGER: To reduce the risk of carrying 15 or more amps. When walking, hold the handrails while running . Using weights and not holding the handrails may affect the accuracy of high speeds. Exercises using the treadmill. Use only a UL-listed surge protector, rated...
... extension cord. 11. The pulse sensor is running on any surface that blocks air openings. The pulse sensor is turned off switch.) 20. IMPORTANT PRECAUTIONS DANGER: To reduce the risk of carrying 15 or more amps. When walking, hold the handrails while running . Using weights and not holding the handrails may affect the accuracy of high speeds. Exercises using the treadmill. Use only a UL-listed surge protector, rated...
English Manual
Page 4
... procedures in -home use of this manual should be performed by an authorized service representative. This is intended for in this product. ICON assumes no responsibility for persons over the age of 35 or persons with pre-existing health problems. Read all parts of this or any exercise program, consult your treadmill. When folding or moving the treadmill, make sure that the storage latch is not...
... procedures in -home use of this manual should be performed by an authorized service representative. This is intended for in this product. ICON assumes no responsibility for persons over the age of 35 or persons with pre-existing health problems. Read all parts of this or any exercise program, consult your treadmill. When folding or moving the treadmill, make sure that the storage latch is not...
English Manual
Page 5
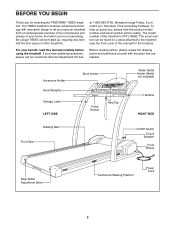
..., 6 a.m. The 785EX treadmill combines advanced technology with the parts that are labeled. Mountain Time (excluding holidays). until 6 p.m. Accessory Holder Hand Weights Storage Latch LEFT SIDE Book Holder Pulse Sensor Key/Clip Water Bottle Holder (Bottle not included) Handrail RIGHT SIDE Walking Belt Foot Rails On/Off Switch Circuit Breaker Front Wheel Rear Roller Adjustment Bolts Cushioned Walking Platform Power Cord 5 If you , please note the product model number and serial number before using the treadmill.
..., 6 a.m. The 785EX treadmill combines advanced technology with the parts that are labeled. Mountain Time (excluding holidays). until 6 p.m. Accessory Holder Hand Weights Storage Latch LEFT SIDE Book Holder Pulse Sensor Key/Clip Water Bottle Holder (Bottle not included) Handrail RIGHT SIDE Walking Belt Foot Rails On/Off Switch Circuit Breaker Front Wheel Rear Roller Adjustment Bolts Cushioned Walking Platform Power Cord 5 If you , please note the product model number and serial number before using the treadmill.
English Manual
Page 6
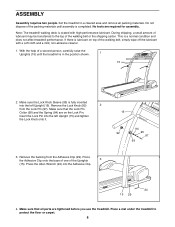
... that the Lock Pin Collar (95) and the Spring (94) are on top of the walking belt or the shipping carton. Note: The treadmill walking deck is in a cleared area and remove all parts are required for assembly. This is fully inserted into the left Upright (15) and tighten the Lock Knob onto it. 3. If there is completed. Press the Allen Wrench...
... that the Lock Pin Collar (95) and the Spring (94) are on top of the walking belt or the shipping carton. Note: The treadmill walking deck is in a cleared area and remove all parts are required for assembly. This is fully inserted into the left Upright (15) and tighten the Lock Knob onto it. 3. If there is completed. Press the Allen Wrench...
English Manual
Page 7
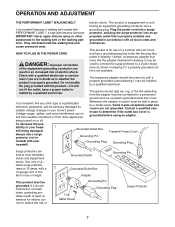
...-performance lubricant. Voltage surges, spikes, and noise interference can result from weather conditions or from the adapter must be installed by a metal screw. being damaged, always use on or off. Grounded Outlet Box Grounding Pin Treadmill Power Cord cluded) with the productÑif it should be used to connect the surge protector to the walking belt or the walking plat- A temporary adapter that is...
...-performance lubricant. Voltage surges, spikes, and noise interference can result from weather conditions or from the adapter must be installed by a metal screw. being damaged, always use on or off. Grounded Outlet Box Grounding Pin Treadmill Power Cord cluded) with the productÑif it should be used to connect the surge protector to the walking belt or the walking plat- A temporary adapter that is...
English Manual
Page 8
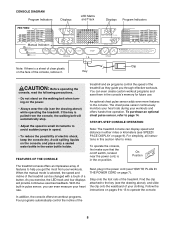
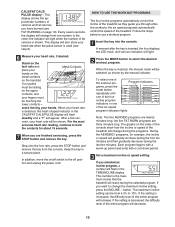
... optional chest pulse sensor, refer to the console. STEP-BY-STEP CONSOLE OPERATION Note: The treadmill console can be changed with a touch of a button. With the built-in the power cord (see the drawing above ), and slide the clip onto the waistband of the treadmill as they guide you get the most from the console, the walking belt will provide continuous exercise feedback. CONSOLE DIAGRAM Program Indicators Displays LED Matrix and Track Displays Program Indicators Manual Indicator...
... optional chest pulse sensor, refer to the console. STEP-BY-STEP CONSOLE OPERATION Note: The treadmill console can be changed with a touch of a button. With the built-in the power cord (see the drawing above ), and slide the clip onto the waistband of the treadmill as they guide you get the most from the console, the walking belt will provide continuous exercise feedback. CONSOLE DIAGRAM Program Indicators Displays LED Matrix and Track Displays Program Indicators Manual Indicator...
English Manual
Page 9
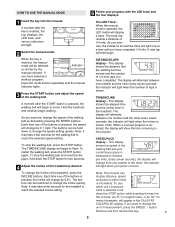
... CALS/FAT CALS/PULSE display. The track represents a distance of measure- A new lap will alternate between one of the walking belt. DISTANCE/LAPS displayÑThis display shows the distance that the walking belt has moved and the number of 1/4-mile laps you exercise, change the speed of the treadmill, press the INCLINE buttons. The display will then begin walking. TIME/INCLINE displayÑThis display shows the elapsed time and the incline level of the walking belt and your...
... CALS/FAT CALS/PULSE display. The track represents a distance of measure- A new lap will alternate between one of the walking belt. DISTANCE/LAPS displayÑThis display shows the distance that the walking belt has moved and the number of 1/4-mile laps you exercise, change the speed of the treadmill, press the INCLINE buttons. The display will then begin walking. TIME/INCLINE displayÑThis display shows the elapsed time and the incline level of the walking belt and your...
English Manual
Page 10
... how the incline or speed of the treadmill will increase. If you are finished exercising, press the STOP button and remove the key. Step onto the foot rails, press the STOP button and remove the key from one number to select the desired workout program. Follow the steps below to change during the selected program. Program Indicators grams, press the mode button repeatedly until one of the four incline program indicators or one of the workout pro- This display will...
... how the incline or speed of the treadmill will increase. If you are finished exercising, press the STOP button and remove the key. Step onto the foot rails, press the STOP button and remove the key from one number to select the desired workout program. Follow the steps below to change during the selected program. Program Indicators grams, press the mode button repeatedly until one of the four incline program indicators or one of the workout pro- This display will...
English Manual
Page 11
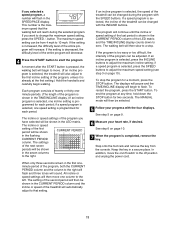
... the TIME/INCLINE display.) If an incline program is selected, one incline setting is selected, the speed of the treadmill can be from the console. If an incline program is programmed for a moment, press the STOP button. The walking belt will then slow to the off switch to a stop the program for each period. The MANUAL mode will then be selected. 5 Follow your heart rate, if desired. Step onto the foot rails and remove the key from...
... the TIME/INCLINE display.) If an incline program is selected, one incline setting is selected, the speed of the treadmill can be from the console. If an incline program is programmed for a moment, press the STOP button. The walking belt will then slow to the off switch to a stop the program for each period. The MANUAL mode will then be selected. 5 Follow your heart rate, if desired. Step onto the foot rails and remove the key from...
English Manual
Page 12
... SPEED buttons are pressed, one -minute periods. Program speed and incline settings for as many one column to the left and the speed setting of the program will then move the on/off switch to select a custom workout program. One speed setting and one of the treadmill, and can be programmed for two seconds. The speed setting of the first period is pressed, the walking belt will light. Step onto the foot rails and remove...
... SPEED buttons are pressed, one -minute periods. Program speed and incline settings for as many one column to the left and the speed setting of the program will then move the on/off switch to select a custom workout program. One speed setting and one of the treadmill, and can be programmed for two seconds. The speed setting of the first period is pressed, the walking belt will light. Step onto the foot rails and remove...
English Manual
Page 13
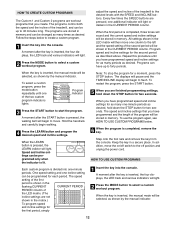
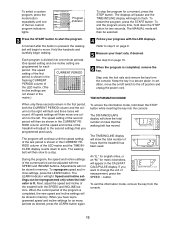
... LED displays. All speed settings will show the total number of the current period can be stored in memory. During the program, the speed and incline settings of miles that the walking belt has moved. The TIME/INCLINE display will then move the on/off switch to start the program. To restart the program, press the START button. One speed setting and one of the treadmill with the SPEED and INCLINE buttons. Step onto the foot rails and remove the key...
... LED displays. All speed settings will show the total number of the current period can be stored in memory. During the program, the speed and incline settings of miles that the walking belt has moved. The TIME/INCLINE display will then move the on/off switch to start the program. To restart the program, press the START button. One speed setting and one of the treadmill with the SPEED and INCLINE buttons. Step onto the foot rails and remove the key...
English Manual
Page 14
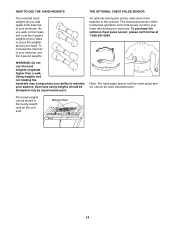
... press the weights above your workouts. Weight Rack 14 An optional chest pulse sensor adds even more features to your workouts. The chest pulse sensor offers hands-free operation and continuously monitors your heart rate during your head. The hand weights can be attempted only by experienced users. HOW TO USE THE HAND WEIGHTS THE OPTIONAL CHEST PULSE SENSOR The included hand weights let you walk on the console. As you add upper body exercise to the console...
... press the weights above your workouts. Weight Rack 14 An optional chest pulse sensor adds even more features to your workouts. The chest pulse sensor offers hands-free operation and continuously monitors your heart rate during your head. The hand weights can be attempted only by experienced users. HOW TO USE THE HAND WEIGHTS THE OPTIONAL CHEST PULSE SENSOR The included hand weights let you walk on the console. As you add upper body exercise to the console...
English Manual
Page 15
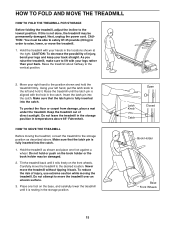
... that the latch pin is fully inserted into the catch. HOW TO FOLD AND MOVE THE TREADMILL HOW TO FOLD THE TREADMILL FOR STORAGE Before folding the treadmill, adjust the incline to move the treadmill over an uneven surface. 3. Hold the treadmill as described above 85¡ Fahrenheit. Next, unplug the power cord. CAUTION: You must be permanently damaged. CAUTION: To decrease the possibility of direct sunlight. As...
... that the latch pin is fully inserted into the catch. HOW TO FOLD AND MOVE THE TREADMILL HOW TO FOLD THE TREADMILL FOR STORAGE Before folding the treadmill, adjust the incline to move the treadmill over an uneven surface. 3. Hold the treadmill as described above 85¡ Fahrenheit. Next, unplug the power cord. CAUTION: You must be permanently damaged. CAUTION: To decrease the possibility of direct sunlight. As...
English Manual
Page 17
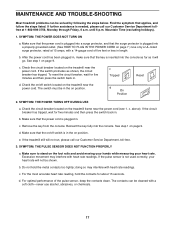
... the power cord is plugged into a surge protector, and that the power cord is needed, please call our Customer Service Department, toll-free. 3. above). If the circuit breaker has tripped, wait for about 15 seconds. b. Mountain Time (excluding holidays). 1. See step 1 on the treadmill near the power cord. d. SYMPTOM: THE POWER TURNS OFF DURING USE a. If the switch protrudes as it will go. Remove the key from the console...
... the power cord is plugged into a surge protector, and that the power cord is needed, please call our Customer Service Department, toll-free. 3. above). If the circuit breaker has tripped, wait for about 15 seconds. b. Mountain Time (excluding holidays). 1. See step 1 on the treadmill near the power cord. d. SYMPTOM: THE POWER TURNS OFF DURING USE a. If the switch protrudes as it will go. Remove the key from the console...
English Manual
Page 18
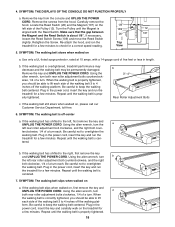
... until the walking belt is cen- SYMPTOM: The walking belt slips when walked on , please call our Customer Service Department, toll-free. 6. form. Use only a UL-listed surge protector, rated at 15 amps, with the Reed Switch. Repeat until the Magnet is correctly tightened, you should be able to lift each side of a turn . terclockwise, 1/4 of the Pulley (12). Plug in the power cord, insert the key and run the treadmill for...
... until the walking belt is cen- SYMPTOM: The walking belt slips when walked on , please call our Customer Service Department, toll-free. 6. form. Use only a UL-listed surge protector, rated at 15 amps, with the Reed Switch. Repeat until the Magnet is correctly tightened, you should be able to lift each side of a turn . terclockwise, 1/4 of the Pulley (12). Plug in the power cord, insert the key and run the treadmill for...
English Manual
Page 19
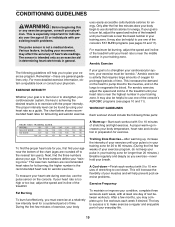
... ÑStart each workout with 5 to exercise with preexisting health problems. The pulse sensor is not a medical device. For maximum fat burning, adjust the speed and incline of the treadmill until your training zone. This will increase the flexibility of your muscles and will help prevent post-exercise problems. Exercise Frequency To maintain or improve your heart rate is near the highest number in preparation for aerobic exercise. CONDITIONING...
... ÑStart each workout with 5 to exercise with preexisting health problems. The pulse sensor is not a medical device. For maximum fat burning, adjust the speed and incline of the treadmill until your training zone. This will increase the flexibility of your muscles and will help prevent post-exercise problems. Exercise Frequency To maintain or improve your heart rate is near the highest number in preparation for aerobic exercise. CONDITIONING...
English Manual
Page 22
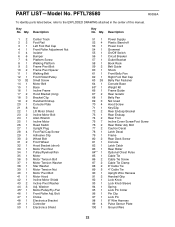
... Power Cord Grommet On/Off Switch Circuit Breaker Outlet Bracket Book Rack Belt Guide Shock Front Belly Pan Right Foot Rail Cap Belly Pan Fastener Console Base Weight Kit Frame Guide Rear Isolator Belly Pan Not Used Hood Screw Key/Clip Rear Endcap Bracket Rear Endcap Rear Foot Incline Cover Screw/Foot Screw Rear Roller Adj. PFTL78580 R0399A To identify parts listed below, refer to the EXPLODED DRAWING attached in the center of this manual. PART LISTÑModel...
... Power Cord Grommet On/Off Switch Circuit Breaker Outlet Bracket Book Rack Belt Guide Shock Front Belly Pan Right Foot Rail Cap Belly Pan Fastener Console Base Weight Kit Frame Guide Rear Isolator Belly Pan Not Used Hood Screw Key/Clip Rear Endcap Bracket Rear Endcap Rear Foot Incline Cover Screw/Foot Screw Rear Roller Adj. PFTL78580 R0399A To identify parts listed below, refer to the EXPLODED DRAWING attached in the center of this manual. PART LISTÑModel...
English Manual
Page 23
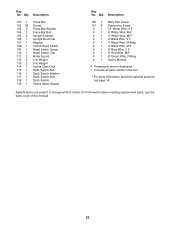
...119 1 Pulse Bar Screw Pulse Bar Washer Pulse Bar Bolt Upright Endcap Upright Grommet Magnet Incline Reed Switch Reed Switch Screw Reed Switch Clip Roller Guard 2-lb Weight 3-lb Weight Incline Optic Disk Optic Switch Nut Optic Switch Washer Optic Switch Bolt Optic Switch Incline Motor Spacer Key No. Qty. Key No. Specifications are not illustrated * Includes all parts shown in the box ** For more information about ordering replacement parts, see page 14. Description 120 7 121 8 #1 #1 #1 #1 #1 #1 #1 #1 #1 #1 Belly Pan Screw Electronics Screw 14Ó White Wire, 2 F 8Ó White Wire...
...119 1 Pulse Bar Screw Pulse Bar Washer Pulse Bar Bolt Upright Endcap Upright Grommet Magnet Incline Reed Switch Reed Switch Screw Reed Switch Clip Roller Guard 2-lb Weight 3-lb Weight Incline Optic Disk Optic Switch Nut Optic Switch Washer Optic Switch Bolt Optic Switch Incline Motor Spacer Key No. Qty. Key No. Specifications are not illustrated * Includes all parts shown in the box ** For more information about ordering replacement parts, see page 14. Description 120 7 121 8 #1 #1 #1 #1 #1 #1 #1 #1 #1 #1 Belly Pan Screw Electronics Screw 14Ó White Wire, 2 F 8Ó White Wire...
English Manual
Page 26
... date of purchase. ICON is made must be prepared to give the following information: ¥ The MODEL NUMBER OF THE PRODUCT (PFTL78580). ¥ The NAME OF THE PRODUCT (PROFORM¨ 785EX treadmill). ¥ The SERIAL NUMBER OF THE PRODUCT (see the front cover of this manual). ¥ The KEY NUMBER AND DESCRIPTION OF THE PART(S) (see the PART LIST on how long an implied warranty lasts. If...
... date of purchase. ICON is made must be prepared to give the following information: ¥ The MODEL NUMBER OF THE PRODUCT (PFTL78580). ¥ The NAME OF THE PRODUCT (PROFORM¨ 785EX treadmill). ¥ The SERIAL NUMBER OF THE PRODUCT (see the front cover of this manual). ¥ The KEY NUMBER AND DESCRIPTION OF THE PART(S) (see the PART LIST on how long an implied warranty lasts. If...


