

English Manual
Page 1
...direct assistance from our factory. USERÕS MANUAL Visit our website at www.proform.com new products, prizes, fitness tips, and much more! CUSTOMER HOTLINE: 1-800-999-3756 Mon.ÐFri., 6 a.m.Ð6 p.m. As a manufacturer, we are missing parts, we will provide immediate assistance, free... DIRECT TO OUR TOLL-FREE CUSTOMER HOT LINE. Save this equipment. MST CAUTION Read all precautions and instructions in the space above for future reference. Model No. Write the serial number in this manual before using this manual for reference. PFBE19000 Serial No. Serial Number ...
...direct assistance from our factory. USERÕS MANUAL Visit our website at www.proform.com new products, prizes, fitness tips, and much more! CUSTOMER HOTLINE: 1-800-999-3756 Mon.ÐFri., 6 a.m.Ð6 p.m. As a manufacturer, we are missing parts, we will provide immediate assistance, free... DIRECT TO OUR TOLL-FREE CUSTOMER HOT LINE. Save this equipment. MST CAUTION Read all precautions and instructions in the space above for future reference. Model No. Write the serial number in this manual before using this manual for reference. PFBE19000 Serial No. Serial Number ...
English Manual
Page 2
... removed. Mountain Time, to the location shown. ! Table of Contents Warning Decal Placement 2 Important Precautions 3 Before You Begin 4 Part Identification Chart 5 Assembly 6 Using the Weight Bench 10 Exercise Guidelines 12 Ordering Replacement Parts Back Cover Limited Warranty Back Cover Note: A Part List/Exploded Drawing is attached to the center of this product may result in serious injury. ¥ Read userÕs manual and follow all warnings and operating instructions prior to use...
... removed. Mountain Time, to the location shown. ! Table of Contents Warning Decal Placement 2 Important Precautions 3 Before You Begin 4 Part Identification Chart 5 Assembly 6 Using the Weight Bench 10 Exercise Guidelines 12 Ordering Replacement Parts Back Cover Limited Warranty Back Cover Note: A Part List/Exploded Drawing is attached to the center of this product may result in serious injury. ¥ Read userÕs manual and follow all warnings and operating instructions prior to use...

English Manual
Page 3
... pounds, including the user, a weight bar, and weights. Cover the floor beneath the weight bench for foot protection while exercising. Inspect and tighten all instructions in this manual before using the weight bench. 9. The weight bench is designed to support a maximum of your barbell (not included) when you are performing bench press exercises, your physician. Do not use a barbell that 310 pounds, including a weight bar and weights, on both adjustment tubes. 13. When using it. When...
... pounds, including the user, a weight bar, and weights. Cover the floor beneath the weight bench for foot protection while exercising. Inspect and tighten all instructions in this manual before using the weight bench. 9. The weight bench is designed to support a maximum of your barbell (not included) when you are performing bench press exercises, your physician. Do not use a barbell that 310 pounds, including a weight bar and weights, on both adjustment tubes. 13. When using it. When...

English Manual
Page 4
... serial number before using the PROFORM 830 weight bench. If you want. Weight Rest Preacher Curl Leg Lever Weight Tube Backrest Large Adjustment Knob Upright Seat 4 The versatile PROFORM 830 is PFBE19000. To help you to achieve the specific results you have additional questions, please call our toll-free Customer Service Department at the drawing below and familiarize yourself with your own weight set (not included) to the weight bench (see the front cover...
... serial number before using the PROFORM 830 weight bench. If you want. Weight Rest Preacher Curl Leg Lever Weight Tube Backrest Large Adjustment Knob Upright Seat 4 The versatile PROFORM 830 is PFBE19000. To help you to achieve the specific results you have additional questions, please call our toll-free Customer Service Department at the drawing below and familiarize yourself with your own weight set (not included) to the weight bench (see the front cover...
English Manual
Page 5
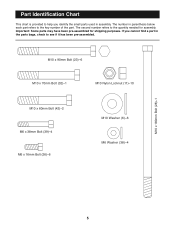
... small parts used in assembly. The second number refers to the quantity needed for shipping purposes. Important: Some parts may have been pre-assembled for assembly. Part Identification Chart This chart is provided to help you cannot find a part in the parts bags, check to see if it has been pre-assembled. The number in parenthesis below each part refers to the key number of the part. M10 x 90mm Bolt...
... small parts used in assembly. The second number refers to the quantity needed for shipping purposes. Important: Some parts may have been pre-assembled for assembly. Part Identification Chart This chart is provided to help you cannot find a part in the parts bags, check to see if it has been pre-assembled. The number in parenthesis below each part refers to the key number of the part. M10 x 90mm Bolt...

English Manual
Page 6
... box above. Note: Some small parts may have the following information and instructions: ¥ Place all parts are in the indicated position. do otherwise. ¥ As you begin. ¥ For help identifying the small parts used in assembly, use the PART IDENTIFICATION CHART on the Crossbar (2) is completed. ¥ Read each assembly step before you assemble the weight bench, make sure that the welded tube...
... box above. Note: Some small parts may have the following information and instructions: ¥ Place all parts are in the indicated position. do otherwise. ¥ As you begin. ¥ For help identifying the small parts used in assembly, use the PART IDENTIFICATION CHART on the Crossbar (2) is completed. ¥ Read each assembly step before you assemble the weight bench, make sure that the welded tube...
English Manual
Page 7
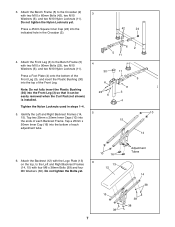
...Do not tighten the Nylon Locknuts yet. Identify the Left and Right Backrest Frames (14, 15). Attach the Bench Frame (5) to the Left and Right Backrest Frames (14, 15) with two M10 x 90mm Bolts (23), two M10 Washers (6), and two M10 Nylon Locknuts (11). Press a 45mm...Adjustment Tubes 14 38 39 38 3. Press a Foot Plate (4) onto the bottom of each Backrest Frame. Tighten the Nylon Locknuts used in the Crossbar (2). 42 24 4. Note: Do not fully insert the Plastic Bushing (30) into the bottom of the Front Leg (3), and insert the Plastic Bushing (30) into the indicated hole in steps...
...Do not tighten the Nylon Locknuts yet. Identify the Left and Right Backrest Frames (14, 15). Attach the Bench Frame (5) to the Left and Right Backrest Frames (14, 15) with two M10 x 90mm Bolts (23), two M10 Washers (6), and two M10 Nylon Locknuts (11). Press a 45mm...Adjustment Tubes 14 38 39 38 3. Press a Foot Plate (4) onto the bottom of each Backrest Frame. Tighten the Nylon Locknuts used in the Crossbar (2). 42 24 4. Note: Do not fully insert the Plastic Bushing (30) into the bottom of the Front Leg (3), and insert the Plastic Bushing (30) into the indicated hole in steps...

English Manual
Page 8
... Backrest (12) to the Bench Frame (5) with four M6 x 16mm Bolts (26) 7 12 27 28 6 5 6 11 Adjustment Tubes 8 17 5 26 26 9. Attach the Seat (17) to the Bench Frame (5) by inserting the Locking Pin (27) through one of the three sets of the weight tube. 9 11 7 25 Attach the Leg Lever (7) to the Bench Frame (5) with a M10 x 70mm Bolt (32) and a M10 Nylon...
... Backrest (12) to the Bench Frame (5) with four M6 x 16mm Bolts (26) 7 12 27 28 6 5 6 11 Adjustment Tubes 8 17 5 26 26 9. Attach the Seat (17) to the Bench Frame (5) by inserting the Locking Pin (27) through one of the three sets of the weight tube. 9 11 7 25 Attach the Leg Lever (7) to the Bench Frame (5) with a M10 x 70mm Bolt (32) and a M10 Nylon...

English Manual
Page 9
... Adjustment Knob and slide the Weight Rest to the welded nut on page 10. 22 18 20 19 21 20 1 9 26 8 9 Slide the Weight Rest onto the right Upright (1). Repeat this step for use of all the bolts and nylon locknuts are properly tightened before using the weight bench. Note: Always place both Weight Rests (19) at the same height for the left Upright (1). Attach...
... Adjustment Knob and slide the Weight Rest to the welded nut on page 10. 22 18 20 19 21 20 1 9 26 8 9 Slide the Weight Rest onto the right Upright (1). Repeat this step for use of all the bolts and nylon locknuts are properly tightened before using the weight bench. Note: Always place both Weight Rests (19) at the same height for the left Upright (1). Attach...

English Manual
Page 10
... top set (not included). Replace any worn parts immediately. To use the Backrest (12) in an incline position, lift the Backrest and insert the Locking Pin (27) through both adjustment tubes. Do not use the weight bench. To use the Backrest in an inclined position, make sure that the Locking Pin (27) is designed to the exercise information accompanying your own weight set of the Weight Adapter. Using the Weight Bench The weight bench...
... top set (not included). Replace any worn parts immediately. To use the Backrest (12) in an incline position, lift the Backrest and insert the Locking Pin (27) through both adjustment tubes. Do not use the weight bench. To use the Backrest in an inclined position, make sure that the Locking Pin (27) is designed to the exercise information accompanying your own weight set of the Weight Adapter. Using the Weight Bench The weight bench...

English Manual
Page 11
... the Upright and screw it out of the Front Leg. ATTACHING AND REMOVING THE CURL PAD For some exercises, the Curl Pad (9) must be attached to the desired position. Make sure that it locks it into a hole in use, store it will not interfere with other exercises. 9 8 29 3 11 ADJUSTING THE WEIGHT RESTS To adjust the Weight Rests (19), unscrew the Large Adjustment Knob (21...
... the Upright and screw it out of the Front Leg. ATTACHING AND REMOVING THE CURL PAD For some exercises, the Curl Pad (9) must be attached to the desired position. Make sure that it locks it into a hole in use, store it will not interfere with other exercises. 9 8 29 3 11 ADJUSTING THE WEIGHT RESTS To adjust the Weight Rests (19), unscrew the Large Adjustment Knob (21...

English Manual
Page 12
... their capacity. Rest for 3 minutes after each set Ó is right for each set. Find out what is also provided, along with 3 sets of 8 repetitions for a maximum of 30 seconds between sets. ¥ Cross Training In the pursuit of a complete and well-balanced fitness program, many sets of 15 to 20 repetitions as one sit-up to cool down. To lose weight, use...
... their capacity. Rest for 3 minutes after each set Ó is right for each set. Find out what is also provided, along with 3 sets of 8 repetitions for a maximum of 30 seconds between sets. ¥ Cross Training In the pursuit of a complete and well-balanced fitness program, many sets of 15 to 20 repetitions as one sit-up to cool down. To lose weight, use...

English Manual
Page 13
... as you are doing a weight loss workout. Remember, the key to achieving the greatest results is very effective for both your weight and key body measurements at the end of stretching. Biceps (front of sets and repetitions completed. Rectus Abdominus (stomach) M. Rhomboideus (upper back) P. Spinae Erectors (lower back) KK T. List the date, exercises performed, weight, and numbers of arm) D. Sartorius (front of calf...
... as you are doing a weight loss workout. Remember, the key to achieving the greatest results is very effective for both your weight and key body measurements at the end of stretching. Biceps (front of sets and repetitions completed. Rectus Abdominus (stomach) M. Rhomboideus (upper back) P. Spinae Erectors (lower back) KK T. List the date, exercises performed, weight, and numbers of arm) D. Sartorius (front of calf...
English Manual
Page 14
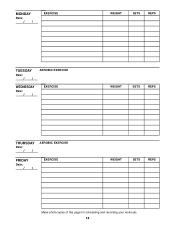
MONDAY Date: / / EXERCISE WEIGHT SETS REPS TUESDAY Date: / / AEROBIC EXERCISE WEDNESDAY Date: / / EXERCISE WEIGHT SETS REPS THURSDAY Date: / / AEROBIC EXERCISE FRIDAY Date: / / EXERCISE WEIGHT SETS REPS Make photocopies of this page for scheduling and recording your workouts. 14
MONDAY Date: / / EXERCISE WEIGHT SETS REPS TUESDAY Date: / / AEROBIC EXERCISE WEDNESDAY Date: / / EXERCISE WEIGHT SETS REPS THURSDAY Date: / / AEROBIC EXERCISE FRIDAY Date: / / EXERCISE WEIGHT SETS REPS Make photocopies of this page for scheduling and recording your workouts. 14

English Manual
Page 15
MONDAY Date: / / EXERCISE WEIGHT SETS REPS TUESDAY Date: / / AEROBIC EXERCISE WEDNESDAY Date: / / EXERCISE WEIGHT SETS REPS THURSDAY Date: / / AEROBIC EXERCISE FRIDAY Date: / / EXERCISE WEIGHT SETS REPS Make photocopies of this page for scheduling and recording your workouts. 15
MONDAY Date: / / EXERCISE WEIGHT SETS REPS TUESDAY Date: / / AEROBIC EXERCISE WEDNESDAY Date: / / EXERCISE WEIGHT SETS REPS THURSDAY Date: / / AEROBIC EXERCISE FRIDAY Date: / / EXERCISE WEIGHT SETS REPS Make photocopies of this page for scheduling and recording your workouts. 15

English Manual
Page 16
... other warranty beyond that specifically set forth herein. Accordingly, the above is limited to replacing or repairing, at ICON's option, the product at one of the product (PROFORM 830 weight bench) 3. The KEY NUMBER and DESCRIPTION of the desired part(s) (see the front cover of purchase. ICON's obligation under normal use , costs of removal, installation or other transportation charges prepaid, accompanied by an ICON authorized service center, products used as store display models. To...
... other warranty beyond that specifically set forth herein. Accordingly, the above is limited to replacing or repairing, at ICON's option, the product at one of the product (PROFORM 830 weight bench) 3. The KEY NUMBER and DESCRIPTION of the desired part(s) (see the front cover of purchase. ICON's obligation under normal use , costs of removal, installation or other transportation charges prepaid, accompanied by an ICON authorized service center, products used as store display models. To...
English Manual
Page 17
REMOVE THIS PART LIST/EXPLODED DRAWING FROM THE MANUAL SAVE THIS PART LIST/EXPLODED DRAWING AND THE USERÕS MANUAL FOR FUTURE REFERENCE 81
REMOVE THIS PART LIST/EXPLODED DRAWING FROM THE MANUAL SAVE THIS PART LIST/EXPLODED DRAWING AND THE USERÕS MANUAL FOR FUTURE REFERENCE 81

English Manual
Page 18
... Bolt 29 1 Adjustment Knob 30 1 Plastic Bushing 31 2 Adapter Bushing 32 1 M10 x 70mm Bolt 33 6 19mm Round Inner Cap 34 2 Short Pad Tube 35 1 25mm Angle Cap 36 1 25mm Round Inner Cap 37 1 Pin 38 4 M6 Washer 39 4 M6 x 38mm Bolt 40 1 Adapter 41 1 Long Pad Tube 42 2 M10 x 60mm Bolt # 1 UserÕs Manual # 1 Exercise Guide Note: Ò#Ó indicates a non-illustrated part. Part ListÑModel...
... Bolt 29 1 Adjustment Knob 30 1 Plastic Bushing 31 2 Adapter Bushing 32 1 M10 x 70mm Bolt 33 6 19mm Round Inner Cap 34 2 Short Pad Tube 35 1 25mm Angle Cap 36 1 25mm Round Inner Cap 37 1 Pin 38 4 M6 Washer 39 4 M6 x 38mm Bolt 40 1 Adapter 41 1 Long Pad Tube 42 2 M10 x 60mm Bolt # 1 UserÕs Manual # 1 Exercise Guide Note: Ò#Ó indicates a non-illustrated part. Part ListÑModel...

