
English Manual
Page 1
Visit our website at www.proform.com new products, prizes, fitness tips, and much more! Model No. 831.288230 Serial No The serial number is found in the space above. Serial Number Decal ¨ USERÕS MANUAL SEARS, ROEBUCK AND CO., HOFFMAN ESTATES, IL 60179 CAUTION Read all precautions and instructions in this manual before using this manual for future reference. Keep this equipment. Write the serial number in the location shown below.
Visit our website at www.proform.com new products, prizes, fitness tips, and much more! Model No. 831.288230 Serial No The serial number is found in the space above. Serial Number Decal ¨ USERÕS MANUAL SEARS, ROEBUCK AND CO., HOFFMAN ESTATES, IL 60179 CAUTION Read all precautions and instructions in this manual before using this manual for future reference. Keep this equipment. Write the serial number in the location shown below.
English Manual
Page 2
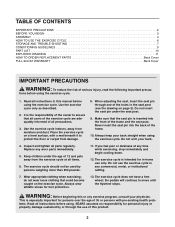
... adjusting the seat, insert the seat pin through the use the exercise cycle in the seat post (see the drawing on page 3). Always keep your back straight when using the exercise cycle. 1. TABLE OF CONTENTS IMPORTANT PRECAUTIONS 2 BEFORE YOU BEGIN 3 ASSEMBLY 4 HOW TO USE THE EXERCISE CYCLE 6 STORAGE AND TROUBLE-SHOOTING 7 CONDITIONING GUIDELINES 9 PART LIST 10 EXPLODED DRAWING 11 HOW TO ORDER REPLACEMENT PARTS Back Cover FULL 90-DAY WARRANTY...
... adjusting the seat, insert the seat pin through the use the exercise cycle in the seat post (see the drawing on page 3). Always keep your back straight when using the exercise cycle. 1. TABLE OF CONTENTS IMPORTANT PRECAUTIONS 2 BEFORE YOU BEGIN 3 ASSEMBLY 4 HOW TO USE THE EXERCISE CYCLE 6 STORAGE AND TROUBLE-SHOOTING 7 CONDITIONING GUIDELINES 9 PART LIST 10 EXPLODED DRAWING 11 HOW TO ORDER REPLACEMENT PARTS Back Cover FULL 90-DAY WARRANTY...
English Manual
Page 3
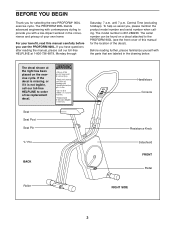
...workout in the drawing below. Central Time (excluding holidays). until 7 p.m. The serial number can be found on the exercise cycle. Seat Seat Post Seat Pin Handlebars Console Resistance Knob ÒLÓ Pin BACK Sideshield FRONT Pedal Roller RIGHT SIDE 3 The decal shown at 1-800-736-6879, Monday through Saturday, 7 a.m. The PROFORM 900L blends advanced engineering with the parts... after reading the manual, please call our toll-free HELPLINE to the PROFORM 900L (see the front cover of this manual carefully before you use the PROFORM 900L. For your own home.
...workout in the drawing below. Central Time (excluding holidays). until 7 p.m. The serial number can be found on the exercise cycle. Seat Seat Post Seat Pin Handlebars Console Resistance Knob ÒLÓ Pin BACK Sideshield FRONT Pedal Roller RIGHT SIDE 3 The decal shown at 1-800-736-6879, Monday through Saturday, 7 a.m. The PROFORM 900L blends advanced engineering with the parts... after reading the manual, please call our toll-free HELPLINE to the PROFORM 900L (see the front cover of this manual carefully before you use the PROFORM 900L. For your own home.
English Manual
Page 4
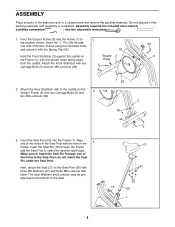
... allen wrench , a phillips screwdriver , and two adjustable wrenches . 1. Insert the Seat Post (20) into the Frame (1). ASSEMBLY Place all parts of the exercise cycle in the Seat Post with two Carriage Bolts (5) and two M8 Locknuts (39). 1 52 Square 2 Holes 5 56 3 2. Attach the Rear Stabilizer (46) to the Seat Post (20) with two Carriage Bolts (5) and 2 two M8 Locknuts (39). 1 39...
... allen wrench , a phillips screwdriver , and two adjustable wrenches . 1. Insert the Seat Post (20) into the Frame (1). ASSEMBLY Place all parts of the exercise cycle in the Seat Post with two Carriage Bolts (5) and two M8 Locknuts (39). 1 52 Square 2 Holes 5 56 3 2. Attach the Rear Stabilizer (46) to the Seat Post (20) with two Carriage Bolts (5) and 2 two M8 Locknuts (39). 1 39...
English Manual
Page 5
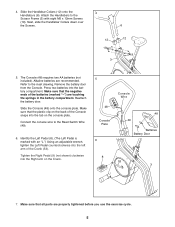
...;) Using an adjustable wrench, tighten the Left Pedal counterclockwise into the tab on the Crank. 5 48 Console Plate 6 8 Console Wire 48 49 Batteries Battery Door 53 3 7. Next, slide the Handlebar Collars down over the Screws. 4 6 12 19 3 12 19 5. Press two batteries into the Right arm on the console plate. Identify the Left Pedal (8). (The Left Pedal is marked with eight M5 x 12mm Screws (19). Alkaline batteries are properly tightened...
...;) Using an adjustable wrench, tighten the Left Pedal counterclockwise into the tab on the Crank. 5 48 Console Plate 6 8 Console Wire 48 49 Batteries Battery Door 53 3 7. Next, slide the Handlebar Collars down over the Screws. 4 6 12 19 3 12 19 5. Press two batteries into the Right arm on the console plate. Identify the Left Pedal (8). (The Left Pedal is marked with eight M5 x 12mm Screws (19). Alkaline batteries are properly tightened...

English Manual
Page 6
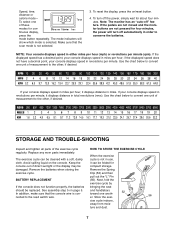
... not installed batteries, see assembly step 5 on /reset button or simply begin pedaling. Note: If a different mode is current- To increase the resistance, turn the Resistance Knob counterclockwise. If you can select the scan mode again by repeatedly pressing the mode button. 6 BATTERY INSTALLATION Before the console can be selected. DESCRIPTION OF THE CONSOLE The console features five modes that provide instant exercise feedback during your pedaling speed, in 16 your exercise, the pedaling resis- The console will...
... not installed batteries, see assembly step 5 on /reset button or simply begin pedaling. Note: If a different mode is current- To increase the resistance, turn the Resistance Knob counterclockwise. If you can select the scan mode again by repeatedly pressing the mode button. 6 BATTERY INSTALLATION Before the console can be selected. DESCRIPTION OF THE CONSOLE The console features five modes that provide instant exercise feedback during your pedaling speed, in 16 your exercise, the pedaling resis- The console will...
English Manual
Page 7
...; Pin (56). Make sure that the console wire is selected. if the displayed speed does not have a decimal point, your console displays speed in use, it displays distance in order to conserve the batteries. Remove the batteries when storing the exercise cycle. To turn off automatically in miles. If the pedals are not moved and the monitor buttons are not pressed for about four minutes. Next, fold the exercise cycle by bringing the seat and...
...; Pin (56). Make sure that the console wire is selected. if the displayed speed does not have a decimal point, your console displays speed in use, it displays distance in order to conserve the batteries. Remove the batteries when storing the exercise cycle. To turn off automatically in miles. If the pedals are not moved and the monitor buttons are not pressed for about four minutes. Next, fold the exercise cycle by bringing the seat and...
English Manual
Page 8
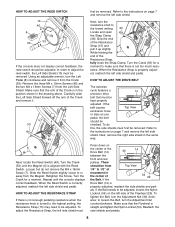
... Resistance Strap is properly adjusted, reattach the side shields and ped- Press down on the left side shield. There should be from the Crank (53). To tighten the Belt, turn the Left Pedal (8) clockwise and remove it from Top View 1/4Ó to make sure that the arm of the Drive Belt (14) 30 14 between the front and rear pulleys. Reattach the side shields and pedals. 8 Turn...
... Resistance Strap is properly adjusted, reattach the side shields and ped- Press down on the left side shield. There should be from the Crank (53). To tighten the Belt, turn the Left Pedal (8) clockwise and remove it from Top View 1/4Ó to make sure that the arm of the Drive Belt (14) 30 14 between the front and rear pulleys. Reattach the side shields and pedals. 8 Turn...

English Manual
Page 9
... highest number is used because your exercise program. Take a sixsecond heartbeat count, and multiply the result by using your body begin to strengthen your body uses easily accessible carbohydrate calories for energy. CONDITIONING GUIDELINES The following three parts: A warm-up increases your body temperature, heart rate, and circulation in your training zone as you stop exercising and place two fingers on either side of the chart...
... highest number is used because your exercise program. Take a sixsecond heartbeat count, and multiply the result by using your body begin to strengthen your body uses easily accessible carbohydrate calories for energy. CONDITIONING GUIDELINES The following three parts: A warm-up increases your body temperature, heart rate, and circulation in your training zone as you stop exercising and place two fingers on either side of the chart...

English Manual
Page 10
... Scissor Frame Magnet Carriage Bolt Handlebar M4 x 16mm Screw Left Pedal Right Pedal Left Side Shield Right Side Shield Handlebar Collar Endcap Drive Belt Resistance Strap Seat Pin Frame Bushing Seat Post Bushing M5 x 12mm Screw Seat Post Seat Large Pulley Push Nut Roller Axle Roller Bearing Assembly Resistance Knob Resistance Control/Cable Flywheel M10 Nylon Locknut Key No. Training zone exercise, consisting of 20 to 30 minutes of exercising with your heart rate in your training zone. (During the...
... Scissor Frame Magnet Carriage Bolt Handlebar M4 x 16mm Screw Left Pedal Right Pedal Left Side Shield Right Side Shield Handlebar Collar Endcap Drive Belt Resistance Strap Seat Pin Frame Bushing Seat Post Bushing M5 x 12mm Screw Seat Post Seat Large Pulley Push Nut Roller Axle Roller Bearing Assembly Resistance Knob Resistance Control/Cable Flywheel M10 Nylon Locknut Key No. Training zone exercise, consisting of 20 to 30 minutes of exercising with your heart rate in your training zone. (During the...
English Manual
Page 12
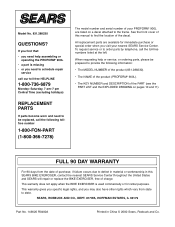
... this SEARS BIKE EXERCISER, contact the nearest SEARS Service Center throughout the United States and SEARS will repair or replace the BIKE EXERCISER, free of the PART (see the PART LIST and the EXPLODED DRAWING on pages 10 and 11). All replacement parts are listed on a decal attached to order parts by telephone, call the following information: ¥ The MODEL NUMBER of the product (831.288230). ¥ The NAME of the product (PROFORM...
... this SEARS BIKE EXERCISER, contact the nearest SEARS Service Center throughout the United States and SEARS will repair or replace the BIKE EXERCISER, free of the PART (see the PART LIST and the EXPLODED DRAWING on pages 10 and 11). All replacement parts are listed on a decal attached to order parts by telephone, call the following information: ¥ The MODEL NUMBER of the product (831.288230). ¥ The NAME of the product (PROFORM...

