
German Manual
Page 15
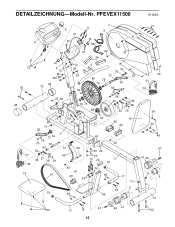
PFEVEX11500 R1000A 9 11 10 7 6 8 13 14 55 22 62 67 14 2 12 25 26 48 72 67 22 33 54 12 26 25 32 4 75 76 77 22 80 79 74 30 53 56 22 50 48 13 78 74 68 42 52 36 38 37 40 39 27 45 16 71 51 10 39 71 29 1 77 74 76 75 44 43 52 57 59 58 36 37 38 39 60 19 61 20 34 19 66 23 23 15 65 64 63 22 35 22 22 70 20 3 19 34 66 17 71 5 18 69 21 22 31 28 34 34 34 49 47 41 46 71 5 73 24 17 18 47 46 41 62 15 DETAILZEICHNUNG-Modell-Nr.
PFEVEX11500 R1000A 9 11 10 7 6 8 13 14 55 22 62 67 14 2 12 25 26 48 72 67 22 33 54 12 26 25 32 4 75 76 77 22 80 79 74 30 53 56 22 50 48 13 78 74 68 42 52 36 38 37 40 39 27 45 16 71 51 10 39 71 29 1 77 74 76 75 44 43 52 57 59 58 36 37 38 39 60 19 61 20 34 19 66 23 23 15 65 64 63 22 35 22 22 70 20 3 19 34 66 17 71 5 18 69 21 22 31 28 34 34 34 49 47 41 46 71 5 73 24 17 18 47 46 41 62 15 DETAILZEICHNUNG-Modell-Nr.
Uk Manual
Page 1
... precautions and instructions in this manual before using this manual for future reference. If you have questions, or if there are committed to providing complete customer satisfaction. Keep this equipment. Visit our website at www.proform.com new products, prizes, fitness tips, and much more! Please CALL: 0345-089009 Or WRITE: ICON Fitness Lifestyle Ltd. PFEVEX11500 Serial No. As...
... precautions and instructions in this manual before using this manual for future reference. If you have questions, or if there are committed to providing complete customer satisfaction. Keep this equipment. Visit our website at www.proform.com new products, prizes, fitness tips, and much more! Please CALL: 0345-089009 Or WRITE: ICON Fitness Lifestyle Ltd. PFEVEX11500 Serial No. As...

Uk Manual
Page 2
... decal in this manual. 3. tions before using the 975R. TABLE OF CONTENTS IMPORTANT PRECAUTIONS 2 BEFORE YOU BEGIN 3 ASSEMBLY 4 HOW TO USE THE PROFORM® 975R 9 HOW TO USE THE PULSE MONITOR 10 MAINTENANCE AND STORAGE 11 CONDITIONING GUIDELINES 12 PART LIST 14 EXPLODED DRAWING 15 HOW TO ORDER REPLACEMENT PARTS Back Cover IMPORTANT PRECAUTIONS WARNING: To reduce the risk of actual size 2 Replace any time while exercising, stop immediately and begin...
... decal in this manual. 3. tions before using the 975R. TABLE OF CONTENTS IMPORTANT PRECAUTIONS 2 BEFORE YOU BEGIN 3 ASSEMBLY 4 HOW TO USE THE PROFORM® 975R 9 HOW TO USE THE PULSE MONITOR 10 MAINTENANCE AND STORAGE 11 CONDITIONING GUIDELINES 12 PART LIST 14 EXPLODED DRAWING 15 HOW TO ORDER REPLACEMENT PARTS Back Cover IMPORTANT PRECAUTIONS WARNING: To reduce the risk of actual size 2 Replace any time while exercising, stop immediately and begin...
Uk Manual
Page 3
... form of low-impact exercise that are labelled. The 975R features adjustable resistance to the level that's perfect for the location of this or any exercise program, consult your exercise to let you tailor your physician. If you , please mention the product model number and serial number when calling. The serial number can be found on a decal attached to the 975R (see the front cover of this manual carefully...
... form of low-impact exercise that are labelled. The 975R features adjustable resistance to the level that's perfect for the location of this or any exercise program, consult your exercise to let you tailor your physician. If you , please mention the product model number and serial number when calling. The serial number can be found on a decal attached to the 975R (see the front cover of this manual carefully...
Uk Manual
Page 4
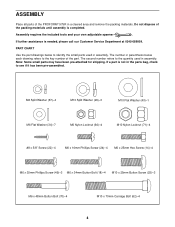
... remove the packing materials. PART CHART Use the part drawings below each drawing refers to see if it has been pre-assembled. Note: Some small parts may have been pre-attached for shipping. If a part is needed, please call our Customer Service Department at 0345-089009. Do not dispose of the PROFORM® 975R in the parts bag, check to the key number of the part. The number...
... remove the packing materials. PART CHART Use the part drawings below each drawing refers to see if it has been pre-assembled. Note: Some small parts may have been pre-attached for shipping. If a part is needed, please call our Customer Service Department at 0345-089009. Do not dispose of the PROFORM® 975R in the parts bag, check to the key number of the part. The number...
Uk Manual
Page 5
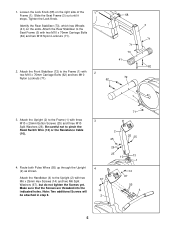
... stops. Attach the Front Stabiliser (72) to the Upright (2) with two M10 x 70mm Carriage Bolts (62) and two M10 Nylon Locknuts (71). 68 1 71 73 41 2. Attach the Handlebar (4) to the Frame (1) with three M10 x 25mm Button Screws (25) and three M10 Split Washers (26). Attach the Rear Stabiliser to pinch the Reed Switch Wire (13) or the Resistance Cable (10). 4. Loosen the Lock Knob...
... stops. Attach the Front Stabiliser (72) to the Upright (2) with two M10 x 70mm Carriage Bolts (62) and two M10 Nylon Locknuts (71). 68 1 71 73 41 2. Attach the Handlebar (4) to the Frame (1) with three M10 x 25mm Button Screws (25) and three M10 Split Washers (26). Attach the Rear Stabiliser to pinch the Reed Switch Wire (13) or the Resistance Cable (10). 4. Loosen the Lock Knob...

Uk Manual
Page 6
Press the Resistance Knob (9) onto the Resistance Control (10). Finish attaching the Handlebar (4) to the Seat Frame (3) 7 with four M6 x 48mm Button Bolts (70) and four M6 Flat Washers (34). 9 10 22 14 67 4 2 70 70 34 34 69 8. Attach the Seat Bracket (69) to the Upright (2) with four #8 x 5/8" Screws (22). 5. Connect the Reed Switch Wire (13) and the Pulse Wires (55) to the Upright (2) with two additional M6 x 25mm Hex...
Press the Resistance Knob (9) onto the Resistance Control (10). Finish attaching the Handlebar (4) to the Seat Frame (3) 7 with four M6 x 48mm Button Bolts (70) and four M6 Flat Washers (34). 9 10 22 14 67 4 2 70 70 34 34 69 8. Attach the Seat Bracket (69) to the Upright (2) with four #8 x 5/8" Screws (22). 5. Connect the Reed Switch Wire (13) and the Pulse Wires (55) to the Upright (2) with two additional M6 x 25mm Hex...
Uk Manual
Page 7
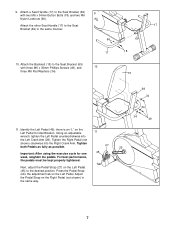
.... 7 Tighten both Pedals as fully as possible. 27 29 Important: After using the exercise cycle for identification. Adjust the Pedal Strap on the Left Pedal. Attach a Seat Handle (17) to the Seat Bracket (69) with two M6 x 34mm Button Bolts (18) and two M6 Nylon Locknuts (66). Attach the other Seat Handle (17) to the desired position. Identify the Left Pedal (45); Press the Pedal Strap onto the adjustment tab...
.... 7 Tighten both Pedals as fully as possible. 27 29 Important: After using the exercise cycle for identification. Adjust the Pedal Strap on the Left Pedal. Attach a Seat Handle (17) to the Seat Bracket (69) with two M6 x 34mm Button Bolts (18) and two M6 Nylon Locknuts (66). Attach the other Seat Handle (17) to the desired position. Identify the Left Pedal (45); Press the Pedal Strap onto the adjustment tab...
Uk Manual
Page 8
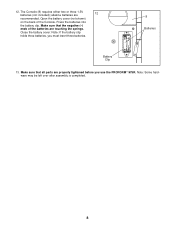
... three batteries, you use the PROFORM ® 975R. Open the battery cover (not shown) on the back of the batteries are 12 recommended. Note: Some hardware may be left over after assembly is completed. 8 Close the battery cover. 12. Make sure that all parts are properly tightened before you must insert three batteries. 8 Batteries Battery Clip 13. Make sure that the negative (-) ends of the Console. The Console...
... three batteries, you use the PROFORM ® 975R. Open the battery cover (not shown) on the back of the batteries are 12 recommended. Note: Some hardware may be left over after assembly is completed. 8 Close the battery cover. 12. Make sure that all parts are properly tightened before you must insert three batteries. 8 Batteries Battery Clip 13. Make sure that the negative (-) ends of the Console. The Console...
Uk Manual
Page 9
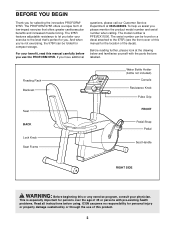
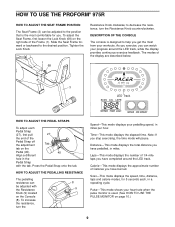
... . Distance-This mode displays the total distance you have pedalled, in miles. Pulse-This mode shows your workouts. As you exercise, you have completed around the LED track, while the display provides continuous exercise feedback. Scan-This mode displays the speed, time, distance, laps and calorie modes, for you stop exercising, the time mode will pause. HOW TO USE THE PROFORM® 975R HOW TO ADJUST THE SEAT FRAME POSITION The Seat Frame (3) can be adjusted with the Resistance 9 Knob (9) located...
... . Distance-This mode displays the total distance you have pedalled, in miles. Pulse-This mode shows your workouts. As you exercise, you have completed around the LED track, while the display provides continuous exercise feedback. Scan-This mode displays the speed, time, distance, laps and calorie modes, for you stop exercising, the time mode will pause. HOW TO USE THE PROFORM® 975R HOW TO ADJUST THE SEAT FRAME POSITION The Seat Frame (3) can be adjusted with the Resistance 9 Knob (9) located...
Uk Manual
Page 10
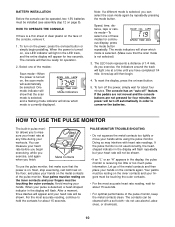
... with heart rate readings. HOW TO USE THE PULSE MONITOR The built-in the LED track, and the entire display will light one of the modes: Scan mode-When the power is turned on the face of the pulse monitor, keep the metal contacts clean. Your palms must be resting on . BATTERY INSTALLATION Before the console can be operated, two 1,5V batteries must be installed (see assembly step 12 on /reset button...
... with heart rate readings. HOW TO USE THE PULSE MONITOR The built-in the LED track, and the entire display will light one of the modes: Scan mode-When the power is turned on the face of the pulse monitor, keep the metal contacts clean. Your palms must be resting on . BATTERY INSTALLATION Before the console can be operated, two 1,5V batteries must be installed (see assembly step 12 on /reset button...

Uk Manual
Page 11
... BATTERY REPLACEMENT If the console does not function properly, the batteries should be kept properly tightened. The 975R can be cleaned with a soft, damp cloth. To prevent damage to assembly step 12 on the right side of the PROFORM® 975R regularly. HOW TO STORE THE PROFORM® 975R When the PROFORM® 975R is not in use, the 1 68 Seat Frame (3) can be adjusted to the storage...
... BATTERY REPLACEMENT If the console does not function properly, the batteries should be kept properly tightened. The 975R can be cleaned with a soft, damp cloth. To prevent damage to assembly step 12 on the right side of the PROFORM® 975R regularly. HOW TO STORE THE PROFORM® 975R When the PROFORM® 975R is not in use, the 1 68 Seat Frame (3) can be adjusted to the storage...
Uk Manual
Page 12
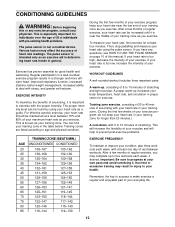
... heart rate as you exercise. For effective aerobic exercise, your heart rate should be found by using the pulse sensor. Then, stop pedalling and measure your own pace and avoid overdoing it. WORKOUT GUIDELINES A well-rounded workout includes three important parts: A warm-up to progress at least one day of rest between workouts. Important: Be sure to five workouts each week, with 5 to exercise with pre-existing health problems...
... heart rate as you exercise. For effective aerobic exercise, your heart rate should be found by using the pulse sensor. Then, stop pedalling and measure your own pace and avoid overdoing it. WORKOUT GUIDELINES A well-rounded workout includes three important parts: A warm-up to progress at least one day of rest between workouts. Important: Be sure to five workouts each week, with 5 to exercise with pre-existing health problems...

Uk Manual
Page 13
...sole of your knees outward. Hold for 15 counts, then relax. Keep your back leg straight and your buttocks as possible. Bring your heel as possible. Inner Thigh Stretch Sit with one leg extended. Hold for 15 counts, then relax. Allow your back and shoulders to ...area as far as you stretch-never bounce. 1. Stretches: Hamstrings, lower back and groin. 3. Stretches: Quadriceps and hip muscles. 1 2 3 4 5 13 Move slowly as possible. Pull your feet toward the wall. SUGGESTED STRETCHES The correct form for balance, reach back and grasp one foot with your knees bent ...
...sole of your knees outward. Hold for 15 counts, then relax. Keep your back leg straight and your buttocks as possible. Bring your heel as possible. Inner Thigh Stretch Sit with one leg extended. Hold for 15 counts, then relax. Allow your back and shoulders to ...area as far as you stretch-never bounce. 1. Stretches: Hamstrings, lower back and groin. 3. Stretches: Quadriceps and hip muscles. 1 2 3 4 5 13 Move slowly as possible. Pull your feet toward the wall. SUGGESTED STRETCHES The correct form for balance, reach back and grasp one foot with your knees bent ...
Uk Manual
Page 14
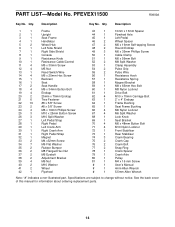
... 2 41 2 42 1 Frame Upright Seat Frame Handlebar Wheel Hub Left Side Shield Right Side Shield Console Resistance Knob Resistance Cable/Control M5 x 30mm Screw M5 Nut Reed Switch/Wire M6 x 25mm Hex Screw Backrest Seat Seat Handle M6 x 34mm Button Bolt Endcap 25mm x 75mm Endcap Tree Fastener #8 x 5/8" Screw #8 x 3/8" Screw M6 x 16mm Phillips Screw M10 x 25mm Button Screw M10 Split Washer Left Pedal Strap Right Pedal Left Crank Arm Right Crank Arm Right Pedal Strap Magnet M4 x32mm Screw M6 Flat Washer Rubber...
... 2 41 2 42 1 Frame Upright Seat Frame Handlebar Wheel Hub Left Side Shield Right Side Shield Console Resistance Knob Resistance Cable/Control M5 x 30mm Screw M5 Nut Reed Switch/Wire M6 x 25mm Hex Screw Backrest Seat Seat Handle M6 x 34mm Button Bolt Endcap 25mm x 75mm Endcap Tree Fastener #8 x 5/8" Screw #8 x 3/8" Screw M6 x 16mm Phillips Screw M10 x 25mm Button Screw M10 Split Washer Left Pedal Strap Right Pedal Left Crank Arm Right Crank Arm Right Pedal Strap Magnet M4 x32mm Screw M6 Flat Washer Rubber...

Uk Manual
Page 15
EXPLODED DRAWING-Model No. PFEVEX11500 R0900A 9 11 10 7 6 14 8 13 55 22 62 67 14 2 12 25 26 48 72 67 22 33 54 12 26 25 32 4 75 76 77 22 80 79 74 30 53 56 22 50 48 78 74 13 42 52 36 38 37 68 40 39 71 71 29 51 10 39 23 23 15 65 64 1 77 74 76 75 44 43 52 57 59 63 22 35 22 27 36 37 38 39 45 16 61 58 22 70 20 3 19 60 19 20 34 34 66 17 71 19 66 5 18 69 21 22 31 28 34 34 34 49 47 41 46 71 5 73 24 17 18 47 46 41 62 15
EXPLODED DRAWING-Model No. PFEVEX11500 R0900A 9 11 10 7 6 14 8 13 55 22 62 67 14 2 12 25 26 48 72 67 22 33 54 12 26 25 32 4 75 76 77 22 80 79 74 30 53 56 22 50 48 78 74 13 42 52 36 38 37 68 40 39 71 71 29 51 10 39 23 23 15 65 64 1 77 74 76 75 44 43 52 57 59 63 22 35 22 27 36 37 38 39 45 16 61 58 22 70 20 3 19 60 19 20 34 34 66 17 71 19 66 5 18 69 21 22 31 28 34 34 34 49 47 41 46 71 5 73 24 17 18 47 46 41 62 15
Uk Manual
Page 16
... writing, please provide the following information: • The MODEL NUMBER of the product (PFEVEX11500) • The NAME of the product (PROFORM® 975R) • The SERIAL NUMBER of the product (see the front cover of this product or if you need to order replacement parts, please call or write the ICON Health & Fitness, Ltd. Part No. 169368 R0900A Printed in China © 2000 ICON Health & Fitness, Ltd. ICON Health & Fitness, Ltd.
... writing, please provide the following information: • The MODEL NUMBER of the product (PFEVEX11500) • The NAME of the product (PROFORM® 975R) • The SERIAL NUMBER of the product (see the front cover of this product or if you need to order replacement parts, please call or write the ICON Health & Fitness, Ltd. Part No. 169368 R0900A Printed in China © 2000 ICON Health & Fitness, Ltd. ICON Health & Fitness, Ltd.

