
English Manual
Page 1
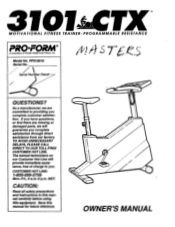
... before using this manual for future reference. 1\ z OWNER'S MANUAL MST. Save this equipment. If you have questions, or find there are committed to you complete customer satisfaction. CAUTION. PF510010 Serial No. Serial Number Decal 4(b QUESTIONS? The trained technicians on our Customer Hot Line will guarantee you complete satisfaction through direct assistance from our factory. 310 MOTIVATIONAL FITNESS TRAINER • PROGRAMMABLE RESISTANCE PRO•FORM...
... before using this manual for future reference. 1\ z OWNER'S MANUAL MST. Save this equipment. If you have questions, or find there are committed to you complete customer satisfaction. CAUTION. PF510010 Serial No. Serial Number Decal 4(b QUESTIONS? The trained technicians on our Customer Hot Line will guarantee you complete satisfaction through direct assistance from our factory. 310 MOTIVATIONAL FITNESS TRAINER • PROGRAMMABLE RESISTANCE PRO•FORM...
English Manual
Page 2
... CONTENTS Important Safety Precautions Before You Begin Assembly Operating the Exercise Bike Maintenance and Trouble-Shooting Conditioning Guidelines Part List Exploded Drawing Ordering Replacement Parts Limited Warranty 2 3 4 5 9 9 10 11 Back Cover Back Cover IMPORTANT SAFETY PRECAUTIONS 1. Do not use the bike if the power cord or plug are damaged, or if the bike is not working properly. (See BEFORE YOU BEGIN if the bike is especially important for individuals over the...
... CONTENTS Important Safety Precautions Before You Begin Assembly Operating the Exercise Bike Maintenance and Trouble-Shooting Conditioning Guidelines Part List Exploded Drawing Ordering Replacement Parts Limited Warranty 2 3 4 5 9 9 10 11 Back Cover Back Cover IMPORTANT SAFETY PRECAUTIONS 1. Do not use the bike if the power cord or plug are damaged, or if the bike is not working properly. (See BEFORE YOU BEGIN if the bike is especially important for individuals over the...
English Manual
Page 3
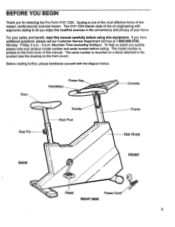
... quickly, please note your product model number and serial number before using this manual. Friday, 6 a.m. - 6 p.m. The serial number is one of the most effective forms of this equipment. If you enjoy this healthful exercise in the convenience and privacy of -the-art engineering with the diagram below. Seat Power Key Handlebar Seat Pin Earclip Seat Post NO \74 Console Frame Side Shield BACK FRONT Pedal Power Cord RIGHT SIDE 3 The 3101 CSX...
... quickly, please note your product model number and serial number before using this manual. Friday, 6 a.m. - 6 p.m. The serial number is one of the most effective forms of this equipment. If you enjoy this healthful exercise in the convenience and privacy of -the-art engineering with the diagram below. Seat Power Key Handlebar Seat Pin Earclip Seat Post NO \74 Console Frame Side Shield BACK FRONT Pedal Power Cord RIGHT SIDE 3 The 3101 CSX...

English Manual
Page 4
.... Remove the Seat Pin (8) from the Console (1) into the right arm of the Crank. Tip the 14 bike back. 11 2. The Pedals are marked for identification. 3. Insert the wire harness from the Frame (11). Attach the Stabilizer (13) to the bracket on the Handlebar with the four Stabilizer Bolts (14). WARNING: At least 2" of the Seat Post must be inside of the Seat (5). Tighten...
.... Remove the Seat Pin (8) from the Console (1) into the right arm of the Crank. Tip the 14 bike back. 11 2. The Pedals are marked for identification. 3. Insert the wire harness from the Frame (11). Attach the Stabilizer (13) to the bracket on the Handlebar with the four Stabilizer Bolts (14). WARNING: At least 2" of the Seat Post must be inside of the Seat (5). Tighten...
English Manual
Page 5
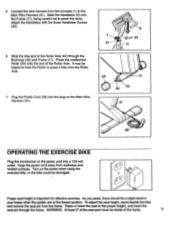
... the power when using the 0° exercise bike, or the bike could be helpful to twist the Roller to the proper height, and insert the seat pin through the Bushings (43) and Frame (11). Turn on the power cord into a 120-volt outlet. Connect the wire harness from the Console (1) to pinch the wires. 5. Attach the Handlebar with the three Handlebar Screws (33). 6. Raise or lower the seat to press...
... the power when using the 0° exercise bike, or the bike could be helpful to twist the Roller to the proper height, and insert the seat pin through the Bushings (43) and Frame (11). Turn on the power cord into a 120-volt outlet. Connect the wire harness from the Console (1) to pinch the wires. 5. Attach the Handlebar with the three Handlebar Screws (33). 6. Raise or lower the seat to press...

English Manual
Page 6
... plus button is the highest resistance setting. To change by 1. The eight indicators in the PACE ADJUST display. PROGRAMMABLE MODE In the programmable mode, workout programs will be held down to concentrate on exercising. Next, select a maximum pace level for operation. As you free to adjust the resistance quickly. P.. Iiiiiiiiiiiii PROGRAM SEAM' START PAUSE 'V set i66, MOLE Preset Program Buttons Manual Button I Program Start Button Pulse Indicator Personal Program Button Stop Button Pulse Earclip Jack TURNING THE POWER ON Insert the power key into...
... plus button is the highest resistance setting. To change by 1. The eight indicators in the PACE ADJUST display. PROGRAMMABLE MODE In the programmable mode, workout programs will be held down to concentrate on exercising. Next, select a maximum pace level for operation. As you free to adjust the resistance quickly. P.. Iiiiiiiiiiiii PROGRAM SEAM' START PAUSE 'V set i66, MOLE Preset Program Buttons Manual Button I Program Start Button Pulse Indicator Personal Program Button Stop Button Pulse Earclip Jack TURNING THE POWER ON Insert the power key into...
English Manual
Page 7
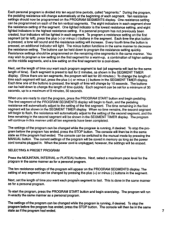
... power cord remains plugged in the SEGMENT TIMER display. (Since there are ready to decrease the resistance setting. The program will continue in the first segment will appear on each prograin segment to the manual mode by pressing the plus button is pressed, an additional indicator will increase. The console can be programmed on the PROGRAM SEGMENTS display. The setting of the program can be changed by pressing the MANUAL button. To stop...
... power cord remains plugged in the SEGMENT TIMER display. (Since there are ready to decrease the resistance setting. The program will continue in the first segment will appear on each prograin segment to the manual mode by pressing the plus button is pressed, an additional indicator will increase. The console can be programmed on the PROGRAM SEGMENTS display. The setting of the program can be changed by pressing the MANUAL button. To stop...
English Manual
Page 8
... your heart rate. PULSE: This mode displays your weight. Always turn the power off when the 8 exercise bike is pressed, the distance displayed will be saved. The modes are turned. Press the SET buttons to be counted down as you have burned. When the goal is pressed. Plug the pulse earclip into the console. Only the original program settings will sound until the START/STOP button is pressed, the weight displayed will not be counted down . If necessary, remove the power key and...
... your heart rate. PULSE: This mode displays your weight. Always turn the power off when the 8 exercise bike is pressed, the distance displayed will be saved. The modes are turned. Press the SET buttons to be counted down as you have burned. When the goal is pressed. Plug the pulse earclip into the console. Only the original program settings will sound until the START/STOP button is pressed, the weight displayed will not be counted down . If necessary, remove the power key and...
English Manual
Page 9
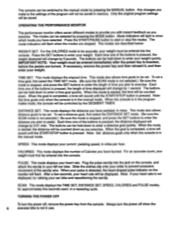
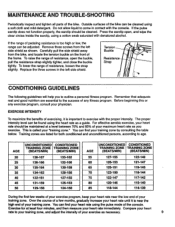
... range of pedaling resistance is important to your training zone, and adjust the intensity of the bike. You can be adjusted. MAINTENANCE AND TROUBLE-SHOOTING Periodically inspect and tighten all parts of your exercise as necessary. 9 Over the course of a few weeks of your exercise program, keep your heart rate near the high end of the bike can find your heart rate immediately. If the pulse earclip does not...
... range of pedaling resistance is important to your training zone, and adjust the intensity of the bike. You can be adjusted. MAINTENANCE AND TROUBLE-SHOOTING Periodically inspect and tighten all parts of your exercise as necessary. 9 Over the course of a few weeks of your exercise program, keep your heart rate near the high end of the bike can find your heart rate immediately. If the pulse earclip does not...
English Manual
Page 10
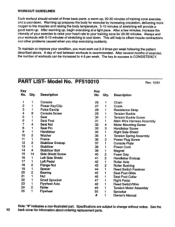
... Tension Spring Assembly Power Plug Screw Console Plate Power Cord Magnet Foam Grip Handlebar Endcap Roller Axle Roller Bushing Reed Switch Fastener Seat Post Glide Seat Post Collar Right Pedal Reed Switch/Wire Tension Motor Assembly Sprocket Owner's Manual Note: "#" indicates a non-illustrated part. See the 1O back cover for 20-30 minutes. Model No. The key to your training zone for information about ordering replacement parts. PART LIST- Qty. After a few minutes, increase the intensity of rest between workouts is CONSISTENCY...
... Tension Spring Assembly Power Plug Screw Console Plate Power Cord Magnet Foam Grip Handlebar Endcap Roller Axle Roller Bushing Reed Switch Fastener Seat Post Glide Seat Post Collar Right Pedal Reed Switch/Wire Tension Motor Assembly Sprocket Owner's Manual Note: "#" indicates a non-illustrated part. See the 1O back cover for 20-30 minutes. Model No. The key to your training zone for information about ordering replacement parts. PART LIST- Qty. After a few minutes, increase the intensity of rest between workouts is CONSISTENCY...
English Manual
Page 11
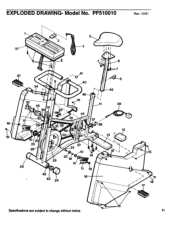
i1 Model No. it 4 6 47 i 9 34 N 4.1.. 1WR 41 40 46 7 8 45 32 49 15 11 38 3 44 • 4 Ir 3 18 ;31 26 36 48 12 15 1• 20 22 28 50 2 23 10 13 5' 20 1 14 25 21 24 ,71, re 11 18 42 16 43 24 15 15 17 15 Specifications are subject to change without notice. PF510010 Rev. 10/91 I "••• i • • 5 2 37 3 I . EXPLODED DRAWING-
i1 Model No. it 4 6 47 i 9 34 N 4.1.. 1WR 41 40 46 7 8 45 32 49 15 11 38 3 44 • 4 Ir 3 18 ;31 26 36 48 12 15 1• 20 22 28 50 2 23 10 13 5' 20 1 14 25 21 24 ,71, re 11 18 42 16 43 24 15 15 17 15 Specifications are subject to change without notice. PF510010 Rev. 10/91 I "••• i • • 5 2 37 3 I . EXPLODED DRAWING-
English Manual
Page 12
... WARRANTY LASTS. ORDERING REPLACEMENT PARTS To order replacement parts, simply call our Customer Service Department toll-free at one of its authorized service centers. Mountain Time (excluding holidays). No other warranty beyond that specifically set forth above is limited to be received by PRO FORM. Printed in workmanship and material, under this manual. The SERIAL NUMBER of the product (see the front cover of this warranty is authorized by PRO FORM...
... WARRANTY LASTS. ORDERING REPLACEMENT PARTS To order replacement parts, simply call our Customer Service Department toll-free at one of its authorized service centers. Mountain Time (excluding holidays). No other warranty beyond that specifically set forth above is limited to be received by PRO FORM. Printed in workmanship and material, under this manual. The SERIAL NUMBER of the product (see the front cover of this warranty is authorized by PRO FORM...

