
Instruction Manual
Page 1
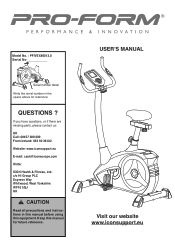
[email protected] Write: ICON Health & Fitness, Ltd. USERʼS MANUAL Visit our website www.iconsupport.eu c/o HI Group PLC Express Way Whitwood, West Yorkshire WF10 5QJ UK CAUTION Read all precautions and instructions in the space above for future reference. Write the serial number in this manual before using this manual for reference. QUESTIONS ? Keep this equipment. Model No. : PFIVEX86013.0 Serial No ___________ Serial number decal serial no.
[email protected] Write: ICON Health & Fitness, Ltd. USERʼS MANUAL Visit our website www.iconsupport.eu c/o HI Group PLC Express Way Whitwood, West Yorkshire WF10 5QJ UK CAUTION Read all precautions and instructions in the space above for future reference. Write the serial number in this manual before using this manual for reference. QUESTIONS ? Keep this equipment. Model No. : PFIVEX86013.0 Serial No ___________ Serial number decal serial no.
Instruction Manual
Page 2
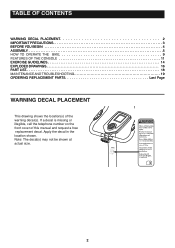
... YOU BEGIN 4 ASSEMBLY 5 HOW TO OPERATE THE BIKE 9 FEATURES OF THE CONSOLE 11 EXERCISE GUIDELINES 14 EXPLODED DRAWINGS 16 PART LIST 18 MAINTENANCE AND TROUBLESHOOTING 19 ORDERING REPLACEMENT PARTS Last Page WARNING DECAL PLACEMENT This drawing shows the location(s) of this manual and request a free replacement decal. ENGLISH 115 Kg 115 Kg 2 Note: The decal(s) may not be shown at actual size. Apply the decal...
... YOU BEGIN 4 ASSEMBLY 5 HOW TO OPERATE THE BIKE 9 FEATURES OF THE CONSOLE 11 EXERCISE GUIDELINES 14 EXPLODED DRAWINGS 16 PART LIST 18 MAINTENANCE AND TROUBLESHOOTING 19 ORDERING REPLACEMENT PARTS Last Page WARNING DECAL PLACEMENT This drawing shows the location(s) of this manual and request a free replacement decal. ENGLISH 115 Kg 115 Kg 2 Note: The decal(s) may not be shown at actual size. Apply the decal...
Instruction Manual
Page 3
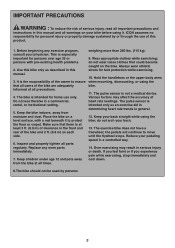
...-existing health problems. 2. Make sure that could become caught on each side. 6. Inspect and properly tighten all times. Wear appropriate clothes while exercising; Hold the handlebars or the upper body arms when mounting, dismounting, or using the bike; The pulse sensor is at all parts regularly. Various factors may result in general. 12. Keep your pedaling speed in a commercial, rental, or institutional setting. 5. do...
...-existing health problems. 2. Make sure that could become caught on each side. 6. Inspect and properly tighten all times. Wear appropriate clothes while exercising; Hold the handlebars or the upper body arms when mounting, dismounting, or using the bike; The pulse sensor is at all parts regularly. Various factors may result in general. 12. Keep your pedaling speed in a commercial, rental, or institutional setting. 5. do...

Instruction Manual
Page 4
... assist you, note the product model number and serial number before you for purchasing the ProForm® Racer 4S. For your workouts at home more effective and enjoyable. If you have questions after reading this manual, please see the front cover of this manual. BEFORE YOU BEGIN Thank you use the exercice bike. The model number is PFIVEX86013.0 and the location of features designed to make...
... assist you, note the product model number and serial number before you for purchasing the ProForm® Racer 4S. For your workouts at home more effective and enjoyable. If you have questions after reading this manual, please see the front cover of this manual. BEFORE YOU BEGIN Thank you use the exercice bike. The model number is PFIVEX86013.0 and the location of features designed to make...
Instruction Manual
Page 5
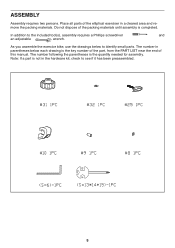
... number following the parentheses is completed. Note: If a part is the key number of the part, from the PART LIST near the end of this manual. ASSEMBLY Assembly requires two persons. The number in a cleared area and remove the packing materials. Do not dispose of the elliptical exerciser in parentheses below to identify small parts. Place all parts of the packing materials until assembly is the quantity needed...
... number following the parentheses is completed. Note: If a part is the key number of the part, from the PART LIST near the end of this manual. ASSEMBLY Assembly requires two persons. The number in a cleared area and remove the packing materials. Do not dispose of the elliptical exerciser in parentheses below to identify small parts. Place all parts of the packing materials until assembly is the quantity needed...

Instruction Manual
Page 6
... counterclockwise direction, the right pedal (22R) should be tighten in the clockwise direction. Fix the vertical post (12) on the post of the Main frame (1) use the Cross solid wrench. STEP 3 Insert the vertical post cover (11) into the vertical post (12) and then connect sensor wire (16) well with hex bolt (14)and arc washer (13), then cover the vertical post cover (11) 6 STEP 2 Attach the Pedal...
... counterclockwise direction, the right pedal (22R) should be tighten in the clockwise direction. Fix the vertical post (12) on the post of the Main frame (1) use the Cross solid wrench. STEP 3 Insert the vertical post cover (11) into the vertical post (12) and then connect sensor wire (16) well with hex bolt (14)and arc washer (13), then cover the vertical post cover (11) 6 STEP 2 Attach the Pedal...

Instruction Manual
Page 7
... the handle cover (10) and the handlebar (7) to the vertical tube (12) with spacer (9) and flat washer (8). Now your machine is ready for use. 7 STEP 5 Put the pulse sensor wire (4) through the hole of vertical tube (12). Connect the Upper sensor wire (3) and pulse sensor wire (4) to the computer (17), and then fix the computer (17) to the vertical tube (12) with cross pan screw (2) and...
... the handle cover (10) and the handlebar (7) to the vertical tube (12) with spacer (9) and flat washer (8). Now your machine is ready for use. 7 STEP 5 Put the pulse sensor wire (4) through the hole of vertical tube (12). Connect the Upper sensor wire (3) and pulse sensor wire (4) to the computer (17), and then fix the computer (17) to the vertical tube (12) with cross pan screw (2) and...
Instruction Manual
Page 8
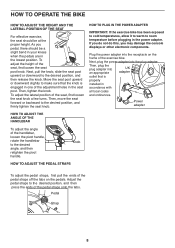
... the console displays or other electronic components. Knob HOW TO ADJUST THE PEDAL STRAPS To adjust the pedal straps, first pull the ends of the pedal straps onto the tabs. Move the seat post upward or downward slightly to the desired position, and then press the ends of the pedal straps off the tabs on the frame of the exercise bike. Pedal Strap 8 HOW TO PLUG IN THE POWER ADAPTER IMPORTANT: If the exercise bike...
... the console displays or other electronic components. Knob HOW TO ADJUST THE PEDAL STRAPS To adjust the pedal straps, first pull the ends of the pedal straps onto the tabs. Move the seat post upward or downward slightly to the desired position, and then press the ends of the pedal straps off the tabs on the frame of the exercise bike. Pedal Strap 8 HOW TO PLUG IN THE POWER ADAPTER IMPORTANT: If the exercise bike...

Instruction Manual
Page 9
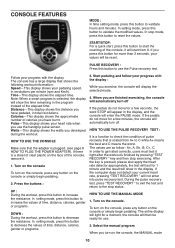
... handgrip pulse sensor with your hands are clean. MEASURE YOUR HEART IF DESIRED MEASURE YOUR HEART RATE IF DESIRED Contacts wear the chest pulse sensor at the same time, the console will be reset. When you are finished exercising If the pedals do not move for several minutes and the buttons are sheets of clear plastic on the metal contacts on the handgrip pulse sensor, remove the...
... handgrip pulse sensor with your hands are clean. MEASURE YOUR HEART IF DESIRED MEASURE YOUR HEART RATE IF DESIRED Contacts wear the chest pulse sensor at the same time, the console will be reset. When you are finished exercising If the pedals do not move for several minutes and the buttons are sheets of clear plastic on the metal contacts on the handgrip pulse sensor, remove the...
Instruction Manual
Page 10
... time, distance, calories, gender or programs. DOWN : During the workout, press this button to reset the values. If the pedals do not move for use. 2. In order to get rated correctly, users must test it right after the workout's finished by pressing "TEST RECOVERY " key and then stop status. During the pulse recovery test, press "TEST RECOVERY " to exit the test and return to the stop exercising. To turn off...
... time, distance, calories, gender or programs. DOWN : During the workout, press this button to reset the values. If the pedals do not move for use. 2. In order to get rated correctly, users must test it right after the workout's finished by pressing "TEST RECOVERY " key and then stop status. During the pulse recovery test, press "TEST RECOVERY " to exit the test and return to the stop exercising. To turn off...
Instruction Manual
Page 11
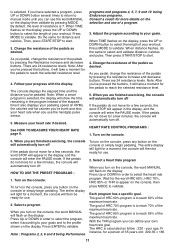
... workout. Then press START/STOP to start . 3. HEART RATE CONTROL PROGRAMS : 1. Press ENTER to validate. Press MODE to validate. When TIME flashes on the display. Press Up or DOWN in RPM), the calories and fat calories you've burnt and also your heart rate when you 've pressed the buttons, it will then be ready for use . 2. Wait for distance and calories. Note: After you are finished exercising, the console will automatically turn...
... workout. Then press START/STOP to start . 3. HEART RATE CONTROL PROGRAMS : 1. Press ENTER to validate. Press MODE to validate. When TIME flashes on the display. Press Up or DOWN in RPM), the calories and fat calories you've burnt and also your heart rate when you 've pressed the buttons, it will then be ready for use . 2. Wait for distance and calories. Note: After you are finished exercising, the console will automatically turn...

Instruction Manual
Page 12
... button to select the Body Fat program. USER SETTING PROGRAMS : 1. To turn on the console, press any button on the display. Press MODE to validate. Do the same for distance and calories. Entering your WATT goal. As you want USER 1-4. Press MODE to select the custom program you pedal, change the resistance of distance, time and calories. The entire display will light for a moment, the console will take a moment for use. 2.Select the body Fat Test Press...
... button to select the Body Fat program. USER SETTING PROGRAMS : 1. To turn on the console, press any button on the display. Press MODE to validate. Do the same for distance and calories. Entering your WATT goal. As you want USER 1-4. Press MODE to select the custom program you pedal, change the resistance of distance, time and calories. The entire display will light for a moment, the console will take a moment for use. 2.Select the body Fat Test Press...
Instruction Manual
Page 13
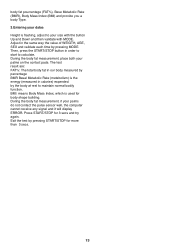
... contact the pulse sensor well, the computer cannot receive any signal and it will display ERROR. Press START/STOP for body shape building. Adjust in the same way the value of WEIGTH, AGE, SEX and validate each time by pressing START/STOP for more than 3 secs. 13 BMI: means Body Mass Index, which is used for 3 secs and try again. Then, press the START/STOP button in calories...
... contact the pulse sensor well, the computer cannot receive any signal and it will display ERROR. Press START/STOP for body shape building. Adjust in the same way the value of WEIGTH, AGE, SEX and validate each time by pressing START/STOP for more than 3 secs. 13 BMI: means Body Mass Index, which is used for 3 secs and try again. Then, press the START/STOP button in calories...
Instruction Manual
Page 14
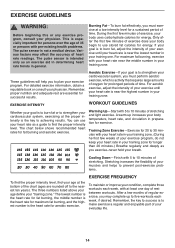
.... A warm-up to plan your "training zone." Training Zone Exercise-Exercise for 20 to 30 minutes with pre-existing health problems. The pulse sensor is to burn fat or to strengthen your heart rate as a guide to strengthen your cardiovascular system, you exercise-never hold your training one day of heart rate readings. The three numbers listed above your age define your exercise program. This is especially important for...
.... A warm-up to plan your "training zone." Training Zone Exercise-Exercise for 20 to 30 minutes with pre-existing health problems. The pulse sensor is to burn fat or to strengthen your heart rate as a guide to strengthen your cardiovascular system, you exercise-never hold your training one day of heart rate readings. The three numbers listed above your age define your exercise program. This is especially important for...

Instruction Manual
Page 15
SUGGESTED STRETCHES The correct form for 15 counts, then relax. Hold for several basic stretches is shown at the right. Calf/Achilles Stretch With one foot with your knees bent .... Hold for 15 counts, then relax. Repeat 3 times for each leg. Hold for balance, reach back and grasp one leg in front of knees, and back. 2. Stretches: Hamstrings, lower back, and groin. 3. Quadriceps Stretch With one leg extended. Hold for each leg. Repeat 3 times. Move slowly as you reach down toward your other , reach forward and...
SUGGESTED STRETCHES The correct form for 15 counts, then relax. Hold for several basic stretches is shown at the right. Calf/Achilles Stretch With one foot with your knees bent .... Hold for 15 counts, then relax. Repeat 3 times for each leg. Hold for balance, reach back and grasp one leg in front of knees, and back. 2. Stretches: Hamstrings, lower back, and groin. 3. Quadriceps Stretch With one leg extended. Hold for each leg. Repeat 3 times. Move slowly as you reach down toward your other , reach forward and...
Instruction Manual
Page 18
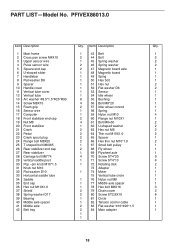
PART LIST-Model No. PFIVEX86013.0 Item Description Qty. Item Description Qty. 1 Main frame 1 43 Belt 1 2 Cross pan screw M4X10 2 44 Bolt 2 3 Upper sensor wire 1 45 Spring washer 2 4 Pulse sensor wire 2 46 Spring washer 2 5 Square end cap 2 47 Magnetic board axle 1 6 U-shaped slider 1 48 Magnetic board 1 7 Handlebar 1 49 Sping 1 8 Flat washer D8 1 50 Hex bolt 1 9 Spacer 1 51 Hex nut 2 10 Handle cover 1 52 Flat washer D6 2 11...
PART LIST-Model No. PFIVEX86013.0 Item Description Qty. Item Description Qty. 1 Main frame 1 43 Belt 1 2 Cross pan screw M4X10 2 44 Bolt 2 3 Upper sensor wire 1 45 Spring washer 2 4 Pulse sensor wire 2 46 Spring washer 2 5 Square end cap 2 47 Magnetic board axle 1 6 U-shaped slider 1 48 Magnetic board 1 7 Handlebar 1 49 Sping 1 8 Flat washer D8 1 50 Hex bolt 1 9 Spacer 1 51 Hex nut 2 10 Handle cover 1 52 Flat washer D6 2 11...

Instruction Manual
Page 19
MAINTENANCE AND TROUBLESHOOTING Inspect and tighten all parts of direct sunlight. 19 Important: To avoid damaging the console, keep liquids away from the console and keep the console out of the exercice bike regularly. To clean the elliptical, use a damp cloth and a small amount of mild detergent. Replace any worn parts immediately.
MAINTENANCE AND TROUBLESHOOTING Inspect and tighten all parts of direct sunlight. 19 Important: To avoid damaging the console, keep liquids away from the console and keep the console out of the exercice bike regularly. To clean the elliptical, use a damp cloth and a small amount of mild detergent. Replace any worn parts immediately.
Instruction Manual
Page 20
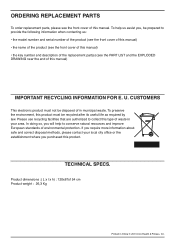
...; 2013 Icon Health & Fitness, Inc. Product dimensions :( L x l x h) : 120x67x154 cm Product weight : 26,3 Kg Printed in your local city office or the establishment where you purchased this product. Please use recycling facilities that are authorized to collect this type of environmental protection. If you , be recycled after its useful life as required by law. TECHNICAL SPECS. ORDERING REPLACEMENT PARTS To order replacement parts...
...; 2013 Icon Health & Fitness, Inc. Product dimensions :( L x l x h) : 120x67x154 cm Product weight : 26,3 Kg Printed in your local city office or the establishment where you purchased this product. Please use recycling facilities that are authorized to collect this type of environmental protection. If you , be recycled after its useful life as required by law. TECHNICAL SPECS. ORDERING REPLACEMENT PARTS To order replacement parts...

