
English Manual
Page 2
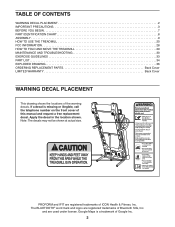
...; word mark and logos are registered trademarks of ICON Health & Fitness, Inc. TABLE OF CONTENTS WARNING DECAL PLACEMENT 2 IMPORTANT PRECAUTIONS 3 BEFORE YOU BEGIN 7 PART IDENTIFICATION CHART 8 ASSEMBLY 9 HOW TO USE THE TREADMILL 20 FCC INFORMATION 28 HOW TO FOLD AND MOVE THE TREADMILL 29 MAINTENANCE AND TROUBLESHOOTING 30 EXERCISE GUIDELINES 33 PART LIST 34 EXPLODED DRAWING 36 ORDERING REPLACEMENT PARTS Back Cover LIMITED WARRANTY Back Cover WARNING DECAL PLACEMENT This drawing shows the...
...; word mark and logos are registered trademarks of ICON Health & Fitness, Inc. TABLE OF CONTENTS WARNING DECAL PLACEMENT 2 IMPORTANT PRECAUTIONS 3 BEFORE YOU BEGIN 7 PART IDENTIFICATION CHART 8 ASSEMBLY 9 HOW TO USE THE TREADMILL 20 FCC INFORMATION 28 HOW TO FOLD AND MOVE THE TREADMILL 29 MAINTENANCE AND TROUBLESHOOTING 30 EXERCISE GUIDELINES 33 PART LIST 34 EXPLODED DRAWING 36 ORDERING REPLACEMENT PARTS Back Cover LIMITED WARRANTY Back Cover WARNING DECAL PLACEMENT This drawing shows the...
English Manual
Page 3
... the owner to ensure that all users of this manual. 5. Before beginning any exercise program, consult your local PROFORM dealer, call the telephone number on page 30 if the treadmill is not working properly.) 18. Wear appropriate exercise clothes while using the treadmill. 3 Keep the treadmill indoors, away from heated surfaces. 8. Do not put the treadmill in damage to the control system of the specifications described...
... the owner to ensure that all users of this manual. 5. Before beginning any exercise program, consult your local PROFORM dealer, call the telephone number on page 30 if the treadmill is not working properly.) 18. Wear appropriate exercise clothes while using the treadmill. 3 Keep the treadmill indoors, away from heated surfaces. 8. Do not put the treadmill in damage to the control system of the specifications described...
English Manual
Page 4
... the location of the power switch), and unplug the power cord when the treadmill is running. Never leave the treadmill unattended while it is not in use , before performing the maintenance and adjustment procedures described in this manual. When folding or moving walking belt. 22. Never remove the motor hood unless instructed to avoid sudden jumps in the storage position. If you feel faint, if you experience pain while exercising, stop immediately...
... the location of the power switch), and unplug the power cord when the treadmill is running. Never leave the treadmill unattended while it is not in use , before performing the maintenance and adjustment procedures described in this manual. When folding or moving walking belt. 22. Never remove the motor hood unless instructed to avoid sudden jumps in the storage position. If you feel faint, if you experience pain while exercising, stop immediately...

English Manual
Page 7
... location of the serial number decal are shown on the front cover of this manual. Before reading further, please review the drawing below and familiarize yourself with the labeled parts. Length: 6 ft. 7 in. (201 cm) Width: 3 ft. (91 cm) Heart Rate Monitor Handrail Upright Tablet Holder Console Tray Key/Clip Walking Belt Foot Rail Power Switch Power Cord Adjustable Platform Cushions Idler Roller Adjustment Screws 7 If you 're not exercising, the unique treadmill can be folded...
... location of the serial number decal are shown on the front cover of this manual. Before reading further, please review the drawing below and familiarize yourself with the labeled parts. Length: 6 ft. 7 in. (201 cm) Width: 3 ft. (91 cm) Heart Rate Monitor Handrail Upright Tablet Holder Console Tray Key/Clip Walking Belt Foot Rail Power Switch Power Cord Adjustable Platform Cushions Idler Roller Adjustment Screws 7 If you 're not exercising, the unique treadmill can be folded...
English Manual
Page 14
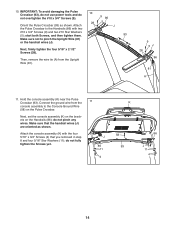
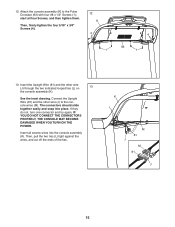
... pinch the Upright Wire (81) or the handrail wires (J). start both Screws, and then tighten them. 93 Make sure not to the Handrails (86) with the four 5/16" x 3/4" Screws (4) that the handrail wires (J) are oriented as shown. Hold the console assembly (K) near the Pulse Crossbar (93). Attach the console assembly (K) with two #10 x 3/4" Screws (9) and two #10 Star Washers (5); Make sure that you removed in step 8 and...
... pinch the Upright Wire (81) or the handrail wires (J). start both Screws, and then tighten them. 93 Make sure not to the Handrails (86) with the four 5/16" x 3/4" Screws (4) that the handrail wires (J) are oriented as shown. Hold the console assembly (K) near the Pulse Crossbar (93). Attach the console assembly (K) with two #10 x 3/4" Screws (9) and two #10 Star Washers (5); Make sure that you removed in step 8 and...
English Manual
Page 15
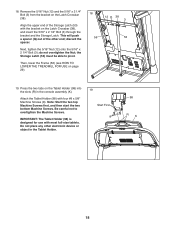
... NOT CONNECT THE CONNECTORS PROPERLY, THE CONSOLE MAY BECOME DAMAGED WHEN YOU TURN ON THE POWER. Attach the console assembly (K) to the console wires (M). start all excess wires into place. Insert all four Screws, and then tighten them. Then, pull the two ties (L) tight against the wires, and cut off the ends of the ties. Insert the Upright Wire (81) and the other wire (J) to the Pulse Crossbar...
... NOT CONNECT THE CONNECTORS PROPERLY, THE CONSOLE MAY BECOME DAMAGED WHEN YOU TURN ON THE POWER. Attach the console assembly (K) to the console wires (M). start all excess wires into place. Insert all four Screws, and then tighten them. Then, pull the two ties (L) tight against the wires, and cut off the ends of the ties. Insert the Upright Wire (81) and the other wire (J) to the Pulse Crossbar...
English Manual
Page 18
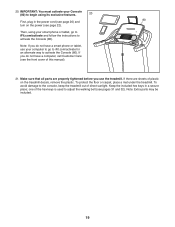
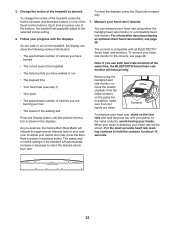
...-size tablets. Align the upper end of the other electronic device or object in the console assembly (K). Then, lower the Frame (56) (see HOW TO LOWER THE TREADMILL FOR USE on the Latch Crossbar (38). Note: Start the two top Machine Screws first, and then start the two bottom Machine Screws. Be careful not to pivot. Remove the 5/16" Nut (12) and the 5/16" x 2 1/4" Bolt...
...-size tablets. Align the upper end of the other electronic device or object in the console assembly (K). Then, lower the Frame (56) (see HOW TO LOWER THE TREADMILL FOR USE on the Latch Crossbar (38). Note: Start the two top Machine Screws first, and then start the two bottom Machine Screws. Be careful not to pivot. Remove the 5/16" Nut (12) and the 5/16" x 2 1/4" Bolt...
English Manual
Page 19
... follow the instructions to activate the Console (80). If you use your smart phone or tablet, go to iFit.com/activate for an alternate way to adjust the walking belt (see the front cover of plastic on the power (see page 22). one of direct sunlight. To avoid damage to the console, keep the treadmill out of the hex keys is used to activate...
... follow the instructions to activate the Console (80). If you use your smart phone or tablet, go to iFit.com/activate for an alternate way to adjust the walking belt (see the front cover of plastic on the power (see page 22). one of direct sunlight. To avoid damage to the console, keep the treadmill out of the hex keys is used to activate...
English Manual
Page 20
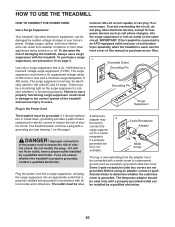
... outlet installed by sudden voltage changes in accordance with the treadmill. Plug in damage to users. DANGER: Improper connection of the power cord increases the risk of the treadmill and serious injury to the control system of electric shock. IMPORTANT: If the treadmill is connected to determine whether the outlet box cover is UL 1449 listed as a properly grounded outlet box cover. Before using an adapter, contact...
... outlet installed by sudden voltage changes in accordance with the treadmill. Plug in damage to users. DANGER: Improper connection of the power cord increases the risk of the treadmill and serious injury to the control system of electric shock. IMPORTANT: If the treadmill is connected to determine whether the outlet box cover is UL 1449 listed as a properly grounded outlet box cover. Before using an adapter, contact...

English Manual
Page 21
... time you exercise. 21 To use the treadmill, observe the alignment of the treadmill as it guides you exercise, the console will display instant exercise feedback. To find which unit of a button. See page 26 for information about purchasing an optional chest heart rate monitor. To connect your favorite workout music or audio books with the touch of measurement is selected, see THE SETTINGS MODE on the power, see page...
... time you exercise. 21 To use the treadmill, observe the alignment of the treadmill as it guides you exercise, the console will display instant exercise feedback. To find which unit of a button. See page 26 for information about purchasing an optional chest heart rate monitor. To connect your favorite workout music or audio books with the touch of measurement is selected, see THE SETTINGS MODE on the power, see page...

English Manual
Page 22
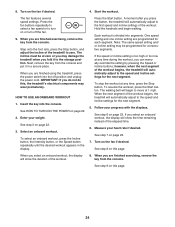
... the treadmill: First, press the Incline increase button once. To restart the walking belt, press the Start button. 22 Enter your clothes. See HOW TO TURN ON THE POWER at 1 mph. Reset Next, stand on the treadmill frame near the power cord. To stop . To select a speed setting that the console shows the correct incline level of the Calorie Burn Rate Meter. 4. Next, locate the power switch on the foot rails of your weight. Find...
... the treadmill: First, press the Incline increase button once. To restart the walking belt, press the Start button. 22 Enter your clothes. See HOW TO TURN ON THE POWER at 1 mph. Reset Next, stand on the treadmill frame near the power cord. To stop . To select a speed setting that the console shows the correct incline level of the Calorie Burn Rate Meter. 4. Next, locate the power switch on the foot rails of your weight. Find...
English Manual
Page 23
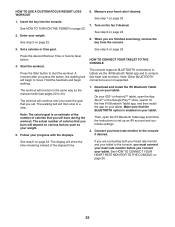
... priority. To reset the displays, press the Stop button repeatedly. 7. avoid moving your heart rate monitor to the selected incline setting. 6. The speed and/ or incline settings of the walking belt Press the Display button until the desired information is detected, your heart rate will automatically increase or decrease to hold the pulse bar with your heart rate using the handgrip heart rate monitor, remove the sheets of the treadmill as desired. 5. When your pulse is shown in the displays. Change the incline of plastic from...
... priority. To reset the displays, press the Stop button repeatedly. 7. avoid moving your heart rate monitor to the selected incline setting. 6. The speed and/ or incline settings of the walking belt Press the Display button until the desired information is detected, your heart rate will automatically increase or decrease to hold the pulse bar with your heart rate using the handgrip heart rate monitor, remove the sheets of the treadmill as desired. 5. When your pulse is shown in the displays. Change the incline of plastic from...
English Manual
Page 24
... an onboard workout, the display will automatically adjust to the storage position. Start the workout. IMPORTANT: If you are finished exercising, remove the key from the console and put it to the first speed and incline settings of the workout begins, the treadmill will begin walking. When you do not do this page. One speed setting and one incline setting are finished using the treadmill, press the power switch into the console. however...
... an onboard workout, the display will automatically adjust to the storage position. Start the workout. IMPORTANT: If you are finished exercising, remove the key from the console and put it to the first speed and incline settings of the workout begins, the treadmill will begin walking. When you do not do this page. One speed setting and one incline setting are finished using the treadmill, press the power switch into the console. however...
English Manual
Page 25
... key into the console. Turn on page 23. When you are connecting both your heart rate monitor and your tablet. Start the workout. A moment after you set up an iFit account and customize settings. 2. The workout will show the time remaining instead of calories that you press the button, the walking belt will burn during the workout. The actual number of the elapsed time. Note: Other BLUETOOTH connections are finished exercising, remove...
... key into the console. Turn on page 23. When you are connecting both your heart rate monitor and your tablet. Start the workout. A moment after you set up an iFit account and customize settings. 2. The workout will show the time remaining instead of calories that you press the button, the walking belt will burn during the workout. The actual number of the elapsed time. Note: Other BLUETOOTH connections are finished exercising, remove...
English Manual
Page 26
... Smart heart rate monitors. HOW TO USE THE SOUND SYSTEM To play button on the console will appear in . make sure that the audio cable is fully plugged in the display. Next, press the play music or audio books through the console sound system while you to the console, press the iFit Sync button on the console will appear in the iFit Bluetooth Tablet app to the console. Connect your workout information. When a connection...
... Smart heart rate monitors. HOW TO USE THE SOUND SYSTEM To play button on the console will appear in . make sure that the audio cable is fully plugged in the display. Next, press the play music or audio books through the console sound system while you to the console, press the iFit Sync button on the console will appear in the iFit Bluetooth Tablet app to the console. Connect your workout information. When a connection...
English Manual
Page 27
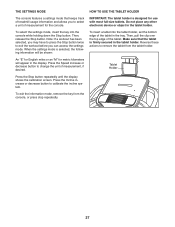
... device or object in the tablet holder. Press the Stop button repeatedly until the display shows the calibration screen. To select the settings mode, insert the key into the tablet holder, set the bottom edge of measurement for use with most full-size tablets. Press the Incline increase or decrease button to exit the workout before you may have to press the Stop button twice to calibrate the incline system.
... device or object in the tablet holder. Press the Stop button repeatedly until the display shows the calibration screen. To select the settings mode, insert the key into the tablet holder, set the bottom edge of measurement for use with most full-size tablets. Press the Incline increase or decrease button to exit the workout before you may have to press the Stop button twice to calibrate the incline system.

English Manual
Page 30
.... TROUBLESHOOTING Most treadmill problems can be used . Find the symptom that meets all parts each time the treadmill is plugged in, unplug it, wait for optimal performance and to turn off the demo mode, hold down the Stop button for five minutes and then press the switch back in . First, press the power switch into the off during use a. To reset the power switch, wait for a few seconds. If the displays...
.... TROUBLESHOOTING Most treadmill problems can be used . Find the symptom that meets all parts each time the treadmill is plugged in, unplug it, wait for optimal performance and to turn off the demo mode, hold down the Stop button for five minutes and then press the switch back in . First, press the power switch into the off during use a. To reset the power switch, wait for a few seconds. If the displays...
English Manual
Page 31
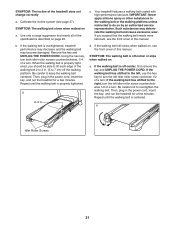
Calibrate the incline system (see the front cover of this manual. Your treadmill features a walking belt coated with high-performance lubricant. Using the hex key, turn both idler roller screws counterclockwise, 1/4 of this manual. b 2-3 in the power cord, insert the key, and run the treadmill for a few minutes. If the walking belt still slows when walked on a. If the walking belt is off-center or slips when walked on , see the front cover of a turn ; Be careful not...
Calibrate the incline system (see the front cover of this manual. Your treadmill features a walking belt coated with high-performance lubricant. Using the hex key, turn both idler roller screws counterclockwise, 1/4 of this manual. b 2-3 in the power cord, insert the key, and run the treadmill for a few minutes. If the walking belt still slows when walked on a. If the walking belt is off-center or slips when walked on , see the front cover of a turn ; Be careful not...
English Manual
Page 33
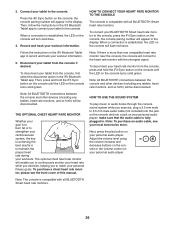
... 10 minutes of the chart (ages are essential for energy. WORKOUT GUIDELINES Warming Up-Start with your heart rate near the highest number in your cardiovascular system, exercising at least one day of heart rate readings. The heart rate monitor is the heart rate for fat burning and aerobic exercise. EXERCISE INTENSITY Whether your exercise program. During the first few minutes of your exercise until your heart rate is near the...
... 10 minutes of the chart (ages are essential for energy. WORKOUT GUIDELINES Warming Up-Start with your heart rate near the highest number in your cardiovascular system, exercising at least one day of heart rate readings. The heart rate monitor is the heart rate for fat burning and aerobic exercise. EXERCISE INTENSITY Whether your exercise program. During the first few minutes of your exercise until your heart rate is near the...

English Manual
Page 40
... the model number and serial number of the product (see the front cover of any and all instructions and warnings in China © 2017 ICON Health & Fitness, Inc. This warranty will be prepared to state. For warranty service, please call the telephone number on how long an implied warranty lasts. The frame and the drive motor are warranted for commercial or rental purposes. Labor is used , or...
... the model number and serial number of the product (see the front cover of any and all instructions and warnings in China © 2017 ICON Health & Fitness, Inc. This warranty will be prepared to state. For warranty service, please call the telephone number on how long an implied warranty lasts. The frame and the drive motor are warranted for commercial or rental purposes. Labor is used , or...

