

English Manual
Page 3
... more amps. Wear appropriate exercise clothes when using the treadmill. 6. Always wear athletic shoes. The pulse sensor is fully closed. 3 Always remove the key, unplug the power cord and move the walking belt while the power is turned off position when the treadmill is not in use the treadmill with at least eight feet of heart rate readings. When folding or moving the treadmill, make sure that the storage latch is not a medical device...
... more amps. Wear appropriate exercise clothes when using the treadmill. 6. Always wear athletic shoes. The pulse sensor is fully closed. 3 Always remove the key, unplug the power cord and move the walking belt while the power is turned off position when the treadmill is not in use the treadmill with at least eight feet of heart rate readings. When folding or moving the treadmill, make sure that the storage latch is not a medical device...
English Manual
Page 4
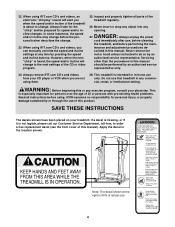
... the next settings of this or any opening. In some instances, the speed and/or incline may change . 23. Never remove the motor hood unless instructed to order a free replacement decal (see the front cover of the CD or video program. 25. Always unplug the power cord immediately after use this manual. Apply the decal in -home use of the treadmill is not legible, please call our Customer Service Department, toll-free, to...
... the next settings of this or any opening. In some instances, the speed and/or incline may change . 23. Never remove the motor hood unless instructed to order a free replacement decal (see the front cover of the CD or video program. 25. Always unplug the power cord immediately after use this manual. Apply the decal in -home use of the treadmill is not legible, please call our Customer Service Department, toll-free, to...
English Manual
Page 5
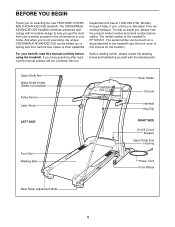
...). For your home. The model number of this manual for selecting the new PROFORM® CROSSWALK ADVANCED 525 treadmill. until 6 p.m. To help you get the most from your exercise program in the convenience of other treadmills. Upper Body Arm Water Bottle Holder (Bottle not included) Pulse Sensor Latch Knob LEFT SIDE Foot Grip Walking Belt Book Holder Console Handrail Key/Clip RIGHT SIDE On/Off Circuit Breaker Upper Body Arm Housing Power Cord Front Wheel Rear Roller Adjustment Bolts 5 If...
...). For your home. The model number of this manual for selecting the new PROFORM® CROSSWALK ADVANCED 525 treadmill. until 6 p.m. To help you get the most from your exercise program in the convenience of other treadmills. Upper Body Arm Water Bottle Holder (Bottle not included) Pulse Sensor Latch Knob LEFT SIDE Foot Grip Walking Belt Book Holder Console Handrail Key/Clip RIGHT SIDE On/Off Circuit Breaker Upper Body Arm Housing Power Cord Front Wheel Rear Roller Adjustment Bolts 5 If...
English Manual
Page 6
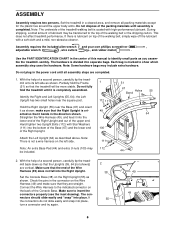
.... Set the Console Base (38) on the Right Upright (55) as you assemble the treadmill. Assembly requires the included allen wrench and your own phillips screwdriver , adjustable wrench , wire cutters , and rubber mallet . Do not fully fold the treadmill until assembly is not a wire harness on the back of the walking belt, simply wipe off the lubricant with high-performance lubricant. Make sure to show which assembly step uses...
.... Set the Console Base (38) on the Right Upright (55) as you assemble the treadmill. Assembly requires the included allen wrench and your own phillips screwdriver , adjustable wrench , wire cutters , and rubber mallet . Do not fully fold the treadmill until assembly is not a wire harness on the back of the walking belt, simply wipe off the lubricant with high-performance lubricant. Make sure to show which assembly step uses...

English Manual
Page 9
... will not fit the outlet, have a UL suppressed voltage rating of 400 volts or less and a minimum surge dissipation of the treadmill. Grounding Pin Grounded Outlet Grounding Plug 2 Grounded Outlet Box Adapter Surge Suppressor Use only a single-outlet surge suppressor that looks like the adapter illustrated in your home's power. There must have a proper outlet installed by sudden voltage changes in drawing...
... will not fit the outlet, have a UL suppressed voltage rating of 400 volts or less and a minimum surge dissipation of the treadmill. Grounding Pin Grounded Outlet Grounding Plug 2 Grounded Outlet Box Adapter Surge Suppressor Use only a single-outlet surge suppressor that looks like the adapter illustrated in your home's power. There must have a proper outlet installed by sudden voltage changes in drawing...
English Manual
Page 10
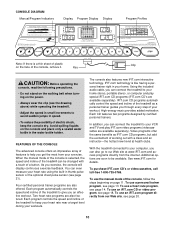
... trainers. To use an iFIT.com program directly from your heart rate using the built-in thumb pulse sensor or the optional chest pulse sensor (see page 14. When the manual mode of the console is a thin sheet of plastic Clip on page 11. Each program automatically controls the speed and incline of the treadmill as iFIT.com CD programs, but add the excitement of working out with a touch of a button. IFIT.com CD programs automatically control the speed...
... trainers. To use an iFIT.com program directly from your heart rate using the built-in thumb pulse sensor or the optional chest pulse sensor (see page 14. When the manual mode of the console is a thin sheet of plastic Clip on page 11. Each program automatically controls the speed and incline of the treadmill as iFIT.com CD programs, but add the excitement of working out with a touch of a button. IFIT.com CD programs automatically control the speed...

English Manual
Page 11
...: The console can display speed and distance in either miles or kilometers. To stop the walking belt, press the Stop button. As you exercise, the indicators around the track will begin to move at 1 mph. Test the clip by carefully taking a few steps backward until you use the thumb pulse sensor (see step 6 on page 10) and slide the clip onto the waistband of the treadmill, press the Incline buttons. HOW TO USE THE MANUAL MODE...
...: The console can display speed and distance in either miles or kilometers. To stop the walking belt, press the Stop button. As you exercise, the indicators around the track will begin to move at 1 mph. Test the clip by carefully taking a few steps backward until you use the thumb pulse sensor (see step 6 on page 10) and slide the clip onto the waistband of the treadmill, press the Incline buttons. HOW TO USE THE MANUAL MODE...

English Manual
Page 12
... trainer program or a heart rate program is not lit, the console will display speed and distance in miles. The display will change the unit of the program, and the incline level. when the Km/H indicator is selected, the display will show the current speed setting for the most accurate reading. To reset the displays, press the Stop button, remove the key, and then reinsert the key. 6 Measure your pulse will not be damaged. Note: When using the treadmill, move...
... trainer program or a heart rate program is not lit, the console will display speed and distance in miles. The display will change the unit of the program, and the incline level. when the Km/H indicator is selected, the display will show the current speed setting for the most accurate reading. To reset the displays, press the Stop button, remove the key, and then reinsert the key. 6 Measure your pulse will not be damaged. Note: When using the treadmill, move...

English Manual
Page 14
... the displays and various indicators on the chest pulse sensor. Follow the steps below to use the heart rate programs. If you are finished using the treadmill, move the on/off circuit breaker near the power cord to use a heart rate program. 1 Put on the console remain lit after the key is removed, the console is 190 beats per minute (50% of the treadmill is inserted, the manual mode will affect your estimated maximum heart rate is...
... the displays and various indicators on the chest pulse sensor. Follow the steps below to use the heart rate programs. If you are finished using the treadmill, move the on/off circuit breaker near the power cord to use a heart rate program. 1 Put on the console remain lit after the key is removed, the console is 190 beats per minute (50% of the treadmill is inserted, the manual mode will affect your estimated maximum heart rate is...

English Manual
Page 15
... your pulse is not detected during the program, the letters PLS will flash in the Speed/Min-Mile display. To use a heart rate program. When a heart rate program is programmed for each time the console compares your heart rate to the current target heart rate setting, the speed and/or incline of the treadmill may automatically change the maximum speed limit by pressing the Quick Speed buttons. 6 Press the Start button or the Speed v button to use a heart rate program again, reselect the program and start the program. You must...
... your pulse is not detected during the program, the letters PLS will flash in the Speed/Min-Mile display. To use a heart rate program. When a heart rate program is programmed for each time the console compares your heart rate to the current target heart rate setting, the speed and/or incline of the treadmill may automatically change the maximum speed limit by pressing the Quick Speed buttons. 6 Press the Start button or the Speed v button to use a heart rate program again, reselect the program and start the program. You must...

English Manual
Page 18
... the treadmill near the power cord. Follow the steps below . A moment after the button is flashing, press the Start button or the Speed v button on page 17. If your VCR is about to change . 18 IN VIDEO AUDIO IN CH 34 OUT RF OUT AUDIO OUT RIGHT LEFT Audio Adapter Cable B. B ANT. Plug the adapter into your personal trainer's instructions. Plug the Y-adapter into the AUDIO OUT jack on your workout. Note: To purchase iFIT.com...
... the treadmill near the power cord. Follow the steps below . A moment after the button is flashing, press the Start button or the Speed v button on page 17. If your VCR is about to change . 18 IN VIDEO AUDIO IN CH 34 OUT RF OUT AUDIO OUT RIGHT LEFT Audio Adapter Cable B. B ANT. Plug the adapter into your personal trainer's instructions. Plug the Y-adapter into the AUDIO OUT jack on your workout. Note: To purchase iFIT.com...

English Manual
Page 19
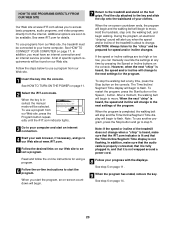
... the audio cable is properly connected, that it is fully plugged in, and that the Time/Incline/Segment Time display is heard, the speed and incline will begin to the next settings of the CD or video program. CAUTION: Always remove iFIT.com CD's and videocassettes from your heart rate if desired. To stop and the Time/Incline/Segment Time display will change to flash. Note: If the speed or incline...
... the audio cable is properly connected, that it is fully plugged in, and that the Time/Incline/Segment Time display is heard, the speed and incline will begin to the next settings of the CD or video program. CAUTION: Always remove iFIT.com CD's and videocassettes from your heart rate if desired. To stop and the Time/Incline/Segment Time display will change to flash. Note: If the speed or incline...
English Manual
Page 20
... key into the console. After a moment, the walking belt will change when a "chirp" is heard, make sure that the audio cable is properly connected, that it is fully plugged in, and that the Time/Incline/Segment Time display is heard, the speed and incline will begin walking. See step 6 on page 11. 2 Select the iFIT.com mode. Find the clip attached to the next settings of your home computer. To use a program...
... key into the console. After a moment, the walking belt will change when a "chirp" is heard, make sure that the audio cable is properly connected, that it is fully plugged in, and that the Time/Incline/Segment Time display is heard, the speed and incline will begin walking. See step 6 on page 11. 2 Select the iFIT.com mode. Find the clip attached to the next settings of your home computer. To use a program...
English Manual
Page 21
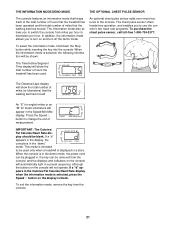
... the demo mode, the power cord can be plugged in, the key can be shown: The Time/Incline/Segment Time display will not operate. IMPORTANT: The Calories/ Fat Calories/Heart Rate display should be used . THE INFORMATION MODE/DEMO MODE THE OPTIONAL CHEST PULSE SENSOR The console features an information mode that keeps track of the total number of hours that the treadmill has been operated and the total number of miles that the walking belt has moved. The information mode also...
... the demo mode, the power cord can be plugged in, the key can be shown: The Time/Incline/Segment Time display will not operate. IMPORTANT: The Calories/ Fat Calories/Heart Rate display should be used . THE INFORMATION MODE/DEMO MODE THE OPTIONAL CHEST PULSE SENSOR The console features an information mode that keeps track of the total number of hours that the treadmill has been operated and the total number of miles that the walking belt has moved. The information mode also...
English Manual
Page 22
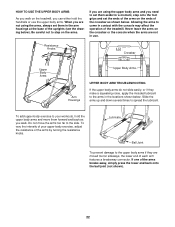
... the arms on the crossbar or the console when the arms are moved too far sideways, the lower end of the treadmill. Lubricate Ball Joint To prevent damage to the upper body arms if they make a squeaking noise, apply the included lubricant to the arms in use the upper body arms. When you need to your upper-body exercise, adjust the resistance of the arms breaks away, simply press the lower end...
... the arms on the crossbar or the console when the arms are moved too far sideways, the lower end of the treadmill. Lubricate Ball Joint To prevent damage to the upper body arms if they make a squeaking noise, apply the included lubricant to the arms in use the upper body arms. When you need to your upper-body exercise, adjust the resistance of the arms breaks away, simply press the lower end...

English Manual
Page 25
... is needed, please call our toll-free Customer Service Department. To reset the on page 9. If the on /off circuit breaker has tripped, wait for five minutes and then press the switch back in. b. PROBLEM: The thumb pulse sensor does not function properly SOLUTION: a. Remove the key and UNPLUG THE POWER CORD. TROUBLESHOOTING Most treadmill problems can be solved by following the steps below. If the switch protrudes...
... is needed, please call our toll-free Customer Service Department. To reset the on page 9. If the on /off circuit breaker has tripped, wait for five minutes and then press the switch back in. b. PROBLEM: The thumb pulse sensor does not function properly SOLUTION: a. Remove the key and UNPLUG THE POWER CORD. TROUBLESHOOTING Most treadmill problems can be solved by following the steps below. If the switch protrudes...

English Manual
Page 26
... the specifications described on , please call our toll-free Customer Service Department. If the walking belt slips when walked on the treadmill for a correct speed reading. Re-attach the hood, and run the treadmill for a few minutes. b 3"-4" Rear Roller Adjustment Bolts c. When the walking belt is changing, remove the key. After a few minutes. If necessary, loosen the Screw 18 101 (24) and move the Reed Switch slightly. When the walking belt is off the walking platform. If the walking belt...
... the specifications described on , please call our toll-free Customer Service Department. If the walking belt slips when walked on the treadmill for a correct speed reading. Re-attach the hood, and run the treadmill for a few minutes. b 3"-4" Rear Roller Adjustment Bolts c. When the walking belt is changing, remove the key. After a few minutes. If necessary, loosen the Screw 18 101 (24) and move the Reed Switch slightly. When the walking belt is off the walking platform. If the walking belt...

English Manual
Page 27
... workout with 5 to exercise with preexisting health problems. The pulse sensor is not a medical device. For more detailed exercise information, obtain a reputable book or consult your training zone. The chart below shows recommended heart rates for prolonged periods of stretching to cool down -Finish each workout with 5 to 10 minutes of time. If your goal is to burn fat, adjust the speed and incline of the treadmill...
... workout with 5 to exercise with preexisting health problems. The pulse sensor is not a medical device. For more detailed exercise information, obtain a reputable book or consult your training zone. The chart below shows recommended heart rates for prolonged periods of stretching to cool down -Finish each workout with 5 to 10 minutes of time. If your goal is to burn fat, adjust the speed and incline of the treadmill...
English Manual
Page 29
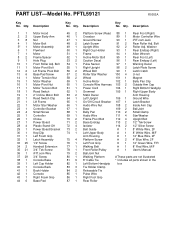
... 1 86 1 87 1 Platform Screw (Rear) Crossbar Ground Screw Latch Screwr Upright Wire Right Cup Holder Frame Incline Motor Bolt Caution Decal Pulse Sensor Right Upright Wheel Bolt Roller Star Washer Wheel Incline Motor Console Wire Harness Power Cord Grommet Static Decal Left Upright On/Off Circuit Breaker Audio Wire Nut Base Belly Pan Audio Wire Frame Pivot Bolt Base Endcap Isolator Belt Guide Left Upper Body Arm Housing Platform Screw Left Foot Grip Walking Belt Front Roller/Pulley Ball Joint Nut Walking Platform 8" Cable Tie Left Bottom...
... 1 86 1 87 1 Platform Screw (Rear) Crossbar Ground Screw Latch Screwr Upright Wire Right Cup Holder Frame Incline Motor Bolt Caution Decal Pulse Sensor Right Upright Wheel Bolt Roller Star Washer Wheel Incline Motor Console Wire Harness Power Cord Grommet Static Decal Left Upright On/Off Circuit Breaker Audio Wire Nut Base Belly Pan Audio Wire Frame Pivot Bolt Base Endcap Isolator Belt Guide Left Upper Body Arm Housing Platform Screw Left Foot Grip Walking Belt Front Roller/Pulley Ball Joint Nut Walking Platform 8" Cable Tie Left Bottom...
English Manual
Page 31
... following information: • The MODEL NUMBER OF THE PRODUCT (PFTL59121) • The NAME OF THE PRODUCT (PROFORM® CROSSWALK ADVANCED 525 treadmill) • The SERIAL NUMBER OF THE PRODUCT (see the front cover of this manual) • The KEY NUMBER AND DESCRIPTION OF THE PART(S) (see the EXPLODED DRAWING and PART LIST attached in the center of merchantability or fitness for a particular purpose is limited in its authorized service centers. All repairs...
... following information: • The MODEL NUMBER OF THE PRODUCT (PFTL59121) • The NAME OF THE PRODUCT (PROFORM® CROSSWALK ADVANCED 525 treadmill) • The SERIAL NUMBER OF THE PRODUCT (see the front cover of this manual) • The KEY NUMBER AND DESCRIPTION OF THE PART(S) (see the EXPLODED DRAWING and PART LIST attached in the center of merchantability or fitness for a particular purpose is limited in its authorized service centers. All repairs...

